Hard Drive Not Showing Up or Detected in Windows? Learn How to Fix
- Reading Duration: 3-5 minutes
- Applies to: Fix used and new hard drive not showing up, internal or external HDD/SSD not detected on Windows PCs.
If your hard drive, whether new or old, internal or external, is not showing up in File Explorer or Disk Management, follow this guide to troubleshoot the issue and get your hard drive showing up again in Windows 10/8/7 without losing data. The guide will help you understand why your hard drive is not visible and provide a step-by-step solution to resolve the problem. By following these steps, you'll be able to identify and fix the issue, making your hard drive visible and accessible again.
| Your Problems | Applicable Fixes |
|---|---|
| (New) Hard Drive Not Showing Up |
Fix 1. Check & Change Hard Drive Connection |
| External Hard Drive Not Showing Up |
Fix 1. Change USB Cable, USB Port |
Why Is My Hard Drive Not Showing Up in Windows
Note: If your hard drive is physically damaged or broken, send it to a local repair center or its manufacturer for repair. Fixes below only work to fix logical errors that prevent your drive from showing up on computers. If your drive is not showing up, try booting from a Live CD or USB drive and run a disk check to see if there are any bad sectors.
If your hard drive is not detected or showing up in Disk Management, it may be due to a connection issue, driver problem, faulty BIOS settings, or something else.
| Symptoms of Disk Not Showing Up | Causes of Hard Drive Not Showing Up |
|---|---|
|
|
All these errors can be fixed, and you can follow the solutions in the next 2 parts to make your internal or external hard drive show up on Windows again.
Part 1. Fix (Old/New) Hard Drive Not Showing Up in Windows 10
Applies to: Fix internal or new hard drive not showing up, not recognized, or not detected errors in Windows 10/8/7.
6 ways to fix a hard drive that won't show up in This PC. Try the method that best suits your situation: If your hard drive is recognized by the BIOS but not by Windows, try method 1. If your hard drive is not recognized by the BIOS, try method 2.
- #Fix 1. Change Disk Connection
- #Fix 2. Format Hard Drive to NTFS
- #Fix 3. Restore Data and Create New Partition
- #Fix 4. Change Hard Drive Drive Letter
- #Fix 5. Update Hard Drive Disk Driver
- #Fix 6. Initialize Disk, Create A Volume, and Enable Disk in BIOS
If you're having trouble with a used hard drive, you can try fixes 1, 2, 3, 4, and 5, and if the new hard drive isn't showing up, try fixes 3 and 6.
To fix the issue of a hard drive not showing up, start by checking the disk management in the computer's settings. If the drive is not visible, it may be due to a driver issue or a faulty drive.
Fix 1. Change Disk Connection - Fix Hard Drive Not Showing Up in File Explorer
Applies to: Fix internal hard drives or new hard drive is not showing up in File Explorer or Disk Management error.
Connection issues with your hard drive are often caused by a faulty cable or loose connection. To fix this, you can try reconnecting the cable or tightening any loose connections. This should resolve the issue and allow your hard drive to show up on your computer.
Step 1. If the power cable or SATA cable is damaged, replace it with a new one to resolve the issue.
Step 2. Unplug and replug your hard drive via the SATA cable and power cable tightly. This simple step can resolve many issues with your computer's hard drive.
Step 3. To troubleshoot the issue, restart your computer and see if the external hard drive is recognized and appears in the File Explorer or Disk Management. If it still doesn't show up, try using a different USB port, cable, or computer to rule out any hardware or software issues.
Fix 2. Format Hard Drive to NTFS - Fix Not Showing Hard Drive with RAW or Corrupted File System
Applies to: Fix hard drive not showing up caused by an unsupported, RAW, or corrupted file system.
When your hard drive displays as RAW or "*Others" in Disk Management, it indicates a file system error, likely caused by a corrupted file system or a virus attack. This issue prevents the operating system from accessing the drive, making it inaccessible.
To format the drive to a supported file system, follow these steps: First, connect the drive to your computer. Then, open the File Explorer or Disk Management tool, depending on your operating system. Next, right-click on the drive and select the format option.
Step 1. In Windows 10/8, Press Windows + X keys, click "Disk Management".
In Windows 7, right-To access the Disk Management tool, click the Start icon, select "Search", type "disk management" and click on it.
Step 2. Find and right-click on your hard drive, select "Format".
Step 3. Set the file system as NTFS, select the "Quick format" option, and click "OK" to begin the formatting process.
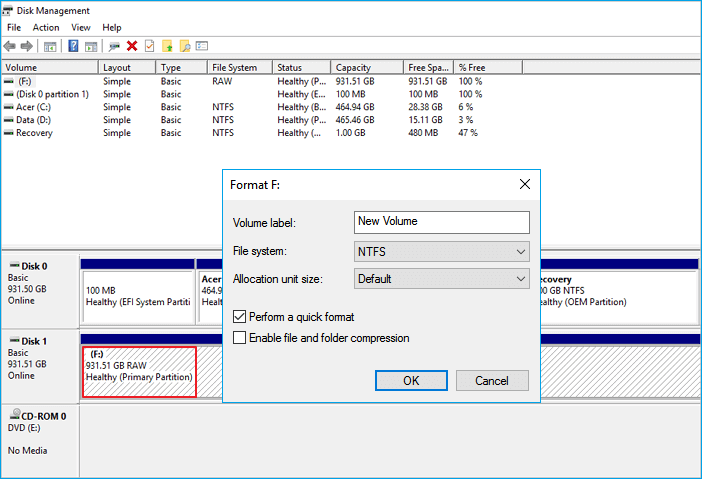
Note: Formatting your external hard drive can cause data loss, so it's essential to use data recovery software to retrieve your files after the drive shows up.
Fix 3. Restore Data and Create New Partition - Fix Not Showing Unallocated Hard Drive
Applies to: To fix a hard drive not showing up but displaying as unallocated or unknown in Disk Management, and a new hard drive showing as not initialized, you can try the following: Boot from a Windows installation media, go to the "Repair your computer" option, and select the "Troubleshoot" option. Then, choose "Advanced options" and select "Command Prompt".
A used hard disk may become unallocated due to accidental deletion, virus attacks, or other unknown reasons that cause partition loss on the disk.
To recover data from the inaccessible hard drive, first recover data from the unallocated space. Once that's done, create a new volume(s) on the disk to make the hard drive show up. This should allow you to access the recovered data.
# 1. Recover Data from Unallocated Hard Drive
Professional hard drive recovery software, Deep Data Recovery, can fully scan a lost partition and recover files from unallocated hard drive space.
Qiling Data Recovery Software
- To recover lost data, start by checking if the file is still in the Recycle Bin. If not, try using a data recovery software such as Deep Data Recovery to scan your device for deleted files.
- Restore lost or deleted data from various storage devices, including the recycle bin, memory cards, flash drives, digital cameras, and camcorders, to recover important files and memories.
- Repair corrupted JPEG/PNG files, videos, and documents during data recovery
The software will identify the unallocated space on your disk as a lost partition, allowing you to directly scan and recover everything on the drive.
Step 1. Select the file types and click "Next".

Step 2. To recover lost data, select the drive where the data was lost and click "Scan" to initiate the recovery process.

Step 3. When the scan is complete, you can use the "Filter" or "Search" feature to locate the lost files. This will help you narrow down the results and find the specific files you're looking for.

Step 4. Select the files you want to recover and click "Recover". Then, save them to a secure location by browsing to another folder.
To recover files from a damaged hard drive, first ensure the drive is safely connected to a computer. Then, use data recovery software to scan the drive and recover any accessible files. Make sure to save the recovered files to another secure location before making the hard drive show up and ensuring it's safe to save files again.
Consult with SalvageData's experts to recover data from inaccessible or corrupted digital media, regardless of brand or format.
- Certified ISO–5 class 100 cleanroom recovery
- Free diagnostic, no data, no charge
- Support all operating systems and devices
- Offer a range of turnaround times for fast recovery
#2. Create a New Partition to Make Hard Drive Show Up
To recover your files, you can use a file recovery software such as Deep Data Recovery. After retrieving all your precious files, you can create a new partition to make your hard disk show up and be usable again on the computer.
Step 1. Right-click "This PC", choose "Manage", and click "Disk Management".
Step 2. To create a new partition on your hard drive, right-click the unallocated space and select the option to create a new simple volume. This will allow you to set the drive letter and format the partition as needed.
Step 3. In New Simple Volume Wizard, click "Next" to continue.
Step 4. To create a new volume, set the volume size, assign a drive letter to the volume, and choose NTFS as the file system before clicking "Next".
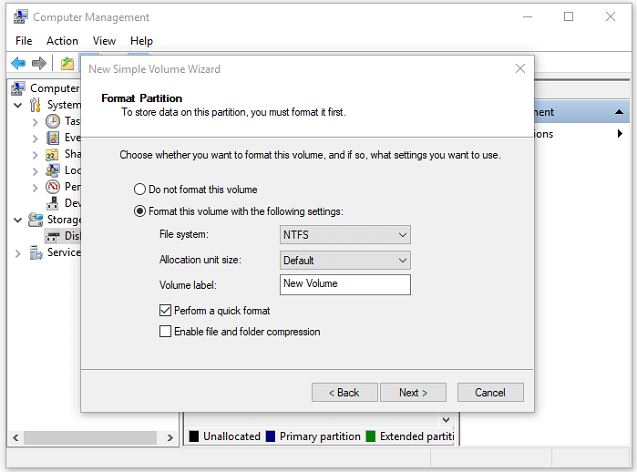
Step 5. Once you've completed the steps to create a new volume in Disk Management, click "Finish" to complete the process. This will finalize the creation of the new volume on your hard drive.
Fix 4. Change Hard Drive Letter - Fix Not Showing Disk with Drive Letter Conflict
Applies to: The error where a hard drive is not showing up in File Explorer can be caused by a conflicted drive letter or the hard drive having no drive letter. This can be resolved by checking the drive letter in Disk Management, assigning a new drive letter, or updating the drive letter in the Registry.
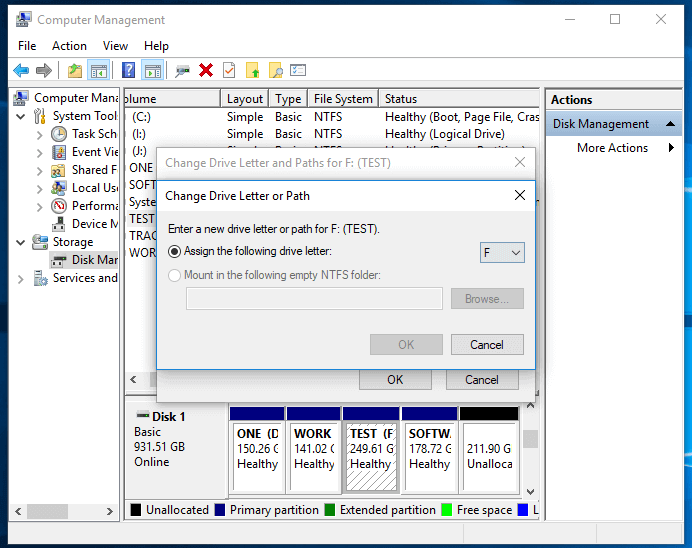
To resolve the issue where your hard drive shows as "New Volume" in Disk Management but not in File Explorer, the drive letter of your hard drive must be changed to a letter that doesn't conflict with another drive letter on the computer. This can be done through Disk Management. Simply right-click on the hard drive listed as "New Volume" and select "Change Drive Letter and Paths." From there, you can choose a new drive letter that is not already in use, and your hard drive should then be visible in File Explorer.
To make your hard drive show up, change its drive letter by following these steps:
Step 1. To assign a drive letter to a new volume in Disk Management, right-click the hard drive marked as New Volume or the partition that doesn't have a drive letter and select "Change Drive Letter and Paths" from the context menu. This will allow you to assign a drive letter to the new volume. Alternatively, you can also use the "Initialize" option to assign a drive letter.
Step 2.To change the drive letter and paths for a drive, select the "Change Drive Letter and Paths" option, then click "Change" in the new window that appears.
Step 3. Assign a new drive letter to your external or internal hard drive and click "OK".
Fix 5. Update Disk Drivers - Fix Hard Drive Not Showing Up Due to Outdated Disk Driver
Applies to: Fix hard drive not showing up in File Explorer, the hard disk has a yellow exclamation mark in Disk Management.
The yellow exclamation mark in Disk Management under the Disk Driver section indicates that the drive driver is outdated, preventing the hard drive from appearing in Windows File Explorer or Disk Management.
The only solution is to update the device driver and here are the steps for you to do that:
Step 1. Right-click "This PC" and choose "Manage".
Step 2. Click "Device Manager" then expand "Disk drives".
Step 3. Right-click the problematic external or internal drive, select "Update driver", and follow the on-screen instructions to complete the process.
Step 4. Click "Search automatically search for driver software online".
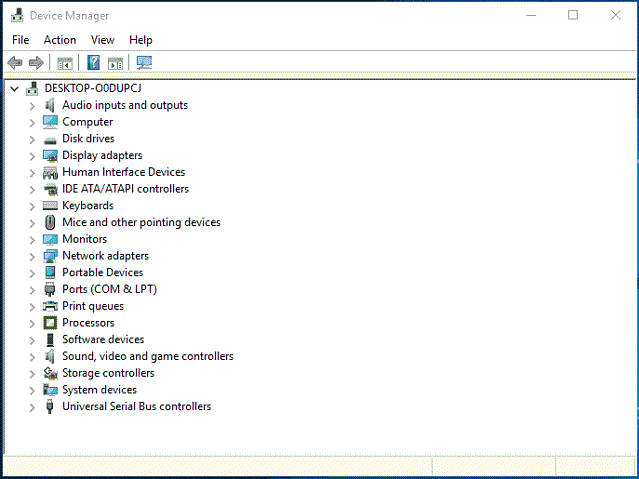
Wait for the driver to be updated, then reboot your computer. Afterward, check if the hard drive shows up.
Fix 6. Initialize Disk, Create Volume, and Enable in BIOS - Fix New Hard Drive Not Showing Up
Applies to: The issue of a new hard drive not showing up in File Explorer can be caused by various factors, including incorrect drive letter assignment, corrupted drive configuration, or a faulty drive. To resolve this, try assigning a new drive letter to the hard drive using the Disk Management tool, check for any corrupted drive configuration, and ensure the drive is properly connected and powered on.
To make a brand new hard drive visible on Windows 10/8/7, you typically need to initialize it first, then create a new partition on it, and finally enable it in your computer's BIOS settings. This process will make your new hard drive appear on your system.
#1. Initialize Disk and Create Volume on New Hard Drive
Step 1. Right-click "This PC" (in Windows 10) and choose "Manage".
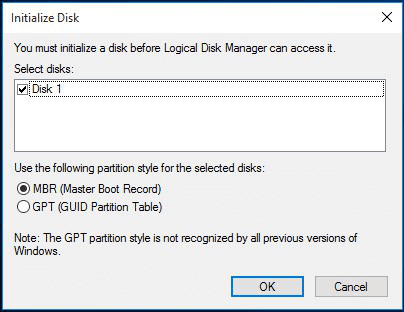
Step 2. To initialize a new hard disk, go to "Disk Management", right-click on the new hard disk, and select "Initialize Disk" from the context menu. This will prepare the disk for use.
Step 3. To begin, select the disk you want to partition and choose MBR (Master Boot Record) or GPT (GUID Partition Table) as its partition style. Click "OK" to initiate the process.
Step 4. Right-click on the unallocated space in your new hard drive and select "New Simple Volume..." to create a new drive letter and format the unallocated space.
Step 5. Set the volume size, drive letter, and file system as NTFS for the new hard drive.
Step 6. Click "Finish" when the process completes.
#2. Enable Hard Drive in BIOS
If the hard drive is disabled in BIOS, the operating system won't be able to detect it, and it won't show up in Windows, making it necessary to check if the hard drive is disabled in BIOS.
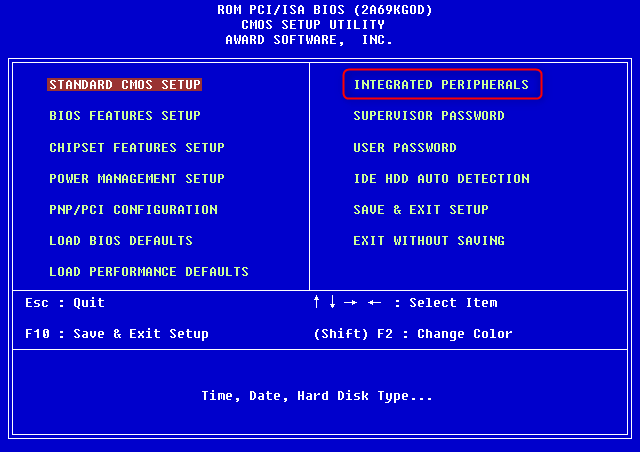
Step 1. To access the BIOS settings, restart your computer and press the F2 or Del key repeatedly until the BIOS setup screen appears. This will allow you to configure various settings such as the boot order, time and date, and other advanced options.
Step 2. To configure the sound card, use the arrow keys on your keyboard to choose "Integrated Peripherals" and hit "Enter".
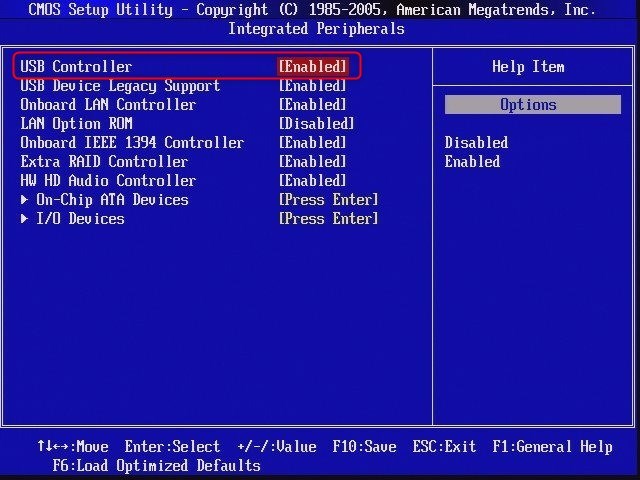
Step 3. Use the arrow keys to select "USB Controller".
If it is disabled, change the option to "Enabled".
Step 4. Save and exit BIOS.
Afterward, restart your computer and see whether your hard drive is detected.
You May Also Be Interested In:
If you're experiencing issues with your external hard drive, such as it not being recognized by your computer, try restarting your computer, checking the USB port, and ensuring the drive is properly connected. If the issue persists, you can try formatting the drive, checking for physical damage, or seeking help from the manufacturer's support page or online forums. Alternatively, you can also try the provided links for further assistance.
Part 2. Fix External Hard Drive Not Showing Up - 4 Fixes
Works to:If your external hard drive is not showing up or not detected by your Windows PC, there are several potential fixes. First, try unplugging the drive and plugging it back in.
When your external hard drive fails to show up on Windows 10/8/7, first, ensure it's properly connected to your computer. Connect your new hard drive correctly to your computers.
If your external hard drive is not showing up on your PC, there are several potential fixes to try. First, ensure that the drive is properly connected to the computer, and try unplugging and replugging it to rule out any issues with the connection.
- #Fix 1. Change USB Cable/USB Port and Reconnect External Hard Drive
- #Fix 2. Format External Hard Drive to NTFS/exFAT
- #Fix 3. Reinstall External Hard Drive Disk Driver
- #Fix 4. Update Universal BUS Controller Drivers
The solutions to making your new hard drive detectable and visible on your computer are now clear. To resolve the issue, simply follow the correct method to ensure your hard drive is recognized and shows up on your computer again.
Fix 1. Change USB Cable, USB Port, and Reconnect External Hard Drive
Try disconnecting and reconnecting the external hard drive to your computer, and see if that resolves the issue. Sometimes, simply restarting the connection can resolve the problem.
Step 1. If the old USB cable is damaged, replace it with a new one and connect the drive to the PC.
Step 2. If the external hard drive doesn't show up, try replacing the USB port and reconnecting the drive to the PC.
Step 3. Switch and connect the external hard drive to another computer.
If the external hard drive doesn't show up on your PC, try the following three fixes: first, check if the drive is properly connected to the computer, then check if the drive is recognized by the computer, and finally, try to initialize the drive by going to Disk Management, selecting the drive, and clicking on "Initialize" or "Online". If none of these fixes work, it's likely that the external hard drive itself has a detection issue and may need to be replaced.
Fix 2. Format External Hard Drive to NTFS/exFAT
If the external hard drive is displayed as RAW or "*Other" on your computer, it won't show up correctly.
Step 1. Keep the external hard drive connected to the PC.
Step 2. Open Disk Management and right-click the external hard drive with the RAW or unknown file system.
Step 3. To format your external hard drive, select the "Format" option and choose either "NTFS" or "exFAT" as the file system. This will ensure the drive is properly formatted for use with your computer.
Step 4. Select "OK" to finish the formatting.
If you lost files after formatting the external hard drive, Deep Data Recovery can help you recover them. It scans the drive and finds your lost files.
Fix 3. Reinstall Disk Drivers - Fix External Hard Drive Not Showing UP with Yellow Exclamation
Applies to:To fix an external hard drive not showing up and displaying a yellow exclamation mark in Disk Management, try the following: disconnect the drive, restart your computer, then reconnect the drive. If it still doesn't show up, check the drive's power cord and ensure it's properly connected.
If an external hard drive's drive driver is outdated, it may not show up in File Explorer. Instead, it will appear with a yellow exclamation mark under the Disk driver section, indicating a problem.
Here are the steps to update the device driver in one paragraph:
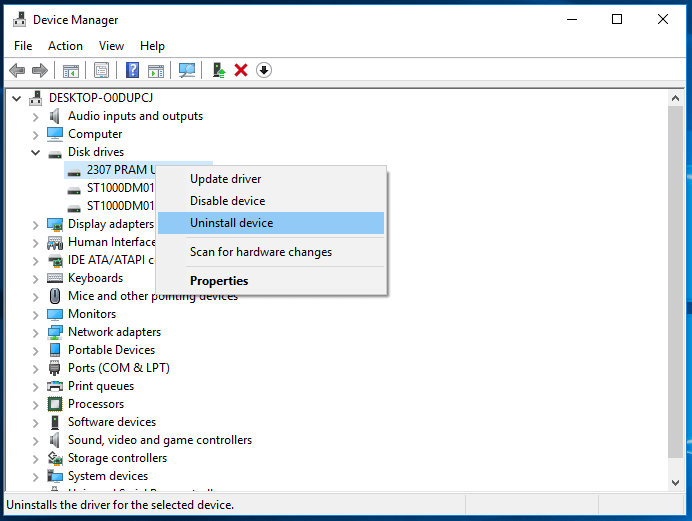
Step 1. Right-click the Windows icon and choose "Device Manager".
Step 2. Expand "Disk drives" and find your external hard drive.
Step 3. Right-click the problematic external drive and select "Uninstall device".
Step 4. Click "OK" to confirm. Restart your computer and reconnect the external hard drive to your PC.
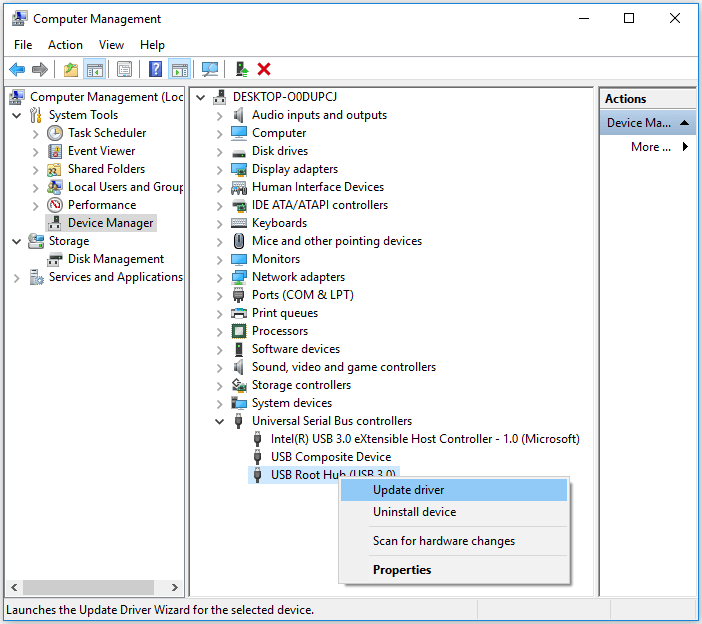
Fix 4. Update Outdated BUS Controller Drivers in External Hard Drive
Applies to: To fix an external hard disk not showing up or not detected by a Windows PC, first, ensure the disk is properly connected to the PC, either through a USB port or an external drive enclosure. Next, check the disk's power source, as some external hard disks require an external power adapter.
If you notice an external hard drive works with one computer but fails to be detected by another, you can try updating the USB Controller driver of the computer where the hard drive is not showing up. This might resolve the issue.
Step 1. Right-click "This PC" and choose "Manage".
Step 2. Click "Device Manager" then expand "Universal Serial Bus controllers".
Step 3. Right-click "USB Root Hub (USB3.0)" and select "Update driver".
Step 4. Choose "Search automatically for updated driver software" and restart your computer.
More Help:
If the fixes don't fully resolve the issue with the external hard drive not showing up, additional help can be found on a tutorial page that provides step-by-step solutions to common problems.
11 Fixes for Toshiba External Hard Drive Not Showing Up
If your Toshiba external hard drive isn't working in Windows, it could be due to various issues such as it not showing up, being unrecognizable, or failing to display files. To troubleshoot the problem, you can follow a series of steps to identify the specific issue and resolve the issue with your Toshiba hard drive.
Part 3. Bonus Tips to Fix Hard Drive Not Showing Files
Sometimes, a hard drive may not display files that actually exist, but these files can still be recovered. This issue can be caused by various reasons, including the disappearance of files due to a malfunction or error. Despite the files not being visible on the hard drive, they are still recoverable, making it possible to retrieve them with the right tools and techniques.
- Files are hidden by malware or a virus
- Files are deleted accidentally
- The computer is unable to recognize or read the file system of the hard drive, which is preventing it from accessing the data stored on the drive. This can be due to a variety of reasons, such as a corrupted file system, a faulty hard drive, or a software issue.
To fix these issues, you can follow the following steps:
Step 1. Recover hidden or removed files from the hard drive.
Reliable Deep Data Recovery can help restore all hard drive files in just 3 steps, as shown in Fix 3 Part 1.
Step 2. Run antivirus or malware removal software to eliminate all viruses and malware.
Step 3. Format the hard drive to restore its full capacity and set NTFS as its file system. This process will erase all existing data, so be sure to back up any important files before proceeding.
Now that the issue with the pen drive not showing files has been resolved, you can use it to save files again. If you need more information or assistance, you can refer to the article about the pen drive not showing files for guidance.
The Ending Line
This guide explains why a hard drive or external hard drive may not show up on a Windows PC, and provides solutions and fixes to help make the used external or internal hard drive, as well as new hard drives, appear again without losing any data.
You may encounter the same issue on devices like USB drives and SD cards. The fixes for this error are applicable to resolve it on these types of devices.
FAQs About Hard Drive Not Showing Up
In addition to new or used hard drive not showing up issue in File Explorer or Disk Management, we will try and answer some of your most asked questions about these issues.
If you have any questions, the following should answer them for you:
1. What do I do if my internal hard drive is not detected?
To fix the internal hard drive not detected issue, there are several solutions you can try, as described on this page.
To set up a new hard drive, start by initializing the disk, which will prepare it for use. Once initialized, create partitions on the drive, dividing it into separate sections for different types of data or operating systems. This step is crucial for organizing and managing the drive's storage capacity effectively.
For a used hard drive, try these tips shown on this page in Part 1:
- 1). Change the hard drive letter;
- 2). Recover lost partition data, and create new partitions;
- 3). Update hard drive driver;
- 4). Check hard drive connection, enable it in BIOS.
2. How do I get Windows 10 recognized a new hard drive?
Similar to the solutions provided on this page, when a new hard drive is not detected or recognized on Windows 10, you should mainly follow the following tips:
To connect a new hard drive, you need to check the connection, initialize the drive, create a partition, and update the drive letter. Additionally, you'll need to enable the new drive in your computer's BIOS settings.
3. Why is my hard drive not showing up on Mac?
The reasons why a hard drive is not showing up on a Mac are similar to those for a Windows computer, including a faulty USB connection, issues with the hard drive itself, or problems with the Mac's operating system. To resolve the issue, try disconnecting and reconnecting the hard drive, checking the Disk Utility app, or running a system restore to see if the hard drive becomes visible.
A Mac hard drive may not show up due to various reasons such as the drive being disconnected, the drive being formatted for a different operating system, or the drive being damaged. Additionally, the drive may not be recognized by the Mac's operating system, or it may be listed under a different name or icon.
- Hard drive connection error
- Settings in Desktop, Finder
- USB port issue
- Hard drive corrupted
- macOS and firmware is outdated
- ...
For a step-by-step guide, you may follow Flash Drive Not Showing Up on Mac to troubleshoot the hard drive not detected on Mac issue and make the drive detectable again.
Related Articles
- Btrfs vs EXT4, All You Need to Know About Btrfs and EXT4!
- Windows 10 Free Download Full Version 32 or 64 Bit ISO
- Hard Drive Randomly Wiped Data! What's WRONG? I Want Data Back
- 2022 Unformat Freeware | Unformat Hard Disks/USB Drives with Ease
- The Best 10 Data Recovery Services Near Me in San Jose, CA
There are several local qualified and experienced companies in Atlanta that can assist you in recovering lost data. The data recovery labs listed in the table below can recover data from your computer, smartphone, external hard drive, SSD, or SD card. - The Best 5 Data Recovery Services Near Me in Seattle, WA
IT professionals in Seattle, WA, who provide data recovery services can assist you in recovering important data, including documents, films, images, and other lost items. This article lists the top 5 data recovery services in Seattle, WA.