How to Format DVR Hard Drive for PC
4 Tips to Format a DVR Hard Drive for Windows 11/10/8/7
To use a DVR hard drive on a Windows PC, you need to connect the DVR to your PC and format the DVR hard drive. This allows you to access and utilize the hard drive's storage capacity on your PC. To do this, follow the necessary steps to connect the DVR to your PC and then format the hard drive using the PC's operating system. This will enable you to use the DVR hard drive as an external storage device on your Windows PC.
| Workable Solutions | Step-by-step Troubleshooting |
|---|---|
| Tip 1. Format DVR with Software | Run Qiling Partition Master, right-click the hard drive partition you intend to format...Full steps |
| Tip 2. Use Disk Management | Right-click on the Windows icon and select "Disk Management"...Full steps |
| Tip 3. Format DVR with File Explorer | Click "This PC", Right-click on the connected DVR hard drive partition and select "Format"...Full steps |
| Tip 4. Run Command Prompt | Type cmd To open the Command Prompt in Windows 11/10, right-click on the search box, select "Edit search bar," and then click on "Command Prompt" from the list of apps. Alternatively, you can type "cmd" in the search box and press Enter to open the Command Prompt.Full steps |
How to Unlock/Connect a DVR on a Windows PC
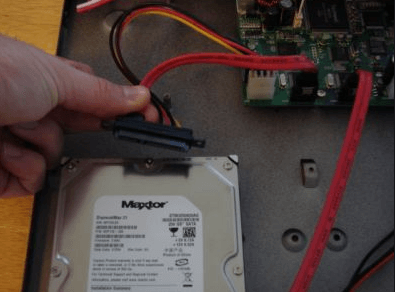
To connect a DVR hard drive to your computer, remove the hard drive from the DVR using a Phillips screwdriver, then connect it to your Windows hard drive using a USB cable or SATA cable, and finally, use the Windows Disk Management tool to initialize and format the DVR hard drive.
Steps 1. Unplug the computer's power cord and remove the screws from the side panel using a Phillips screwdriver.
Step 2. To install a DVR drive, start by removing the screw at the edge of an empty drive bay inside the computer, near its top edge, using a screwdriver. Then, pull the drive tray out of the drive bay. Remove the two screws from the sides of the drive tray using the screwdriver. Next, slide the DVR drive into the drive tray's slot, with the connector side facing out. Finally, reattach the screws to secure the drive tray in place.
Step 3. To safely remove the DVR drive, unplug the power and data cables from the drive bay, then plug the power cable into the DVR's power socket and the data cable into the DVR's data socket.
Step 4. Insert the drive tray back into the drive bay, reattach the screw, and then put back the side panel and other components.
Then, you can turn on your computer and start the DVR formatting process.
Tip 1. Format DVR Hard Drive with Professional HDD Formatter
To format a DVR hard drive on Windows OS, you can use a third-party partition magic software called Qiling Partition Master. This software allows you to easily convert the hard drive to NTFS or FAT32 file system with simple steps, and it also supports other file system types.
To format a DVR hard drive, you can use Qiling Partition Master, which can also perform other tasks such as partitioning, merging partitions, and cloning a hard drive. Download and install the software on your Windows computer, including Windows 11/10/8/7, to access its features.
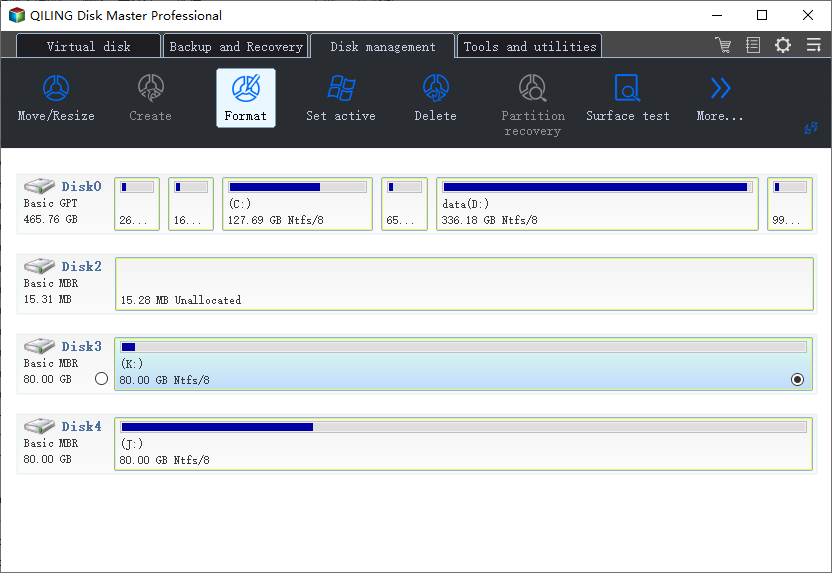
Step 1. Run Qiling Partition Master, right-click the hard drive partition you intend to format and choose "Format".
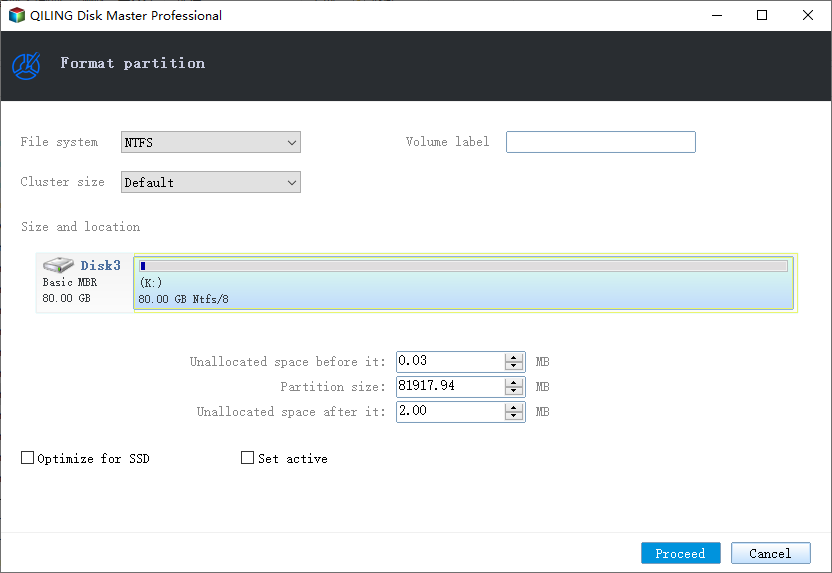
Step 2. Set the partition label, file system, and cluster size in the new window, then click "Proceed" to format the partition.
Step 3. To start formatting the partition on your hard drive, you will see a warning window. Click "OK" in it.
Formatting a hard disk will erase data, so it's recommended to back up your data first. If not, you can proceed with DVR data recovery.
Tip 2. Format DVR Hard Drive with Windows Disk Management
If you don't want to download any software, you can format a DVR hard drive using Windows' built-in Disk Management tool. This tool allows you to create, delete, extend, shrink, and format partitions, making it easy to reformat your DVR's hard drive. To do this, simply follow the steps in Disk Management to format the drive.
Step 1. Right-click on the Windows icon and select "Disk Management".
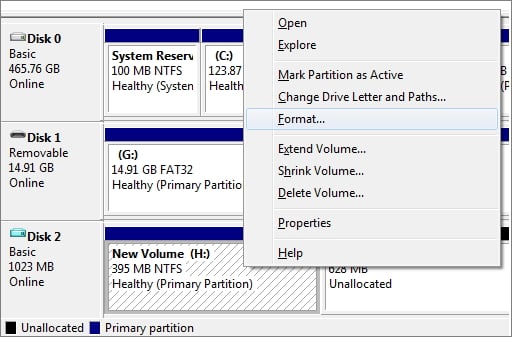
Step 2. Right-click on the DVR drive and click on "Format".
Step 3. The first step is to select a file system and set the cluster size, with options including NTFS and FAT32, which are commonly used on Windows systems.
Step 4. Click "OK" to format the drive.
Tip 3. Format DVR Hard Drive Using File Explorer in Windows 11/10
To format a DVR hard drive using File Explorer, start by opening File Explorer and selecting the DVR hard drive from the list of available drives. Right-click on the drive and select "Format" from the context menu. Choose the file system you want to use, such as FAT32 or NTFS, and select the allocation unit size.
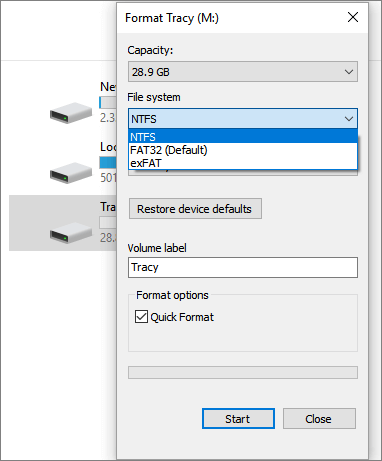
Step 1. The steps to format a DVR hard drive partition are as follows: Click on "This PC", right-click on the connected DVR hard drive partition, and select the "Format" option.
Step 2. On the format window, select the desired file system for your device.
Step 3. Check "Quick Format" and click "Start".
After clicking "OK" to confirm the formatting, you can repeat the process for each additional partition, if needed. Once you've completed formatting all desired partitions, you can proceed with the next steps.
Tip 4. Run Command Prompt to Format a DVR Hard Drive
If you're familiar with Command Prompt, you can consider this method, but be cautious as any incorrect operation can lead to serious consequences.
Step 1. To open Command Prompt in Windows 11/10, type cmd in the search box, right-click on "Command Prompt", and select "Run as administrator".
Step 2. In the command prompt, type diskpart and press "Enter".
Step 3. Input the following command lines and hit "Enter" each time:
- list disk
- select disk + disk number ( for example, select disk 2)
- list volume
- select volume + volume number
- format fs=ntfs
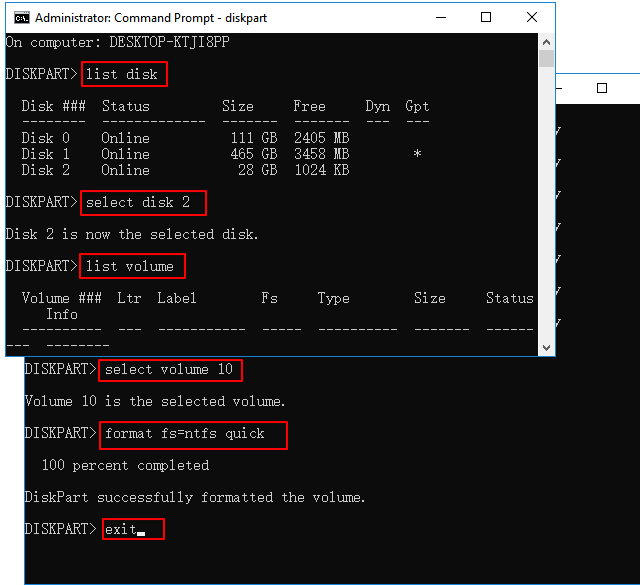
Then, type exit and hit "Enter" to finish this DVR formatting process.
Why Are the DVR Hard Drive Not Recognized by a Computer
If a healthy DVR hard drive won't spin up or power on a normal Windows computer, but still works fine in its original DVR box, there's likely nothing to worry about. Knowing the DVR hard drive's file system can help resolve this issue and allow it to be used on a computer.
The hard drive in a DVR, such as Dish or DirecTV, may be preformatted with the XFS file system, which is a Linux-based file system.
If a Linux PC or laptop is available, try attaching the DVR hard drive to see if Linux can recognize it. However, since most people use Windows, you can format the DVR hard drive to NTFS or FAT, making it compatible with Windows.
Conclusion
Formatting a DVR hard drive for a PC involves creating a bootable USB drive and using a disk management software, such as Qiling, to format the drive on a Linux device. This process allows you to utilize the DVR hard drive on a PC, making it a viable solution for those looking to repurpose the drive.
Formatting the DVR Hard Drive FAQs
If you have some other related questions about DVR hard drive formatting, you can read these questions and answers below.
What format does DVR use?
Finding the right DVR (Digital Video Recorder) system is crucial to meet security requirements. A suitable DVR box should support the desired operating system, such as Windows or Linux, and be able to record and play various video formats like H.264, MPEG-4, MPEG-2, VOB, and ISO images, along with MP3 and AC3 audio tracks.
Can a surveillance hard drive be used on the desktop?
While surveillance drives outperformed desktop drives in a test, it's essential to note that they serve different purposes. For setting up a PC, a desktop drive is still the better choice, but for a CCTV system, a video-optimized surveillance drive is more suitable. This distinction is crucial to ensure optimal performance and functionality for each specific use case.
How do I force format my hard drive?
Four tips to format DVR hard drive:
- Tip 1. Format DVR Hard Drive with Professional HDD Formatter
- Tip 2. Format DVR Hard Drive with Windows Disk Management
- To format a DVR hard drive using File Explorer in Windows 11/10, open File Explorer, right-click on the DVR hard drive, and select "Format" from the context menu. This will launch the Format dialog box where you can choose the file system (FAT32, exFAT, or NTFS), assign a label, and select the allocation unit size. Click "Start" to begin the formatting process, which will erase all data on the drive.
- To format a DVR hard drive, open Command Prompt, navigate to the drive letter of the DVR hard drive, and run the command `format /q` to initiate the formatting process. Ensure the drive is safely disconnected from the DVR before proceeding. Be cautious as formatting will erase all data on the drive.
Can I use SSD on DVR?
Using an SSD in a DVR may be a viable option, especially if you're recording a large number of shows, as it can improve the device's performance and reduce the time it takes to access recorded content. However, this would depend on the DVR's capabilities, such as whether it supports live caching, which can help reduce the load on the SSD.
Related Articles
- The Volume Is Too Big for FAT32 Windows 11/10, Fixed Here!
- How to Optimize Windows 11 for Gaming (6 Ways)
- Patriot Formatter | The Best USB Format Tool for Patriot Flash Drive
- SD Card Repair Tool - 10 Ways to Fix Corrupted Memory Card
- How to Fix 3DS Could Not Detect SD Card in 6 Ways
If your 3DS can't detect an SD card, this guide provides efficient solutions to fix the “Could not detect an SD card” error and make the card readable again. - Top 8 Ways to Fix Attempted Write to Readonly Memory BSOD Error in Windows 11/10
Windows 11/10 users may encounter a frustrating issue where the operating system repeatedly asks to restart the PC due to an Attempted Write to Readonly Memory BSOD error. Fortunately, this article provides 10+ reliable solutions to help fix this problem, making it easier for users to resolve the issue and get back to work without further interruptions.