Effective Fixes for Hard Drive Not Detected in Windows 10 Installation
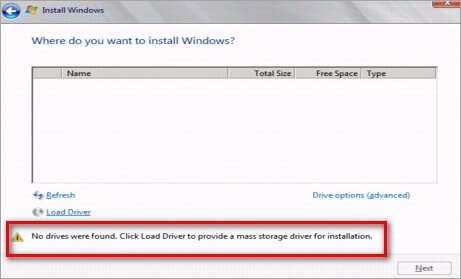
Errors: No Drives Were Found. Click Load Driver to Provide a Mass Storage Driver for Installation
When installing Windows OS on a specific HDD or SSD, you may encounter an issue where the hard disk is not detected during the installation process, resulting in error messages.
The computer is unable to find any available drives to install from, prompting the user to load a driver to access a storage device.
However, clicking "Load Driver" doesn't solve the problem at all. What's the next move then? Have you found viable solutions to troubleshoot hard disk not detected in Windows 10 or Windows 7 installation even it's normally connected to the computer?
| Workable Solutions | Step-by-step Troubleshooting |
|---|---|
| 6 Solutions to Fix Hard Drive Not Detected | Method 1. Use a Different SATA Port...Full steps Method 2. Load RAID Driver for RAID Disk...Full steps Method 3. Check the Hard Drive in BIOS...Full steps More ways... |
| Bonus Tip: Free Partition Manager to Enhance System Performance | Launch Qiling Partition Master on your PC > Free up space...Full steps |
How to Fix Hard Disk Not Detected in Windows 10 Installation
Even though Windows 10 or Windows 7 installations include almost all disk drivers, the "No drives were found. Click load driver to provide a mass storage driver for installation" issue occurs from time to time and you find no way to out. When you encounter Windows 10 install not detecting hard drive or Windows 7 couldn't find any drivers to get storage driver problems, try the practical six ways below.
Method 1. Use a Different SATA Port
If you're experiencing issues with your desktop computer, try switching the SATA port to see if it resolves the problem. Some desktop computers come equipped with two different SATA controllers, which may be the root cause of the issue.
Method 2. Load RAID Driver for RAID Disk
Windows 10 install not detecting hard drive mostly occurs on RAID disk. To fix the issue, you need to load RAID drivers manually.
Step 1. On the Windows Setup screen, click "Load Drivers" at the bottom left, then "Browse" to select the device driver, as there is no hard drive detected in the "Where do you want to install Windows?" prompt.
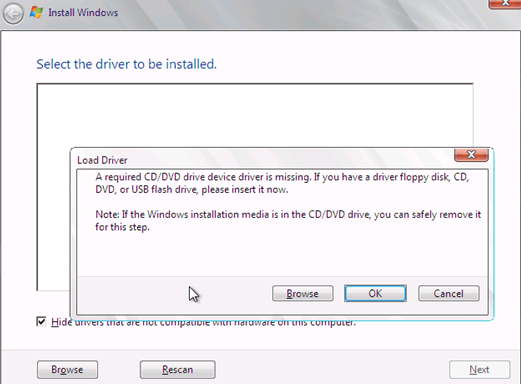
Step 2. To access and load an available RAID driver, go to your computer or storage device and locate the driver software. This can usually be found on the manufacturer's website or on a CD/DVD provided with the RAID setup.
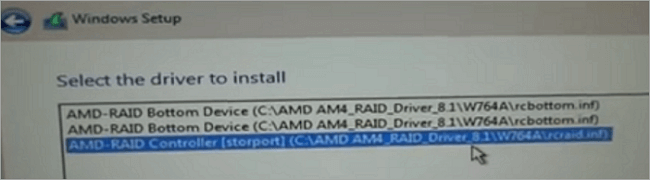
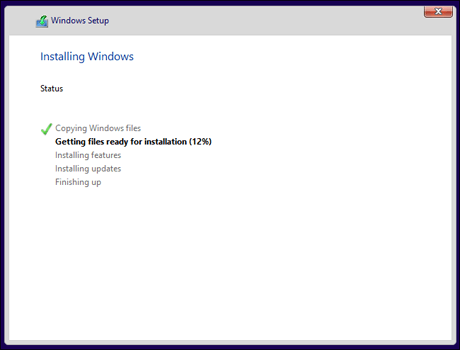
Step 3. After the device diver has been loaded, Windows 10 installation will successfully detect the hard disk, and then follow the onscreen instructions to complete the installation.
Method 3. Check the Hard Drive in BIOS
If the hard drive doesn't appear in BIOS, it's possible that the drive is not recognized or is faulty. Check the drive's power and data cables to ensure they're securely connected.
To enter the BIOS settings, press F2 while holding the key. Check if the hard drive is listed in the BIOS settings. If not, refer to the solution for repairing a hard drive not showing in BIOS.
If not, check your BIOS settings for the following parameters:
* SATA configuration -> Enhanced
* Configure SATA -> AHCI
Method 4. Check the Status of Your Hard Drive
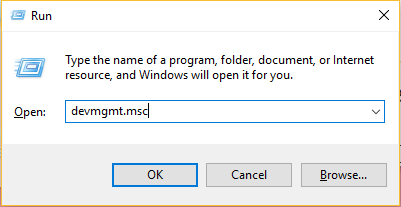
Step 1. Press Windows + R and the window will pop up.
Step 2. Input devmgmt.msc and press Enter.
Step 3. Choose Disk Drives and right-click the hard drive.
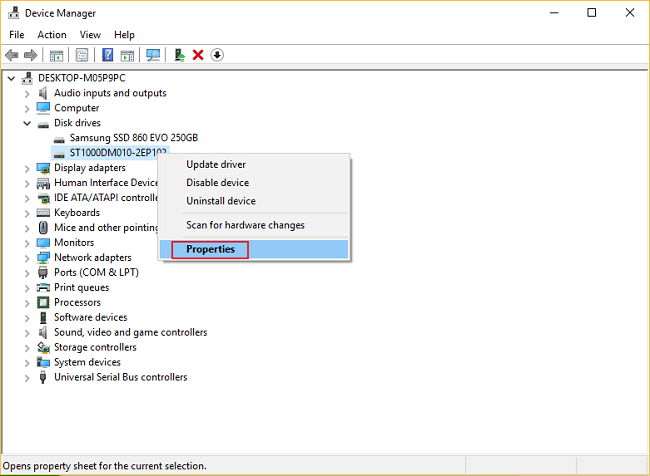
Step 4. If your hard drive is in good condition, the status will be "This device is working properly" when you click on Properties.
Method 5. Boot from Windows 10 Install Media
Microsoft provides a method for booting from Windows 10 Install Media to resolve issues such as a drive not showing up when installing Windows 10. To fix this, follow these steps.
Step 1. To install the software, follow these steps: Choose "Install Now" and then accept the license agreement. Next, select the installation type and click on "Custom Advanced".
Step 2. Press Shift + F10.
To execute this command, enter each line in sequence and press Enter: DISKPART, then list volume, select disk*, clean, convert mbr, create partition primary, active, format quick fs=ntfs, and finally exit.
Then you can install Windows again.
Method 6. Ask Help from the Manufacturer
Many PC manufacturers have built-in diagnostic tools to help troubleshoot and repair issues, including hard drive not detected problems. If you're a customer of a brand like Dell or Lenovo, you can check their websites for diagnostic software that can help you quickly test and repair your hard drive. In fact, it's often recommended to reach out to the manufacturer for assistance and learn how to use these tools to resolve issues like this.
Bonus Tip: Free Partition Master to Enhance System Performance
After successfully installing Windows 10, you can enjoy its exciting features. To further enhance system performance, consider using free partition management software. This tool allows you to organize and optimize your hard drive, extending your computer's life and capabilities.
Qiling Partition Master Free is a comprehensive partition management program that offers a range of features, including partition creation, deletion, resizing, and formatting, as well as disk management capabilities such as disk cleanup, disk clone, and disk partition recovery. It also supports various file systems, including FAT, NTFS, and HFS+, and provides a user-friendly interface for easy navigation and management.
- To resize/move partitions, you can either drag the partition left or right on the screen or enter a specific size you want for the partition, which can help increase the size of the C drive and potentially speed up your computer.
- Create, format and delete partitions
- Completely wiping out all data on a hard disk permanently involves a process called "secure deletion" or "data destruction." This can be achieved through various methods, including using specialized software, physical destruction of the hard drive, or using a technique called "zeroing.
Download the ultimate Windows 10/8/7 disk management tool and follow these simple steps to resize and move your partitions. With this tool, you can easily manage your disk space and make the most of your computer's storage capacity.
Step 1. Shrink partition to free up space to extend partition.
If the hard drive has enough unallocated space to extend the target partition, then proceed with the next steps. Otherwise, release space by deleting or resizing other partitions to make room for the target partition to be extended.
- Right-To resize or move a partition, click on the partition next to the target partition and select the option "Resize/Move".
- Drag the partition ends to free up space, leaving enough unallocated space behind the target partition, then click "Proceed".

Step 2. Extend target partition.
Click on the target partition and select "Resize/Move".
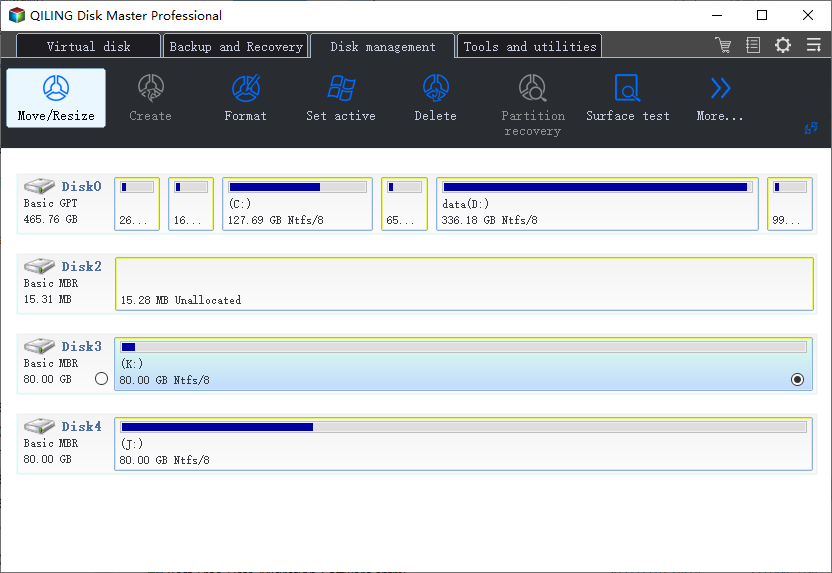
To extend the target partition, simply drag the partition handle into the unallocated space. This will increase the size of the partition and utilize the available free space.
Step 3. Keep all changes.
Click the "Proceed" to keep all changes.
Windows 10 Install Not Detecting Hard Drive FAQs
1. How do I fix no device drivers found?
Fixes for No Device Drivers Were Found:
Solution 1. Switch to a USB 2.0 Port
Solution 2. Set the partition where you want to install Windows to as Active. This will make that partition the primary boot device and allow you to install Windows on it.
Solution 3. Create a New Disc
Solution 4. Enable the xHCI hand-off Option in BIOS
Solution 5. To change everything to legacy and set the boot device to your DVD or USB, you'll need to make some adjustments in the BIOS settings. Typically, this involves entering the BIOS setup by pressing a key like F2, F12, or Del, then navigating to the Boot Mode or Legacy Boot option and selecting it.
2. Where do you want to install Windows 10 no drives were found?
To fix "No drives were found. Click load driver to provide a mass storage driver for installation", do it in the following way:
Step 1. To load drivers, click on the "Load Drivers" button located at the bottom left of the screen, and then select the device driver by clicking on the "Browse" option.
Step 2. Choose and load an available RAID driver.
Step 3. After Windows 10 is successfully installed, it will detect the hard disk. Follow the on-screen instructions to complete the installation process.
3. Where do you want to install Windows 7 no drives were found?
Fix: No Hard Drives Found in Windows 7 Installer:
Solution 1. Format the hard drive using diskpart in command prompt.
Solution 2. Load the hard drive storage controller drivers from a USB into the Windows setup.
Solution 3. Change the boot controller mode in BIOS.
Solution 4. Reset BIOS.
Solution 5. Use a different SATA port.
4. How do I install drivers for my hard drive?
The basic steps to install drivers for a hard drive are:
Step 1. Configure the drive as a master or slave device, which is only applicable for PATA drives.
Step 2. Mount the drive in the chassis.
Step 3. Connect the data cable to the drive and to the appropriate interface (PATA or SATA) on the motherboard.
Step 4. Connect a power cable to the drive.
Step 5. Restart the system and run the BIOS Setup.
Step 6. When installing a PATA or SATA interface card or RAID adapter, configure the card according to the manufacturer's instructions and connect the cables to it.
Related Articles
- How to Format WD Passport for Mac and PC (3 Ways)
- [Fixed] Boot Device Not Found Error in Windows 10/8/7
- How to Merge Partitions in Windows 11/10/8/7
- Patriot Formatter | The Best USB Format Tool for Patriot Flash Drive
- Can't Format/Clean USB Bootable Flash Drive, How to Fix
Why can't format/clean WinTo USB bootable flash drive? How can you fix this error efficiently? this article will guide you on how to remove this error. - Clean VS Formatting a Hard Drive, Can You Tell Me Their Difference
Is cleaning a hard drive the same as formatting a hard drive? Of course not. This article focuses on this question and tells you how to format a hard drive instead of cleaning a hard drive.