Does Initializing a Disk Erase Data, Yes or No?
Initializing disk is a After installing a new hard drive on a computer, the old hard drive may suddenly show as not initialized, prompting the user to initialize it. However, the concern is whether initializing the disk will erase its data, and the answer is no, initializing a disk does not erase its data, it simply prepares it for use.
This page provides comprehensive information about disk initialization, covering all aspects of the topic and addressing any questions you may have in the following sections.
Case - If I Initialize a Disk, Will It Be Erased
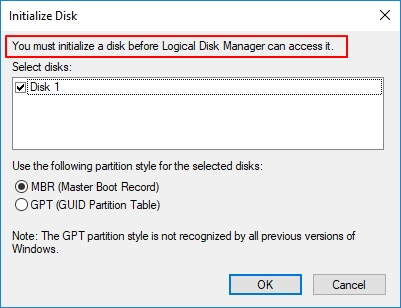
Initialization affects a hard disk by preparing it for use, erasing any existing data, and setting up a new file system. This process is typically done when you want to repurpose a hard disk or create a new partition on an existing one. Initialization is a critical step that ensures the hard disk is in a clean state, ready for you to format and use it as you see fit.You must initialize a disk before Logical Disk Manager can access it.The disk is formatted with the NTFS file system and does not contain an operating system.
Initializing a disk will erase all data on it, so you should make sure you have backed up any important files before doing so. If you're looking to reuse the disk, you might consider formatting it instead, which provides you a clean slate without deleting any data. Please review the guidelines below.
You may have the same confusion as to the user above when you are requested to initialize a disk. Generally, Windows operating system would pop up the initializing disk request to two types of hard disk:
1. A Brand New Disk
2. Old Hard Drive Shows "Unknown, Not Initialized" Suddenly
If your disk is new and unformatted, you can initialize it without worrying about data loss.
Initializing a disk means formatting it, which will erase all existing data, including files, folders, and operating system. If you have files on the disk, initializing it will delete them.
Follow the next part, your doubts will get released.
Does Initializing a Disk Erase Data
What are the benefits of using a hard disk? What are the differences between a hard disk and a solid-state drive?
- What does it mean to initialize a disk
- What happens when you initialize a disk
Initializing diskThe process of rebuilding or rebuilding the Master Boot Record (MBR) involves creating or re-creating the first sector of a hard drive, which stores information to load logical partitions and system files. To accomplish this, Windows disk management can be used to initialize the disk, or a third-party disk initialization tool can be employed.
During disk initialization, Windows disk management or a third-party tool rewrites the 0 sectors in the Master Boot Record (MBR) partition table, enabling the creation of logical partitions on the drive.
Will Initializing a Disk Erase Data
Initializing a disk will not erase data on the hard drive because it only affects 0 sectors in the MBR, making it a non-destructive process.
Initializing a disk does not erase everything on it. If you don't see files after initializing a used disk, it's likely because the hard drive is still unallocated. Creating partitions on the drive will make it visible again.
To fix the file not visible issue after disk initialization, you need to check the file system and permissions. Make sure the file system is correctly initialized and that the permissions are set to allow access to the file. You can try running a file system check and repair using the command-line tool or GUI utility provided by your operating system.
Fix Disk Initialization: Make Initialized Hard Drive Work Again, No Data Loss
If your disk is new or used, and the computer requires initialization, follow this process to resolve the issue. This will allow you to fix the disk initialization problem and get your disk working normally again without losing any data.
Note: If your disk is brand new, skip the troubleshooting steps and go straight to the disk formatting process.
Procedure 1. Initialize Disk using Disk Management
To initialize a disk, you can use either Windows Disk Management or a free partition manager, providing a convenient solution for disk initialization.
To execute disk initialization in Disk Management, follow these steps:
Step 1. Press Windows + X keys, click "Disk Management".
Step 2. Locate the target disk, and if it shows "Offline", right-click and choose "Online" first.
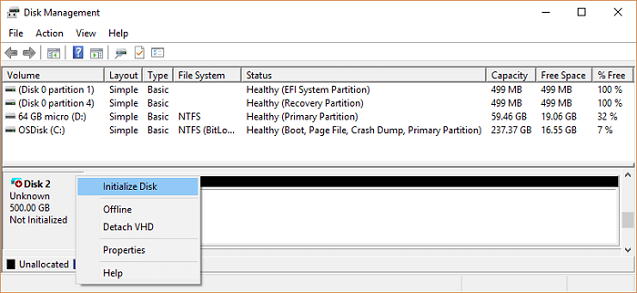
Step 3. Then right-click the not initialized disk and choose "Initialize Disk".
Step 4. Set the partition style to GPT or MBR and click "OK" to start initializing the disk.
After initializing the disk, it will be formatted and will display as "Basic" instead of the "Unknown, Not Initialized" symbol.
If your disk still shows as Not Initialized or Unknown, you can try updating the disk driver or changing the connection cable to troubleshoot the issue. If that doesn't work, consider sending the disk to the manufacturer's center or a professional disk repair service for assistance.
- Tip
- You can convert a disk from MBR to GPT or vice versa without losing your files. This process is different from disk initialization and can be done after the disk has been initialized. You can use disk management software to convert the partition style of a disk, and the process
- Reliable partition manager software - Qiling Partition Master can help.
Procedure 2. Recover Data from the Disk
For individuals whose old disk is displaying a "not initialized" message, it's essential to note that the disk may still contain important data. Although the disk is initialized, it remains inaccessible, making it crucial to explore alternative methods to recover the saved data.
You can't access or see any files on the drive, but reliable hard drive recovery software like Deep Data Recovery can help. It allows you to scan the entire empty drive and find all your data using its Quick and Deep scan modes.
To recover data from an initialized disk, connect the disk to your computer and open the Disk Management tool (Windows) or Disk Utility app (macOS). Identify the initialized disk and its corresponding partition, then check if it's being used by the operating system or any other application.
Step 1. Select file types
Select file types. Click "Next" button to start.

Step 2. Scan the hard drive partition
Select the drive where you lost or deleted files, click "Scan" to let the software scan the drive and recover lost data.

Step 3. Check the results
When the scan is finished, you can apply the "Filter" feature or click the "Search files or folders" option to find the lost files on the hard drive.

Step 4. Restore lost hard drive data
Select the files you want to recover and click "Recover" to save them to a different location.
Procedure 3. Partition Disk - Make Hard Drive Visible
To make your initialized disk visible, use Windows Disk Management to partition and set the disk format, allowing it to show up and function normally on your computer.
Let's start partition the disk:
Step 1. Press the Windows key + X keys, click on "Disk Management" to open it.
Step 2. To create a new partition on your disk, right-click the unallocated space and select "New Simple Volume" from the context menu.
Step 3. In New Simple Volume Wizard, click "Next" to continue.
Step 4. Set the size and the drive letter to the new volume, click "Next".
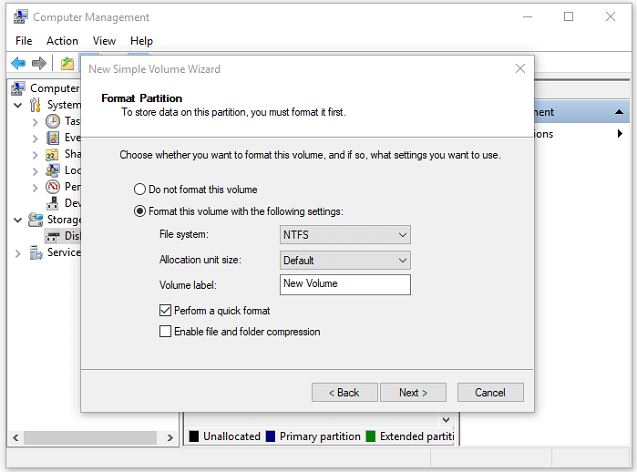
Step 5.To format a USB drive, select the drive in the Disk Management console, right-click on it and choose "Format". Choose the drive letter and file system (NTFS recommended), and set the allocation unit size to 4096 bytes.
To create partitions on an initialized disk, you can repeat the process, using the same steps as before, to create additional partitions. Once you have created all the desired partitions, you can use the disk as a system or data disk on your computer.
The Bottom Line
This page addresses questions related to disk initialization, with a specific focus on the common concern that initializing a disk will erase data. The answer to this concern is no, initializing a disk does not erase data. This page addresses questions related to disk initialization, with a specific focus on the common concern that initializing a disk will erase data.
Initializing a disk only affects the Master Boot Record (MBR) and the first 0 sectors, leaving the saved data on the drive intact. The data remains, but the drive becomes unallocated, making the saved data invisible.
To resolve the issue, use Qiling data recovery software to restore data from the disk, then create new partitions to make the drive accessible again.
To protect your data, it's essential to back up your disk regularly. You can either manually copy important files or use automatic file backup software to ensure your data is safe. This will prevent data loss in case something goes wrong with your disk.
Related Articles
- Get Your Answer: Does Formatting A Laptop Remove Viruses?
- How to Repair Corrupted PNG/JPEG Files
- Can I Recover Deleted Outlook Emails? Yes!
- 4 Efficient Ways Are Ready! Fix Compile Error in Hidden Module
- Your File History Drive Was Disconnected for Too Long, How to Reconnect File History Drive
Windows 10 users may encounter the error “Reconnect your drive. Your File History drive was disconnected for too long.” This error can occur for various reasons, but don't worry, the solutions in this article can help fix the problem and restore lost files. - Files Automatically Encrypted, How to Remove Encryption from Files
If your files are automatically getting encrypted on your computer, this post provides detailed instructions on how to remove encryption in Windows 10, 8, or 7. You can also learn how to decrypt a file and change an encrypted file to a normal file, such as unencrypting PDF and Excel files.