4 Fixes to You Must Initialize a Disk Problem
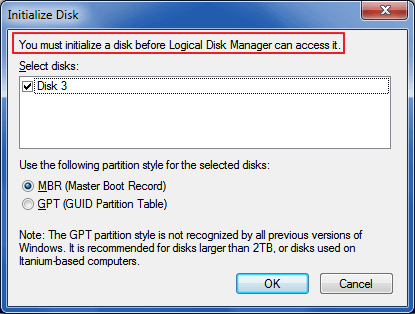
When Windows warns that the disk must be initialized before the Logical Disk Manager can access it, it's likely due to the disk becoming unallocated and uninitialized. To resolve this, you can try to initialize the disk from within the Disk Management console.
If you're experiencing issues with your uninitialized disk, don't worry! There are several solutions to help you detect and access it without losing any data. One quick fix is to simply restart your computer and see if the disk becomes visible.
If your external hard drive is not showing up, try initializing it to MBR or GPT and then recover your data using EaseUS Data Recovery Wizard. This process will erase all data on the drive, so make sure to back up any important files first. To do this, connect the external hard drive to your computer and open the Disk Management tool.
# Fix 2. Update 'not initialized' Drive Driver
To fix the "Not Initialized" issue with your disk drive, you can try uninstalling and reinstalling the disk drive in the Device Manager. This process involves disabling the disk drive, uninstalling it, and then restarting your computer to allow Windows to automatically reinstall the driver. Once the installation is complete, you can enable the disk drive and check if the issue is resolved.
# Fix 4. Reinstall All USB Controllers
Initialize Disk - You must initialize a disk before Logical Disk Manager can access it
If you're one of the many hard drive owners who've received the Windows prompt warning you to initialize your disk, you might be feeling a sense of anxiety about what to do next. The prompt can be intimidating, but initializing your disk is a relatively straightforward process that can help resolve any issues with your hard drive. By initializing your disk, you'll be formatting the drive and preparing it for use, which can help resolve any errors or issues that were preventing your computer from functioning properly.
To resolve the "You must initialize a disk" error, you need to use either MBR or GPT as the partition style for the selected disk by initializing it. This involves selecting the disk, choosing the partition style, and confirming the initialization process. This step is crucial to ensure the disk is properly formatted and recognized by the operating system.
Many people are puzzled about whether the solution can be applied to both new and used hard disks, and Windows recommends doing so, but why?
Identify your disk - a new or a used disk
1. The hard drive is brand new, unformatted, and has no data on it.
2. The hard drive is currently being utilized and contains numerous data files.
The differences between initializing a new disk and a used drive
For a brand new disk, Windows cannot access it until it's initialized. Initializing the disk rebuilds the Master Boot Record (MBR), allowing Windows to access the drive, and enabling you to create partitions and use the disk to store data.
When a disk that has been in use becomes undetectable by Windows, you may need to reinitialize it, but this will result in a complete data loss. To avoid this, perform data recovery immediately after initializing the disk.
How to Fix "You must initialize a disk" Error without Losing Data
The fixes mentioned are also applicable to other external devices such as external hard drives, USB drives, pen drives, and SSDs, to resolve the same error.
The "You must initialize a disk" issue may also occur with SSDs, external hard drives, and USB flash drives. To resolve this issue without losing data, you can try various fixes depending on the device type. For example, if it's an external hard drive, you can try reformatting it using the Disk Management tool in Windows. If it's an SSD or USB flash drive, you can try using a third-party formatting tool or updating the device drivers to resolve the issue.
If your disk isn't properly inserted or connected to your computer, Windows may not be able to load it, and you might get an error message. To fix this, simply unplug the disk, check the SATA and power cables, and then reconnect it correctly to your computer.
If this doesn't work, the connection of your drive is all right, try any fix below to make your drive work again.
Fix 1. Initialize the Disk to MBR or GPT and Recover Data
If your external HDD, SSD, or USB is not faulty or completely dead, initializing it can be the quickest and easiest way to resolve the issue. This will allow you to download hard drive recovery software, such as Qiling, to recover data from the hard drive after initializing, thereby protecting you from losing everything on it.
First. Initialize the disk - HDD/SSD/USB
To resolve the "you must initialize the disk" issue, you can work on both new and old disks using Disk Management. To initialize a disk, follow these steps:
Step 1. Right-click "This PC" and choose "Manage" to enter "Disk Management".
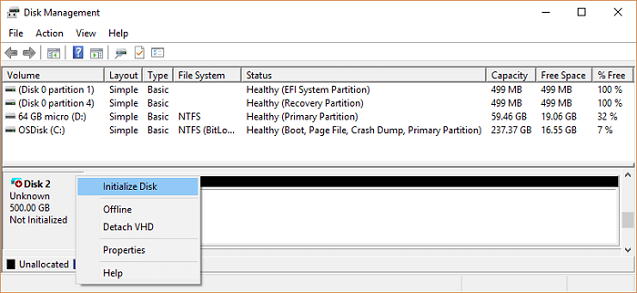
Step 2. Right-click the disk showing "Not Initialized" and choose "Initialize Disk"
Step 3. To proceed with the "Initialize Disk" window, select the most suitable disk style - either Master Boot Record (MBR) or GUID Partition Table (GPT) - and click "OK" to continue.
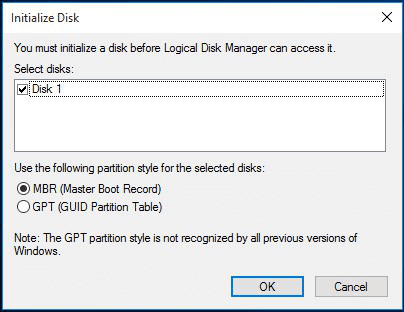
The Disk Manager will now start processing. Once finished, the new drive is ready to create partitions and save files. You can refer to the guide on "How to Partition a Hard Drive" for further assistance.
If your used hard drive is initialized, its partitions will be visible in the list. If you've lost data due to this action, you can recover all the partitions using the next guide.
Second. Recover Lost Data from HDD/SSD/USB
To use Deep Data Recovery, simply download and run the software, select your hard drive, and click Scan to find all disappearing files. The tool can also repair corrupted files on the storage device, such as repairing corrupted photos, videos, or documents, as long as Windows correctly detects your drive.
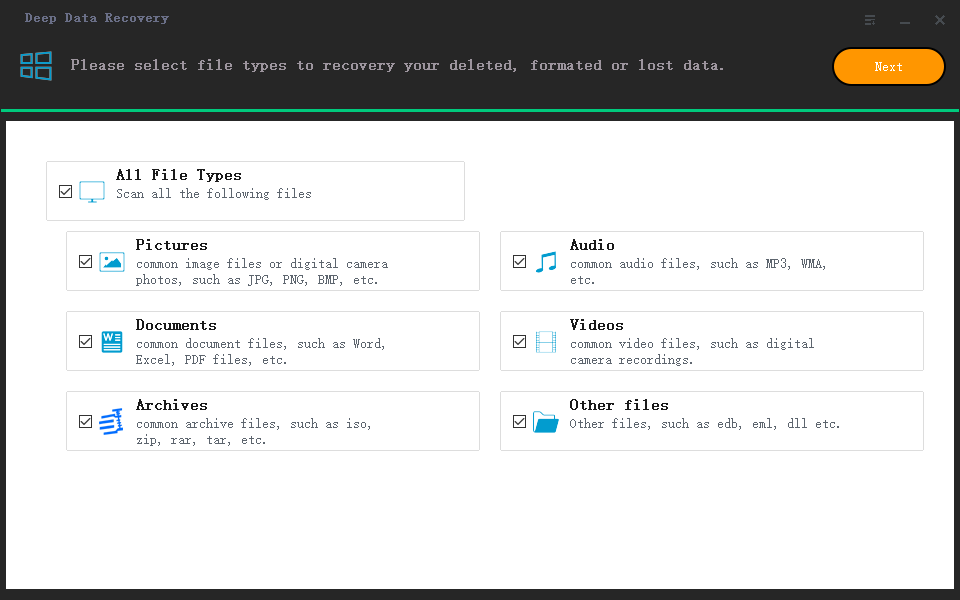
Step 1. Select file types
Launch Deep Data Recovery software on your PC, select the desired file types, and click "Next" to initiate the recovery process.
Step 2. Scan the hard drive partition
To recover lost or deleted files, select the drive on your hard disk where the files were lost or deleted, click "Scan", and let Qiling data recovery software scan for all lost data and files on the selected drive.

Step 3. Check the results
When the scan completes, you can apply the "Filter" feature or click the "Search files or folders" option to find the lost files on the hard drive.

Step 4. Restore lost hard drive data
Select the files you want to recover and click "Recover" to save them to another location.
To resolve the issue, restart your computer, then try to save data again. If the problem persists, you may need to run a disk check on your drive to ensure it's functioning properly. This can be done by going to the Control Panel, clicking on System and Security, then clicking on Administrative Tools, followed by Computer Management.
Fix 2. Update 'not initialized' Drive Driver
While not 100% effective, this method won't affect the data at all, making it still worth trying.
Step 1. To open the Device Manager, click on "My Computer" or "This PC" and then select "Manage". From the resulting window, choose "Device Manager" under the "System Tools" section. This will open the Device Manager window, where you can view and manage the hardware devices connected to your computer.
Step 2. Double-click the device name to open the driver properties window.
Step 3. Go to the "Driver" tab and click Update Driver.
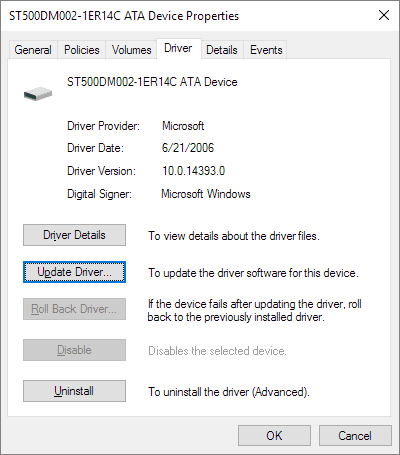
Step 4. Click Search automatically for updated driver software.
The Windows Update process will now restart your computer. Wait for the process to finish, and now your disk driver has been updated to the latest one.
Fix 3. Uninstall & Reinstall Disk Drive of the "Not Initialized" Disk
Step 1. Open Device Manager and expand the Disk drives.
Step 2. Right-click on your disk drive and choose "Uninstall" device.
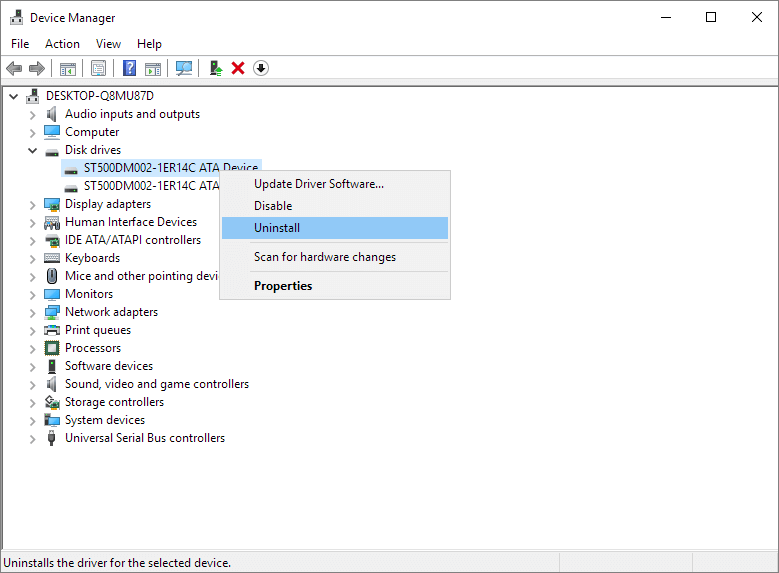
Step 3. Go through the wizard guide and then reboot your computer.
The computer will automatically reinstall the driver that was uninstalled.
Fix 4. Reinstall All USB Controllers
Here are the steps to reinstall USB controllers for your device, especially the not initialized one:
Step 1. Right-click on the Windows icon and select "Device Manager".
Step 2. Under Universal Serial Bus controllers, right-click on the USB controllers of your problematic drive and select "Uninstall".
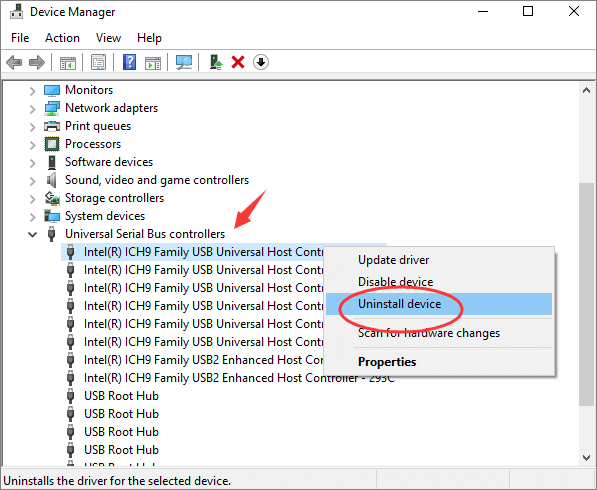
Step 3. Restart the computer and Microsoft will automatically reinstall the USB controllers software for your drive.
The data will be restored to its original location on your hard drive, making it accessible through your usual operating system and file explorer. This means you'll be able to view and interact with the saved data as you normally would, without any additional software or steps required.
Conclusion
When you encounter the error message "You must initialize a disk before Logical Disk Manager can access it", there are several fixes you can try. One quick fix is to check if the disk is initialized, and if not, initialize it.
Initializing disk and data recovery software in Fix 1 will resolve the issue for you at one time. This is a straightforward solution that can be implemented to fix the problem.
If your disk shows as not initialized in Disk Management, it will become undetectable. To make it detectable again, you may need to update the drive driver, uninstall the disk drive, or reinstall the USB controllers.
People Also Ask
We've continued to investigate disk initializing errors and related issues. In doing so, we've also addressed three top concerns from Google users, providing the most accurate answers to these frequently asked questions.
If you are interested, check the answer here now:
1. Will initialize a disk erase data?
Initializing a disk itself doesn't erase data, but partitioning and formatting it will, so use data recovery software if you don't want to lose files.
To recover data from a hard drive after initializing, first, stop using the hard drive immediately. Then, download and install a reliable data recovery software, such as EaseUS Data Recovery Wizard.
2. How do I initialize my new SSD?
If you're having issues with your SSD, you can try initializing it using Disk Management, as recommended in Fix 1. Alternatively, you can also try initializing your SSD using other methods, such as using the command prompt or a third-party tool, to resolve the issue.
To initialize a disk, you can either use the Command Prompt (CMD) to run the disk initialization command or utilize a partition manager tool like Qiling Partition Master, which features an Initialize Disk function.
The two methods to initialize a hard drive or solid state drive are practical and efficient. For more information, see the article "How to Initialize an HDD/SSD".
3. Should I initialize MBR or GPT?
To initialize a disk to MBR or GPT, first consider your intended use. If you're setting up a legacy system or a device that only supports the Master Boot Record (MBR) format, you'll want to initialize it as MBR.
1). To use the disk as new system disk:
To change the disk partition style from MBR to GPT or vice versa, open Disk Management, right-click the system disk, select "Properties", and check the partition style. If it's MBR, initialize the disk to MBR, and if it's GPT, initialize to GPT.
2). To use the disk as a data drive:
If your disk is over 2TB or you need more than 4 primary partitions, initialize it to GPT; otherwise, initialize it to MBR.
Related Articles
- 1TB HDD vs 256GB SSD, Which Is Better
- How to Fix 'The semaphore timeout period has expired'
- Recover Data from Dead, Failed or Crashed SSD in Windows 11/10
- How to Fix a Slow WD External Hard Drive Without Losing Data