[DIY Guide] Where Do I Find My Scanned Documents on Windows/Mac
Here are several effective ways to find scanned documents on Windows and Mac: You can use the search bar on your computer to search for scanned documents by typing the name of the document or keyword. On Windows, you can also use the File Explorer to search for scanned documents in specific folders.
| Workable Solutions | Step-by-step Troubleshooting |
|---|---|
| 2 Ways to Locate Scanned Documents on Windows 10 |
Method 1. Check the Pictures folder in Windows 10. Open "This PC" on your desktop...Full steps Method 2. Find the scanned files by checking the scan app. Click the search button and input Scan...Full steps |
| How to Scan and Find the Scanned Documents on Mac | First, learn how to scan a document on Mac, then find the scanned files in this way. Open "Finder > Go > Home". Locate the "Pictures" folder. double-click the icon to open it. Then, you can find the scanned files...Full steps |
How to Locate the Scanned Documents on Windows 10
"Hi Everyone - On Windows 10, when you scan a document from your wireless printer, it's likely being saved to a folder within the "Documents" folder, but the exact path might be different from what you're used to on Windows 7. To determine which folder the scans are going to, you can try checking the "Save to" or "Destination" setting on your printer's control panel or in the Windows 10 settings app. You can also try searching for the scanned document in the "Documents" folder and its subfolders to see where it's being saved. If you're still having trouble, you might need to adjust the printer settings or consult the printer's manual for more information.
If you're frustrated because your newly scanned documents can't be found on your hard drive, we've got a solution for you. To avoid this issue in the future, you can change the settings to ensure that your scanned documents are saved in a specific location, making them easily accessible. By doing so, you'll never have to deal with the hassle of searching for your scanned documents again.
Method 1. Check the Pictures Folder in Windows 10
When you connect a scanner to your computer, Windows PC saves scanned documents in the "My Documents" or "My Scans" folder by default.
For a Windows 10 user, saved files such as images (.jpg, .jpeg, .png) are often found in the "Pictures" folder.
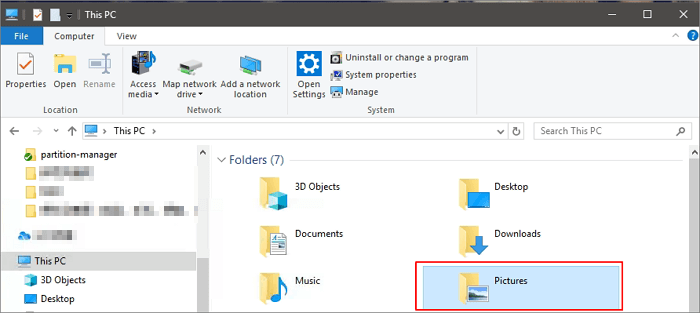
Step 1. Open "This PC" on your desktop.
Step 2. To access the scanned files, select the "Pictures" folder and navigate to find the scanned files within it.
If you're unable to locate the scanned files, you can also perform a comprehensive search of your entire hard drive to find them. This can be done using various search tools and software available on your computer.
Method 2. Find the Scanned Files by Checking the Scan App
To find the location of scanned files on Windows 10, you can check the default storage folder for your scan app. This is usually done by checking the settings or preferences of the built-in scan program, such as the Scan app or the Camera app. By looking for the default storage folder, you can locate the scanned documents and access them easily.
Step 1. Click the search button in your Taskbar and input Scan.
Step 2. Choose "Windows Fax and Scan" by clicking it.
Step 3. To start a scan in the Windows Scan application, click on the "Scan" button located at the bottom left corner of your screen.
Step 4. To save a scan, select the "Save as" option, which typically defaults to the "Scanned Documents" subfolder within the "Documents" folder. If you wish to change this default location, you can simply relocate the entire "Documents" folder to a new location.
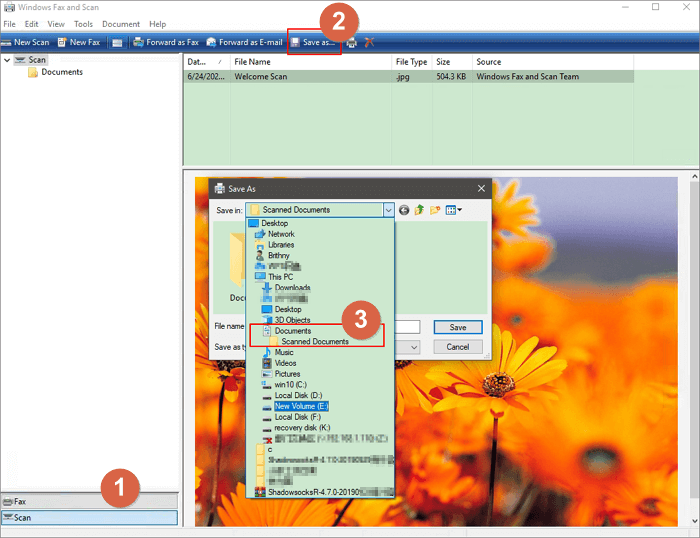
To find scanned files on your Windows PC, navigate to "This PC" and click on "Documents" and then "Scanned Documents". The location of scanned files may vary depending on the scanner software installed on your PC, such as HP Solution Center. If you're having trouble finding your files, check the original scanner software for assistance.
How to Find Your Scanned Documents on Mac
To locate scanned files on your Mac, first learn how to scan a document using Image Capture. This will allow you to scan a document and save it to your computer, making it easier to find later.
Method 1. Scan a Document on Mac
Step 1. Place the document you want to scan in the scanner, turn on your scanner and connect it to your Mac. Make sure your scanner is properly connected to your Mac via USB cable, then open the scanner software on your Mac, select the scanning option, and follow the on-screen instructions to complete the scanning process.
Step 2. Open "Image Capture" on Mac.
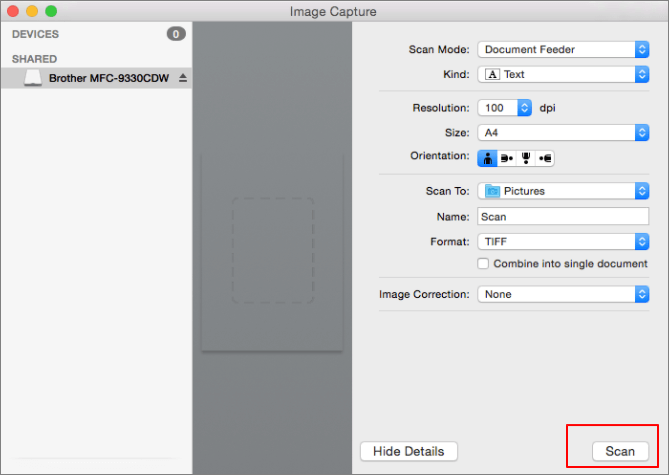
Step 3. Select your scanner from the pane at the left of the main window.
Step 4. Select the destination folder for the scanned picture in the Pictures drop-down menu. I select the "Picture" folder.
Step 5. Select a size for the bounding box, which defaults to US Letter, and choose to draw multiple boxes to scan different parts of the document. Then, click "Scan" to initiate the scan, which will be saved in the chosen location.
Method 2. Go to the Location You Choose
When you scan a document on Mac, you'll be prompted to choose a storage folder, so remember the location you select. To find your scanned files, navigate to that folder, which by default is the "Pictures" folder on your Mac, where scanned images and documents are automatically saved.
Step 1. Open "Finder > Go > Home".
Step 2. When the Home window opens in Finder, locate the "Pictures" folder, and double-click its icon to open it.
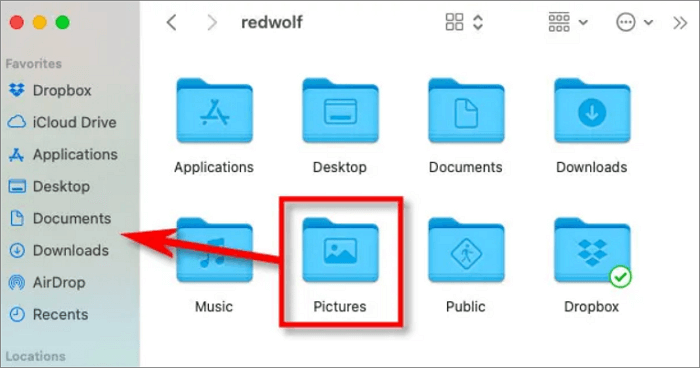
Then, you can view the Scanned files on Mac.
Extra Tips: How to Find Scanned Files with Software
If you're having trouble finding scanned files, you can try using third-party software like Qiling data recovery software. This tool can scan your Windows or Mac hard drive to find existing and lost documents, and even help you recover deleted scanned files with simple steps.
Step 1. Launch Deep Data Recovery, select the desired file types, and click "Next" to initiate the recovery process.

Step 2. To recover lost files, choose the drive where the files were lost and start scanning. This software can recover data from various devices, including hard drives, solid-state drives, USB drives, SD cards, pen drives, and camera memory.

Step 3. You can browse the full scan results and choose the file type you need by clicking on the file type filter, which supports over 1000 file types including photos, videos, documents, emails, audio files, and many more.

Step 4. Select the files you want to preview. Click "Recover" and set a storage location to save the recovered data.
Conclusion
Your scanned files may appear in various locations depending on your scanner brand and storage choice. If you're unable to locate them, you can also consider using Qiling hard drive recovery software, which can scan your entire disk or partition to help you find lost or existing files.
Related Articles
- EFS Decryption Guide: How to Recover Encrypted Files on NTFS Drive Without Effort
- Undo ESD-USB | Convert 32GB ESD-USB Hard Drive/External Hard Drive to Normal
- Best Free Windows 10 Data Recovery Software
- How to Recover Data from Diskpart Cleaned Disk by Accident
- Excel Found A Problem with One Or More Formula References in This Worksheet [Solved]
You receive an error message in Excel saying it found a problem with one or more formula references in the worksheet while saving the workbook. To fix this issue, you can refer to the post for troubleshooting steps. If you're experiencing file loss problems, you can try using Deep Data Recovery to recover your Excel files. - Should You Wait for a Response or Close When Excel Frozen but Not Crashed? 10 Tricks Here
If Excel freezes but doesn't crash in Windows 10, the correct reaction is to wait patiently for it to respond, rather than immediately restarting. This approach can help prevent data loss and allow you to recover unsaved work. If Excel remains unresponsive, you can try using the built-in Task Manager to close the application, or use the “Ctrl+Alt+Del” shortcut to open the Task Manager and end the process. If these methods fail, restarting your computer may be necessary to resolve the issue.