How to Recover Deleted User Profile and Files in Windows 10/11
When the C drive is full, people may delete large files to free up space, but sometimes they accidentally delete important files like those in the User Profile folder.
When you restart Windows 10, you won't be able to log into the system as your old User Account files have been removed, requiring you to recreate a new user account and potentially losing your files. Alternatively, you can refer to the solutions provided to recover your User Profile.
How Do I Restore Deleted User Profile in Windows 10/11
To recover a deleted User Profile in Windows 10, you can try the following steps: go to the System Properties, click on "Advanced" then click on "Settings" under "User Profiles". Look for the profile you want to recover and click on "Load" or "Restore" to restore it. If the profile is not listed, try booting in Safe Mode and see if it appears.
If you didn't have backups, you can try using the built-in Windows 10 feature called "System Restore" to restore the User Profile and files. You can also try using the "File History" feature to recover deleted files. Additionally, you can try using a third-party data recovery software like Deep Data Recovery to scan your computer for lost files. If none of these methods work, you may need to reinstall Windows 10 and restore your files from a previous backup or by using a cloud storage service like OneDrive.
Losing user profiles can cause file loss issues and some personal settings to vanish in Windows PC, a problem that still bothers many Windows 10 users, as well as those on Windows 8 and 7.
To restore deleted user profiles, you can use the System Restore feature to go back to a point before the deletion, or use the Profile Wizard to recreate the profile from scratch. Additionally, you can also use the built-in Windows utility, "User Profile Service," to restore the profile.
Part 1. Restore Deleted User Profile in Windows 10/11
Note: The solutions provided in this part may also be applicable to Windows 8 and Windows 7 users who want to recover their lost User Profiles. While some specific operations may vary, the general approach can still be effective for these earlier operating systems.
To help you recover lost User Profiles, we will list methods from easiest to most difficult. Let's get started with the restoration process.
Before You Start to doing, you shall boot Windows 10 into the Safe Mode
- 1. To reboot your PC, hold the Shift key and click "Power" on the sign-in screen, then select "Restart".
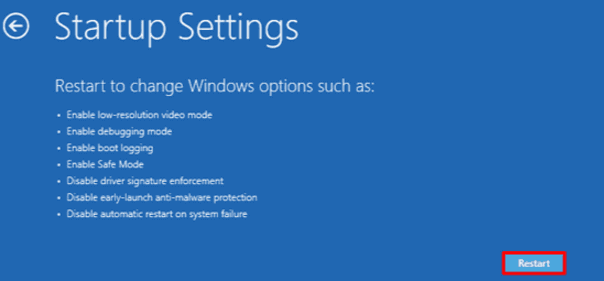
- 2. After selecting Troubleshoot, choose Advanced options, then Startup Settings, and finally Restart.
- 3. Press F4 when the computer is booting up and it will then start in Safe Mode.
When the process finishes, you can continue with the following methods to learn how to bring back your lost User Profiles.
- Method 1. Restore Deleted User Profile Files and Create a New Profile
- Method 2. Manually Restore Deleted User Profile in Windows 10
- Method 3. Perform System Restore and Bring Deleted User Profile Back
Method 1. Restore Deleted User Profile Files and Create a New Profile
To resolve this issue, restore the deleted User Profile documents and files, and then create a new User Profile in Windows 10. This can be done by following the steps below, which will help you recover your lost files and set up a new User Profile.
1. Restore All Deleted Old User Profile Files with File Recovery Software
Professional file recovery software can effectively scan and restore deleted User Profile files and documents, with Deep Data Recovery being a recommended option that simplifies the process in just 3 steps.
Qiling Deleted Recovery Software
- Recover lost or deleted files, documents, photos, audio, music, and emails quickly and effectively.
- In the process of scanning, any data that has been showing up in the result will be restored as part of the process.
- Data recovery software supports recovery from various scenarios, including sudden deletion, formatting, hard drive corruption, virus attacks, and system crashes, helping to retrieve lost data under different circumstances.
Step 1. Launch Deep Data Recovery, select the file types you want to recover, and click "Next" to begin the recovery process.

Step 2. Select the drive where you lose your data and click "Scan" to start the recovery process.

Step 3. When the scan is complete, use the "Filter" or "Search" feature to find the lost files. This will allow you to narrow down the search results and locate the specific files you're looking for.

Step 4. Select all the files you want and click "Recover". Then, browse another secure location to save them.
Note: To recover a Windows 10 system that won't boot, try booting from a Windows installation media, go to the Advanced options, and select the Troubleshoot option. Then, choose the "Reset this PC" option and select the "Keep my files" option. This will remove any installed applications and return the system to its original settings while keeping the user's files and settings intact.
2. Enable Administrator Account and Create a New User Account
Step 1. To open the Command Prompt as an administrator, right-click on the Start button or Windows icon, select "Search", and type "command prompt". Then, select Command Prompt (Admin) from the search results.
Step 2. Type: net user administrator /active: yes and hit Enter.
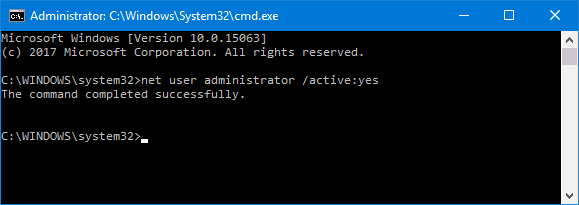
Note: You can switch "yes" to "no" when you want to reverse this in the future by running the same command. This will allow you to easily undo the changes you've made if you decide you don't like them.
To enable the hidden administrator account, you can type "net user administrator /active:yes" in the Command Prompt, then restart your computer. After the restart, you can create a new account.
3. Create a New Account - New User Account
Step 1. Go to Settings > Accounts > Family & other users.
Step 2. To add another user to a PC, click "Add someone else to this PC" and follow the on-screen instructions to complete the setup.

Note: If you want to create a local account instead of a Microsoft one, click "I don't have this person's sign-in information" > Then select "Add a user without a Microsoft account".
4. Replace New Account User Profiles with Restored Old User Profile Data
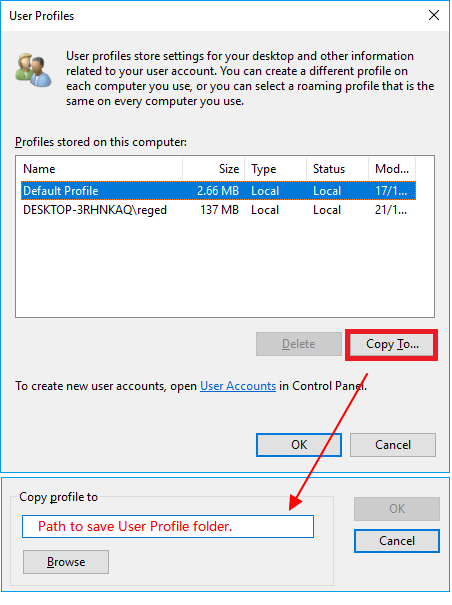
To restore your User Profile, copy the restored User Profile files and document to your new account. You can copy and paste the files and documents to the new account.
Step 1. Restart your PC and log into the administrator account.
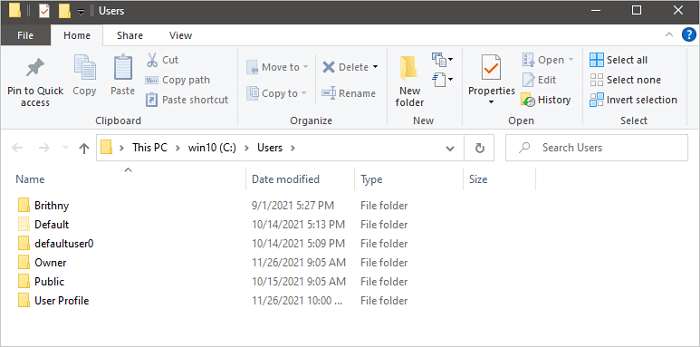
Step 2. To open the Users folder in File Explorer, press the Windows + R keys to open the Run dialog box, type "C:/Users" and press Enter. This will take you directly to the Users folder where you can access your personal folders, such as your own user folder, the Public folder, and the Default folder.
Step 3. Copy and paste all the restored user profiles into the new one.
Note: We recommend reviewing each folder individually to avoid bringing across any hidden and potentially problematic system files.
After replacing the files in the new user account, you can restart your PC and keep all the changes. This will allow you to use your old User Profile data with the new account again.
Method 2. Manually Restore Deleted User Profile in Windows 10
To recover a lost User Profile, you can try using Registry Editor. First, open Registry Editor by searching for it in the Start menu. Then, navigate to the "HKEY_LOCAL_MACHINE\SOFTWARE\Microsoft\Windows NT\CurrentVersion\ProfileList" registry key.
1. Find out Security Identifier
Step 1. To open the Command Prompt, right-click on the Start or Windows icon, select "Search", type "command prompt" and press Enter.
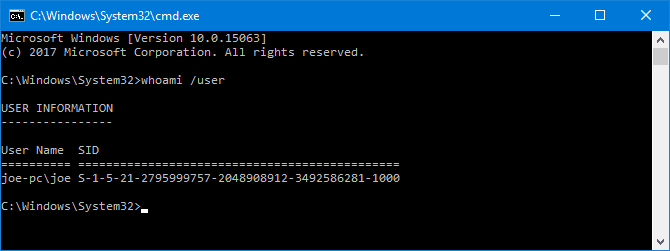
Step 2. Type: whoami /user and hit Enter.
The system command "whoami" queries the system to your SID of the current account. The SID is a unique identifier for the account, and the "whoami" command returns this ID.
2. Edit the Registry
Step 1. To open the Registry Editor, type "regedit" in the Windows Search bar and press Enter. Once open, click "Yes" to allow Registry Editor to make changes to your computer.
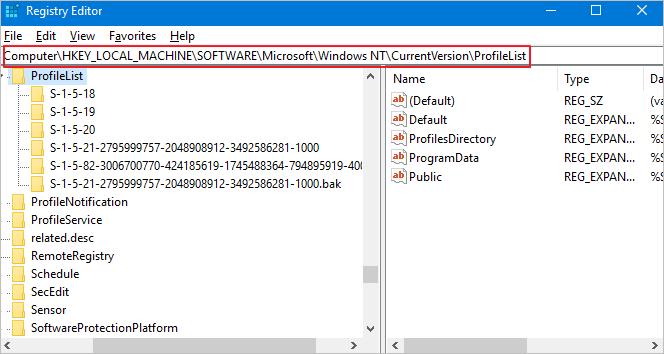
Step 2. Navigate to the below path to find your User Profile list:
HKEY_LOCAL_MACHINE\SOFTWARE\Microsoft\Windows NT\CurrentVersion\ProfileList
The SID (System ID) is a unique identifier for each database in a SQL Server instance. It's usually listed twice, once with the .BAK extension and once without it.
- SID listed with a .BAK extension, such as: S-1-5-21-2795999757-2048908912-3492586281-1000.bak
- SID listed without a .BAK extension, such as: S-1-5-21-2795999757-2048908912-3492586281-1000
You can recover your deleted User Profile by following the steps provided below. If you're unable to recover it, you can also try using the System Restore feature to restore your system to a previous point in time when your User Profile was intact.
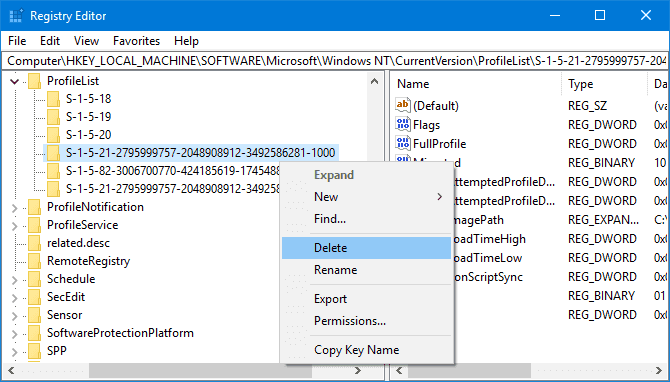
- Option 1. Delete Duplicate Folder
If the SID is listed twice, delete the folder without the .BAK extension. If the SID is not listed twice, delete the folder with the .
1. Right-click the folder from the left-hand pane and click "Delete".
2. Click "Yes" to confirm.
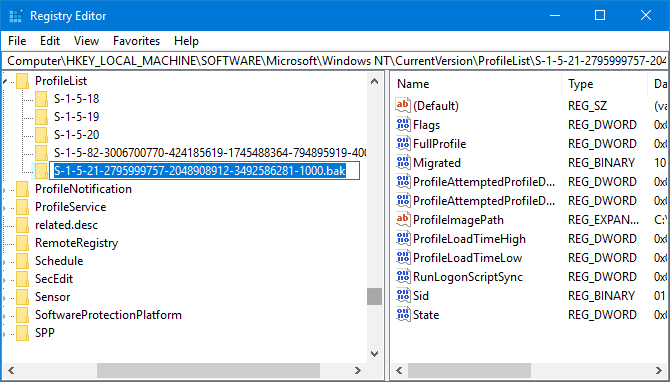
- Option 2. Rename.BAK Folder
- 1. Right-click the folder matching your SID with the .BAK extension and click "Rename".
- 2. Remove.BAK from the end of it and hit Enter to save all changes.
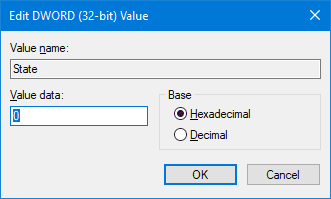
- Option 3. Adjust the Folder Path and State
- 1. Click on the folder on the left-hand side of the screen that corresponds to your unique Security Identifier (SID).
- 2. Locate the ProfileImagePath in the registry, double-click it, and then input the correct path for your user profile in the Value Data field.
- Note: If you're unsure where your user profile is, press Win + R, input C:\Users, and hit Enter, which shows you the correct path to your user profile.
- 3. Click "OK" once you've written the correct Value Data.
- 4. To modify the "State" value, double-click on it in the right-hand registry pane, change the Value data to "0", and click "OK" to save the changes.
To restore deleted registry entries, close Registry Editor, restart your PC, and sign back into your user account. This will restore everything that was deleted.
Method 3. Perform System Restore and Bring Deleted User Profile Back
Important: A System Restore Point records the system state, including the user profile, installed programs, and saved files, essentially capturing a snapshot of the entire PC.
A System Restore Point records the entire state of your PC, including the system state, saved files, installed programs, and even the User Profile. By restoring your system to a previous state, you can recover lost User Profile documents, among other things. This means that System Restore can help you recover lost files and bring your system back to a previous working state.
Step 1. Right-click on the Windows icon and select "Search".
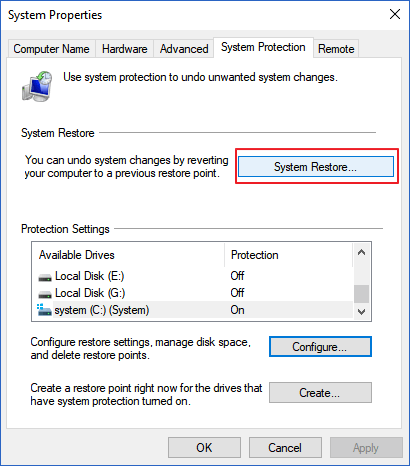
Step 2. Type: create a restore point, and click the top result to open "System Properties".
Step 3. To restore your computer to a previous state, click the System Restore button under the System Protection section, which will display all the restore points you've created.
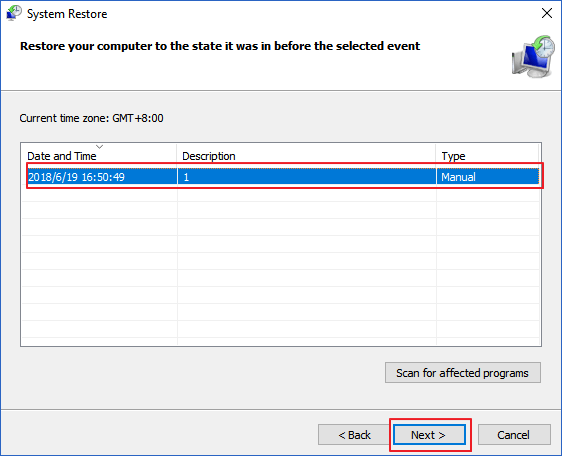
Step 4. To restore your PC to a previous state, click "Next" and select the restore point that you want to use and restore on your PC.
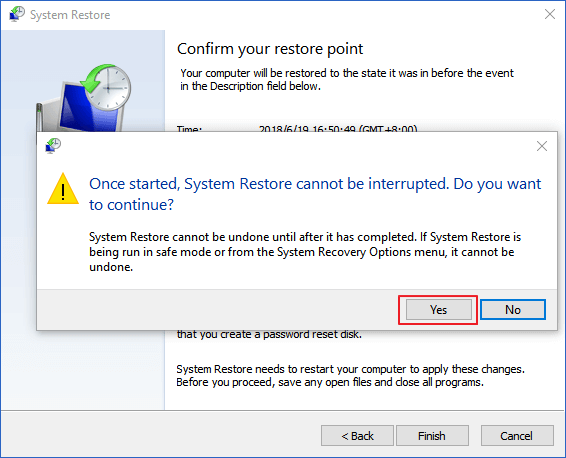
Step 5. To confirm the restore point and execute the System Restore on your PC, click "Finish" and then click "Yes".
Wait for the process to finish, then restart your computer and log in with your old user account to access your old user profile documents.
Part 2. Tips to Protect Valuable User Profile and System
There is a way to prevent User Profile documents from being lost. It can be done by creating a backup of the documents in a safe location, such as a network drive or cloud storage. This way, even if the User Profile is lost or corrupted, the documents will still be accessible.
Here, we've covered several practical tips that can help you protect your User Profile and even Windows system by backing up your files, disabling Windows Update, and more, to prevent data loss and system damage.
- 1. Copy User Profile with File History
In Windows 10, File History can be used to copy individual files and save them as a backup, allowing for selective backup of the User Profile.
- 2. Use Windows Backup Software - Qiling Backup
This backup software allows you to easily back up your User Profile or entire Windows system in just three steps, giving you peace of mind by protecting what matters most to you.
- 3. Create a Windows Restore Point
To enable System Protection, go to System Properties, click System Protection, select the System C: drive, click Configure, and then click Enable.

Then, follow the on-To browse to a large enough drive to create and save Windows restore points, follow these steps: Ensure that you have a drive with sufficient free space, ideally a separate drive from the one where Windows is installed. You can browse to this drive by clicking on "This PC" or "Computer" in the File Explorer, and then selecting the drive you want to use.
Related Articles
- How to Recover Ransomware Encrypted Files
- How to Recover Deleted PST File in Outlook 2019/2016/2013/2010
- How to Decrypt a File Without Password, Certificate, and Key
- How to Restore Missing Desktop Icons and Files in Windows 10/11
- How to Create Windows 10 System Image Backup
Creating a system image backup of Windows 10 is a crucial step in ensuring the safety and security of your system. A system image backup is a snapshot of your entire system, including all installed software, settings, and files. - How to Use Deep Data Recovery
It is a tutorial for how to make use of Deep Data Recovery to recover lost and deleted files from computer and external hard drives.