Microsoft Word Has Encountered a Problem and Needs to Close
| Workable Solutions | Step-by-step Troubleshooting |
|---|---|
| Fix 1. Solutions for Windows 10 | Open Windows Explorer > click "Program Files" > "Microsoft office" >"Office". Right-click "Winword.exe"....Full steps |
| Fix 2. Solutions for Mac |
|
"Microsoft Word has encountered an issue and needs to shut down. Sorry for the disruption."
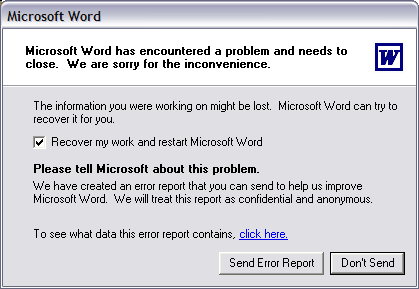
When you open a Word document, you may see the error message "Microsoft Word has encountered a problem and needs to close" due to a serious issue that prevents the file from opening properly, affecting Windows PC or Mac users.
The causes of this problem may be:
- Word application crashes
- Corruption of user account profile
- Word compatibility
- Corruption of Word preferences
If Microsoft Word encounters a problem and needs to close, you can fix the issue without losing your contents by trying out the solutions provided for both Windows and Mac. These methods can help you open Word without showing a blank page. In case you need to recover deleted or lost Word documents, consider using powerful Word file recovery software.
Read also how to fix Microsoft Word has stopped working.
Fix Microsoft Word Has Encountered a Problem and Needs to Close in Windows 10/8/7
When you encounter an error in Word, you're presented with two options: "Send Error Report" or "Don't send". Unfortunately, neither of these options effectively resolves the issue. Clicking either one brings you to safe mode, where you might occasionally be able to revive Word, but more often than not, it doesn't solve the problem. Instead, we'll guide you through a step-by-step process to completely remove the error and allow you to open your Word document without shutting down.
- To access the Microsoft Office folder in Windows Explorer, follow these steps: Open Windows Explorer, click on "This PC" or "Computer" in the left sidebar, then navigate to the "Program Files" folder, followed by "Microsoft Office", and finally "Office".
- Find and right-click "Winword.exe" > choose "Properties".
- To clear all the check boxes in the "Compatibility" tab, click on it and press to deselect all the check boxes, and then hit "OK".
Fix Microsoft Word Has Encountered a Problem and Needs to Close on Mac
When starting Microsoft Word for Mac 2011 or 2008, you might encounter an error that causes the program to close. This issue can be resolved in three ways, preventing Word from shutting down.
Run Repair Disk Permissions
In Mac versions 10.2 or later, the "Repair Disk Permissions" feature can be used to diagnose and potentially resolve issues like the "Microsoft Word has encountered a problem and needs to close" error. This feature is designed to fix permissions issues that might be causing the problem. By running the repair process, you may be able to identify and correct the underlying cause of the error, allowing Microsoft Word to function properly again.
To run the First Aid and Repair Disk Permissions on your Mac, go to the "Utilities" section in the "Go" menu, then select "Disk Utility", choose your primary hard drive, and click "First Aid" and then "Repair Disk Permissions" in the resulting window.
If the error persists after scanning, try opening Word in safe mode by holding the Shift key while launching Word from the Applications folder or Dock. If the issue still exists, proceed to the next step.
Reset Word for Mac preferences
Corrupted Word preferences are a common cause of the error message "Word has encountered a problem". To troubleshoot, try resetting Word preferences, which can often resolve the issue.
- To access the Library folder on a Mac, click "Go" in the top menu bar, then hold down the Option (or Alt) key on your keyboard while clicking "Library". This will reveal the Library folder in the drop-down menu. For OS X 10.7 or later versions, you can also hold down the Option key and click "Library" directly.
- To remove Microsoft Word's preferences, open the "Preferences" folder on your computer and drag the "com.microsoft.Word.plist" file to the desktop. If you can't find this file, look for the Microsoft folder within Preferences and drag the "com.microsoft.Word.prefs.plist" file to the desktop instead. This will clear out any saved settings and preferences for Microsoft Word.
- If you have Service Pack 2 installed, open the "Application Support" folder, then navigate to "Microsoft" and "Microsoft", and check if the error occurs in Word.
Or, try another alternative method.
- Click "Go" > "Home" > "Library".
- To access the User Templates folder, navigate to the "Application Support" folder, then select the "Microsoft" folder, followed by the "Office" folder, and finally the "User Templates" folder.
- To find the Normal.dotm file, navigate to the "User Templates" folder, and locate the file. Once found, drag it to the desktop for easy access and use.
Create a new user account
If the problem is caused by a corrupted user account, you can try to create a new user account to fix the issue. This can help to resolve the problem by creating a new, clean account that does not have the same issues as the original account.
- In "System Preferences", click "Accounts".
- To create a new account, click the Plus sign in the lower left corner to open the new account window. Enter "Test" as the username and leave the password box blank. Then, click the "Create Account" button, and when prompted, click "OK" to acknowledge the warning.
If the above method doesn't work, you may need to remove or reinstall Office for Mac.
Bonus Tip: How to Recover Deleted/Lost Word Document on Windows and Mac
Word document loss is a common issue due to accidental deletion, formatting, virus attacks, or application crashes. However, with Qiling data recovery software, you can easily recover lost documents, photos, audios, videos, emails, and other 200+ files from various storage devices, including HDD, SSD, USB flash drives, Pen drives, CF/SD cards, on both Windows and Mac computers.
Qiling Data Recovery is a powerful tool for recovering various types of data, including Word documents, from formatted hard drives, RAW partitions, lost partitions, and more. To recover a Word document using Qiling Data Recovery, follow these steps: 1. Download and install Qiling Data Recovery software, 2. Launch the software and select the drive or partition where the Word document was stored, 3.
Step 1. Select file types and click "Next" to start
Launch Deep Data Recovery software. Select the desired file types and click "Next" to begin the recovery process.

Step 2. Choose the Word file location
Select the drive or folder you want to scan and click the "Scan" button to initiate the process.

Step 3. Locate your Word files
The software will start scanning all lost data on the selected drive, and after the scan, you can select the "Documents" option in the left panel, then choose "Word" from the category bar, and finally click "Preview".

Step 4. Recover Word files
Preview the lost Word files, select the desired files, click "Recover", and choose a folder to save the recovered files.
Related Articles
- Files Missing from External Hard Drive but Still Taking Space
- Recover Deleted or Lost AppData Folder and Files in Windows 11, 10, 8, 7
- Microsoft Has Committed to Right to Repair, What Does It Mean?
- Folder Shows Empty but Files Are There Windows 10/8/7
- How to Fix Hitachi Hard Drive Not Working/Recognized
If your 1TB Hitachi hard drive is not working or detected in Windows 10/8/7, this post provides effective solutions to make it detected and recognized. To fix the issue, you can try various troubleshooting steps. If you've lost data on the Hitachi hard drive, you can download and run Qiling hard disk data recovery software to easily restore lost data with simple steps. - How Does An Excel File Get Corrupted? We Discussed Reasons and Fixes Here
Excel file corruption can occur due to various reasons, causing the inability to open a workbook. Common causes include file system errors, Excel add-in or plugin issues, and incorrect file format. If your Excel file is corrupted, you may be able to recover it in Windows 10 by using built-in tools such as System File Checker (SFC) or by reinstalling Excel. Additionally, third-party software like Excel repair tools or data recovery software can also help in recovering corrupted Excel files.