How to Fix Memory Card Locked Error Without Losing Data in 4 Ways
If your memory card gets locked, there is a solution. You can unlock it without losing any data by following one of the methods provided, which will guide you through the process to regain access to your memory card.
| Workable Solutions | Step-by-step Troubleshooting |
|---|---|
| Fix 1. Switch Card Lock | If the memory card has a plastic slider switch, switch if from "OFF" to "ON"...Full steps |
| Fix 2. Unlock with Password | On Android Phone, go to "Settings" > "Security & privacy" > ""More settings" > "Unlock SD card"...Full steps |
| Fix 3. Remove Write Protection | Use attributes disk clear readonly command or Qiling M Tool to remove the write protection...Full steps |
| Fix 4. Format Memory Card | Connect SD card to PC > Use File Explorer or Disk Management to format the card...Full steps |
| Bonus Tip. Recover Data | If you lost data, run Deep Data Recovery > Scan and recover lost SD data...Full steps |
Memory Card Locked
You're experiencing a "Memory card locked" issue with your Sony camera. To unlock the card without formatting or losing data, try the following: check if the card is properly inserted and the camera's mode is set to the right one. If that doesn't work, try ejecting and reinserting the card. If the issue persists, you can try using a different card reader or a computer to access the card. If none of these steps resolve the issue, you may need to consult the camera's manual or contact Sony support for further assistance.
Memory cards, including SD cards, Micro SD cards, and CF cards, are commonly used in digital cameras and Android phones. However, issues like "memory card not showing files on mobile" and "memory card locked" errors can occur. If your memory card is locked or write-protected, you won't be able to add new files or edit existing ones, which can be frustrating. To resolve this issue, you need to unlock the memory card to remove the "memory card locked" or "SD card locked" error and use it as usual.
4 Fixes for "Memory card locked" Error
If your SD card is locked, you can try to unlock it by using a computer or card reader and following the on-screen instructions. If that doesn't work, you can try formatting the SD card, which will erase all data, so make sure to back up any important files first. If you're still having trouble, contact the manufacturer or store where you purchased the SD card for assistance.
Method 1. Remove "Memory card locked" Error via Lock Switch
The small plastic slider switch on the left side of SD memory cards, including SDHC, SDXC, and Eye-Fi cards, serves to unlock or lock the device, preventing writing or erasing of files stored on the card. When in the 'up' position, the card is unlocked, writable, and can be erased, while a 'down' position locks the card, resulting in a "Memory card locked" error on cameras or Android phones.
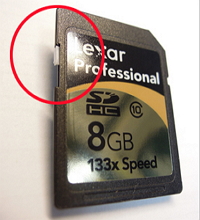
When you get a "Memory card locked" error message, check your SD card to see if the tiny locking slide switch on the side of it is in the "locked" downward position, which might have been accidentally placed there. This is the simplest step to unlock your memory card.
If the switch is missing or broken, you can use a toothpick or something similar to carefully toggle the switch to unlock your SD card. This can be a delicate process, so be cautious not to damage the card.
Method 2. Unlock SD Card with Password
If your Android phone's SD card is locked, you can remove the "SD card locked" error by entering the password you set. The process may vary slightly depending on your device and the file manager app you're using, but generally, you can access your SD card by going to Settings > Storage > SD card, then enter the password to unlock it.
Step 1. Open "Settings" on your Android phone.
Step 2. Go to "Security & privacy" > "More settings".
Step 3. Choose "Unlock SD card" and enter your password when needed.
Method 3. Remove Write Protection on the SD Card
Write protection on the SD card may also cause "SD card locked" error on your digital camera or mobile phone. Thus, removing write protection could be helpful in some cases. Here you can remove the "read-only" attribute using diskpart on computer.
Step 1. Connect your memory card into your computer via a card reader and run "Command Prompt" as an administrator.
Step 2. Enter diskpart and click "Yes" in the prompt asking for notification.
Step 3. Enter the following command in order:
list volume select volume X (Replace "X" with the number of your write-protected SD card.) attributes disk clear readonly
If you're not tech-savvy or comfortable using command lines, there are graphical-based solutions to help you remove write-protection from your hard drives, USB drives, and SD cards.
Qiling CleanGenius is a tool that helps fix issues on your drives, such as those caused by the Windows 10 October 2018 Update, without requiring any command-line knowledge.
Here's an easy-to-use tool. To get your issues sorted using this tool, follow these simple steps: first, identify the specific problem you're facing and what you hope to achieve by resolving it; next, consult the tool's user manual or online resources to understand how it works and what features are available; then, input the relevant information and follow the prompts to guide you through the process; finally, review the output and take any necessary actions to resolve the issue. By following this straightforward process, you'll be able to effectively use this tool to get your issues sorted and achieve your desired outcome.
Step 1: DOWNLOAD and install Qiling CleanGenius (free) on your computer.
Step 2: Run Qiling CleanGenius on your PC, select Optimization and choose the Write Protection mode.
Step 3: Select the device that is write-protected and click Disable to remove the protection.
Method 4. Format the Memory Card
If you've forgotten your password or the previous methods didn't work, you may need to format your SD card, which will erase all existing files. Note that recovering data from a formatted card is difficult.
How to Recover Lost Files from Locked Memory Card
If you've successfully removed the "memory card locked" error but still experience data loss on your device, you can use hard drive recovery software like Deep Data Recovery to recover the lost data. Additionally, while retrieving data erased by force unlocking the device can be challenging, the software can also scan for lost files.
To perform SD card data recovery:
Step 1. Connect the SD card, memory card, or CF Card to your computer and launch Qiling memory card recovery software. Select the desired file types and click "Next" to initiate the recovery process.

Step 2. To recover lost data from an SD card, locate the SD card under the Devices section and select it. Then, click the "Scan" button to initiate the data recovery process.

Step 3. The software will automatically start a scan, which is powerful enough to find all lost files, including those with lost file names. After the scanning process, you can find deleted items from the tree-view panel on the left, and then click "Filter" to look for a specific file type, such as photos, documents, videos, or emails.

Step 4. You can directly double-click the files to preview their content. After previewing, you can select the wanted files and click "Recover" to restore them to a secure location on your PC or other external storage devices.
The Bottom Line
To resolve the issue of an "SD card locked" with data loss, it's crucial to remember to regularly back up your data. This can be achieved by manually copying files to another location, utilizing free backup software, or syncing files to cloud storage. Taking proactive measures is essential to prevent data loss.
Related Articles
- Is Your SD Card Not Working Camera? Here Is Why and How to Fix It!
- Microsoft Partition Recovery Tool Free Download (2022): How to Get It and Apply
- Terraria Load Failed No Backup Found (Terraria Data Recovery)
- 2022 Aptio Setup Utility Ultimate Guide | How to Access and Fix It
- Free PST Recovery Software
When Outlook PST files become corrupted and won't open, free PST repair tools and PST file recovery software can help. If PST files were accidentally deleted, formatted, or missing, PST recovery software can be downloaded to restore lost Outlook emails immediately. - How to Recover Data from RAID 1 Disk with Raid 1 Recovery Software
This page provides RAID 1 recovery software to help you recover lost data from a RAID 1 drive due to formatting, deletion, RAW partition, or system crashes.