How to Automatically Delete Temp Files in Windows 7/8/10
Temp Files Are Taking Too Much Space! How to Auto-Delete Them
Windows often accumulates temporary files and other junk that take up space on the hard drive. To clean up this clutter, methods like Disk Cleanup and third-party utilities like CCleaner can be used, often resulting in the removal of the Temp folder's contents. However, keeping the Temp folder clean is also desirable.
You can automatically delete temporary files from various sources, including APPs, the recycle bin, and the download folder, by following these steps. To do this, you can use a combination of built-in Windows features and third-party tools to set up a regular cleaning schedule.
Method 1. Create a Batch File to Automatically Clean Temp Folder
To save space on your hard drive, you can create a batch file to automatically delete temp files, regardless of whether you're using Windows 7 or Windows 10. This can be done daily, especially if you shut down your PC every night, allowing you to safely delete temp files from the previous day during boot.
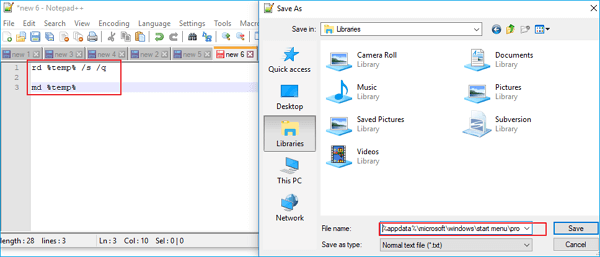
1. Open Notepad and type in the following:
rd %temp% /s /q
md %temp%
2. Now, save the file exactly as the path below:
%appdata%\microsoft\windows\start menu\programs\startup\cleantemp.bat
To create a batch file that runs a command at startup, navigate to the Startup folder, right-click, and select "New" > "Text Document". Name the file with a .bat extension, such as "cleantemp.bat".
After creating the batch file, you can reboot your PC and open the Temp folder, where you'll notice a significant reduction in the number of files compared to before.
Method 2. Automatically Delete Temp Files in Windows 10
With the Windows 10 Fall Creators Update, Microsoft introduced an option to automatically delete files from the Downloads folder or temp files that are no longer in use, after 30 days. This option, which is turned off by default, can be enabled to free up storage space by deleting unchanged files and temp files from the Downloads folder or Recycle Bin.
- Notice:
- While Windows 10's feature to automatically delete unused files can be convenient, it's worth noting that it will delete all types of files, including important ones, if they haven't been accessed in 30 days, potentially leading to lost files. Users who save important files in the Downloads folder or Recycle Bin may want to consider alternative storage options.
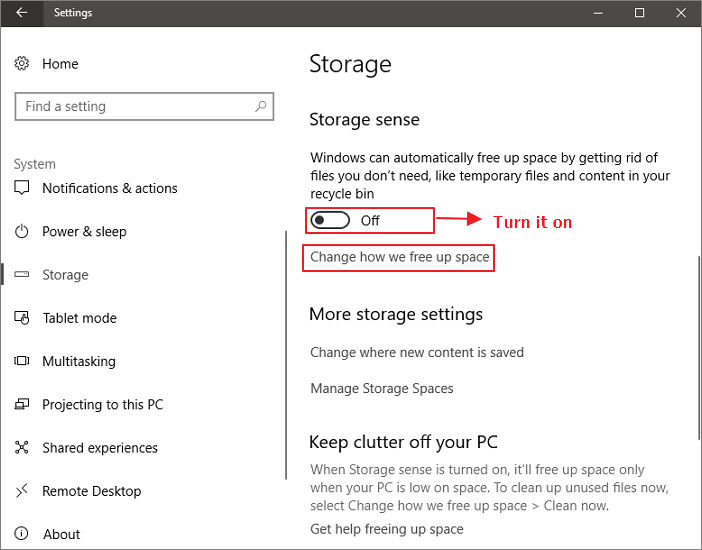
Step 1. Open Settings app. Navigate to System > Storage.
Step 2. To turn on Storage sense, move the slider to the right. This feature helps manage storage space by automatically deleting temporary files and freeing up space on your device.
Step 3. To free up space, click the "Change how we free up space" link, ensuring that Storage sense is turned on as mentioned in the first step.
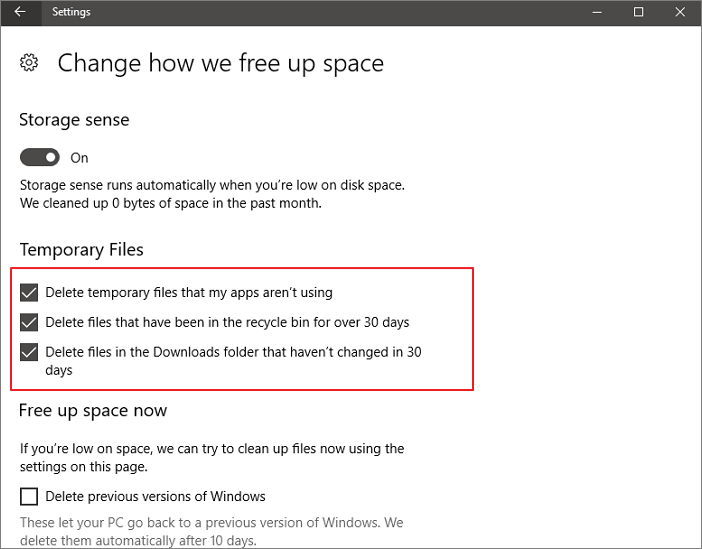
Step 4. To turn on the "Delete temporary files that my apps aren't using" option, go to Settings > Storage > Internal Storage, then toggle the switch next to "Delete temporary files that my apps aren't using" to the On position. This will allow your device to automatically delete temporary files that are not being used by any apps, which can help free up storage space.
The Disk Cleanup tool on Windows 10 can automatically delete temporary files and other files that are no longer needed, freeing up disk space. To enable this feature, go to Settings > System > Storage > This PC, and toggle on the switch next to "Delete temporary files that my apps don't need". This will allow Windows 10 to automatically delete files that are no longer needed, keeping your computer running smoothly and freeing up disk space.
Extra Tips: Recover Important Temp Files
If you accidentally delete important files on your Windows 10/8/7, you can still recover them using a file recovery software from Qiling, which allows you to restore up to 2GB files for free. You can download it and easily recover deleted files.
Step 1. Select file types and click "Next" to start
Launch Deep Data Recovery software, select the desired file types, and click "Next" to initiate the recovery process.

Step 2. Select a location and start scanning
Launch Deep Data Recovery, hover on the partition/drive where the deleted files were stored. Click "Scan" to find lost files.

Step 3. Select the files you want to recover
After the scanning process is complete, select the deleted files you want to recover. You can filter the results to only show certain file types, or search for a specific file name in the "Search files or folders" box, which can be the quickest way to find the target file.

Step 4. Preview and recover deleted files
Preview the recoverable files, select the desired files, and click "Recover" to save them to a new location, bypassing the original disk where data was lost.
Related Articles
- [Solved] Cannot Connect to Camera Please Make Sure to Close Other Apps
- 3-Step Solution to Recover Deleted Picasa Photos with Ease
- How to Recover Lost Data after Disk MBR to GPT Conversion
- Fix 'Photos Cannot Preview or Open' Error in Windows 10/8/7
- Reliable Ways to Fix i saved a word document and can't find it Issue
Have you encountered the frustrating issue of being unable to find a Word document you saved? This situation often occurs when you forget where the files are stored, documents aren't saved correctly, or Word files get lost or deleted. Don't worry, we have several methods to help you handle this issue and recover your lost Word file. - [Solved] IDM File Has Been Moved
Internet Download Manager says The file has been moved when you download a large file. How to solve this? Read this article to know the solutions, and restore the moved files from IDM with ease.