How Do I Use Unallocated Free Space in Disk Management | 2022 Windows Tutorial
This page provides an overview of unallocated space on storage devices in Windows Disk Management. Unallocated space refers to free space on a storage device that is not assigned to a specific partition or volume. In Disk Management, you can see unallocated space on your storage devices and learn what you can do with it, such as creating a new partition or volume, formatting it, or extending an existing partition.
What Is Unallocated Space | Unallocated Space Definition?
Unallocated space is a portion of a storage device that is not assigned to any file system or partition, making it available for use by the operating system or for creating new partitions or files.
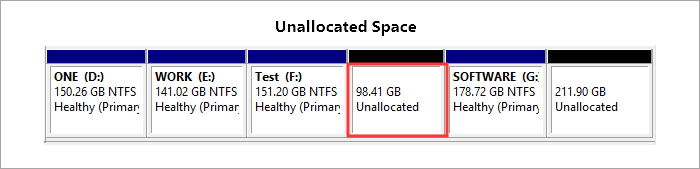
The unallocated space is a portion of a storage space that hasn't been allocated to any partitions, allowing it to be easily viewed in Disk Management.
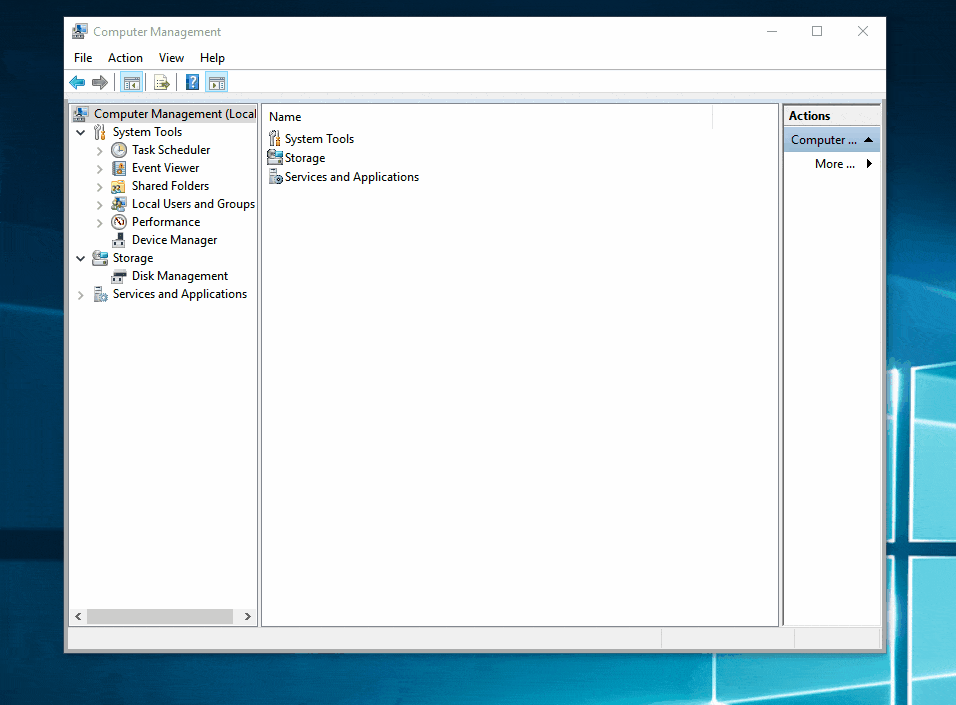
Step 1. To open Disk Management, right-click the Windows icon and select "Disk Management".
Step 2. Once disk management opens, you can view the unallocated space existing on your drives.
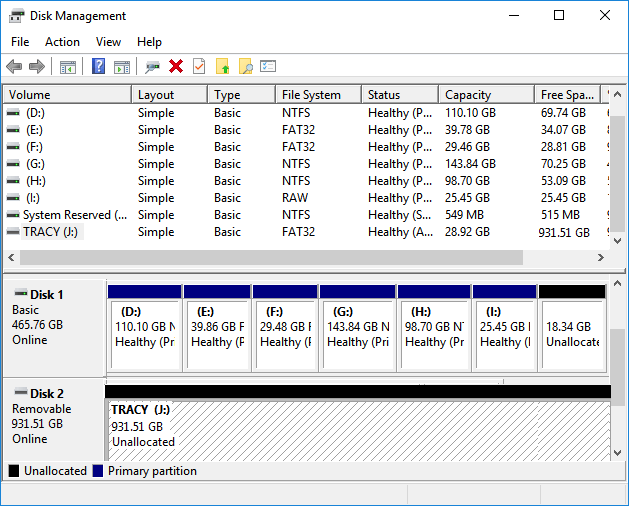
The unallocated space exists on various storage devices, including hard drives, SSDs, external HDDs/SSDs, USB flash drives, SD cards, etc. This space can be utilized, and its use will be discussed in the following parts.
What Can I Do with Unallocated Space in Disk Management [Pros & Benefits]
Having unallocated space on your storage devices leaves many possibilities on Windows computers and external storage devices.
Leaving enough unallocated space on a hard drive, particularly on the OS disk, has several benefits. It allows for future expansion and flexibility, as you can install new software or update existing ones without having to worry about running out of space.
- Unallocated space allows users to create new simple volumes in Disk Management, enabling them to store files on their hard drives, SSD, and external drives.
- Unallocated space allows for flexible extension of volumes when facing low disk space errors, enabling users to make the most of available storage capacity.
- Unallocated space can be a lifesaver for your computer, helping to extend the C drive and resolve slow performance issues instantly. By freeing up space, you can breathe new life into your computer, making it run more smoothly and efficiently.
Using unallocated disk drives offers several benefits, including the ability to install Windows or macOS on a computer. To do this, you'll need to delete all partitions on a drive and make the whole disk unallocated, allowing you to install an operating system directly onto the drive.
To utilize the unallocated drive or unallocated space in a storage device, you can refer to the next part of the guide, which will provide a complete walkthrough on how to use unallocated free space in Disk Management on Windows.
How to Use Unallocated Free Space in Disk Management
There are two major things that you can do with the unallocated free on your disk in Disk Management:
- 1. To create new simple volumes or partition a new hard drive/SSD.
- 2. To extend partitions that are adjacent or non-adjacent.
To use the unallocated space on your drive, you'll need to follow these steps:
#1. Create New Simple Volume or Partition Hard Drive/SSDs
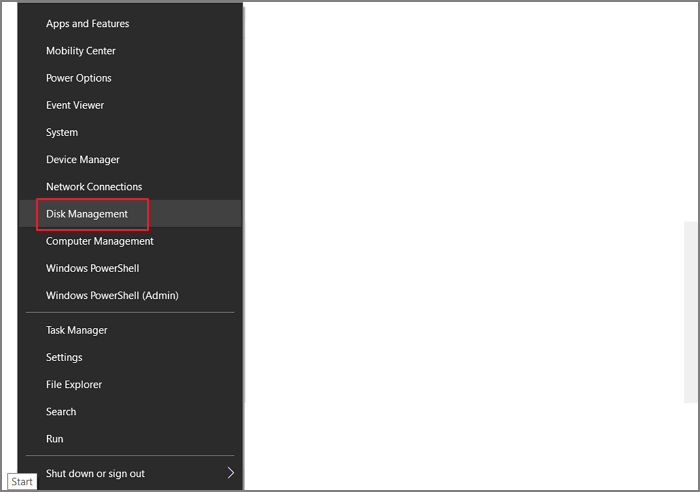
Step 1. Right-click the Windows icon, and select "Disk Management" from the list.
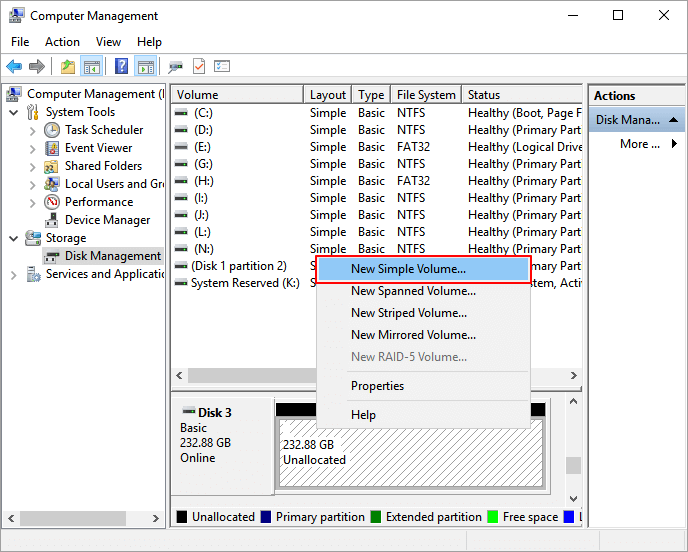
Step 2. Right-click on the unallocated space on your disk and select "New Simple Volume..." from the context menu.
Step 3.To set up the new simple volume, adjust its size, format the file system, and assign a drive letter. Click "Next" each time to proceed.
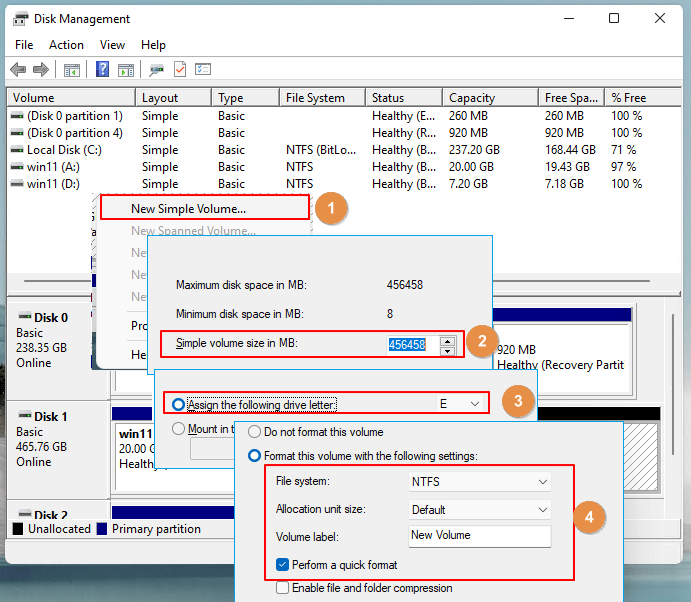
Step 4. Click "Finish" when everything is done.
If your drive is brand new and the whole disk is unallocated space, you can create multiple partitions by repeating the process.
-
The MBR disk has a limitation of creating 3 primary partitions and 1 extended volume, allowing for multiple logical partitions within the extended volume.
The GPT (GUID Partition Table) disk is not limited to partition numbers, allowing for the creation of multiple primary or local partitions.
- Notice:
#2. Extend an Adjacent/Neighbor Partition or Add Unallocated Space to C Drive
When there's unallocated space next to the partition you want to extend, you can directly add that free space to the volume.
The unallocated space must be adjacent to the target volume, either preceding or succeeding the drive.
To add unallocated space to C drive, first, you need to open the Disk Management tool. Then, you can right-click on the unallocated space and select "New Simple Volume" to create a new drive.
Step 1.To open Disk Management, right-click the Windows icon and select "Disk Management" from the list.
Step 2. To extend the volume, right-click on the C drive or target volume and select "Extend Volume...".
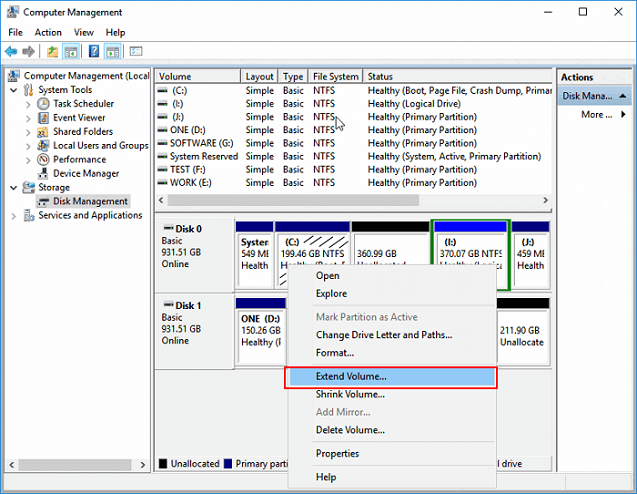
Step 3. Select the unallocated space, and click "Next" to continue.
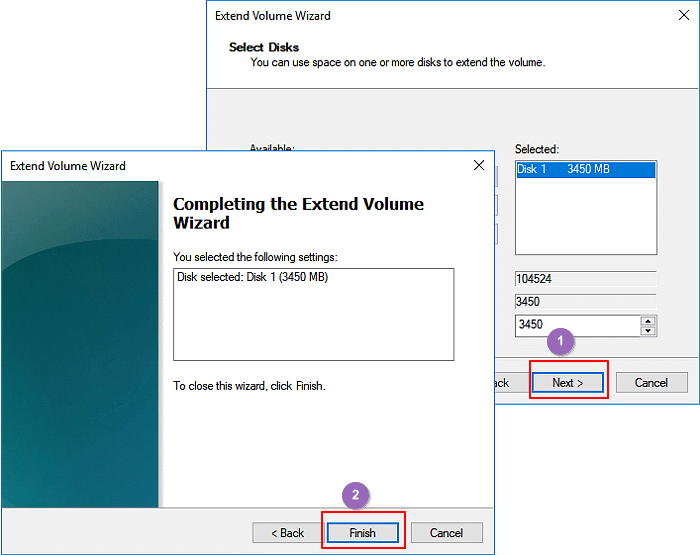
Step 4. Click "Finish".
#3. Allocate Unallocated Space to Extend a Non-adjacent Partition
When your hard drive contains unallocated space that's not next to your target volume, you'll need a professional partition manager software to help you move the unallocated space first, as Disk Management is unable to execute this task.
Qiling Partition Master can help you move the unallocated space to a new location on your PC. You need to install it and apply it to the unallocated space to move it to a new location.
Here is how to do so:
1. Move Unallocated Space Next to The Target Partition
Step 1. To free up space, click the partition next to the unallocated space, select "Resize/Move".
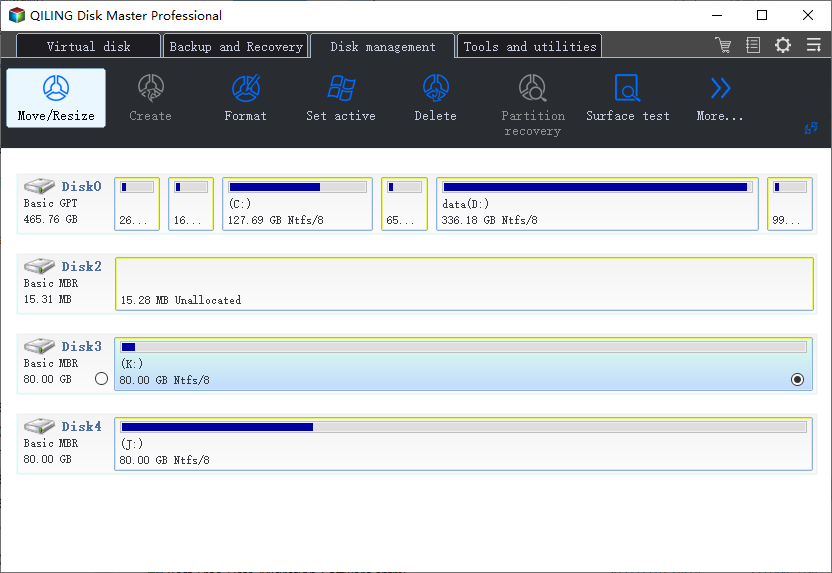
Step 2. To move the unallocated space, place the mouse cursor on the partition, then drag it to the left or right. This action will adjust the partition's size, freeing up space on the other side.

You can repeat Step 1 and 2 to move the unallocated space to the desired location.
Step 3. To proceed, click the "Proceed" button. This will initiate the process of adding the unallocated space to the target partition, which may involve executing operations to merge the free space into the selected partition.
2. Extend Partition with Unallocated Space
Step 1. Open Disk Management, and right-click the target volume.
Step 2. Select "Extend Volume..." and click "Next" to continue.
Step 3. Click "Finish" when the extending partition process completes.
Using Qiling partition manager software and disk management, you can extend a non-adjacent partition with unallocated space by following a series of steps: resizing the non-adjacent partition, allocating the unallocated space, and then merging the two partitions. Once this process is complete, you have successfully extended the non-adjacent partition with unallocated space using the software.
Unallocated Space Troubleshooting: Fix Unallocated Space Problems on Windows
In Disk Management, issues with unallocated space on hard drives and storage devices can occur, causing problems with data storage and management. This can be due to various reasons such as disk formatting, partitioning, or deletion errors.
Here we'll list 3 top concerned problems and show you the complete guide here to help you fix these errors effectively. Let's go.
1. Can't Extend C Drive with Unallocated Space on Windows 10
You may encounter issues extending the C drive using Disk Management, and upon checking, you may find that your disk has one or more of the following cases: the disk is not a basic disk, the disk is not a dynamic disk, the disk does not have enough free space, or the disk is not a system disk.
If you're running out of space on your C drive, you can extend it by following the respective method. To do this, you'll need to identify the drive letter that's not in use and assign it to your C drive.
1.1 Unallocated Space is Not Next to the System C Drive
If the unallocated space on your computer is not next to your C drive, you can use Qiling Partition Master to move the unallocated space after the C drive first, then proceed with the steps shown in Method 3.
To extend the C drive and add unallocated space to it, you can use the Disk Management tool. First, open the Disk Management tool, select the C drive, and click on the "Extend" button to add unallocated space to it.
1.2 There Is No Unallocated Space Left on the OS Disk
If the Windows disk doesn't have unallocated space, you can either extend the partition, which will allow you to create a new volume, or you can add a new disk to your system, which will provide additional storage space.
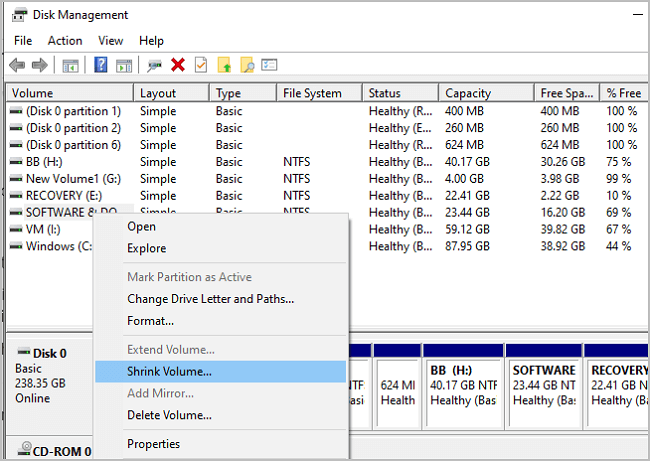
#1. Shrink a Neighbor Volume and Extend C Drive
When the partition next to C drive has enough free space, you can shrink it and then add the unallocated space to C drive. To do this, you'll need to use a partition manager like Disk Management (built-in to Windows) or a third-party tool like Qiling Partition Master.
- Open Disk Management, right-click the partition after C drive and select "Shrink Volume...".
- To free up space on the C drive, select the unallocated space you want to make for it and click "Shrink".
- Right-Click on the "C:" drive and select the option to "Extend Volume..." from the context menu. Then, click "Next" to proceed with the volume extension process.
- Then, click "Finish" to complete the process.
#2. Allocate Space from Other Drive to C Drive
When there's not enough space in the partition next to the system C drive, Qiling Partition Master can be used to allocate free space from other existing partitions to the C drive.
See how to do so with the guide here:
Step 1. To resize the D: partition, click on the D: partition with sufficient free space and select the "Resize/Move" option.
Step 2. Move the D partition panel to the left to shrink it and free up space, then click Proceed to confirm the change.
Step 3. Select the target partition - C: drive and select "Resize/Move".
Step 4. Drag the C: partition panel rightward to add the free space from D: drive to C: drive. Then click "Proceed" to start the process of moving free space from D: drive to C: drive.
2. What Do I Do If There Is Not Enough Unallocated Space on Target Disk
If your data disk doesn't have enough free space, you can convert it and another disk into dynamic disks, then merge their spaces into one.
To extend your current disk space into a second disk, you can follow these steps: First, you'll need to connect the new disk to your computer and ensure it's properly recognized by the system. Next, you'll need to partition and format the new disk, which provides it a file system and make it accessible to your computer. Once the new disk is set up, you can use the built-in disk management tools or third-party software to expand your current disk space into the new disk.
Step 1. To convert a disk to a dynamic disk, open Disk Management, right-click the source disk, and select "Convert to Dynamic Disk...".
Step 2. Select the disks you want to convert to Dynamic.
Here you can select both the source and target disks and click "OK".
Step 3. Then click "Convert" to start converting both two disks into Dynamic. And click "Yes" to confirm.
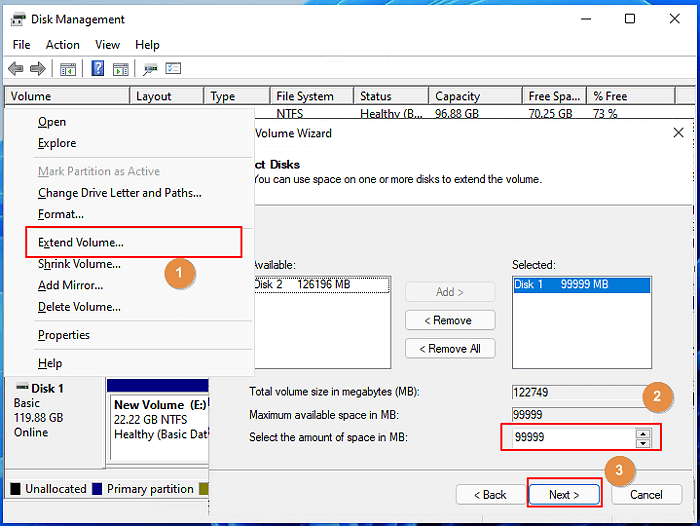
Step 4. Right-click the partition that needs to be extended, and then select "Extend Volume...".
Step 5. Then select the target disk, select "Add", and click "Next".
Step 6. Last, click "Finish".
This feature will allow you to utilize unallocated disk space across multiple disks, effectively increasing your storage capacity.
3. Disk 0, Disk 1 Unknown, Not Initialized, Unallocated, What Do I Do
When a brand-new disk is connected to a computer, it often shows up as "unknown," "not initialized," or "unallocated" in the Disk Management console or Disk Utility. This is because the disk has not been formatted or initialized yet, and no partition table has been created.
To fully utilize your disk space, you can use the Disk Management tool to initialize the disk and create partitions from the unallocated space, effectively removing it from its unknown, uninitialized, and unallocated state.
Here is how to do so:
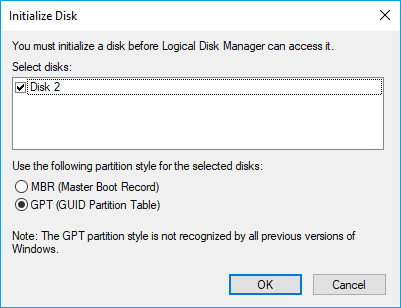
To initialize a disk, open Disk Management, right-click the disk, and select "Initialize Disk".
Set a disk partition type for the drive, either MBR for disks smaller than 2TB or GPT for larger disks.
Third, right-To create new simple volumes on your disk, click on the unallocated space in Disk Management, which will then allow you to assign a drive letter to the new volume. This process is similar to creating a new partition.
Conclusion
Unallocated space is the free and unused physical storage space on a hard drive, SSD, USB, or SD card, allowing for the creation of volumes, partition extension, and even setting up a new hard drive for Windows installation or disk upgrade.
When you find unallocated space on your disk, don't panic. You can make full use of unallocated space with provided solutions on this page in Disk Management.
Related Articles
- Getting Windows 11 Boot Loop? Troubleshoot This Error Now - Qiling
- Computer Slow to Play Games? How Do I Upgrade Gaming PC? [Beginners Guide]
- Fix Windows 11 Update Stuck at 0%, 100% on Your Own - Qiling
- Step-By-Step Guide: How to Install Windows 11 on a GPT Partition
- Windows 10/8/7: How to Shrink Volume Using Diskpart Command Line?
Learn how to use DiskPart to shrink volume from in command line prompt with the syntax in Windows 11/10/8/7. But sometimes, it may tell you there is an error. Fortunately, Qiling Disk Master can fix it. - Solved - "Virtual Disk Service Error: The Volume Size Is Too Big"
Received the virtual disk service error: the volume size is too big when formatting a hard drive beyond 32 GB using Diskpart? Here comes the best solution.