How to Remove Write Protection and Format Write Protected SSD [6+ Fixes]
If you're unable to format an SSD or it's displayed as read-only in Windows 10, it's likely due to write protection. This can be caused by various factors such as a hardware issue, a software glitch, or a physical write protection switch. To resolve this, you can try running a disk check, checking for BIOS settings, or using a third-party tool to remove the write protection. If none of these solutions work, it may be necessary to contact the manufacturer or a professional for further assistance.
| Workable Solutions | Step-by-step Troubleshooting |
|---|---|
| Fix 1. Manually Unlock Write-Protected SSD with Password | Step 1: Run the write-protection software; Step 2: Select to remove write protection from SSD...Full steps |
| To unlock a write-protected SSD, you can try running the built-in Check Disk (chkdsk) command in Windows or the fsck command in Linux to repair bad sectors and file system errors. This can help restore the SSD's write capabilities. Additionally, you can try running a disk check using the built-in disk checking tool in Windows or the diskutil command in macOS to identify and repair any errors on the SSD. | Step 1: Open Qiling Partition Master on your computer. Then, locate the disk, right-click the partition you want to check...Full steps |
| Fix 3. Remove Write Protection from SSD using CMD | Step 1: Type cmd in Windows search, right-click on Command Prompt and select "Run as administrator"...Full steps |
| Fix 4. Run CMD Alternative - Write-Protection Removal Tool | Step 1: DOWNLOAD and install Qiling CleanGenius (free) on your computer...Full steps |
| Fix 5. Remove SSD Write Protection using Registry | Step 1: To edit the Windows Registry, first type "Regedit" in the Windows search box and hit Enter to open the Registry. Then, navigate to the specific section you want to edit.Full steps |
| Fix 6. Clean Up Virus to Remove SSD Write-Protection | Step 1: Download and install antivirus software on your PC; Step 2: Scan the SSD and confirm...Full steps |
Fixes on this page can also be applied to fix and remove write protection from hard drives on Windows PC, and can also be used to help with a write-protected USB.
Can't Format SSD Which Is Write-Protected, Help
You got a new Samsung 840 Evo SSD, but Windows can't format it because it's write-protected. This is likely due to the SSD being in a secure erase mode or having a firmware issue. You may need to reset the SSD to its factory settings or update its firmware to resolve the issue. Can I help you with any further troubleshooting steps?
"You've discovered that removing write protection is a prerequisite to formatting your SSD. Unfortunately, there's limited information on how to do this for SSDs. Would you like some guidance on how to proceed?"
When an SSD is write-protected, it cannot be accessed or have any operations performed on it, including formatting, due to the lock imposed by write protection.
the SSD is not permanently damaged. In the following, you'll learn why the SSD is write-protected, how to remove the protection, and some tips to prevent it from being write-protected again.
Causes - Why Is SSD Write Protected
Write protection is a mechanism that prevents data and files from being deleted, formatted, or removed from storage devices, such as SSDs, hard drives, and USBs, to safeguard against unauthorized modifications.
However, "The disk is write-One of the top concerns for both hard drive and SSD users is the issue of being "write-protected". When a storage device is in this state, it cannot be accessed or opened, making it impossible to use.
If you see one of the following symptoms, it means that your SSD locked by write protection: the drive is not showing up in the BIOS or UEFI settings, it's not showing up in the operating system, or it's showing up but not allowing any writes to be made to it.
Symptom 1.You can't open the SSD and Windows says "The disk is write-protected. Remove the write-protection or use another disk."
Symptom 2.The SSD is stuck in read-only mode in Disk Management, which means it cannot be formatted or modified. This could be due to a corrupted system file, a firmware issue, or a hardware problem.
Adding write protection to an SSD can be done manually for data security, but sometimes a disk may become write-protected due to other reasons.
Your SSD (Solid-State Drive) may become write-protected due to various reasons. One possible cause is a hardware issue, such as a faulty SSD controller or a malfunctioning USB interface, which can prevent the drive from being written to.
- A virus or malware infection that adds write protection to an SSD (solid-state drive) can render the drive inaccessible, making it impossible to install new software, update existing programs, or even save changes to files. This can effectively "brick" the drive, leaving the user with a non-functional storage device.
- Bad sectors on SSD make the drive write-protected.
- You manually add write protection to SSD.
- Third-party software adds write protection to SSD.
Solutions - 6 Fixes to Remove Write Protection from SSD
If you're wondering how to remove write protection from your SSD, you're not alone. Fortunately, we've identified the common causes and have a solution for you. Based on these known causes, we've collected 6 practical fixes with detailed tutorials that can help your SSD work normally again.
- #1. Manually Unlock Write-Protected SSD with Password
- #2. Repair Bad Sectors and File System Errors to Unlock Write-Protected SSD
- #3. Remove Write Protection from SSD using CMD
- #4. Run CMD Alternative - Write-Protection Removal Tool
- #5. Remove SSD Write Protection using Registry
- #6. Clean Up Virus to Remove SSD Write-Protection
If your SSD is write-protected, you can unlock it on your own by following these steps. First, ensure your computer is set to boot from the SSD.
Fix 1. Manually Unlock Write-Protected SSD with Password
If you've manually locked or encrypted your SSD with a password, you can remove the write protection from SSD on your own.
If the SSD is locked by third-To unlock a write-protected party software or application, run the software and enter the correct password. This will remove the write protection, allowing you to make changes or edits to the software or application.
Step 1. Run the write-protection software.
Step 2. Select to remove write protection from SSD.
Step 3. Type your password if necessary.
Fix 2. Repair Bad Sectors and File System Errors to Unlock Write-Protected SSD
If your SSD is locked or write-protected due to bad sectors or unknown file system errors, the best solution is to repair the bad sectors and fix the file system errors on the SSD. This will help restore normal functionality and prevent further issues.
An all-To fix software bad sector and repair file system errors on an SSD, one resolution is to turn to Qiling Partition Master for help. You can easily run its Check File System feature to repair software bad sector and repair file system errors on SSD at one time.
Step 1. Open Qiling Partition Master, locate the disk, right-click the partition you want to check, and choose "Advanced" > "Check File System" to check the partition.
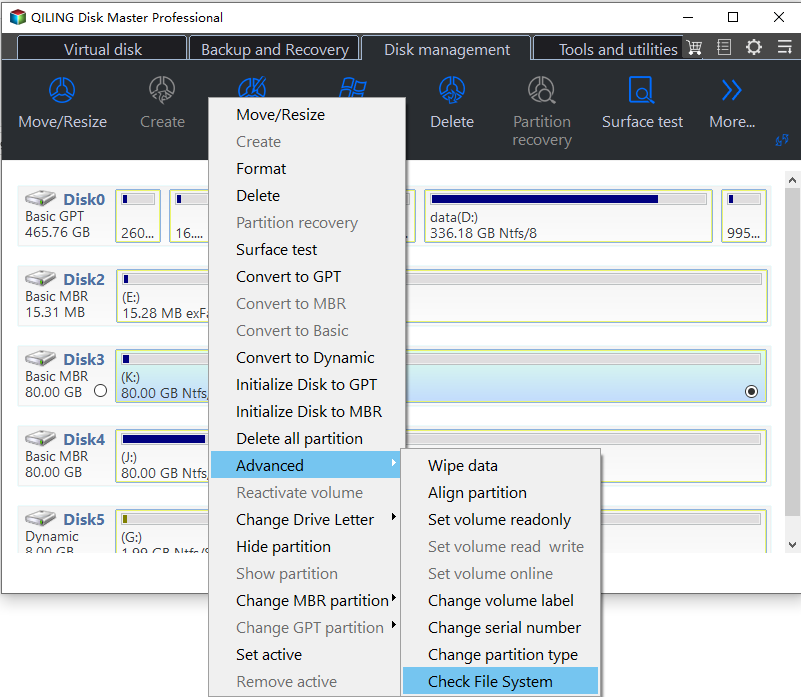
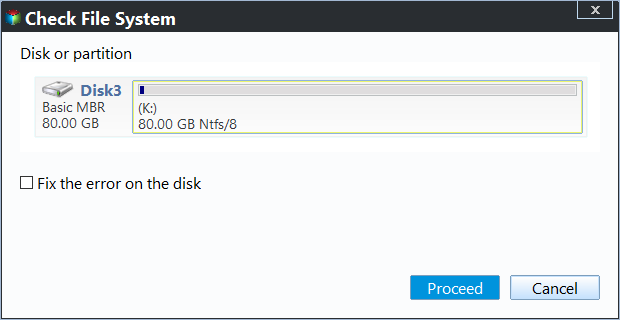
Step 2. In the Check File System window, select the "Fix the error on the disk" option and click "Proceed" to start checking your partition's file system on the disk.
Fix 3. Remove Write Protection from SSD using CMD
If your SSD is write-To unlock a protected, read-only disk in Disk Management, run the command "bcdboot C:\Windows /s C:" in Command Prompt, then restart your computer. This will allow you to access and manage the disk.
Step 1.To run Command Prompt as an administrator in Windows, simply type "cmd" in the Windows search bar, right-click on the Command Prompt result, and select "Run as administrator".
Step 2.Typediskpart and hit Enter.
Step 3.Type the following command and hit Enter each time:
- list disk
- select disk # (# is the number of the write-protected SSD)
- attributes disk clear read-only
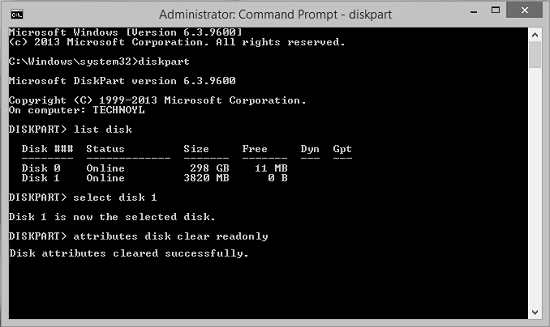
Step 4.When Diskpart tells that attributes cleared successfully, type exit and hit Enter to close the window.
Fix 4. Run CMD Alternative - Write-Protection Removal Tool
If you're not tech-savvy, ! There are graphical-based solutions to help you remove write-protection from your hard drives, USB drives, and even SD cards, making it easy to access and use them without needing to navigate through command lines.
Qiling CleanGenius is a tool that helps fix issues on drives without requiring command-line knowledge.
Here's an easy-Here's a one-paragraph guide on how to use this tool:
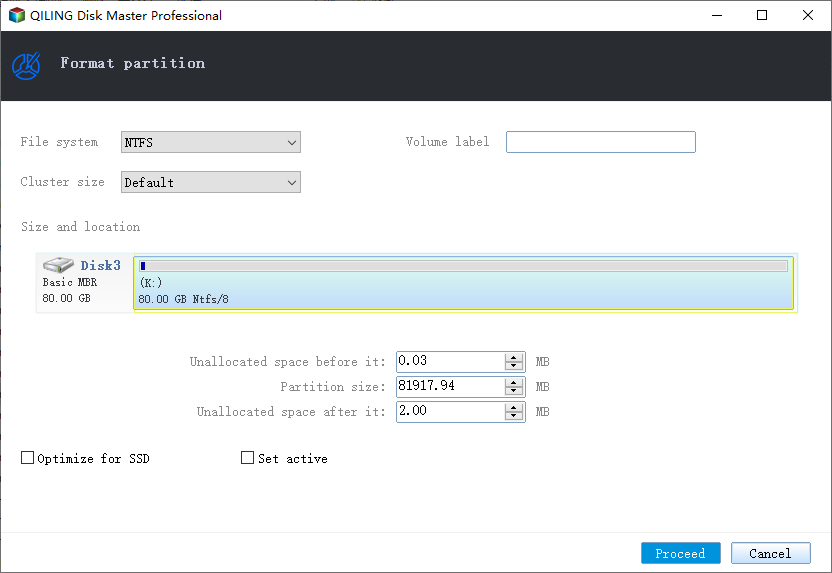
Step 1. Launch Qiling Partition Master, click the partition you intend to format and choose "Format" in "Disk management" page.
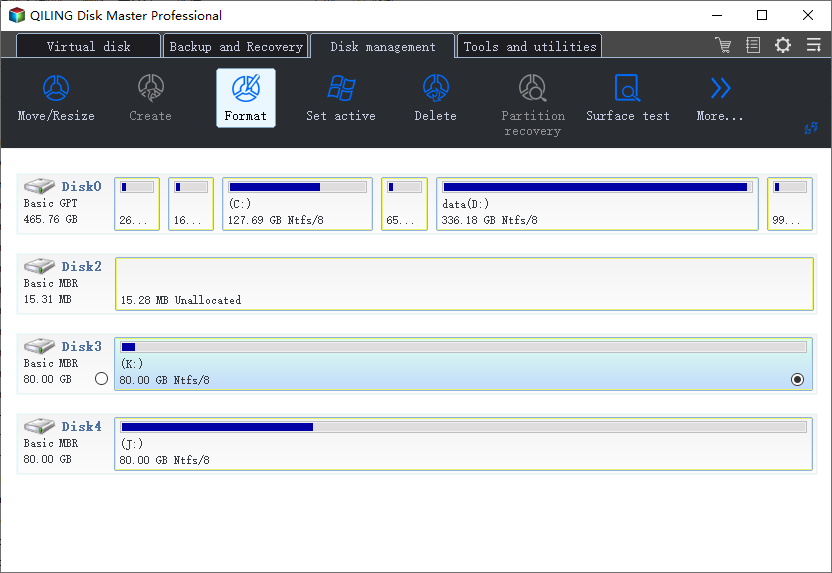
Step 2. In the next window, set the Partition label, File system, and Cluster size for the partition, then click "Proceed".
Fix 5. Remove SSD Write Protection using Registry
Another practical trick that you can try is to change the Registry WriteProtect WORD, which will also help you unlock the SSD from write protection:
Step 1. To open the Registry, simply type "Regedit" in the Windows search box and hit Enter.
Step 2. Navigate to: Computer\HKEY_LOCAL_MACHINE\SYSTEM\CurrentControlSet\Control\StorageDevicePolicies.
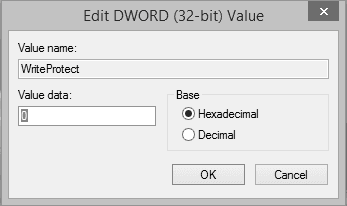
Step 3. To disable write protection, find and double-click on the "WriteProtect value" in the right-hand pane.
Change the Value data from 1 to 0, then click "OK" to save the change.
Step 4. Close Registry and restart your computer.
After this, you can retry to open the SSD and check your data again.
Fix 6. Clean Up Virus to Remove SSD Write-Protection
If your SSD is write-protected, it's possible that a virus or malware has taken control of your storage device, preventing you from modifying saved data and files. To resolve this issue, we recommend running antivirus software to scan and clean up any viruses or malware from your computer. This should help restore write protection and allow you to access and modify your files as needed.
Step 1. Download and install antivirus software on your PC.
To protect your computer from malware and viruses, you can run Windows Defender, a built-in antivirus software, or use third-party antivirus software like Noton AntiVirus, Kaspersky Anti-Virus, ESET NOD32 Antivirus, etc.
Step 2. Run a full scan on the SSD to identify and remove any detected viruses, malware, or suspicious files that may be present.
Step 3. Restart PC.
Important - Format SSD after Removing Write Protection
After removing write protection from an SSD using CMD or Regedit, it's recommended to format the SSD. This process will erase all data on the drive, so it's essential to back up any important files to a safe location first. By doing so, you can ensure that your valuable data is preserved and not lost due to the formatting process.
Qiling Partition Master can help you format any internal or external hard drive storage in Windows operating systems with ease.
Formatting can help fix inaccessible issues on an SSD disk, and requires no technical skills or formatting experience. It can also be used to format a RAW SSD.
Step 1. Right-click the hard drive partition and choose the "Format" option.
Step 2. In the new window, set the partition label, file system, and cluster size for the partition.
Step 4. Click the "Proceed" button to start the hard drive partition formatting process. This will erase all data on the selected partition.
Step 3. You can see a warning window, click "Yes" to continue.
Conclusion
SSDs (Solid State Drives) are widely used by gamers, administrators, and individuals as a game drive or new OS disk to optimize their computer's performance. However, if your SSD, HDD, external hard drive, or USB is write-protected in Windows PC,
This page explores the reasons behind SSDs becoming write-protected, as well as six practical solutions to remove write protection from SSDs, using an SSD as a case study.
After removing the write protection, use a reliable formatting tool like Qiling Partition Master to format the SSD with the file system set back to NTFS.
FAQs About Write Protection Removal
Adding write protection to a storage device helps safeguard data, but it can also cause inconvenience when trying to access or format the device.
Removing write protection from an SSD and formatting it for a new storage can be a challenging task for ordinary users. However, the steps outlined above provide a solution to this problem, making it possible for users to overcome the write protection and prepare the SSD for a fresh start.
If you have furthers related the write protection removal, check out the FAQS and find your answers:
1. How do I format a write-protected SSD?
To format a write-To remove write protection from a protected SSD, you will first need to use a write protection removal tool, which can be obtained from the manufacturer or a third-party supplier. This tool will allow you to disable the write protection feature, making it possible to access and modify the SSD's contents.
- To remove write protection from a USB drive, you can try using DiskPart, Registry, or CleanGenius.
- Then, run a virus cleaner to clean up the disk.
- To safely format an SSD, you can run Windows File Explorer, Disk Management, or Qiling Partition Master, which will guide you through the process with ease.
2. To protect your SSD, HDD, and external hard drive from write protection, it's essential to ensure they are properly connected and configured. For SSD and HDD, make sure they are securely attached to the motherboard or a compatible enclosure, and that the power and data cables are firmly connected.
To protect your storage devices and data, consider implementing write protection measures. This can be done by using a write-protected USB drive or external hard drive, or by setting up a write-protected folder on your computer.
- #1. Run virus cleaner software regularly
- #2. Back up vital data to another location
- #3. Don't use any third-party encryption tool or software
- If you tend to encrypt the storage device, it's a good idea to save the password so you can easily access your encrypted data in the future. This way, you won't have to remember the password every time you need to access your encrypted files or devices. Just make sure to store the password securely, such as in a password manager or a safe place, to prevent unauthorized access.
3. What do I do if SSD stuck in read-only mode?
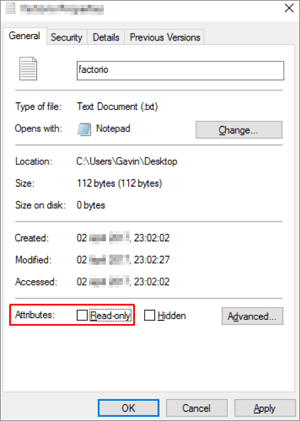
There are two ways to fix the issue of a file being read-only on an SSD. One solution is to remove the file's read-only attribute, which can be done by right-clicking on the file, selecting "Properties", and then unchecking the "Read-only" box. Alternatively, you can also try using the command line to remove the read-only attribute using the `attrib` command.
Step 1. Right-click on the Read-only file on SSD and select "Properties".
Step 2. To make the file editable, go to the General tab, uncheck the "Read-only" box, and then click "Apply" to save the changes.
To clear the read-only state on an SSD, you can run the command "chkdsk /f" in the Command Prompt (CMD) to check and fix any disk errors, and then set the SSD to read-write mode using the command "fsutil behavior set disabledeletenotify 0" and "fsutil behavior set disablebackupvalidate 0". This process can help resolve issues related to the SSD's read-only state.
Step 1. Run CMD as administrator
Step 2. Type diskpart.exe
Step 3. Type list disk
Step 4. Type select disk + number
Step 5. Type attributes disk clear readonly
After the data recovery, you can format the SSD and reset its file system to NTFS. Then, you can save the recovered files to the disk again.
Related Articles
- Can I Check and Optimize SSD Performance in Windows 11? Yes, Sure
- RAID 0 vs RAID 1, Comparison and How-to Setup Guide [2022 New]
- Fixed: The Disk Is Write Protected Windows 11
- How Do I Reset Hard Drive on My Own? Here Is the Complete Guide
- Why Is Hogwarts Legacy Not Downloading on My PC? [Causes and How-To Fix]
Is your computer not downloading the latest Harry Potter game - Hogwarts Legacy? On this page, we'll guide you to efficiently find out the causes of why Hogwarts Legacy is not downloading or stuck on unpacking, and fix this issue to download and install this game on your PC successfully. - Full Guide to Check How Much Disk Space Do I Have in 2024
Users of Windows PCs can use this page to find out how much disk space do I have. Discover five practical strategies that solve this question by following this tutorial.