How to Fix 3DS Could Not Detect SD Card in 6 Ways
As a game user, you might have encountered a situation that you are unable to start a game because your SD card cannot be detected or read by 3DS. Just like the following case:
"When I open my 3DS XL, it displays a message saying "Could not detect SD CardThe error "The software on the SD Card could not be displayed" is likely due to a compatibility issue or corrupted data on the SD card. To fix this, try the following: 1. Eject the SD card from your device, then safely remove it. 2.?"
6 Ways to Fix 3DS Could Not Detect SD Card
If your 3DS is unable to detect the SD card, don't worry, as there are several practical solutions to fix the issue. Firstly, try restarting your 3DS console, as this simple step can often resolve the problem.
| Workable Solutions | Step-by-step Troubleshooting |
|---|---|
| 1. Change 3DS SD Card Reader | Unscrew the two 3mm Phillips #0 head screws along the top edge of the device...Full steps |
| 2. Update 3DS SD Card Driver | Insert your memory SD card to a card reader and connect it to your PC...Full steps |
| 3. Run CHKDSK | Press Windows Key + X button to bring up the power users menu...Full steps |
| 4. Run CHKDSK Alternative | Click "File Showing" to enter the next step. Choose the target device and tick the box of "Check and fix file system error"...Full steps |
| 5. Reformat 3DS SD Card | Find your SD card and right-click the partition you want to format and choose "Format"...Full steps |
| 6. Replace old 3DS SD Card | Buy a new 3DS SD card. Connect the old SD card to your PC. Copy the data to your new SD card...Full steps |
Fix 1. Change 3DS SD Card Reader to Make it Detected
If your device doesn't read or detect the 3DS SD cards, you may need to replace the SD card reader. To change the 3DS SD card reader, you will need to purchase a new one and follow the manufacturer's instructions for installation, which typically involves removing the old reader and installing the new one in its place. This process may vary depending on the device model and manufacturer. .
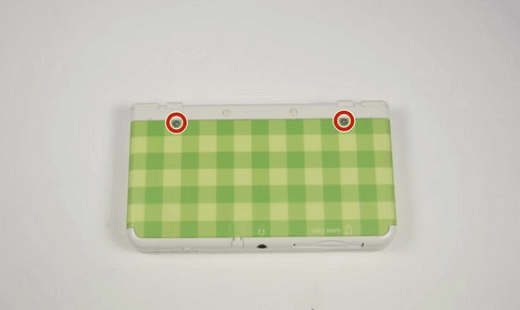
Step 1. To remove the top cover of the device, you need to unscrew the two 3mm Phillips #0 head screws that are located along the top edge of the device. This will allow you to access the internal components.
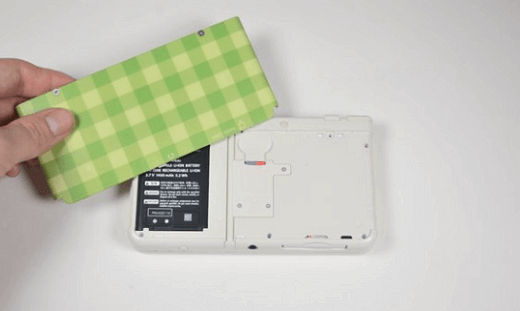
Step 2. Open the device.
- Pull the top corner tabs of the front faceplate outward and towards you.
- To remove the faceplate, pull it up and out of the slots at the bottom of the device.
- Set aside the back faceplate.
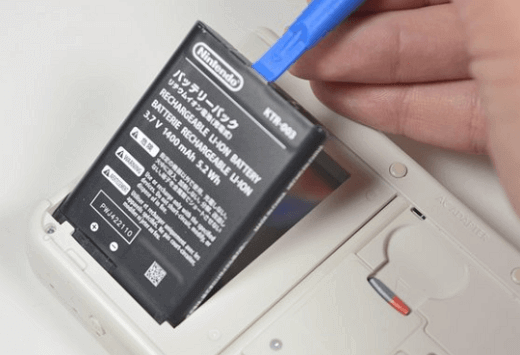
Step 3. Take out the battery.
Use a plastic opening tool to pry up the battery.
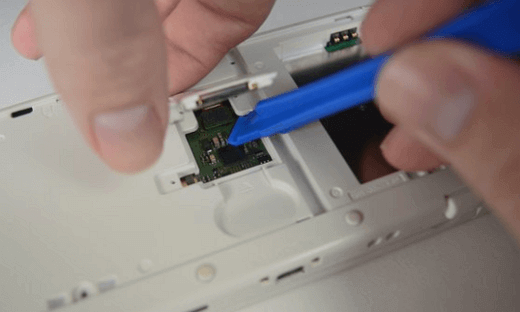
Step 4. Gently pull the SD card reader from the edge with two holes to free the tab at the top of the SD card reader.
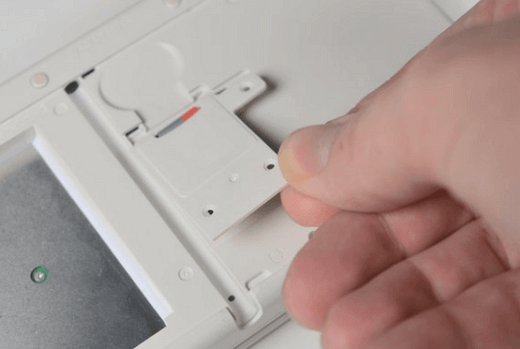
Step 5. Change the 3DS SD card reader.
To remove the SD card reader, you need to lift the SD card reader gently and then pry the SD card ribbon cable off the socket on the motherboard.
To resolve the issue, remove the SD card reader from the lower casing, and then attempt to connect your 3DS SD card to the device again to see if it functions properly.
If another SD card reader does not work, it might suggest that your 3DS should be repaired. If there is nothing with your SD card, you can fix your SD card with the following fixes below. If another SD card reader does not work, it might suggest that your 3DS should be repaired.
Fix 2. Update 3DS SD Card Driver to Fix the Not Detect Issue
When you connect your 3DS SD card to your computer, you may encounter the "3DS could not access SD card" error. To resolve this issue, you can try updating the SD card driver, which should help resolve the problem and allow you to access the SD card as intended.
Step 1. To access and transfer files from your memory SD card, insert it into a card reader and plug the reader into your computer using a USB cable. This will allow you to view the contents of the SD card on your PC and transfer files to and from it.
Step 2. Open "Computer" and choose "System Properties".
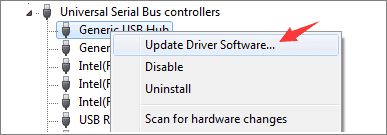
Step 3. In the taskbar on the left, click "device manager" and next to "Universal Serial Bus controller" click "+ (plus)" and look for a yellow exclamation mark.
Step 4. Right-click and choose "update driver software".
Step 5. Click "Search automatically for driver software online"...
Wait until the process completes. Then, reconnect your SD card to your PC to see whether it can be recognized or not.
Fix 3. Run CHKDSK to Check and Fix SD Card Error
If your 3DS SD card is not being detected, you can run the CHKDSK command to check and repair the SD card, which may make it detectable again.
Step 1. To bring up the power users menu, press the Windows Key + X button.
Step 2. To access the Command Prompt (Admin) from the power users menu, select the Command Prompt (Admin) option.
Step 3. To proceed, click "Yes" when prompted with the User Account Control (UAC) window, allowing the Command Prompt to run with elevated privileges as an administrator.
Step 4. In the new Command Prompt window, type `chkdsk E: /f /r /x`, replacing E with your Micro SD card letter.
Fix 4. Run CHKDSK Alternative to Check and Fix SD Card Error
Download Qiling CleanGenius and install it on your computer, then proceed with checking and fixing file system errors.
Step 1. Click "File Showing" to enter the next step.
Step 2. To fix a problematic device, choose the target device and select the option to "Check and fix file system error". Then, click "Execute" to initiate the repair process.
Step 3. When the fixing process completes, click "here" to open and use your device.
Fix 5. Reformat 3DS SD Card to FAT32
To fix the not detected SD card, you can try formatting the 3DS card. This will erase all data on the card, so you won't be able to transfer games to another drive, but it will make the card accessible again.
You can use a free SD card formatter called Qiling Partition Master. This tool allows you to format various storage devices, including HDD, SSD, USB, memory card, and SD card, making them available for reuse. Additionally, it enables you to delete a partition, making the space available for new use. It also has other features.
- Resize or move a partition
- Merge partitions
- Clone a partition
- SSD 4K alignment and more
Steps to format an SD card:
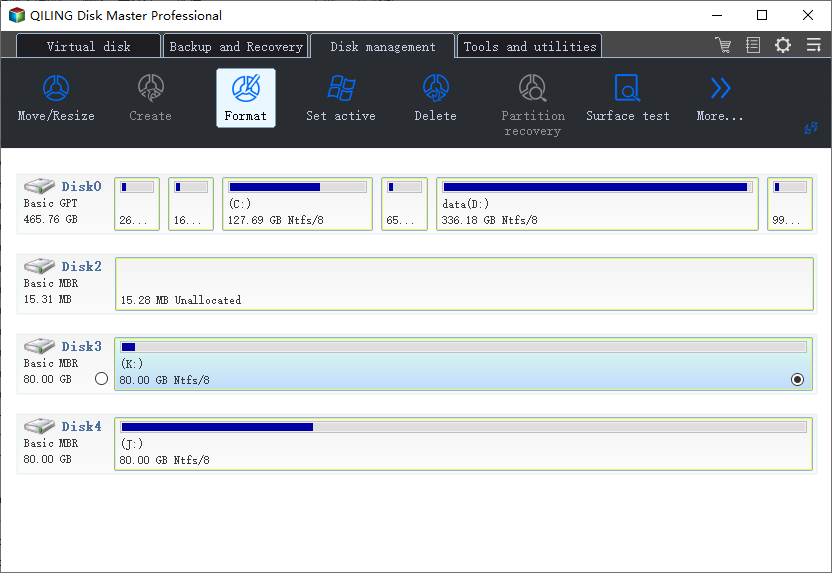
Step 1. To format an SD card, locate the card and right-click on the partition you wish to format, then select "Format" from the menu.
Step 2. Set a new partition label, file system (NTFS/FAT32/EXT2/EXT3/EXT4/exFAT), and cluster size to the selected partition, then proceed.
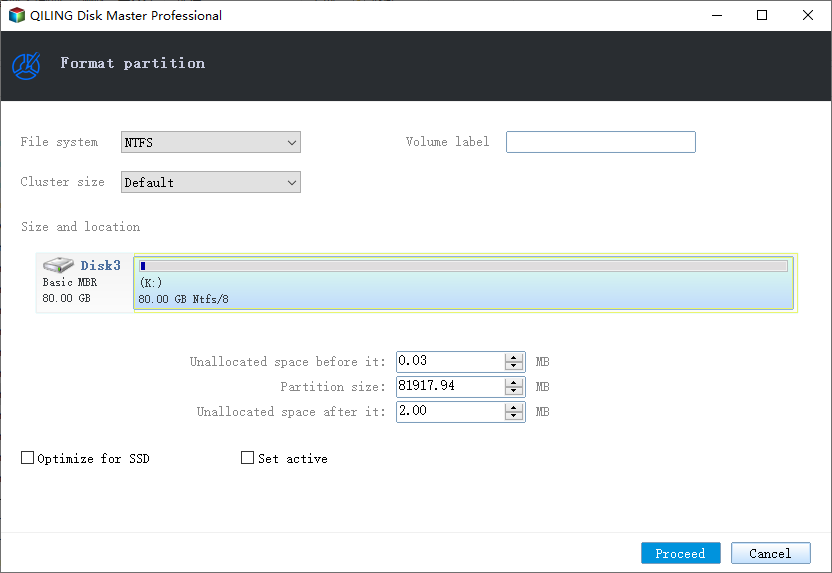
Step 3. To start formatting your SD card, click "OK" on the pop-up window that appears. This will initiate the formatting process, allowing you to prepare your SD card for use with your device.
Fix 6. Replace Old 3DS SD Card with a New One
Some users who are still experiencing issues may not be able to detect an SD card error on their 3DS after reformatting the card. In such cases, it is recommended to replace the old card with a new one.
Step 1. Buy a new 3DS SD card.
Step 2. Connect the old SD card to your PC.
The instructions are to copy the entire "Nintendo 3DS" folder from the SD card to your desktop.
Step 3. Copy the data to your new SD card.
Step 4. The new SD card with all of your copied data should be inserted back into the 3DS's card slot.
After turning on the power, everything should be back to normal, as if nothing had occurred.
Extra Tips to Fix Could Not Detect an SD Card (Error Code: 007-2073)
Step 1. Ensure the system is turned off, remove the SD card, and verify that the SD card is compatible.
Step 2. To access the micro SD card on a New Nintendo 3DS XL, you need to remove the battery cover, which requires a size #0 cross-head (+) screwdriver. This allows you to access the micro SD card.
Step 3. Check the SD Card and ensure it is unlocked.
Step 4. Micro SD cards do not have a lock switch and therefore cannot be locked.
Step 5. Insert the SD Card and turn the system on.
- If the error message mentions that the SD card may be full, try deleting unused content on the card to free up space and resolve the issue.
- If you're experiencing issues with a specific downloadable game or application on your Nintendo 3DS, try using the Nintendo 3DS Download Repair Tool to scan and repair the game or application for errors. This tool can help resolve problems and get you back to playing your favorite games.
- Even if no errors are found, you can still choose to run the repair tool.
Step 6. If you're experiencing issues with a game or application, try restarting it to see if the problem persists. This simple troubleshooting step can often resolve the issue by clearing out any temporary glitches or bugs that may have caused the problem.
Conclusion
3DS SD card issues can be resolved with six easy and quick solutions. These solutions can help you access your SD card and avoid issues where the 3DS cannot detect it. To resolve the problem, try the suggested solutions, which can be done in two ways to prevent the issue from occurring in the first place.
- Don't remove or insert SD cards while the system is on.
- Never remove a mini SD or micro SD card while the adapter is still in the system. This can cause damage to the card or the system.
3DS Not Detecting SD Card FAQs
If you still have a problem, you can read these 3DS related questions to solve your problem.
What happens if you put a 3DS game in a DS?
The DS and 3DS use different processors, making it impossible to run 3DS games on the DS, and requiring 3DS cartridges to be re-coded for the DS, which is not possible due to the code being unreadable by the DS.
Why does my 3DS keep saying the SD card was removed?
If your SD card is dying, you should back it up and try a different card to see if the message still pops up. If the issue persists, it might be a problem with your 3DS, and you may need to get it repaired.
What type of SD card does 3DS use?
The Nintendo 3DS, 3DS XL, and 2DS systems are compatible with SD cards up to 2 GB and SDHC cards up to 32 GB. However, miniSD and microSD cards require an adapter to be used.
How do I transfer my SD card to my 3DS?
For transferring data between SD cards or microSD cards:
Step 1. Remove the SD Card from the system.
Step 2. The SD Card with the Nintendo 3DS data should be inserted into the SD Card Slot or the SD Card reader/writer.
Step 3. Open the file explorer on your computer (Windows Explorer on PC or Finder on Mac) and navigate to the SD card.
Step 4. To transfer data, highlight it and drag it to the desktop. If part of a system transfer, drag all folders to the desktop as they appear, without clicking into them to drag their contents. Instead, drag the entire folder.
Step 5. Insert the first SD Card, then eject it. Next, insert the second SD Card into the slot or use a reader/writer. Finally, access the SD Card again using Windows Explorer or Finder.
Step 6. To transfer data from your desktop to the new SD Card, simply drag and drop the desired files or folders from your desktop onto the SD Card icon on your computer. This will copy the data from your desktop to the SD Card, allowing you to free up space on your desktop and make the most of your new storage device.
If you recently performed a system transfer and chose to delete the data on the target system's SD Card, you can now choose to copy and replace it for duplicate folders or files.
Related Articles
- 5 Ways to Increase Transfer Speed of USB 3.0 External Hard Drive
- Check & Repair Hard Disk Partition Errors in Windows 10 for Free
- What Is NTFS File System and Do I Need It? [Check The Answer Here]
- How to Wipe a Hard Drive without Deleting Windows
- How to Fix SSD Health at 99% [Full Guide in 2024]
This guide will help you determine if SSD health at 99% is normal or not, and provide you with a tool to quickly and easily check SSD health. Additionally, you'll get some tips on how to maintain your SSD performance. - How to Fix SSD Shows Up in BIOS But Not Windows Issue 💡
A situation where an SSD is recognized in the BIOS but not in Windows is a frustrating issue. Fortunately, this problem can be attributed to a few possible reasons, including loose connections, incorrect drive configuration, or a corrupted drive. To resolve this issue, users can try checking the drive's connections, ensuring it's properly seated in the motherboard, and running a disk check to identify any potential issues. Additionally, updating the BIOS and drivers, or reinstalling the operating system, may also resolve the problem. By addressing these potential causes, users can successfully get their SSD recognized in Windows.