How to Enable/Disable UEFI Mode? Your Complete Guide
UEFI (Unified Extensible Firmware Interface) is a modern method of BIOS that allows faster booting and advanced capabilities, but some operating systems require Legacy Boots instead. To accommodate such systems, you can disable UEFI Mode via the Command Prompt in the Boot Manager screen.
Secure Boot is a security feature that prevents unauthorized software from running when a PC boots up, but it can be disabled from within Windows if it's causing issues with booting the operating system.
What Is UEFI?
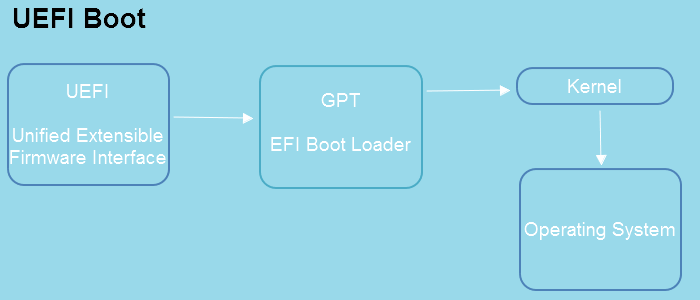
UEFI is a standard firmware interface for newer PCs, responsible for initializing and starting x86 computers, handling input/output operations, and offering a program interface for software development, replacing the older BIOS system.
UEFI mode offers expanded control over your computer's boot-up process, allowing you to choose which devices are activated at startup. This means you can disable specific devices, such as USB ports, if you don't want them active when you start your computer.
The software provides a user-friendly Graphical User Interface (GUI) that enables easy navigation through hardware configuration, making it simple to manage computers in large-scale computing environments. It offers various graphics and text mode capabilities, along with unique features that facilitate tasks such as network management, firmware updates, and device resets, allowing for efficient management of thousands of devices in seconds.
Compared to the formerly-UEFI systems offer several enhancements over traditional BIOS systems, including improved performance, faster boot times, and support for newer hardware like solid-state drives.
UEFI-PCs with UEFI can boot up quickly and resume faster, and are more secure as they require a password and have features to block malware. However, accessing configuration settings has changed, with UEFI PCs requiring pressing "F2" instead of "Delete" during boot-up.
When Should UEFI Boot be Enabled or Disabled
UEFI mode should be enabled by default until specific issues arise.
UEFI provides improved security, simpler interfaces, better performance, and more features compared to legacy BIOS. It enables computers to use larger memory partitions, resulting in improved performance.
The system optimizes performance and saves battery life with intelligent power management tools, making it a standard for corporate, government, and educational settings.
If you want to dual-boot your machine and switch between multiple OS with a mouse, choose UEFI. If you prefer a keyboard and text-based UI over navigation with a mouse and GUI, then BIOS is for you.
UEFI mode is a required setting for new motherboards, supporting a GPT disk partitioning scheme. It's generally recommended not to disable this mode and switch to legacy mode, especially if your computer is set up to boot from UEFI. However, if you've made changes in the BIOS configuration that you're unsure about or fear might damage your data, switching to legacy mode might be a safer option.
How to Enable UEFI Boot Mode
UEFI Mode simplifies the process of upgrading to Windows 11, making it faster and easier than ever before. Windows 11 offers many exciting new features, building on the user-friendly interface of previous versions, while also supporting all earlier OS features. With UEFI Mode, users can enjoy a seamless and efficient upgrade experience, taking advantage of the latest innovations and capabilities that Windows 11 has to offer. features
Microsoft has announced that Windows 11 will likely require UEFI mode, a more secure boot process, to run the operating system. This means that users planning to upgrade to Windows 11 will need to have a UEFI-enabled system to install the OS.
1. Convert OS Disk to GPT First
The GPT (GUID Partition Table) is the latest partition style, while MBR (Master Boot Record) is the oldest. Computers running Windows XP, Vista, and Windows 7 are typically MBR-based, resulting in an MBR disk. To upgrade to Windows 11, however, you'll need to create a GPT-based disk.
To enable UEFI boot mode, Windows 11 must be installed on a partition style called GPT (GUID Partition Table).
If you're unsure whether your disk is GPT or MBR, you can check by following these steps: look for a file called `boot.ini` in the root directory, or check the partition table using the command `parted -l` or `fdisk -l` to see if it's a GPT or MBR partition.
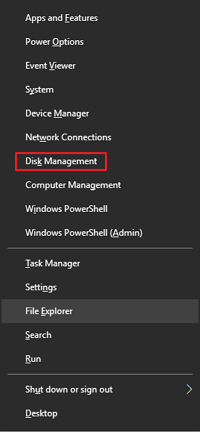
Step 1. Right-click on the Windows icon and Open Disk Management.
Step 2.To check the partition style of a disk, navigate to the Disk Management window and right-click on the disk you're interested in, then select Properties from the context menu. This will display the disk's properties, including its partition style.
Step 3.Now click on the Volumes tab and check for Partition Style under Disk Information.

If the partition style is GUID Partition Table, it allows a direct upgrade to Windows 11.
If you have a Master Boot Record (MBR) disk, you'll need to convert it to a GUID Partition Table (GPT) before upgrading to Windows 11. You can use a tool like Qiling Partition Master to make this conversion. This is a necessary step if your disk is currently in MBR format.
Qiling Partition Master is a powerful tool that enables users to manage hard disk partitions efficiently, ensuring data safety throughout the process.
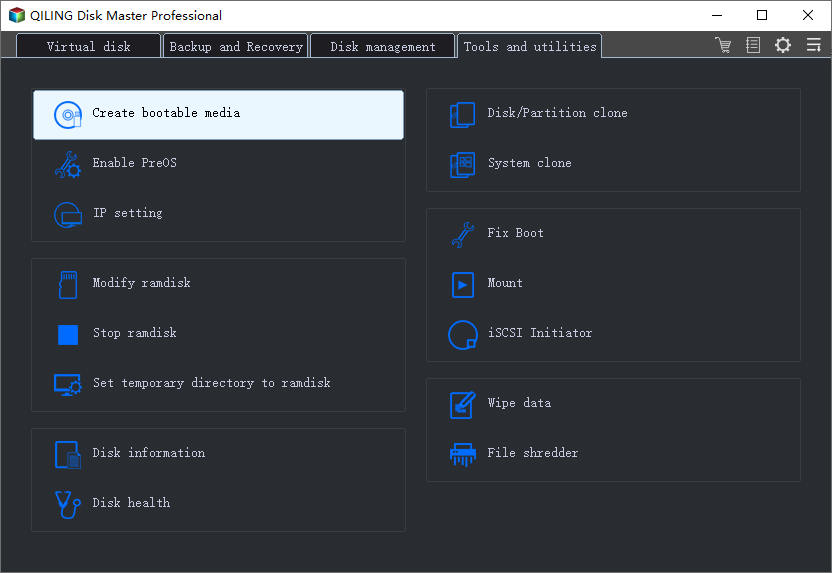
Step 1. To create a bootable drive using Qiling Partition Master, prepare a disc or drive, connect it to a bootable computer, then launch Qiling Partition Master and access the "Create bootable media" feature.
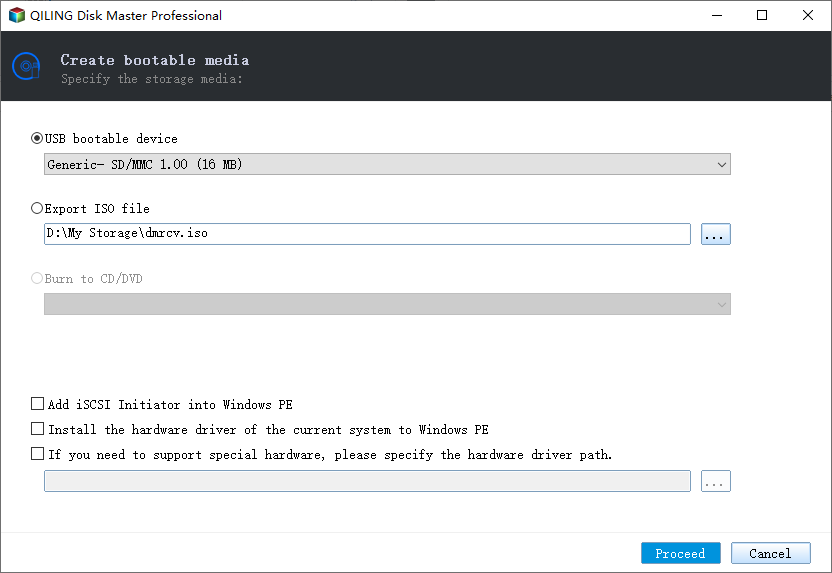
Step 2. Connect the device (USB or CD/DVD) to the computer, then click "Proceed" to continue the installation process.
Step 3.Connect the WinPE bootable disk to your computer, then restart it and enter the BIOS settings by pressing F2/Del simultaneously. In the BIOS settings, set the PC to boot from the removable device (USB disk) or CD-ROM drive (CD/DVD) instead of the hard drive, and save the changes by pressing F10.
Step 4. Launch Qiling Partition Master, select the MBR disk you want to convert, click "More" and choose "MBR -> GPT" to convert the disk from MBR to GPT.

What Else Can You Do With Qiling Partition Master?
- The tool is designed for users to easily modify existing disk partitions, allowing them to resize, move, or delete partitions as needed.
- Create new disk partitions without losing data.
- Maximize disk usage without going over the maximum limit.
- Convert logical drives from MBR to GPT.
- Expand system partitions.
- Merge two adjacent disk partitions into a bigger one.
Qiling Partition Master is a user-friendly utility tool that helps with dual boot, complicated partition states, or dynamic disks. It's designed for the average user, making it easy to use with just a single click, even for those without technical experience. This tool can resolve data loss issues due to MBR to GPT conversion, making it a helpful solution for various partition management needs.
2. Enable UEFI
Here are the steps to Enable UEFI:
Step 1. To shut down and restart your computer, click on the Windows icon, right-click on it, and select "Shut down and restart" from the context menu.
Step 2. Press the F2 key right after your computer is restarting. This will take you to the BIOS Setup Utility screen.
Step 3. Look for the Boot or System Configuration tab and Click on Boot.
To change the boot order, go to the Boot tab in the BIOS settings, use the up and down arrows to select the desired boot device, and press Enter.
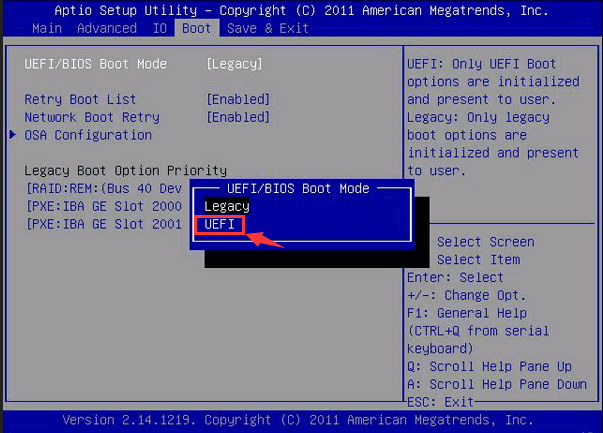
Step 4. Under the Boot screen, navigate to UEFI/BIOS Boot Mode and press Enter.
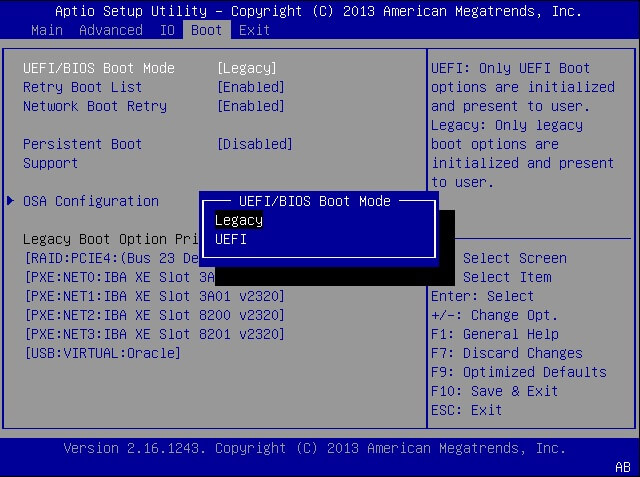
Step 5.To access the UEFI settings, click on the up and down arrow keys to select the UEFI mode option, and then press Enter to proceed.
Press F10 to save the changes and exit the screen.
How to Disable UEFI Mode
Most computers with UEFI boot firmware also have an option to switch to a CSM/Legacy boot mode within the UEFI firmware. This allows you to run operating systems that aren't UEFI-aware, such as Windows 7, Ubuntu, Linux, and many others. Using this option is a simple way to enable compatibility with these operating systems.
Find out how to disable UEFI firmware and enable a legacy BIOS compatibility mode instead.
Step 1.Restart your Windows PC
Step 2. Press the F2 key until you see the BIOS Setup screen. The BIOS Setup screen is usually displayed on a black background with white text, and may have a logo or other graphics at the top.
Step 3. Under Boot, click on UEFI/BIOS Boot Mode and press Enter.
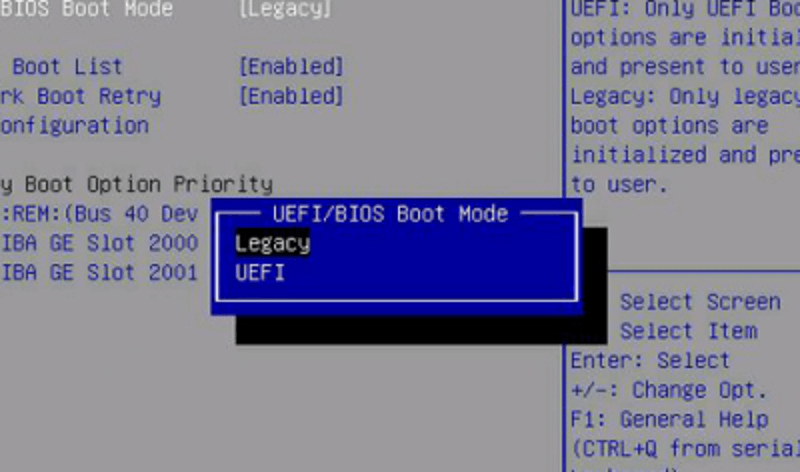
Step 4. Now, Choose Legacy and press enter.
Select "Legacy" and Press "Enter" Select an Image
Press F10 to save the changes and exit the BIOS screen.
Enabling or Disabling UEFI Mode Is Not Complex, Choosing a Correct Mode for PC
BIOS and UEFI are two types of firmware that power the PC platform. BIOS has been around for a while and is still a viable option.
- For a complete beginner, a simple firmware like BIOS might be more suitable, as it is more efficient at accessing small storage hard disks compared to UEFI.
- If you have limited storage space, specifically less than 2 TB, or only one partition drive, then using a BIOS is the way to go.
When to use UEFI mode? You should use UEFI over BIOS to configure and boot from multiple partitions on large hard disks and partitions.
- You should use UEFI for large hard disk support.
- UEFI is recommended for discrete graphics card support and also enables drivers for new devices to be loaded after PC startup, making it a more versatile and efficient option.
- If you need support for loading more than a few dozen modules and external devices, UEFI is a requirement.
- Last, Windows 11 installation requires UEFI boot mode as a must.
I recommend sticking with UEFI over BIOS unless there's a specific reason to use the latter. This simple approach ensures you get the most out of your system's capabilities.
The use of UEFI has increased significantly in recent years, driven in part by security concerns associated with traditional BIOS. Many newer computers now only use UEFI to boot their operating system, eliminating legacy BIOS support.
To use UEFI mode on a computer, first convert the OS disk to GPT using a disk conversion software like Qiling Partition Master, then enable UEFI in Boot mode via BIOS settings, and finally enable Secure Boot mode for Windows 11 installation.
Related Articles
- How to Fix Windows 11 Slow Startup? Your Complete Guide
- How to Convert exFAT to FAT32 in Windows 11/10/8/7
- How to Convert a Dynamic Disk to Basic Windows Server
- 4 Solutions To Fix Bootmgr Is Missing Windows 11
- MSI Stuck on MSI Screen Windows 10/11? How to Fix?
If your MSI computer screen is stuck on the MSI logo, you can try to fix it by pressing the power button for 30 seconds to discharge the power, then press and hold the power button for 30 seconds to reset the BIOS, or by disconnecting the power cord, pressing the power button for 30 seconds, and then reconnecting the power cord. You can also try to enter the BIOS settings by pressing the corresponding key (usually F2, F12, or Del) and then save and exit the BIOS settings. If none of these methods work, you may need to contact MSI support or visit their website for further assistance. - [FIXED]No Bootable Image Found, Notebook Will Be Shutdown
When you receive the error message 'No bootable image found, notebook will be shutdown', it means your computer is unusable. Fortunately, Qiling offers 6 effective fixes, providing both professional technical advice and experimentation to help resolve the issue.