Windows 10 Startup Folder Location, How to Change Startup Programs
The Windows Startup folder is a hidden and important system folder where any program placed will automatically start and run when the computer is turned on. This guide will take you through the full process of the Windows 10 Startup folder, covering all you need to know.
Where Is the Startup Folder in Windows 10
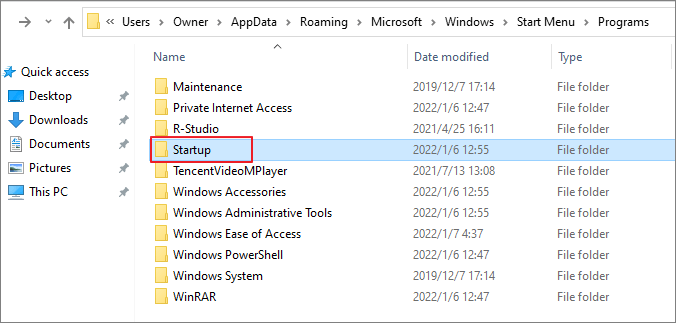
The Startup folder in Windows 10/11 contains shortcuts of programs that need to run with Windows. You can access this folder by navigating to either the "Startup" folder in the Start menu, or by typing "%AppData%\Microsoft\Windows\Start Menu\Programs\Startup" in the File Explorer address bar. This allows you to find and manage the programs that start automatically with Windows.
The current users' Startup folder location is located at:
- C:\Users\Username\AppData\Roaming\Microsoft\Windows\Start Menu\Programs\Startup
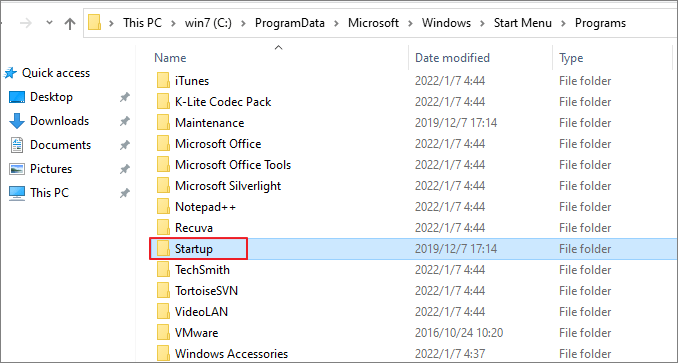
The Startup folder locations for all users is located at:
- C:\ProgramData\Microsoft\Windows\Start Menu\Programs
Find Windows 10 Startup folder in Command
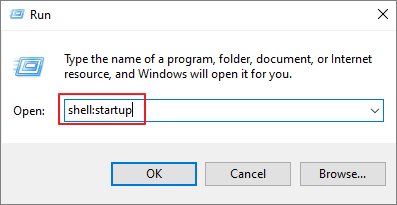
Or, you can access Windows 10 Startup folder in Command.
Step 1. Press Win+ R keys to open the Run box.
Step 2. To open the Current User's Startup folder, type `shell:startup` in the address bar and press "OK".
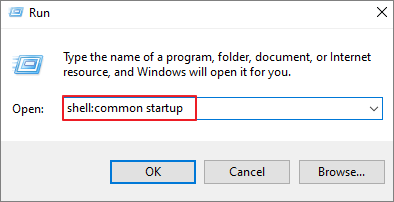
To open the All Users Startup folder, type shell:common startup and press Enter.
Show Hidden Files on Windows 10
Note that AppData is a system-To access a protected and hidden folder, you need to change some settings to show hidden files, as it is not visible by default.
Step 1. Press Win + E to open Windows File Explorer.
Step 2. In the top toolbar, click "View" tab > "Options".
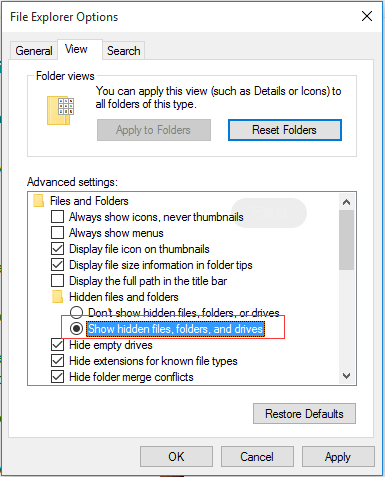
Step 3. To show hidden files, folders, and drives in Windows, click on "Folder Options" in the Control Panel, then click on the "View" tab, and select the checkbox next to "Show hidden files, folders, and drives".
Step 4. Uncheck the "Hide protected operating system files" option if it is selected.
Step 5. Then, click "OK" to save all the changes.
How to Change What Programs Run in Startup Folder on Windows 10
To change programs that run at the Startup folder in Windows 10, you can add or remove an app by right-clicking on the Start button, selecting "Task Manager," clicking on the "Startup" tab, finding the program you want to modify, and clicking on it to enable or disable it. Alternatively, you can access the Startup folder by typing "shell:startup" in the Run dialog box (Windows key + R) and modifying the programs listed there. This allows you to easily manage which programs launch automatically when you start your computer.
Add an App to Run at Startup Folder
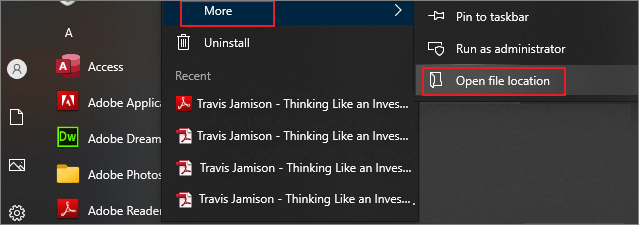
Step 1. To find the app you need to start automatically, right-click it, select "More", and then choose "Open file location". This will open the location where the program saves its shortcut. If there's no "Open file location" option, the application can't run at startup.
Step 2. To access the Startup folder, you can either navigate to its location on your computer or open it using the command "shell:startup" in the Run dialog box. This will allow you to view and manage the programs that start automatically when you log in to your Windows computer.
Step 3. To automatically start an application when Windows boots, copy and paste the application shortcut to the Startup folder. This will ensure that the application launches automatically every time Windows starts up.
Remove Windows 10 Startup Programs in Startup Folder
Step 1. Access the Startup folder in this file path: C:\Users\Username\AppData\Roaming\Microsoft\Windows\Start Menu\Programs\Startup
Step 2. Right-click the unwanted program in the Startup folder, click "Delete", and it won't start when you boot your computer.
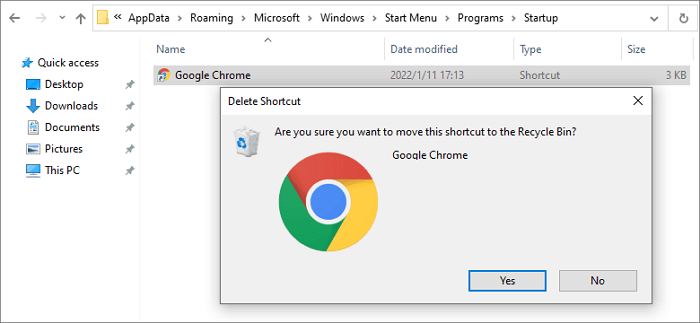
The program shortcut will stay in the Recycle Bin until you decide to get rid of the Recycle Bin contents.
How to Fix Windows 10 Startup Folder Not Working in 4 Simple Ways
If your favorite program stops opening automatically every time you log into your computer, This issue can be frustrating, but there are ways to fix it. Try these methods to resolve the problem with your Windows 10 startup folder not working.
Fix 1. Check Windows Startup in Task Manager
To resolve the issue where the Startup folder is not loading apps, you can check the Task Manager to identify the application that is preventing this functionality. This application might be consuming system resources or running in the background, thereby blocking the Startup folder from loading apps.
Step 1. To open the Task Manager, press the keys CTRL + SHIFT + ESC or CTRL + ALT + Delete.
Step 2. Click the "Startup" tab in the Task Manager window.
Step 3. Right-click the program you want to boot automatically and choose "Enable".
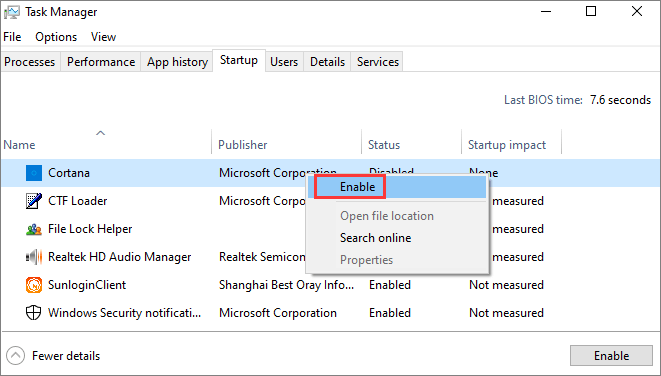
Step 4. Restart your PC and check if the program runs automatically.
Fix 2. Copy the App's Shortcut Manually
Step 1. Press Windows + R to open the Run command line.
Step 2. To open the Startup folder in Windows, type "shell:startup" in the Run box.
Step 3. The program's shortcut should be copied and pasted into the Startup folder.
Step 4. Restart your PC and check for changes.
Fix 3. Create a Batch File to Force a Program to Start
To enable running any program at startup, you can create a batch file. Open Notepad, type `@echo off`, `start "Program" "C:\Program Files\Program.
Step 1. Open a New text document.
Step 2. In the document, paste the following lines. Change the file path with your own program's location.
@echo off
C:\Program Files (x86)\Google\Chrome\Application\chrome.exe
Exit
Step 3. To save the file as a batch script, click on "File" in the top menu bar, then select "Save As..." from the dropdown menu. In the Save As window, change the file extension from ".txt" to ".bat" and click "Save" to save the file with the new extension.
Step 4. To run the program automatically every time you start your system, you can double-click the batch file to execute it, and it will run simultaneously with your system startup.
Fix 4. Edit Windows 10 Registry
If all the above-If given solutions fail to fix Windows 10 startup folder not working issue, then you may finally try to edit your registry.
Step 1. To open the Registry Editor, type "regedit" in the search bar, then click "Registry Editor" in the search results.
Step 2. To make changes to a certain registry key, go to the following path:
HKEY_LOCAL_MACHINE\Software\Microsoft\Windows\CurrentVersion\Run
Step 3. Right-click on the empty space and choose "New > String Value".
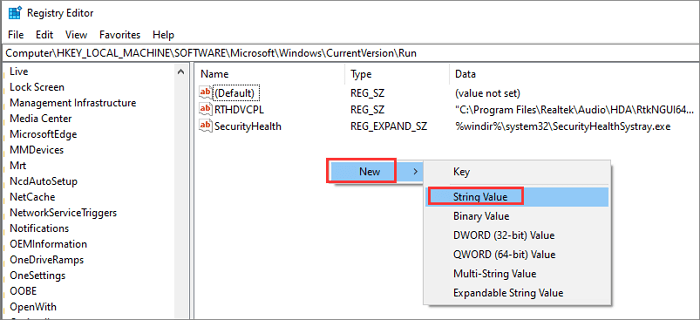
Step 4. The value name is exactly the same as the name of the program to run. This is a requirement for the program to run successfully.
Step 5. Next, right-click on the newly-created value and choose "Modify".
Step 6. In the Value Data Field, enter the path of the .EXE file for the program you want to run.
Step 7. Finally, save the changes and restart your computer.
How to Restore Startup Folder on Windows 10/11
Some Windows 10 users have reported that their Startup folder and programs have disappeared due to unknown reasons, and they were able to resolve the issue by using Qiling data recovery software.
Deep Data Recovery is a software that uses advanced algorithms to recover data from various storage media, including hard drives, solid state drives, external devices, memory cards, and USB drives. It can recover deleted files and folders due to accidental deletion, formatting, OS crashes, virus attacks, and other issues.
This tool enables you to repair corrupted files after data recovery and supports document, photo, and video recovery in all file formats. You can also recover lost folders.
Step 1. Choose file types and click "Next" to start
Launch Deep Data Recovery, select the desired file types, and click "Next" to initiate the recovery process.

Step 2. Select a folder to scan for lost files
To recover a lost folder, select "Select Folder" under the "Specify a location" option. Then, click "Browse" to locate the folder's original directory, and click "OK" to initiate the scanning process. This will help you recover the lost folder.

Step 3. Find and preview found files in the lost folder
To quickly find lost files, type the folder name in the search box and open the found folder to preview scanned files. Alternatively, use the Filter feature to find specific types of files.

Step 4. Recover and save the lost folder
Select the folder and files you need, click "Recover", and choose a new and secure location on your PC to keep the recovered data.
Concluding Words
The Windows 10 Startup folder location is C:\Users\Username\AppData\Roaming\Microsoft\Windows\Start Menu\Programs\Startup, where you can manage startup programs easily. You can also access it using the shell:startup command.
This post provides solutions to fix the Startup folder not working problem, including several useful ways to resolve the issue. Additionally, it shows how to use Qiling data recovery software to easily recover deleted or lost Startup folder with minimal effort.
Related Articles
- How to Recover Deleted Screenshots on Windows 10/8/7
- How to Recover Permanently Deleted AOL Emails Older Than 7 Days
- Recover and Repair Word Document Opens with Random Codes
- How to Restore, Unlock Encrypted Excel File Without Password
- Fix 'Card Cannot Be Accessed' Error in Canon Without Losing Data
The SD card in a Cannon camera is reporting an error, stating that the card cannot be accessed. The error message suggests reinserting or changing the card, or formatting the card with the camera. Formatting the card would erase all data, so it's not a recommended option if there are many photos on the card. Instead, a data recovery software like Deep Data Recovery can be used to recover files from the inaccessible SD card, and then the error can be resolved with the camera or a computer. - 4 Efficient Ways Are Ready! Fix Compile Error in Hidden Module
Users may encounter a “Compile error in hidden module” error message when opening MS Excel, which can be caused by various factors such as corrupted add-ins, incorrect Excel settings, or missing DLL files. To resolve this issue, users can try methods like disabling add-ins, resetting Excel to its default settings, or reinstalling the program. Additionally, recovering and repairing lost Excel files can be achieved through bonus solutions, ensuring that users can access their important data.