Fixed: USB/External Hard Drive Shows in Device Manager But Not in This PC
If your USB or external hard drive shows up in Device Manager but not in File Explorer or This PC, don't worry. This guide provides three simple steps to resolve the issue and recover all your data with just a few clicks.
| Workable Solutions | Step-by-step Troubleshooting |
|---|---|
| Preparation. Check it in Disk Management | First, insert or connect the USB or external hard drive to your PC; check if...Full steps |
| Procedure 1. Recover your drive data | Download Qiling hard drive recovery software > choose the drive to scan > recover...Full steps |
| Procedure 2. Fix USB not showing up | 1. Update or reinstall device drivers; 2. Assign a new drive letter; 3. Format or create a new volume...Full steps |
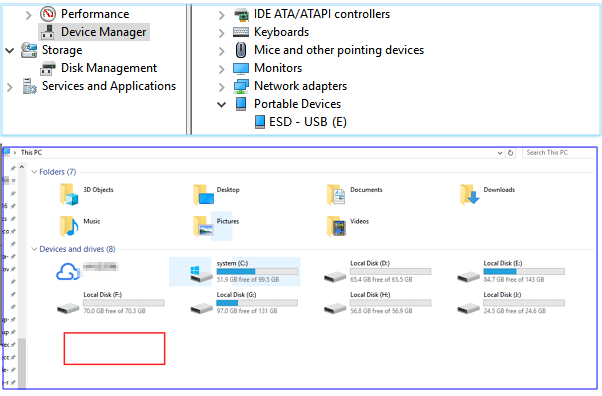
If you have important data saved on your external hard drive or USB drive, be sure to check if your saved data are available. If they're not, use a professional file recovery tool to access and restore data from a USB or external hard drive after it appears in Disk Management.
You May Also Interest In: How to Fix Hard Drive Not Showing Up in Windows
Preparation. Check if USB/external hard drive is detectable
If your USB storage drive is not showing up in This PC (Windows 10/11) or File Explorer, you can try making it detectable in Disk Management first. To do this, press the Windows key + R, type "diskmgmt.msc" and press Enter.
Step 1. First, connect the USB or external hard drive to your PC, either via a USB port or by physically attaching it to your computer.
Step 2. Check if it appears in Disk Management or not.
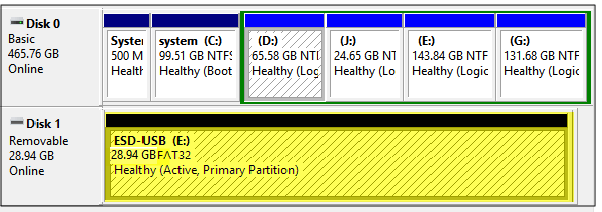
If not, try the below tips for help:
#1. To check if your USB or external hard drive is recognized by your computer, press the Win + X keys simultaneously and select Disk Management. This will open a window where you can see all the connected storage devices, including your USB or external hard drive, listed as a Removable disk.
#2. Instead of using a USB hub, try plugging your USB or external hard drive into a different USB port on your computer. This might resolve the issue.
#3. If your external hard drive or USB drive is not working, try turning it on and connecting it to a different computer. This can help determine if the issue is with the drive itself or the computer it's connected to.
When a USB or external hard drive appears in Disk Management, you can first use a data recovery program to restore your files, and then take effective methods to fix the error, making the drive visible again in This PC.
Procedure 1. Access and extract data from USB/external hard drive
If your USB flash drive or external hard disk is visible in Disk Management, you can use powerful hard disk recovery software like Deep Data Recovery to access, extract, and restore all data from the device in advance.
Deep Data Recovery - Professional Flash Drive Recovery
Whenever data recovery problems occur, you can download and run Deep Data Recovery, which can restore data from any device, including emptied Recycle Bin, formatted hard drive, lost partition, NAS, and more.
Step-by-Step Guide:
Step 1. Select file types and click "USB/SD Scan" to start
- To recover lost data, download and install Qiling Data Recovery on your computer or laptop.
- Connect the external hard drive to your computer.
- Run Deep Data Recovery, select file types and click "USB/SD Scan" to start the recovery process.
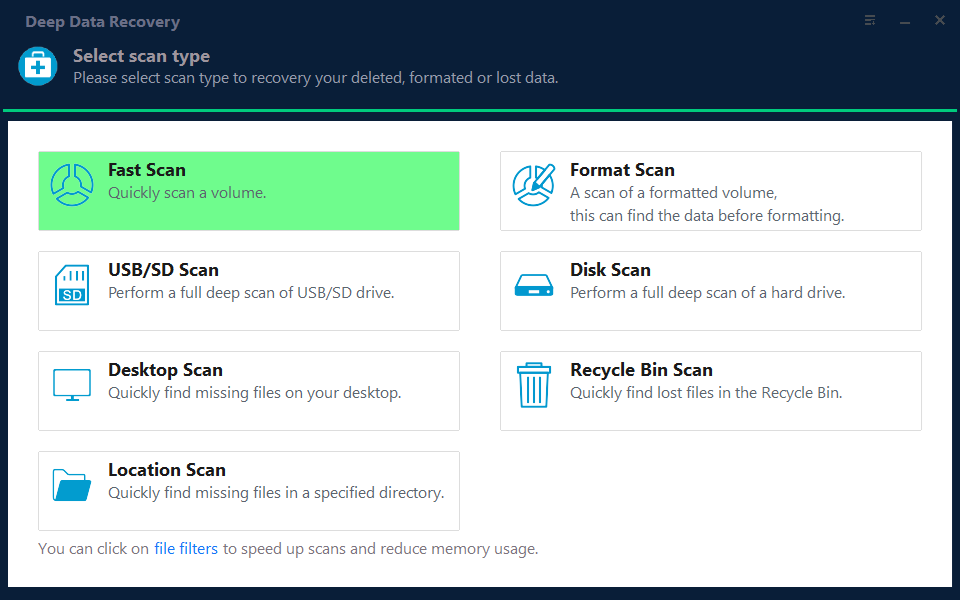
Note: You can choose different search modes based on where and why the data was lost.
Step 2. Choose and scan the external hard drive
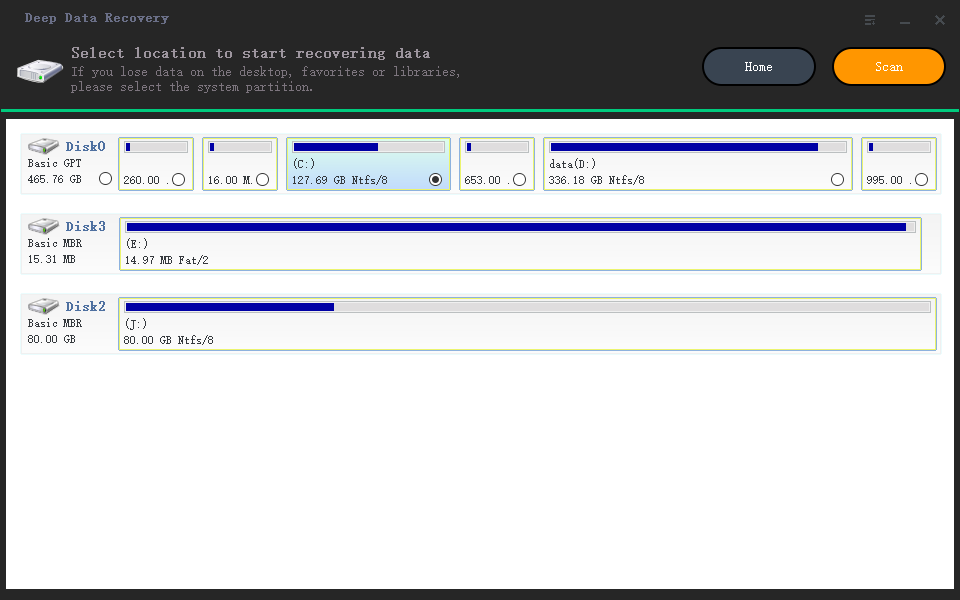
- Choose the external drive from the External drives list, then click Scan for lost data.
Step 3. Check the scan results
- Qiling data recovery software scans the selected drive for all data, including deleted, corrupted, and existing data, immediately after selection.
- You can use the Filter feature to quickly locate files of a specific kind, such as Pictures, Word, Excel, PDF, videos, or emails.
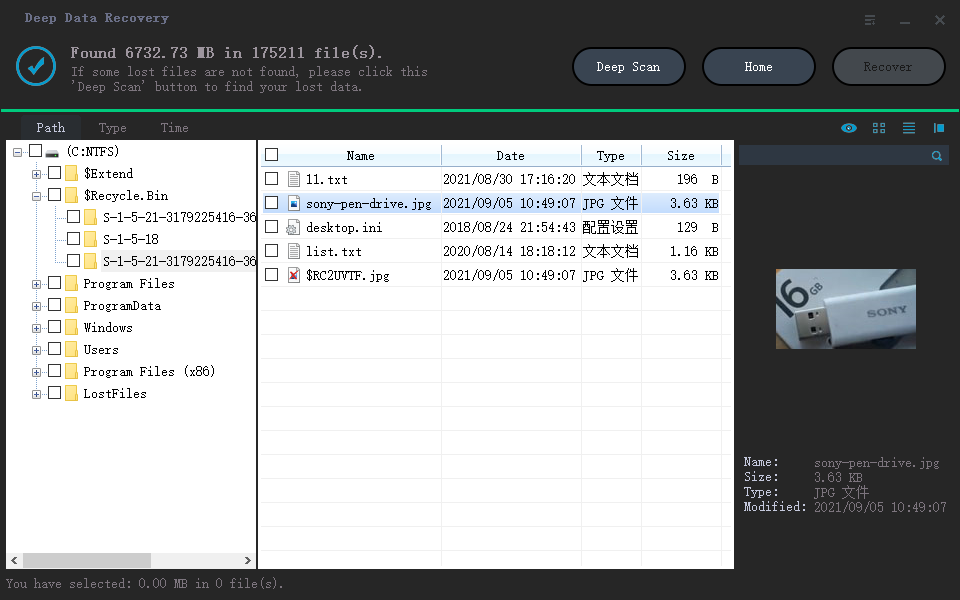
Step 4. Preview and recover data
- Double-clicking a file from the scanned results to preview.
- Choose the files you want and click "Recover".
- Save the recovered files to a different drive to avoid overwriting any existing data on the original drive.
This software allows you to easily restore data and repair undetectable flash drives or disks with just a few clicks.
Procedure 2. Fix 'USB/External hard drive showing in Device Manager only'
If your USB or external hard drive doesn't show up in Explorer on your PC, don't worry, there are three fixes to resolve this issue. Firstly, try checking the drive letter and ensuring it's not already assigned to another device.
Method 1. Update or reinstall USB/external hard drive drivers
Step 1. Connect your USB or external hard drive to your PC, then go to the Devices Manager, click on Universal Serial Bus Controllers.
Step 2. To remove a USB or external hard drive, right-click on it and select "Uninstall" from the context menu. Then, unplug the drive from your computer.
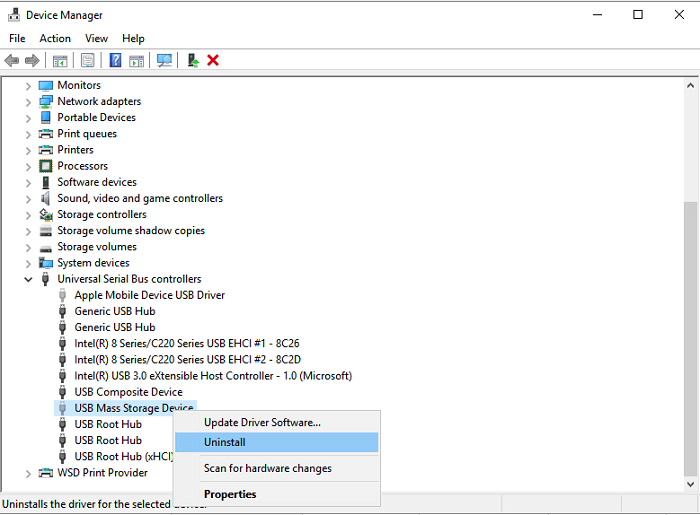
Step 3. To resolve the issue, simply plug the USB/external hard drive back into your PC and navigate back to the Device Manager, where you should go to the Universal Serial Bus Controllers section.
Step 4. To update the USB component, click on the highlighted USB component to select it. This will allow you to proceed with the update process.
Step 5. To update the USB drive, right-click on the USB icon in the Device Manager, then select "Update Driver Software" from the context menu. This will initiate the process of checking for and installing any available updates for the USB drive.
Step 6. Follow the on-screen guide in the Update Driver Software Wizard to update the drivers for your USB or external hard drive. This will walk you through the process of finding and installing the latest drivers for your device.
Method 2. Assign external hard drive with a new drive letter to make it appear in Windows Explorer
Step 1. Press Win + X keys and click Disk Management.
Step 2. To change the drive letter and path of your USB or external hard drive, find and right-click on it, then select the option "Change Drive Letter and Path" from the context menu.
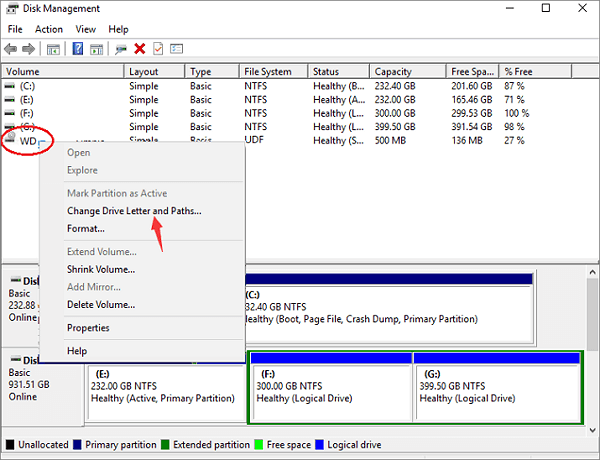
Step 3. If the drive doesn't have a letter, click "Add" to assign one, or if it does, select a new letter and click "OK" to save the changes.
Method 3. Format or create a new volume on a USB/external hard drive
After formatting your USB or external hard drive to NTFS, you can then reset the file system on your device. To do this, you can use the built-in formatting tool on your computer to erase all data on the drive and then convert the file system to NTFS.
Be aware that this method may erase existing data on your storage device, so make sure to back up your important data before proceeding. If you haven't, use a data recovery software like Qiling to restore your data.
Step 1. Right-click Start and select Disk Management.
Step 2. To format your USB or external hard drive, locate the device, right-click on it, and select the "Format volume" option from the context menu. This will erase all data on the drive and prepare it for new content.
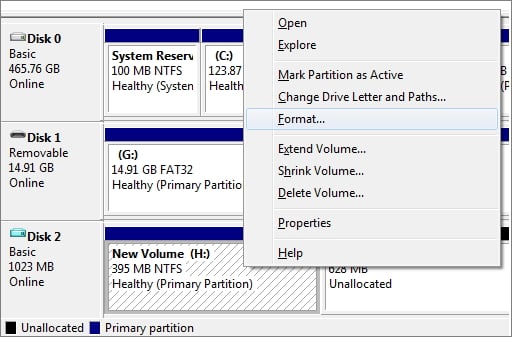
Step 3. To reset the file system from FAT or RAW to NTFS, click OK to confirm and keep all changes.
If a USB or external hard drive appears as unallocated space on Windows 10, you can create a new volume on the disk to make it usable again for saving data. To do this, go to Disk Management, select the unallocated space, and click "New Simple Volume" to assign a drive letter and file system to the disk.
Step 1. To access the Disk Management tool, press the Windows key + X keys simultaneously, then select Disk Management from the menu that appears.
Step 2. To create a new partition on your USB or external hard drive, right-click the unallocated space and select "New Simple Volume" from the context menu.
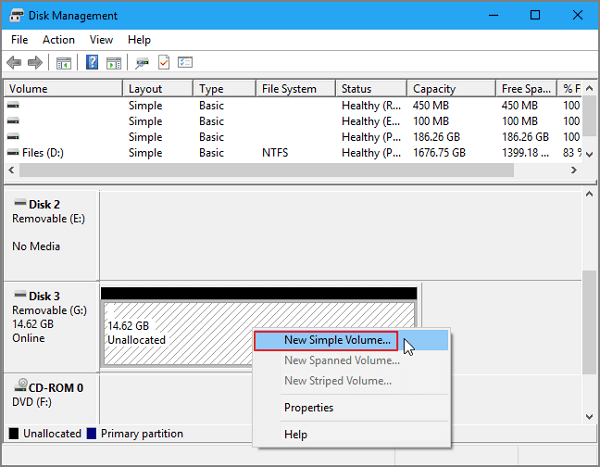
Step 3. Recreate and set the drive file system with a new drive letter to make it detectable in This PC/Windows Explorer again.
The Bottom Line
If you're experiencing an issue where your USB or external hard drive only shows up in Device Manager, the solution involves checking if the drive is detectable in Disk Management first. If it is, you can then use one of the three methods provided to resolve the issue, and finally recover your data with Deep Data Recovery. If you have any further questions, you can contact our support team at support@idiskhome.com.
Related Articles
- Seagate 4TB External Hard Drive PS4/Xbox One [Full Guide]
- Fix Saved Game Corrupted Error on Xbox 360
- DIY Solutions | Fix/Repair Corrupted USB Drive Without Formatting
- Fix Unknown USB Device - Device Descriptor Request Failed
- Top 6 Best Free Partition Software for Windows 7/10
Partition software for Windows is a must if you want to manage your drives fully. Here are the 5 best free partition software for Windows 7 and Windows 10. - Download Qiling Bootable Data Recovery Software to Recover Files
If your system can't start normally, Qiling bootable data recovery software can help you access your hard drive data with an OS by starting your computer from a WinPE bootable disk.
Products
Articles & Tutorials
- Data Recovery
- Data Backup
- File Recovery
- File Backup
- System Backup and Restore
- Disk and Partition Clone
- Technical articles
- Mobile articles
- Disk Master Help
- Windows Data Recovery Tutorials
- Windows Secure Delete Tutorials
- Windows Partition Management Tutorials
- Windows File Backup and Restore Tutorials
- Windows System Backup and Restore Tutorials
- Windows Disk Backup and Restore Tutorials
- Windows Clone Tutorials