How to Turn on AutoSave in Excel 2007-2019 (An Easy Guide)
What Is AutoSave in Excel
AutoSave is a feature in Microsoft Excel, Word, PowerPoint, and Office 365 that automatically saves your files at set intervals while you work, ensuring your progress is protected.
In Microsoft Office, you can use the AutoSave feature to temporarily keep changes in a local directory on your computer, and the location can be changed. Additionally, in Microsoft 365, AutoSave is enabled by default for files stored on OneDrive, OneDrive for Business, or SharePoint Online.
With AutoSave enabled in Excel, your file will be automatically saved at regular intervals, reducing the risk of data loss in case of unexpected events such as program crashes, power outages, or system corruption. To enable AutoSave on Mac and Windows 10, follow these steps.
How to Turn on AutoSave in Excel 2019/2016/2013/2010/2007
To enable AutoSave in Office Excel, follow these steps: on Mac, go to File > Options > Save, and toggle the switch to turn AutoSave on; on Windows, go to File > Save > AutoSave, and toggle the switch to turn it on. Additionally, if you have Office 365, you can also enable AutoSave by going to File > Save > AutoSave, and following the prompts to set up AutoSave. This will automatically save your work at regular intervals, helping you avoid losing your progress.
Turn on AutoSave in Excel Mac
If your macOS crashes or experiences a power failure while working on a crucial Excel document that wasn't saved, the AutoSave feature can be a lifesaver. To enable AutoSave in Excel on Mac, follow these steps:
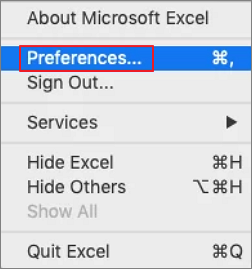
Step 1. To access Excel preferences on a Mac, open Excel and click on the Excel menu at the top of the screen, then select "Preferences" from the drop-down menu.
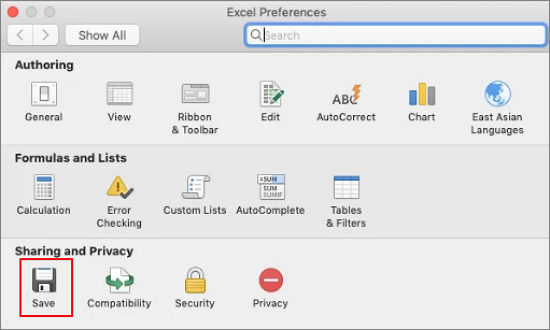
Step 2. In the Excel Preferences box, click "Save" under Sharing and Privacy.
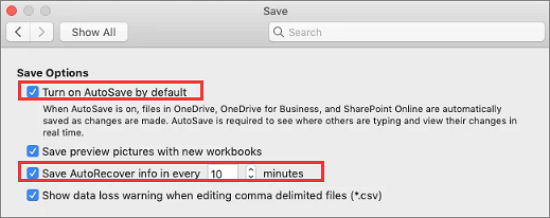
Step 3. Enable AutoSave by default and set the AutoRecover interval to xx minutes. Click "OK" to apply the changes. That's it. (Note: I removed the "That's it" at the end because it's not necessary)
Turn on AutoSave in Excel Windows 10
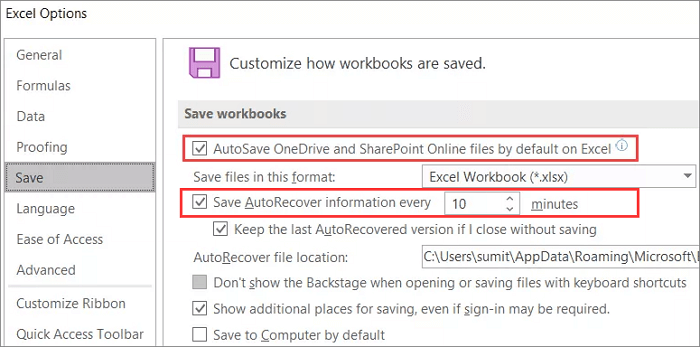
To enable the AutoSave feature in Excel on Windows 10/8/7, simply go to File > Options > Save, and then check the box next to "Save AutoRecover information every X minutes." This will allow Excel to automatically save your work at regular intervals, which can be especially helpful if you experience any issues or crashes. Additionally, you can also specify the location where the AutoRecover files will be saved.
Step 1. Open Excel on your computer. Go to "File" > "Options".
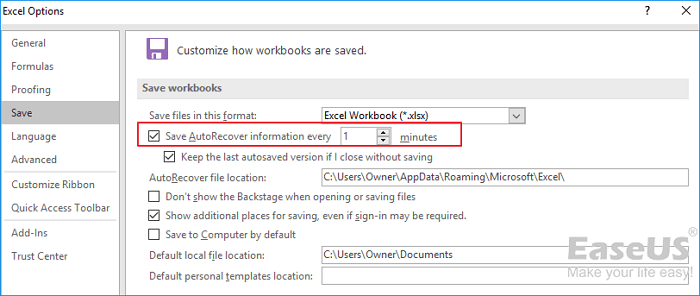
Step 2. In the left panel, click "Save" and select "Save AutoRecover information every xx minutes" and "Keep the last autosaved version if I close without saving" by ticking the boxes, then click "OK" to save the changes.
Turn on AutoSave in Excel Office 365
If the AutoSave doesn't work in Excel of Office 365, turn it on and change the settings with the ways below.
Step 1. Start Excel, click "File" > "Options".
Step 2. To enable real-time saving of Excel work in OneDrive and SharePoint Online, go to the Options dialog box, click the "Save" button, and select the "AutoSave OneDrive and SharePoint Online files by default in Excel" option. This will save your Excel work in real-time.
Step 3. Save AutoRecover information every xx minutes, keeping the interval as short as possible, then click OK to apply the change.
Here's a brief summary:
Excel AutoSave and AutoRecover
AutoSave and AutoRecover are two features in Excel that help save your work. AutoSave is a new feature in Excel Office 365, while AutoRecover is the name of the auto-save feature in prior versions, Excel 2010/2013/2016/2019.
AutoSave and AutoRecover are enabled by default in Microsoft 365. They both save changes to your work on your local computer. If you lose unsaved data, AutoRecover can retrieve the last saved version from temporary files.
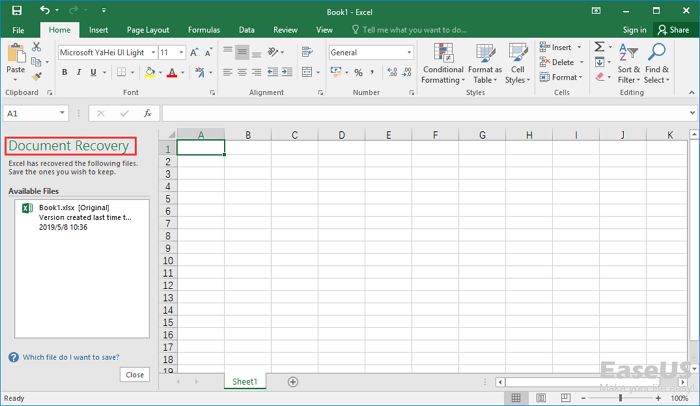
Excel AutoRecover helps you recover unsaved files after an accidental closure or crash by restoring to the last saved version, which is displayed in the Document Recovery pane when you start Excel next time.
How to Restore Unsaved Excel Files Using AutoRecover
If you lose your Excel work after a fortuitous closure or crash, you can recover unsaved Excel files by using the AutoRecover features in 2 Ways.
1. Recover Unsaved Excel in the Document Recovery
Excel AutoRecover allows you to restore from the last saved version that appears in the Document Recovery pane when you restart Excel.
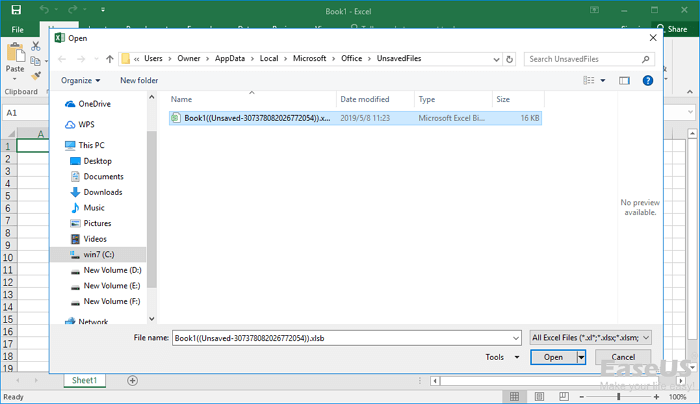
2. Retrieve Unsaved Excel from Temporary Files
Step 1. Open your Excel, choose "File" > "Open" > "Recover Unsaved Workbooks".
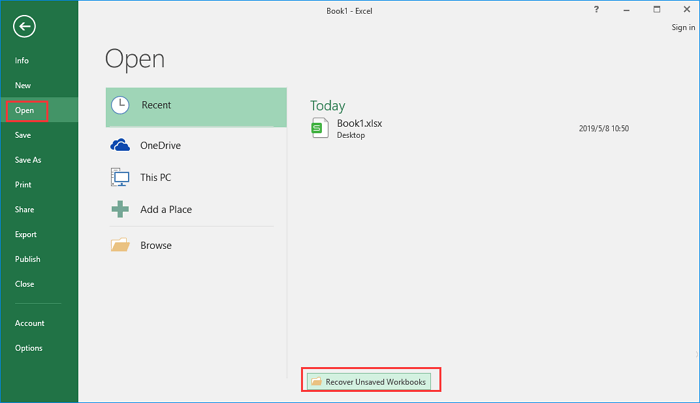
Step 2. To recover a lost workbook in Excel, select the workbook from the list of open workbooks, then open and save the Excel file. This will ensure that the workbook is properly saved and can be accessed again.
If AutoSave is enabled in Excel, recovering unsaved data is straightforward. However, it's essential to note that Excel's AutoSave or AutoRecover features should not replace manual saving, and users should still save their work in real-time to prevent data loss.
How to Recover Deleted Excel Files in Windows 10 and Mac
Accidentally deleting Excel files is a common issue, but users can recover them with Deep Data Recovery, which can also retrieve lost files like photos, videos, audio, emails, and more.
This reputable data recovery and repair tool is also effective in repairing corrupted Excel files efficiently. You can download it for free and learn how to recover permanently deleted Excel files in just three steps.
Step 1. Select file types and click "Next" to start
Launch Deep Data Recovery software. Select the desired file types and click "Next" to initiate the recovery process.

Step 2. Select location and click "Scan"
Select the drive or folder where the Excel files were lost, and click the "Scan" button to start the recovery process.

Step 3. Locate your excel files
To quickly find Excel files from the scan results, click the "Documents" option in the left panel, select "Excel", and click "Preview" to verify if the files are the desired ones.

Step 4. Recover Excel files
Select the desired Excel files, click the "Recover" button, and choose a folder to save the recovered Excel files to a different location.
Addition Information About Excel AutoSave
When using AutoSave in Excel, you may encounter issues such as various issues. Let's explore the methods to resolve these problems together.
1. Why can't I turn on AutoSave in Excel?
If AutoSave settings aren't working for certain files, especially large ones or those stored on SharePoint, you can try going to "File > Options > Save" and re-check the AutoSave box to see if that resolves the issue.
2. How to change AutoSave Location in Excel?
The AutoRecover file location path is typically C:\Users\Owner\AppData\Roaming\Microsoft\Excel, but can be changed as needed. To do so, users can follow the steps below.
Step 1. To access Excel's options, open Excel and click on "File" in the top left corner, then select "Options" from the dropdown menu. In Excel 2007, click the Office button and select "Excel Options" from the dropdown menu.
Step 2. Click Save in the left bar and find "AutoRecover file location".
Step 3. Enter your location in the field provided. Click "OK" to save the change. The default path will be removed.
3. How to disable AutoSave in Excel?
To turn off AutoSave in Excel 2016, follow the steps to enable AutoSave, locate the AutoSave option, and uncheck it.
Related Articles
- Fixed: Samsung SSD Not Showing Up in BIOS
- [Solved] Recover Data from Ext4/3/2 NAS/Linux Device
- How to Use Deep Data Recovery
- Run Deep Data Recovery from WinPE Bootable Disk
- Full Guide to Restore LINE Chat from Google Drive (iPhone & Android)
If you want to recover your LINE chat history from Google Drive, you can try the steps outlined in this post. Alternatively, you can also use Qiling MobiSaver, a user-friendly app that can help you recover your LINE chat history on both iPhone and Android devices. - How to Restore LINE Chat History from PC to iPhone/Android
To recover LINE chat history from PC to iPhone/Android, you can try several methods or use Qiling MobiSaver, a user-friendly app that can help you recover your chat history on both iOS and Android devices.