How to Mount ISO File in Windows 10/11
This article will guide you on how to mount ISO images in Windows 10/11, addressing common issues people face when trying to do so, and also provide a solution on how to safely restore deleted ISO files.
So, let's dive into the details.
ISO Image Overview
To mount an ISO image, you can use various methods depending on your operating system. On Windows, you can use software like PowerISO, MagicISO, or DAEMON Tools to mount the ISO image as a virtual drive.
An ISO image is a disc image that contains all sector data and file system of an optical disc, similar to an archive file, and is often used for CDs, DVDs, and Blu-Ray disks. The ISO file extension comes from the ISO 9660 file system, but it can also include the Universal Disk Format (UDF) system used for DVDs and Blu-Ray disks.
Here are the various methods to help you mount ISO images in Windows 10/11 without any problems. You can use the built-in utility, PowerISO, UltraISO, 7-Zip, or a virtual drive software like Virtual CloneDrive, Daemon Tools, or PowerArchiver.
How to Mount ISO Windows 10 to USB with File Explorer
The ISO file can be mounted through File Explorer using three distinct methods. Each method is described in detail, allowing the ISO image to be mounted successfully.
1. Use the Context Menu to Mount an ISO File
To mount the ISO file with File Explorer, right-click on the ISO file and select "Open with" > "File Explorer" from the context menu. This will allow you to access the contents of the ISO file as if it were a physical drive. Alternatively, you can also right-click on the ISO file and select "Open with" > "File Explorer" from the context menu, and then select the option to "Open as an archive".
Step 1. To locate the ISO image file, go to File Explorer and search for the folder containing the ISO image file.
Step 2. Once you find the folder, click right on the ISO file.
Step 3. Now click the "Mount" option from the context menu.
Step 4. To access your files on a virtual drive, select the drive from the panel on the left side of the window. This will allow you to view and manage the files stored on that drive.

2. Double Click to Mount the Image
The second easiest way to mount an ISO file with File Explorer is explained below in simple steps.
Step 1. Press the Win + E keys to open File Explorer.
Step 2. To find the folder containing the ISO image file, follow these steps: Search for the folder which contains the ISO image file. This can be done by looking through your computer's file system, typically found in the "This PC" or "Computer" section of your file explorer.
Step 3. Once you find the folder, double-click the iso file to start the installation process.
Step 4. After double-clicking, the file will open in a separate window, allowing you to access and extract its content as needed.
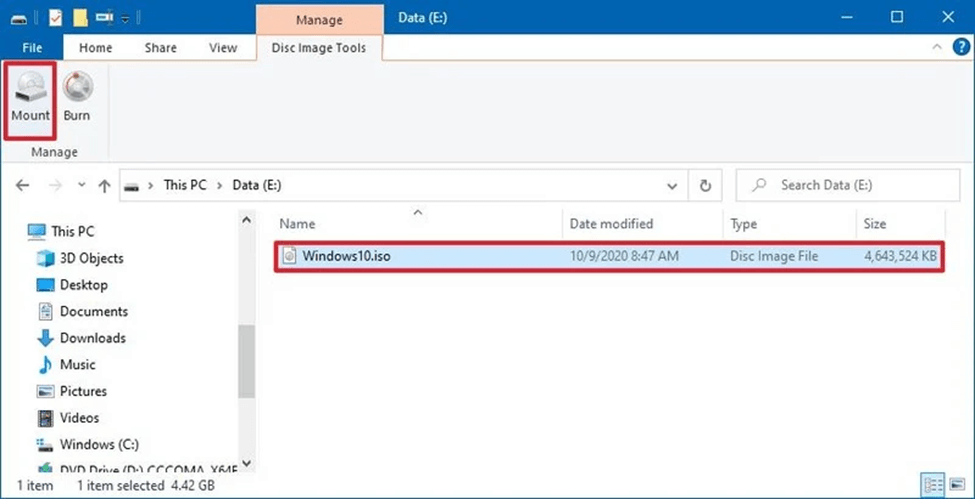
3. Mount ISO File by Using the Mount Option Located in the Ribbon Menu
To mount an ISO image or file from the ribbon menu, apart from the initial steps, follow these additional steps.
Step 1. Go to File Explorer.
Step 2. Now, search for the folder which contains the ISO image file, then select the ISO file.
Step 3. Click on the option "Disc image tools" at the top of the screen.
Step 5. Select the "Mount" option, which can be found in the top left corner of the screen.
Users typically don't see the "Mount" option on the menu bar because they have third-party tools set to open and run compressed files, which includes iso images. If this is the case, you can try mounting the iso image using File Explorer through one of the other two methods, as the Mount option may not be visible.
How to Mount ISO Image Using Windows PowerShell
To mount an ISO file in Windows 10 and 11, you can use PowerShell. Follow these steps to mount the ISO file using PowerShell commands.
Step 1. Click the "Start" option on your computer/laptop. Search for Powershell.
Step 2. Now click right on it to run it as an administrator.
Step 3. Paste the following command and hit Enter: Mount-DiskImage -ImagePath "CompletePathToISO.iso".
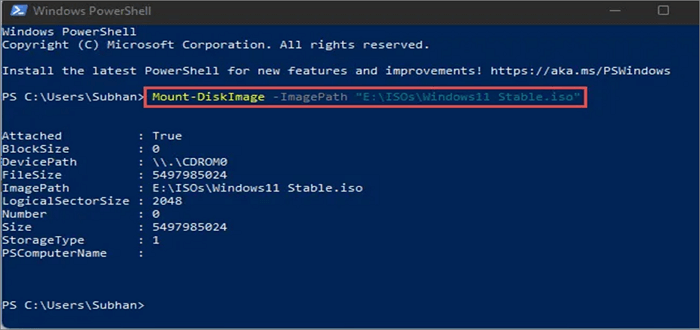
Replace "CompletePathToISO" with the actual path to the ISO file you want to mount. After running the command, the ISO file will be mounted and accessible as a virtual drive.
How to Recover Deleted or Lost ISO Image File Quickly
ISO files are typically large and can be reused by users. If a user accidentally deletes their ISO file, they can use Deep Data Recovery Free to recover it. This tool allows users to restore deleted or lost files in any format from various devices, including hard drives, solid-state drives, USB drives, and external hard drives.
This tool offers data recovery from damaged, corrupted, formatted, or RAW hard drives, allowing you to quickly recover 1000+ file types in just three simple steps without requiring any complex rules or techniques.
Step 1. Select file types and click "Next" to start
Launch Deep Data Recovery, select the file types you want to recover, and then click "Next" to begin the recovery process.

Step 2. Select the location to scan
Go to the device and drive where you permanently deleted files using Shift delete or emptied the recycle bin, then click the "Scan" button to find lost files.

Step 3. Check the results
The software will automatically scan the selected drive, and once complete, select the "Deleted Files" and "Other Lost Files" folders. Then, apply the filter feature or search for files to quickly find deleted files.

Step 4. Recover deleted files
Select the deleted files, click "Preview", and then click "Recover" to save them to a safe location.
Windows 10 Mount ISO Option Missing, How to Fix
Some users reported that when they right-clicked on ISO files, the "Mount" option disappeared from the context menu. To restore or add the Mount option, you can try resetting Windows Explorer, checking for corrupted system files, or reinstalling the Windows Subsystem for Linux (WSL) if you're using it, as these methods may resolve the issue.
Fix 1. Add Missing Mount Option Using Properties
To quickly restore the mount option without spending too much time on the process, you can follow these steps using the Properties option.
Step 1. To access the ISO file, go to the File Explorer on your computer, then navigate to the folder that contains the ISO file.
Step 2. Simply right-click on the ISO file. Then, select the "Properties" > "Change".
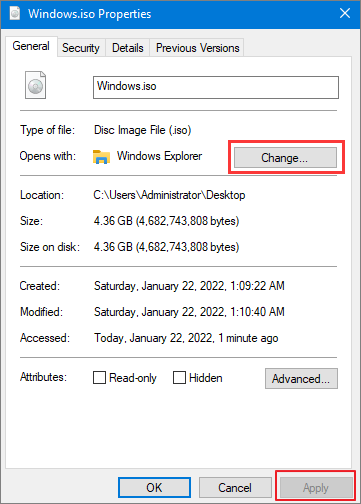
Step 3. Select File Explorer from the list and click OK and then Apply.

To view the mount option when right-clicking on an ISO file, follow these steps: 1) Right-click on the ISO file, 2) Select 'Open with' and choose your preferred media player, 3) Click 'Open' to mount the ISO file, and 4) Right-click on the mounted ISO file and select 'Properties'. In the properties window, you will see the mount option listed.
Fix 2. Restore the Missing Mount Option Using Settings
The mount option will be directly accessible in the context menu by selecting the file explorer from the settings app.
Step 1. Search and select the "Settings" app on your device.
Step 2. Click the "Apps" and then Default apps
Step 3. Click "Set Defaults by Apps."
Step 4. Select the Windows Disc Image Burner and click the Manage option.
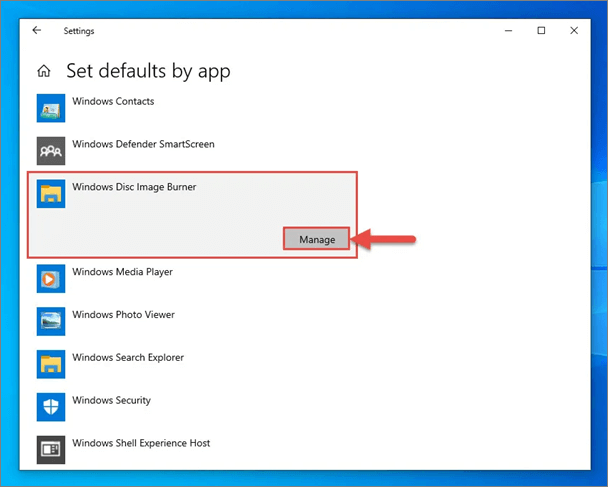
Step 5. Select the "File Explorer" as the default app for iso files.
Step 6. After setting File Explorer as the default app for ISO files, the mount option will appear in the context menu when you right-click on any ISO file.
Fix 3. Add Mount ISO Option Using Control Panel
You can also use the control panel for restoring the mount option by carrying out the below steps.
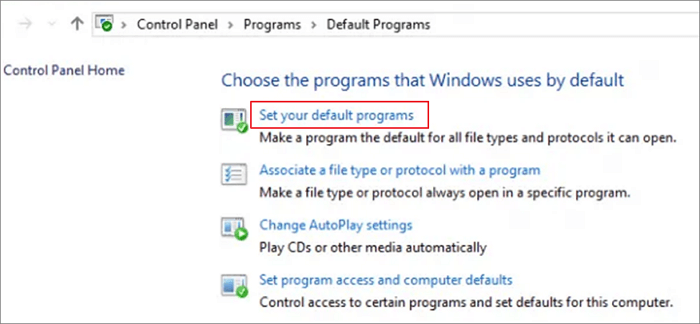
Step 1. Go to "Control Panel > Programs > Default Programs".
Step 2. Click "Set your default programs".
Step 3. Click "Choose defaults for this program".
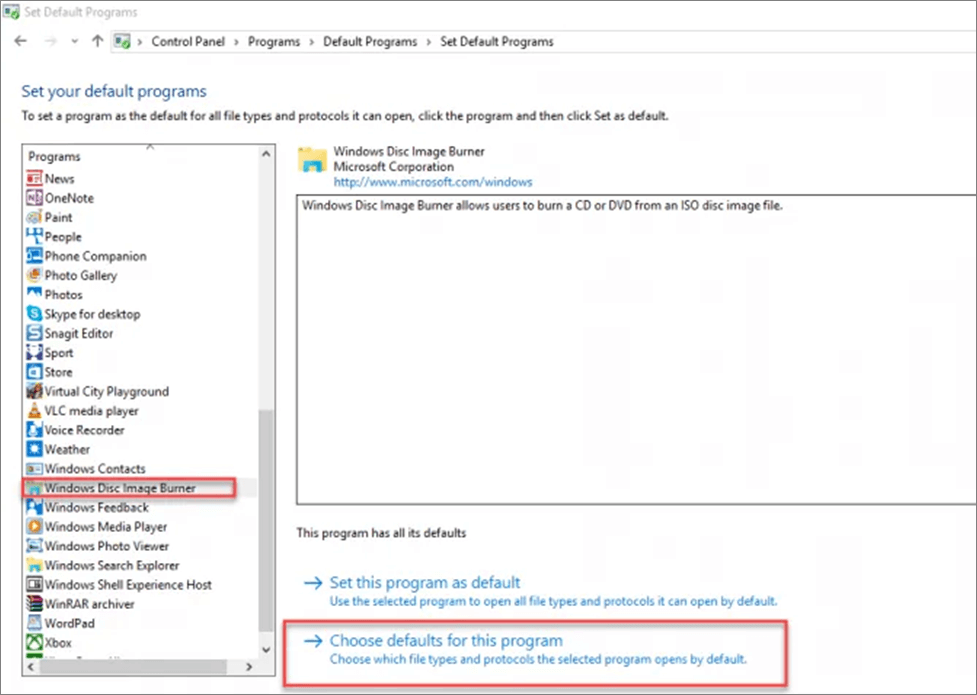
Step 4. Click on the "Check all" and "Save" in the list which appears.
The mount option will be added to the context menu, which can be accessed by right-clicking on the iso file.
The Bottom Line
This guide provides a simple and easy-to-understand explanation of how to mount an ISO file on Windows 10/11. It covers two main methods: mounting through File Explorer and using the PowerShell command. The article aims to help users troubleshoot any issues they may encounter when mounting an ISO file in Windows 10/11.
This article provides a solution to help you retrieve deleted ISO files using the Qiling data recovery software, offering an affordable and easy-to-use tool to resolve multiple ISO issues.
Related Articles
- Troubleshoot Windows 11 Not Showing Up in Windows Update
- How to Convert a Shortcut File into Original File
- How to Repair Corrupted Files After Recovery in Windows 10, 8, 7
- Free Shortcut Virus Remover Software/Tool
- How to Corrupt a PDF File so That It Can't Be Opened (Step-by-Step Guide)
How to corrupt a PDF file so that it cannot be opened? This how-to article teaches you how to corrupt a file in two ways by using Notepad and Corrupt a File.Net tool. Meanwhile, if you mistakenly corrupt a wanted PDF, use Stellar PDF file repair tool to fix the corrupted PDF files efficiently. It can restore the text, hyperlinks, graphs, watermark, and digital signatures from corrupted PDF files efficiently. - How to Delete a Corrupted File Windows 10? Simple Methods Here!
If you're having trouble deleting a corrupted file on Windows 10, don't worry - there are still ways to get rid of it. You can try deleting the file using an administrator account, or booting into Safe Mode to see if that makes a difference. Alternatively, you can use the Command Prompt (CMD) to delete the file, among other methods.