Free Fix Hard Drive Partition Shows 0 Bytes Error in Windows 11/10/8/7
To fix a drive showing 0 bytes, try the following solutions. First, check the drive's file system for errors using built-in tools like chkdsk on Windows or diskutil on macOS. If the issue persists, try running a virus scan to ensure the drive isn't infected with malware.
| Workable Solutions | Step-by-step Troubleshooting |
|---|---|
| Fix 1. Restore data | Run Qiling recovery software, scan to find...Full steps |
| Fix 2. Format to NTFS | In Disk Management, right-click 0 bytes drive...Full steps |
| Fix 3. Convert Raw to NTFS | Run CMD to convert the RAW drive to NTFS...Full steps |
| Fix 4. Check disk errors | In File Explorer, right-click 0 bytes HDD/SSD...Full steps |
| Fix 5. Update driver | In Device Manager, update 0 byte drive driver...Full steps |
Hard drive shows 0 bytes used, how to fix it
You've noticed that one of your computer hard drive partitions has shown as 0 bytes since last Friday, and now you're concerned because you need to access a very important file saved in that partition.
If your computer's hard drive partitions suddenly show 0 bytes, don't worry - there are solutions to fix this issue in Windows 10/8/7. The problem can be resolved by following the steps outlined on this page, allowing you to regain access to your data and restore your hard drive to its normal state.
Note: The symptoms of 0 bytes hard drive partitions in Disk Management are RAW and No Media, indicating a problem with the partition. The solution to this issue varies depending on whether you encounter RAW or No Media, and can be resolved by following the appropriate steps to address the specific error.
- Tip
- A quick fix toward this issue is to:
- 1. Unplug, replug the hard drive and reboot the computer.
- 2. To resolve the issue, simply replace the power line of the hard drive and the STATA cable, then restart the computer. This should resolve the problem.
- If this doesn't work, follow on and get the issue resolved.
[Fixed] 0 Bytes Hard Drive Shows RAW in Disk Management
To fix a 0-byte hard drive or SSD partition that shows as RAW, but is online and has a healthy state, you can try running a full scan with a disk checking tool like Chkdsk or a third-party software like Qiling Disk Master. This can help identify and repair any logical corruption that may be causing the RAW status.
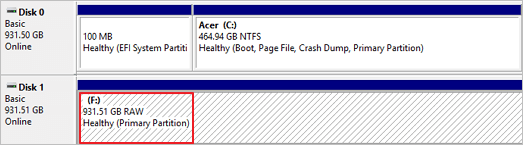
If you encounter a hard drive partition or HDD/SSD with a RAW issue, it may display 0 bytes used in device properties. To resolve this issue without data loss, you can follow the steps outlined in the guide provided, which will help you recover your data.
# 1. Restore Data
When a device shows 0 bytes in Disk Management, it means you can't access the data. Fortunately, professional hard drive recovery software can help you recover your precious data. Tools like Deep Data Recovery enable fast and secure data recovery on hard drive partitions, USB drives, SD cards, and other storage devices affected by the "0 bytes" issue.
Step 1. Choose file types and click "Next" to start
Run Deep Data Recovery on your computer. Choose the desired file types and click "Next" to initiate the scan.

Step 2. Select a drive and start scanning
Hover over the partition where you lost data, then click "Scan".

Step 3. Check and preview scanned files
To narrow down the scan results, use the file format filter on the left or upper right corner. This allows you to find the specific files you need. Once you've filtered the results, you can click the "Preview" button or double-click a file to view its content. This way, you can see what's inside the files without having to open them individually.

Step 4. Recover lost data to a secure location
To recover lost data, select the file, click the checkbox next to it, and then click "Recover". Store the recovered data in a secure location, away from the original disk where the data was lost.
Remember to save the restored data to another secure device until the error is resolved.
Consult with Qiling Data Recovery Experts for a one-on-one manual recovery service. After a FREE diagnosis, we can offer various services, including manual recovery.
- To repair a corrupted RAID structure, unbootable Windows OS, or damaged virtual disk file, you can try using specialized tools like Qiling Backup, DiskGenius, or Deep Data Recovery. These tools can help you recover data from the corrupted RAID, fix the Windows OS, or repair the virtual disk file. You can also try using built-in Windows tools like Check Disk (chkdsk) or the built-in Windows Recovery Environment to troubleshoot and repair issues. Additionally, you can use third-party tools like Qiling backup to create a backup of your data and then restore it to a healthy state. It's essential to act quickly, as the longer you wait, the higher the risk of data loss.
- Recover/repair lost partition and re-partitioned drive
- Unformat hard drive and repair raw drive (BitLocker encrypted drive)
- Fix disks that become GPT protected partitions
# 2. Fix 0 Bytes Error on RAW Hard Drive (3 Methods)
Quick Fix - Change the Hard Drive Letter
If your hard drive shows 0 bytes, it could be due to a connection issue or the drive letter not being detected. To troubleshoot, try reconnecting the hard drive and assigning a new drive letter to it. This simple step might resolve the issue.
Step 1. Press "Windows+R" and type diskmgmt.msc and hit "Enter". The Disk Management window appears.
Step 2. Right-click on the hard drive that shows 0 bytes free space and choose "Change Drive Letter and Paths…"
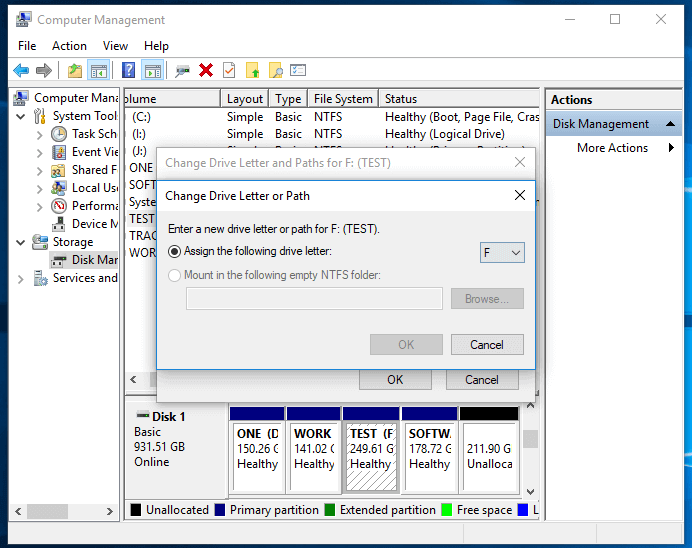
Step 3. Click the Change drive letter button and choose a drive letter from the drop-down list.
Step 4. Click "OK" and then click "Yes" when prompted. Click "OK" to confirm and close the box.
3 methods to resolve the RAW issue on a 0-byte hard drive partition are: using the built-in Windows feature to scan and repair the drive, running a third-party disk recovery software, or using a specialized tool to restore the partition table and file system. These methods can help recover data from a corrupted hard drive partition.
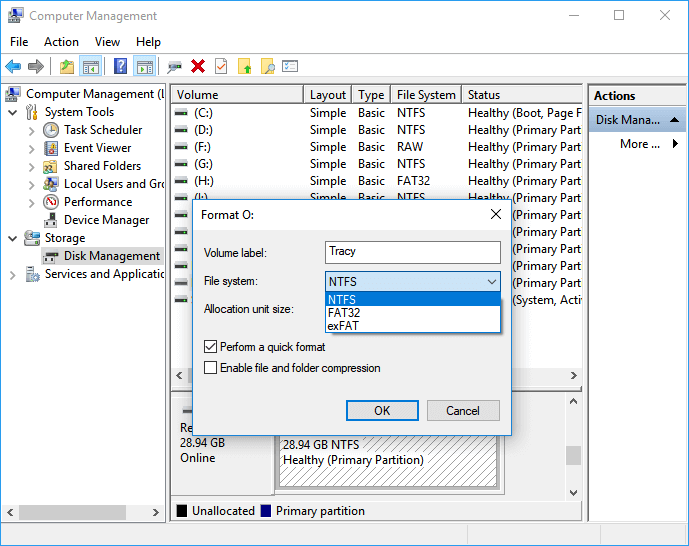
Method 1. Format 0 Byte RAW SSD/Hard Drive Partition to NTFS
After restoring data, you can use Disk Management to format the 0 bytes RAW hard drive partition to NTFS in one step, which will make the drive usable again.
- Step 1: Right-click on This PC/My Computer, select "Manage".
- Step 2:To format the 0 byte hard drive partition, open Disk Management, locate the partition, right-click on it, and select the "Format" option.
- Step 3: Select NTFS as the file system for the partition and click "OK" to confirm.
-
Method 2. Convert RAW Hard Drive to NTFS with CMD
If you're experiencing issues with a device on a 0-byte used hard drive, you can try resolving the RAW file system issue by converting it to NTFS using a CMD command. This alternative method can help resolve the problem.
Step 1. Press Windows + R, type diskpart, and hit Enter.
Step 2. Enter the following commands hitting Enter after each line:
- list volume
- select volume X ("X" means the volume number of the RAW drive)
- format fs=ntfs quick (or format fs=fat32 quick)
- exit
Then, check the drive.
Method 3. Run Disk Error Checker
- Step 1:Open File Explorer, right-click on the 0 bytes HDD/SSD partition, and select "Properties" to go to the Tools tab.
- Step 2: Click on the Check button under the Error checking section.
- Step 3: It scans the SD card and automatically repairs file system errors found.
-
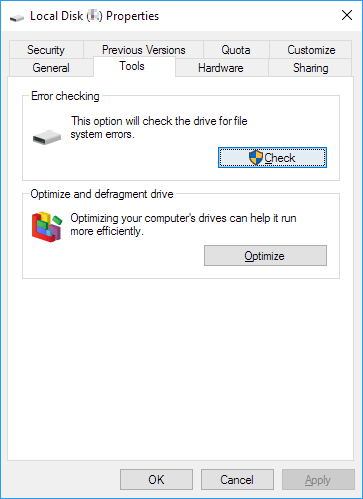
When the process completes, you can restart the PC if necessary. Then the partition will be available for saving and storage new files and you can copy the restored data back to the partition again.
[Resolved] 0 Bytes Hard Drive Shows No Media in Disk Management
To resolve the issue of a 0-byte hard drive displaying "No Media" in Disk Management, you can try running the Check Disk (chkdsk) command in Command Prompt as an administrator. This command can help identify and potentially fix any disk errors that may be causing the issue.
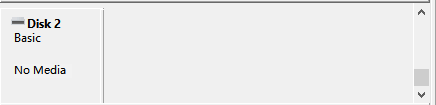
To repair 0 bytes used hard drive or partition which displays No Media in Disk Management, you have two methods to try here below.
# 1. Update Hard Drive Driver
- Step 1: Right-click on the This PC/My Computer icon, select Manage, and go to Device Manager.
- Step 2:To update the disk driver, expand the Disk drives section, right-click on the 0 bytes hard drive that appears as "No media", and select "Update driver".
-
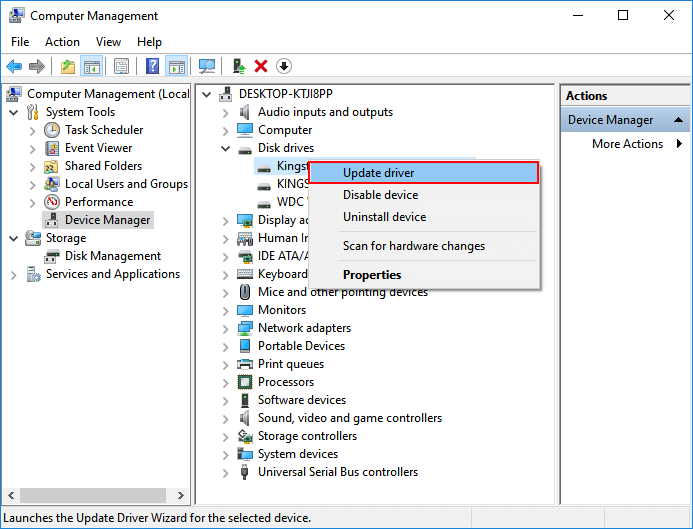
- Step 3: Select "Search automatically for updated driver software" and wait patiently till the process completes.
- Restart the PC if necessary.
If you have a customized hard drive or SSD, you can find and install the correct driver from the manufacturer's website to ensure proper functionality.
After updating the device, check the hard drive partition to see if you can access the data. Also, check the display state in Disk Management to confirm.
- If it shows RAW, follow the above solutions and fix it.
- If the device shows Offline, try to activate it to Online and then attempt to open it again.
- If it still shows no media, follow Method 2 below for help.
# 2. Take 0 Bytes No Media Hard Drive to Local Device Repair Center
When the first method fails, take your hard drive to a local storage device repair center or its manufacturer's support center for repair.
Related Articles
- How to Fix SD Card Not Detected in Android Phone/Windows Error [2022 New]
- [Fixed] Drive Is Not Accessible, Access Is Denied in Windows 10/8/7
- 4 Fixes to You Must Initialize a Disk Problem
- 6 Fixes for Xbox One Won't Turn On Issue
- Top List of Data Recovery Services in USA [2023 NEW]
To find a data recovery service near you in the USA, you can use a service finder to locate a data recovery service in your area. These services specialize in safely recovering data from various devices such as hard disk drives (HDD), solid state drives (SSD), SD cards, RAID systems, and external hard drives. - Deleted File Recovery Software Free Download Full Version with Key
Deleted file recovery software free download full version can help you recover unlimited deleted or lost files from a hard drive, external hard drive, USB flash drive, SD card, or other storage devices on Windows 11/10/8/7 and macOS. Free download Qiling deleted data recovery full version with a key to restore lost data via simple steps.