Fixed: Windows 10 Freezes While Copying Files, No Data Loss
To fix the issue of Windows 10 freezing or becoming stuck when copying files, restart your computer and then try the copy operation again. If the problem persists, try disabling any recently installed software or drivers that may be interfering with the file copy process.
| Workable Solutions | Step-by-step Troubleshooting |
|---|---|
| Fix 1. Close Running Programs | Press Ctrl+Alt+Del > open Task Manager > End Task of running program...Full steps |
| Fix 2. Check Bad Sectors | Run Qiling Partition Master > Right-click device > "Surface test"...Full steps |
| Fix 3. Disable Remote Compression | Open Windows Feature > Disable Remote Differential Compression...Full steps |
| Fix 4. Delete Desktop.ini File | Open File Explorer > "View" > "Options" > Click "View" > Check "Show hidden files, folder..."...Full steps |
| Fix 5. Restore Lost Files | Run Qiling file recovery software > Scan drive > Restore lost files if file copying fails...Full steps |
- If you lost files or data due to Windows 10 freezes while copying files, professional data recovery software like Deep Data Recovery can restore all lost files for you.
- If Windows 10 is stuck in copying files, try restarting the computer, checking the drive for errors, and ensuring the USB drive is properly formatted and connected. Additionally, you can try disabling the Secure Boot feature, checking for any corrupted system files, and running a System File Checker scan.
Problem: Windows 11/Windows 10 hangs and freezes while copying files
Windows 10, 8, and 7 users often experience issues with their operating system freezing or getting stuck while copying files to another hard drive or an external storage device. This problem can occur due to various reasons, including hardware conflicts, software glitches, or issues with the file system.
If Windows 10 freezes while copying files from drive D: to E:, it's likely due to a disk space issue on drive E:. Try checking the available disk space on drive E: and consider deleting unnecessary files to free up space. You can also try running the System File Checker (SFC) and the Check Disk (chkdsk) utilities to identify and fix any disk errors.
"Windows 10 freezing while copying files from D: to E: drive. 6GB of files saved on D: drive. Need to move files without losing data. Is there a way to resolve this issue without data loss?"
If your Windows 10 PC is stuck while copying files from the PC to an external device, try restarting the Windows Explorer process. To do this, press the Ctrl+Shift+Esc keys simultaneously to open the Task Manager. Look for the Windows Explorer process and click on it.
Your Windows 10 computer is stuck on copying files from PC to an external hard drive. To resolve this issue, try restarting your computer, checking the external hard drive for errors, or using the built-in Windows utility to safely eject the drive. You can also try using a third-party disk cloning software to clone the files to the external hard drive. If none of these methods work, you may need to try a system restore or seek further assistance from a technical expert.
If you're experiencing this issue, don't worry, you can fix it without losing any files. To do so, follow the methods below:
Fixes for Windows 11/Windows 10 Freezes or Stuck Copying Files Error
To resolve the Windows 10 freezing or hanging issue while copying files, you can try the following quick fixes and manual methods. First, stop the file copying process and retry, or close running programs that are consuming high CPU or disk usage. For more persistent issues, check for bad sectors on the drive, disable Remote Differential Compression, or delete the excessively large Desktop.ini file.
Two Quick Fixes
# 1. Stop the file copying process and retry again
If your Windows 10 gets stuck right after starting the copying process, you can stop the process and retry again.
Step 1. Click "Cancel" on the file copying taskbar or the close button at the right top corner.
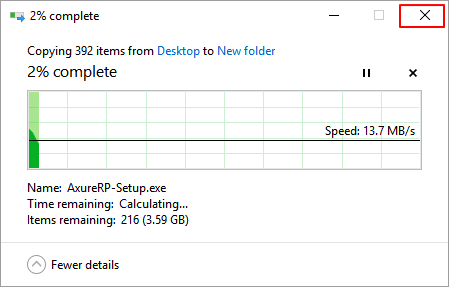
Step 2. Click "Yes" to confirm that you want to abort the copying process.
Step 3. Select files to copy and save to your target hard drive or external storage device again.
Wait for the file copying process to complete in Windows 10.
# 2. Stop running programs and services that freeze Windows 10 on copying files
Step 1. Press Ctrl + Alt + Del and select Task Manager.
Step 2. Select the running programs and services that are taking high CPU or Disk usage.

Step 3. Click "End Task" to finish the process.
This will stop running programs and services that are taking high CPU or Disk usage, causing Windows freeze issues, allowing you to retry copying files to another drive.
If the copying process gets stuck while transferring files to an external storage device, verify that the power supply and USB cable are properly connected.
Three Manual Methods
Method 1. Check Bad Sectors on Hard Drive or External Storage Device
When a hard drive or external storage device has too many bad sectors, it can become extremely slow and even get stuck while performing operations on a Windows PC.
Qiling Partition Master Free Edition, a free partition manager software, has a Surface Test feature that allows users to check existing bad sectors on their hard drive or other storage devices.
Step 1. Open Qiling Partition Master, right-click the disk you want to check, and click "Advanced" then "Surface Test".
Step 2.The operation will be done right away and all bad sectors will be marked as red.
The disk check process identifies bad sectors on your hard drive, which can be caused by physical damage, power outages, or other factors. Once the bad sectors are identified, you can decide how to proceed, such as running a disk check to mark the bad sectors as unusable, or using a data recovery tool to attempt to recover data from the affected areas.
- If the first sector on your device is marked as red, the whole disk is damaged and you can do nothing to it.
- If the existing bad sectors on your device have already exceeded 10% of the existing data, it may cause issues while running programs or executing operations on the disk, potentially leading to system crashes or freezes.
- To resolve this issue, we suggest you upgrade the old disk to a new drive.
Method 2. Disable Remote Differential Compression and Turn Off Thumbnail
# 1. Disable Remote Differential Compression:
Step 1. Type Windows Features in the Search box and open Turn Windows Features On or Off.
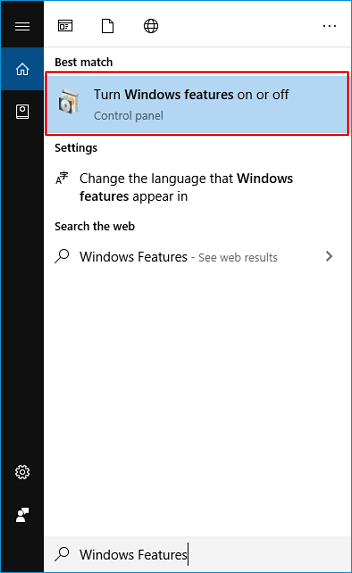
Step 2. Uncheck Remote Differential Compression box, click "OK". Then restart your PC to keep all the changes.

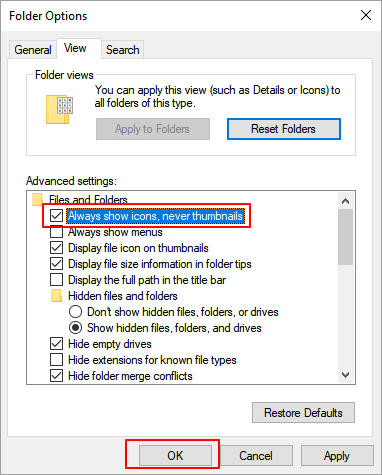
To speed up copying files in Windows, turn off the thumbnail preview feature. This can be done by going to File Explorer Options, clicking on the View tab, and unchecking the "Show thumbnails" option. This will disable thumbnail generation, allowing for faster file copying.
Step 1. Open the File Explorer and click "View".
Step 2. Click "Option" and a new dialog Folder Option will open.
Step 3. Click View, check "Always show icons, never thumbnail", click "Apply" and "OK" to turn off the Thumbnail.
Method 3. Check and Delete Desktop.ini File
Desktop.ini files are typically small and invisible, but if one becomes excessively large, exceeding 100MB, it can significantly slow down your device's performance.
To troubleshoot the issue, you can try deleting the Desktop.ini file. This file can sometimes cause problems with the desktop, and deleting it may resolve the issue.
Step 1. Open Windows File Explorer, go to the View Tab and click "Options".
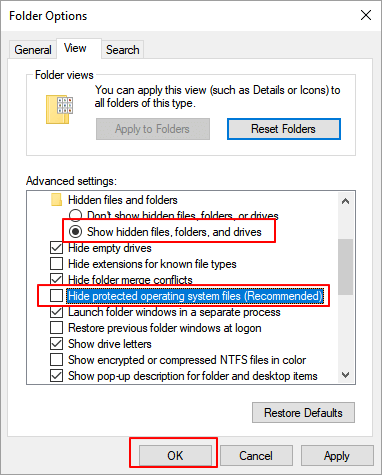
Step 2. On Folder Options, go to the View tab.
To access hidden files, folders, or drives, check the box next to "Show hidden files, folder, or drives" and uncheck the box next to "Hide protected operating system files" in the Folder Options window, then click "OK" to confirm.
Step 3. If the Desktop.ini file is extremely large, over 100MB, delete it and restart your PC to resolve the issue.
When you finish the process, you can retry to copy files to another storage device again on your Windows 10 PC.
Extra Tip: Restore Lost Files If File Copying Fails in Windows 10/11
If you've lost files due to Windows freezing on copying a file or Windows 10 copying files failing, don't worry. Professional data recovery software from Qiling can help you recover your lost files with simple steps.
Step 1. Select file types
Run Deep Data Recovery and select the file types. Click "Next" to start the recovery process.

Step 2. Select a location and start scanning
Choose the partition where you lost data. Then, click "Scan".

Step 3. Filter and preview files
Use the file format filter on the left or upper right corner to find the specific files you need, and then click the "Preview" button or double-click a file to preview its content.

Step 4. Recover lost data or files
Click the checkbox next to the file and click "Recover" to restore the lost data to a secure location.
You can resolve Windows 10's stuck or hangs while copying files using two quick fixes and three manual methods. The quick fixes involve running the built-in System File Checker (SFC) and DISM tools, while the manual methods include running the Windows Update Troubleshooter, resetting the Windows Update components, and using the Command Prompt to copy files with the Robocopy command.
When you lose files on your Windows PC due to copying file failure, deletion, formatting, or other reasons, Deep Data Recovery is ready to help and recover your files.
Related Articles
- 'The file cannot be opened because there are problems with the contents' Fixes
- Recover Deleted or Lost Chrome Bookmarks, Histories and Favorites
- Fix Word Document Is Blank When Opened
- How to Remove Folders and Files from Quick Access Windows 10/11
- [Stepwise Guide]: How to Recover Deleted Files on Windows
The article offers four methods to recover deleted files on Windows 10 or 11, providing users with options to choose the method that suits them best. - How to Recover Deleted Partition in Windows 11, 10, 8, 7?
Follow this step-by-step guide on how to recover deleted partition in Windows 11/10. Some tested solutions are provided here, including repairing damaged/corrupted partitions.