How to Disable AutoSave in Word and Excel
What Is AutoSave in Word/Excel
Microsoft's AutoSave feature is enabled by default when saving files to OneDrive or SharePoint in Microsoft 365. This feature automatically saves any changes made to a file, potentially overwriting the original document. To disable AutoSave, users can follow specific steps to turn it off.
| Workable Solutions | Step-by-step Troubleshooting |
|---|---|
| Disable AutoSave on Windows | Open an Office 365 program that can open a Word, Excel, PowerPoint, etc. file and...Full steps |
| Disable AutoSave on macOS | Open Excel or Word or any of the Office programs and click (in our case) Excel...Full steps |
| Recover Lost Word/Excel Files | Choose the Word file location. If it's on a USB flash drive or SD card, connect it to your computer...Full steps |
Part 1. How to Disable Word/Excel AutoSave on Windows
To disable AutoSave in Microsoft Word or Excel on Windows 10/8.1/8/7, follow these steps.
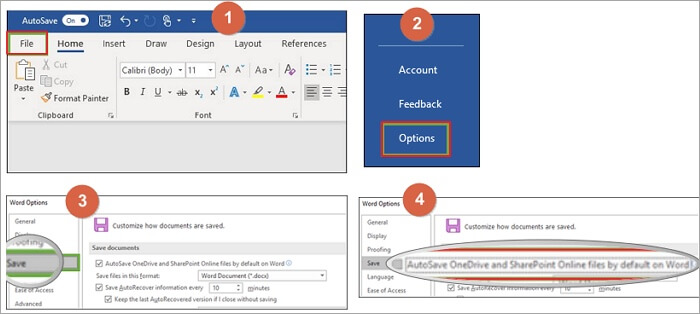
Step 1. Open an Office 365 program such as Word, Excel, or PowerPoint, click on the "File" tab, and select it.
Step 2. Select "Options" from the left navigation.
Step 3. In the "Options" window, select "Save" from the left navigation.
Step 4. Under Save documents, locate AutoSave files stored in the Cloud by default in Word and uncheck it.
Part 2. How to Disable Word/Excel AutoSave on macOS
If you turn off AutoSave for a specific file on a computer, the application will remember to keep it off every time you reopen that file. However, the behavior may vary on a Mac.
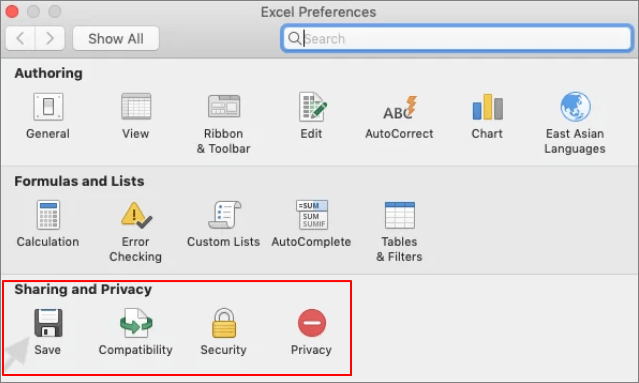
Step 1. Open Excel or any of the Office programs by clicking on the corresponding icon in the toolbar at the top of the screen.
Step 2. Click "Preferences".
Step 3. To save changes in the Preferences Dialog box, click the "Save" button located at the bottom of the box under the "Sharing and Privacy" section.
Step 4. Unselect the "Turn on AutoSave" by default.
Part 3. How to Recover Lost Word/Excel Files on Your PC
Microsoft Office's AutoSave feature is turned on by default, providing a safeguard against data loss. However, if you've turned it off, you'll need to take extra precautions to protect your files. If you do experience data loss, you can use professional data recovery software like Deep Data Recovery to restore deleted or lost files, including Word, Excel, and PPT documents.
Deep Data Recovery
- Recover lost or deleted files, documents, photos, audio, music, emails, and other digital data with ease and effectiveness.
- To recover files from an SD card, emptied recycle bin, memory card, flash drive, digital camera, and camcorders, you can use data recovery software such as Deep Data Recovery. This software can scan the device and recover deleted files, including photos, videos, and documents.
- Data recovery support is available for various situations, including sudden deletion, formatting, hard drive corruption, virus attacks, and system crashes. This assistance can help recover lost data under different circumstances.
Follow the steps below to recover lost Word or Excel files.
Step 1. Select file types
Launch Deep Data Recovery. Select file types and click "Next" to start.

Step 2. Choose the Word file location
Select the drive or folder you want to scan and click the "Scan" button.

Step 3. Locate your Word files
The software will immediately scan all lost data on the selected drive, then click the "Documents" option in the left panel, choose "Word" from the category bar, and finally click "Preview" to view the recovered Word files.

Step 4. Recover Word files
Preview the lost Word files, select the desired ones, click "Recover", and choose a folder to store them.
Conclusion
AutoSave is a feature in Excel, Word, and PowerPoint for Microsoft 365 subscribers that saves files automatically, and it's recommended to keep it on to protect Office data. However, it can sometimes cause issues, and users can disable it using the provided methods. If Office data loss occurs, users can also consider using Qiling data recovery software.
Related Articles
- Where Is the Recycle Bin in Windows 10/11, How to Find and Open Recycle Bin
- [Official and Latest] Deep Data Recovery Crack, Serial Key, License Code 2022
- Free Undelete Software for Windows 10/11
- How to Activate Windows 10/11 with Product Key/Digital License/CMD
- [Solved] SQL Server Error 3013/3266: Backup Database Is Terminating Abnormally
You're experiencing SQL Server error 3013, but don't worry, there are ways to fix it. Methods include Qiling MS SQL Recovery, which is a reliable tool that can easily repair SQL server databases and resolve various SQL database repair issues. This solution can help you resolve all types of SQL database repair problems. - SSD vs HDD, HDD vs SSD Speed and Gaming, Which Is Best for You
To choose between an SSD and HDD, consider that SSDs are significantly faster than HDDs, making them ideal for gaming and improving overall system performance. They use flash memory to store data, allowing for quick loading times and responsive gameplay. In contrast, HDDs use spinning disks and mechanical heads to read and write data, resulting in slower speeds and potential lag. If you're looking to upgrade your gaming experience, an SSD is likely the better choice.