How to Fix Dell No Hard Drive Detected Error
"When I start up my computer and it's loading the bios it says something like this: No Device Detected. I don't know what happened to it randomly did this, and it's been doing this for like a week (won't work) its definitely plugged in and powered so I don't know what could be wrong or if its just broke. If I get a new hard drive would it work or is there another reason why it's not being detected or working?"
The "hard drive not detected" issue can occur on various laptops, including Dell, HP, Samsung, and others, often when the computer is started. If you're experiencing this issue on your Dell laptop, you can try the following 5 fixes to resolve the problem.
| Workable Solutions | Step-by-step Troubleshooting |
|---|---|
| 1. Check BIOS Settings | Shut down the computer and press the power button to restart it...Full steps |
| 2. Run Dell Diagnostic Tool | Shut down Dell. Press the power button to restart it. Keep taping...Full steps |
| 3. Check Hard Drive Connection | Before uninstalling the hard drive, you should backup all your data...Full steps |
| 4. Update Dell Drivers | Identify the Dell product. Scan for the available updates...Full steps |
| 5. Run An Data Recovery Software | Connect the hard drive to another PC via SATA cable and download...Full steps |
Why is Hard Drive Not Detected in Dell
There are the culprits why does dell laptop say no hard drive detected:
- Hard disk not detected.
- Corrupted BIOS.
- The hard drive has bad sectors.
- Loose or damaged SATA cable.
...
If your Dell laptop is showing a "No Hard Drive Detected" error, don't panic. This issue can be caused by a faulty hard drive, a loose connection, or a BIOS setting issue.
Fix 1. Check BIOS Settings on Dell Laptop
Step 1. To restart the computer, shut it down completely by clicking on the Start menu, selecting the Power option, and choosing Restart. Then, press the power button on the computer to turn it back on.
Step 2. Press F2 many times to enter the BIOS.
Step 3. The Setting menu is located on the left side of the Dell screen.
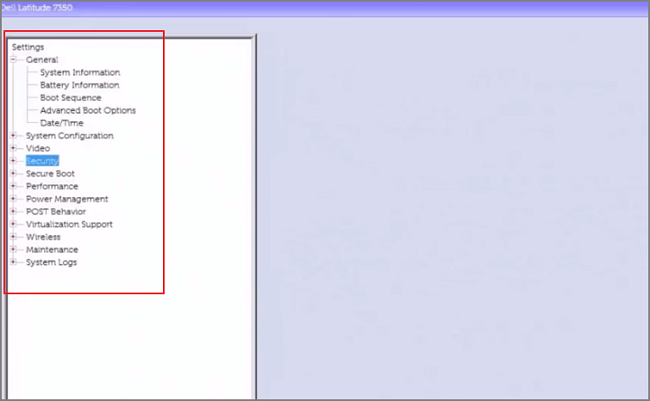
Step 4. Under the General tab, click Date/Time.
If your computer's date and time are incorrect, it may cause issues with your hard drive's functionality. Ensure your system's date and time are accurate to prevent potential problems.
Step 5. Click Boot Sequence to change the boot option.
You can't boot your computer right now, so it's recommended to change the Boot List Option.
Change UEFI to Legacy:
- Expand the Secure Boot tab
- Click Secure Boot Enable
- Turn on Disabled
- Click Yes when the warning window pop up
- Go to Advanced Options
- Check the box of Enable Legacy Option ROMs
- Go back to Boot List Option and choose Legacy.
Change Legacy to UEFI:
- Go to Secure Boot
- Click Secure Boot Enable and choose Enabled
- Navigate to Advanced Boot Options
- Uncheck Enable Legacy Option ROMs
- Go back to Boot Sequence and choose UEFI.
Step 6. Change System Configuration
To change the SATA operation to AHCI, go to System Configuration, select SATA Operation, choose AHCI, click Apply, and then click OK in the Apply Setting Configuration box.
Step 7. Exit from BIOS and restart your computer.
To check if Windows is booting from the hard drive in a Dell computer, follow these steps: Restart your Dell computer and immediately start tapping the F2 key. This will take you to the BIOS settings.
Fix 2. Run Dell Diagnostic Tool
If the BIOS settings don't work, you can use the Dell self-diagnostic test to check for hard drive errors. The Dell ePSA diagnostic tool can be used to scan the hardware and identify malfunctioning components.
Step 1. Shut down the computer. Press the power button to restart it. Keep tapping the F2 key.
Step 2. You can see the diagnostic screen.
Step 3. Use the Down arrow key to focus on the Diagnostics.
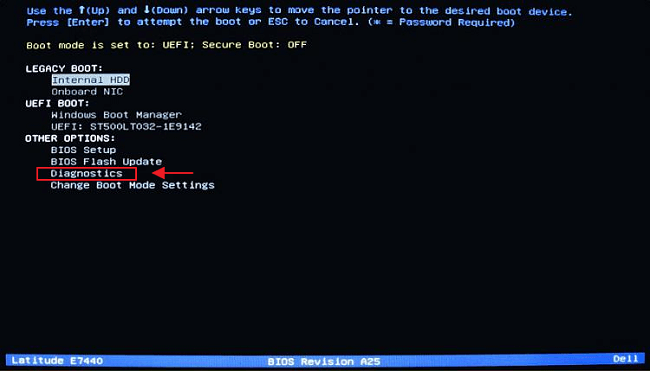
Step 4. Hit Enter button and you can run your diagnostic tool.
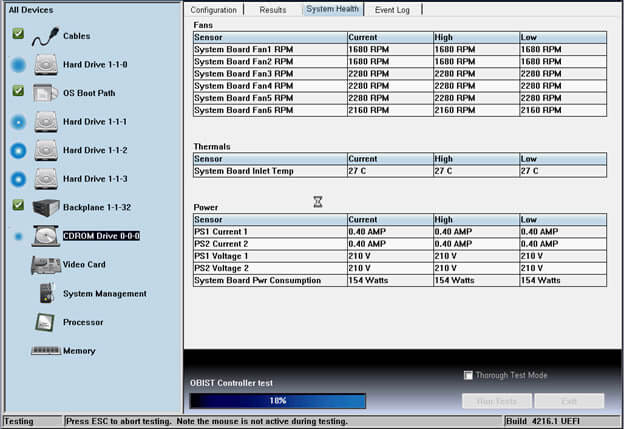
If you see color bars displayed on your screen, choose Yes or No based on your observation, and then wait for the testing process to be completed.
Step 5. The arrow icon on the right corner of the screen is the "Navigate" button. Clicking it will open the navigation menu, allowing you to switch between different apps, windows, or virtual desktops.
The system allows you to check the status of all scanned hardware on the left side of the screen. A green checkmark indicates that the hardware is functioning properly, while a red mark signifies any issues or problems with the hardware.
Fix 3. Check Hard Drive Connection from Dell Laptop
Before uninstalling the hard drive, backup all data to avoid loss, disconnect all cables, and if needed, contact a computer service store.
To uninstall a hard drive, first determine which system you are using: Latitude, Precision, or Inspiron. For assistance, refer to the "How to Uninstall Hard Drive" guide provided by Dell.com.
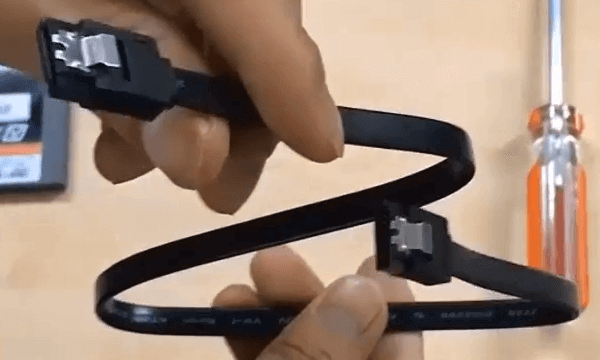
Check the SATA cable of the hard drive for looseness or damage. If it's loose, tighten it firmly.
Fix 4. Update Dell Drivers
You can update your dell drivers to make it detectable.
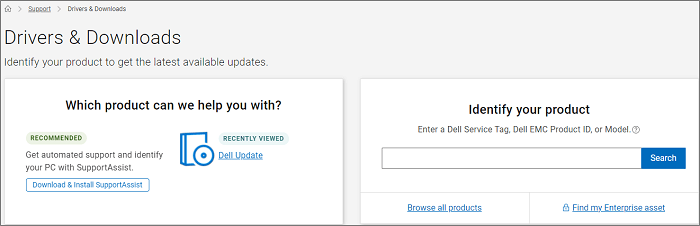
Update drivers through Dell Drivers & Downloads website:
Step 1. Identify the Dell product.
Step 2. Scan for the available updates.
Step 3. Choose driver updates to install.
Fix 5. Run a Data Recovery Software
If none of the above methods work, you can connect the hard drive to another PC and run Deep Data Recovery software to recover your data and potentially fix the issue.
1 - Connect the hard drive to another PC via SATA cable.
2 - Download and Run Qiling Data Recovery.
Step 1. To recover data, launch Deep Data Recovery, select the desired file types, and click "Next" to initiate the recovery process.

Step 2. Choose the place where you lost data. Then, click "Scan".

Step 3. After the scan, use the file format filter on the left or upper right corner to find the files you need, and then click the "Preview" button or double-click a file to view its content.

Step 4. To recover lost data, select the file that was lost, check the box next to it, and then click on the "Recover" button. This will restore the lost data to a secure location.
To Sum Up
If your Dell laptop is showing a hard drive detected issue, there are five potential solutions to try. I recommend starting with the first two methods, which may resolve the problem. If these don't work, you can try using a data recovery tool like Qiling to retrieve your data and see if the issue is fixed.
Related Articles
- Unlimited Data Recovery Software Free Download Full Version [2022]
- How to Recover Data Lost By Ghost Recovery
- Recovered Files Won't Open or Not Opening
- How to Fix Hitachi Hard Drive Not Working/Recognized
- Sony Handycam Camcorder Video Recovery
You can download Sony video camera data recovery software for free to recover deleted or formatted videos and images from your Sony camera. This software can help you retrieve your lost data after a careless deletion or accidental formatting. - [Fixed] SQL Error 945 | Database Cannot Be Opened due to Inaccessible Files
SQL error 945, which indicates that a database cannot be opened due to inaccessible files, insufficient memory, or disk space, is a common SQL Server error that signifies a database failure. However, you can resolve this issue by adjusting settings or utilizing a SQL Recovery Tool, and implementing the most suitable solution will allow you to fix SQL error 945 promptly.