How to Solve Windows 11/10 High RAM Memory Usage Issue [10 Fixes]
If your computer gets stuck and Windows Task Manager warns "High memory usage", ! We'vethis guide can help with easy fixes for Windows 11/10/8/7. From closing unnecessary apps to freeing up memory with Task Manager, we'll guide you through resolutions to resolve the high memory usage issue and get your computer running smoothly again.
| Workable Solutions | Step-by-step Troubleshooting |
|---|---|
| Fix 1. Close Unnecessary Programs | On Task Manager, find running programs that take high memory, click End Task...Full steps |
| Fix 2. Disable Programs from Startup | On Task Manager, go to Startup, right-click to disable big programs from Startup...Full steps |
| Fix 3. Defragment Hard Drive | Type dfrgui In the Search bar, open the "Defragment and Optimize Drives" utility, select the drives you want to optimize, and then click "Optimize" to start the process.Full steps |
| Fix 4. Fix File System Error | Run Qiling Partition Master, right-click drives to fix file system error...Full steps |
| More Fixes... | Other 6 fixes are available here for you to follow and fix high RAM memory errors...Full steps |
What is High Memory Usage?
Windows computers can enter a state known as High Memory Usage, where the RAM, ROM, or Cache usage grows to an extremely high level, causing issues with Windows 10, particularly with regards to RAM and virtual memory.
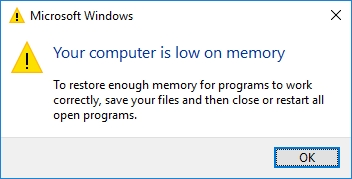
When a PC experiences high memory usage, it may freeze while running a program and display an error message stating that the computer is low on memory, prompting the user to take action to free up memory.
Follow to check if you are having this error and what caused high memory usage.
Define High Memory Usage Windows 11/10 Error:
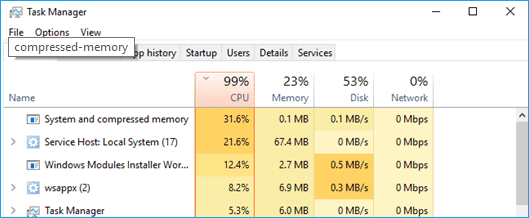
If you're experiencing issues with your computer, you can try to identify the problem by checking if it's due to high memory usage, high CPU usage, or high disk usage. You can do this by looking at the Task Manager, which can be accessed by pressing Ctrl+Shift+Esc on Windows or Command+Option+Esc on Mac.
Step 1. Press the Ctrl + Alt + Del keys on your keyboard and select "Task Manager" from the menu that appears.
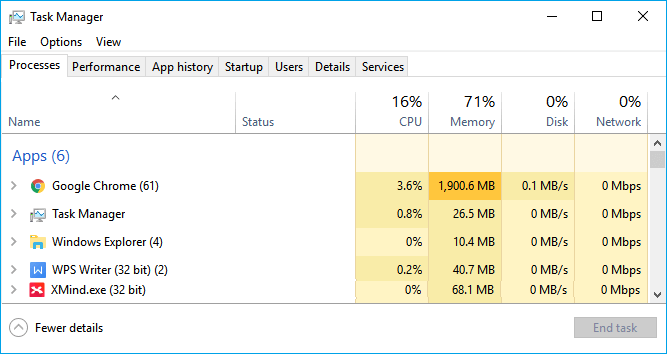
Step 2. At the Process tab, the usage state of CPU, Memory, and Disk should be checked.
70%, 80%, 90%, or 99% used memory indicates a "High Memory Usage" issue.
High Memory Usage in Processes:
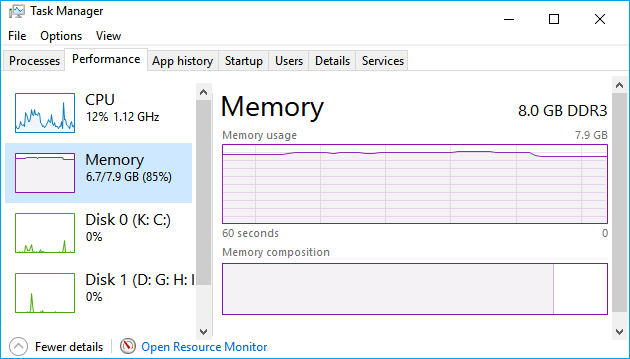
High Memory Usage in Performance:
Symptoms and Causes of High Memory Usage:
A high memory usage issue on a computer can cause it to slow down or even crash, as the system struggles to allocate resources. This can be caused by various factors such as running too many resource-intensive programs simultaneously, having too many browser tabs open, or having a large number of background applications running. It can also be caused by malware or viruses that consume system resources, or by a malfunctioning program that fails to release memory. In such cases, users may experience freezes, crashes, or other system instability issues.
| Symptoms of High Memory Usage | Causes of High Memory Usage |
|---|---|
|
|
10 Fixes for High (RAM) Memory Usage Issue in Windows 11/10
To fix high memory usage issues in Windows 11/10, try closing unnecessary applications, check for malware, disable startup programs, update drivers, and consider upgrading your RAM. Additionally, use the Task Manager to identify and close memory-intensive programs, and enable the "Show processes from all users" option to see all running processes. You can also use the built-in Disk Cleanup and System File Checker tools to free up space and repair corrupted system files.
To fix high memory usage issues on Windows 11/10, try the following fixes: disable startup programs, close unnecessary apps, update drivers, disable Bluetooth, turn off animations, disable Windows Search, disable Windows Update, disable Windows Defender, delete temporary files, and run the System File Checker (SFC) and DISM tools. Additionally, consider upgrading your RAM, disabling unnecessary services, and running a virus scan to ensure your system is free from malware.
- 1. Close Unnecessary Running Programs/Applications
- 2. Disable Startup Programs
- 3. Defragment Hard Drive & Adjust Best Performance
- 4. Fix Disk File System Error
- 5. Increase Virtual Memory
- 6. Disable Superfetch service
- 7. Set Registry Hack
- 8. Increase Physical Memory
- 9. Disable NDU in Registry
- 10. Clean Up Virus
If you're experiencing issues in older Windows OS versions like Windows XP, you can also try the same fixes.
Method 1. Close Unnecessary Running Programs/Applications
When your computer is experiencing high memory usage, you can try to close some unnecessary running programs and applications to free up memory and resolve the issue.
Step 1. To open Task Manager, right-click on the Windows icon and select "Task Manager".
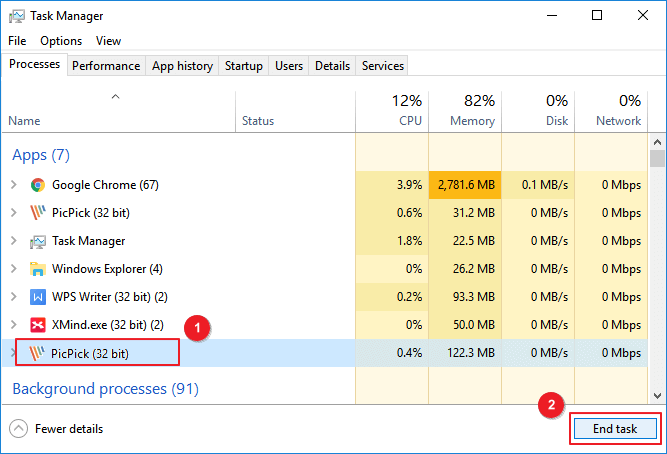
Step 2.To optimize your computer's performance, go to the "Process" tab and identify the running programs that are consuming high memory but are not currently in use. This will help you close unnecessary programs and free up memory, which can improve your computer's speed and overall performance.
Step 3. Click the unnecessary programs and select "End Task".
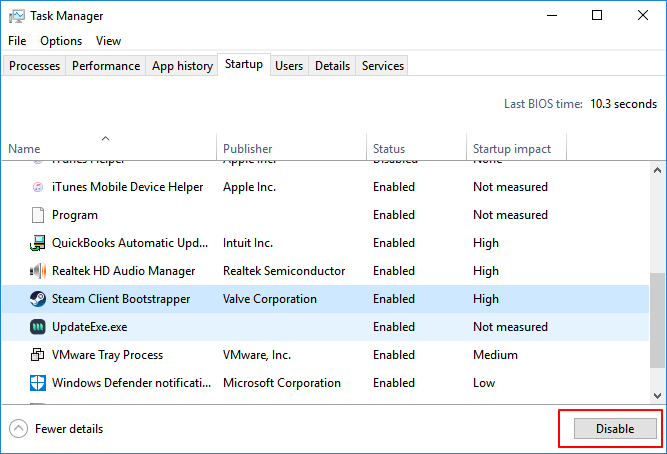
Method 2. Disable Programs Running from Startup
Disabling programs running from Startup can significantly decrease system load and save CPU memory space, making the system run more efficiently.
Step 1.Press Ctrl + Alt + Del keys, select "Task Manager".
Step 2.To prevent applications from running at startup, click on "Startup" in Task Manager, right-click on the unwanted applications and select "Disable" from the context menu.
Method 3. Defragment Hard Drive & Adjust for Best Performance
Defragmenting hard drives can save a significant amount of memory space and improve performance by optimizing disk usage, and a manual method is also available for those who prefer it.
Defragment hard drives:
Step 1. To open the Defragment and Optimize Drives app, press the Windows key + R, type "dfrgui", and click on the "Defragment and Optimize Drives" option.
Step 2. Click on the hard drives (C: drive for example) you want to defragment and click "Optimize" in the Disk Cleanup tool.
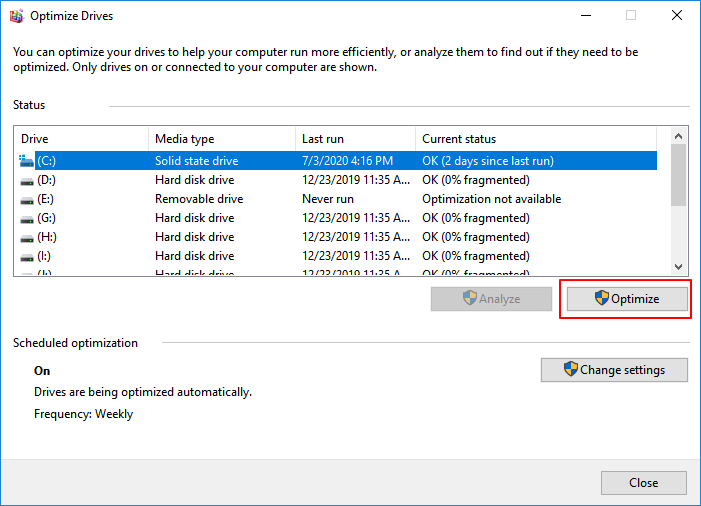
Wait for the disk defragmentation process to finish, and then restart your computer once it's complete.
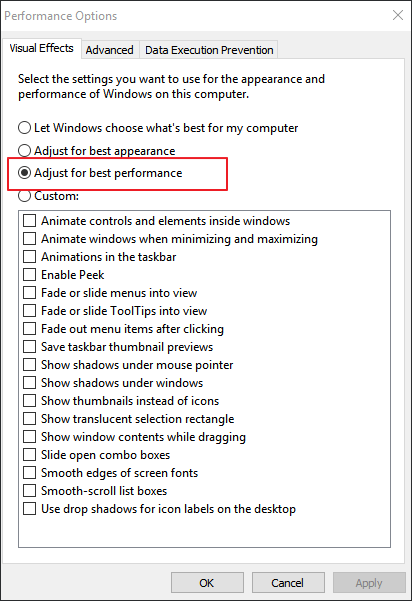
Adjust for the best performance:
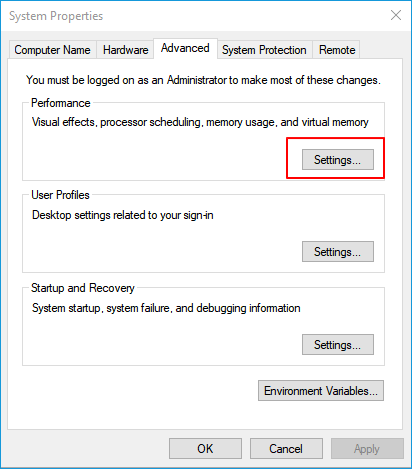
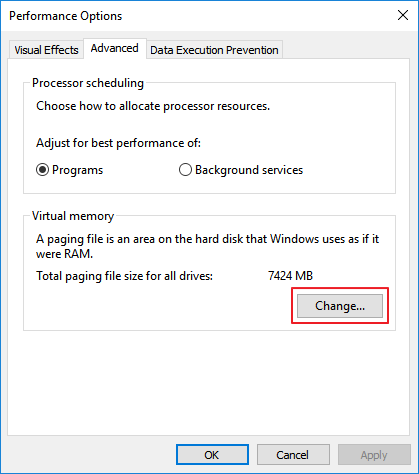
Step 1. Right-click "This PC" and select "Properties".
Step 2. Click "Advanced system settings", click "Settings" under Performance.
Step 3. Check "Adjust for best performance", click "Apply" and "OK" to confirm.
Method 4. Fix Disk File System Error
A file system error can cause high memory usage or high CPU usage on Windows computers. Fortunately, professional partition manager software like Qiling Partition Master can easily fix this error and eliminate it from your PC, making it a user-friendly solution for all levels of Windows users.
Method 5. Increase Virtual Memory
Virtual memory helps alleviate computer memory stress by utilizing part of the disk space as memory. When your computer is experiencing high memory usage, you can try increasing virtual memory by following these steps.
Step 1. Right-click on This PC, select "Properties".
Step 2.Click "Advanced system settings" in the pop-up window.
Step 3.To optimize system performance, go to the Advanced tab in the System Properties window and click on "Settings..." in the Performance section.
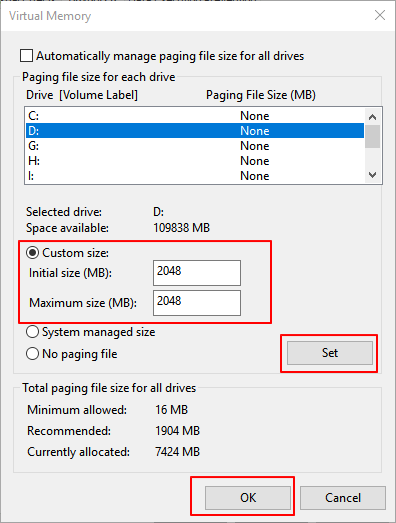
Step 4.Navigate to the Advanced tab, click "Change" under the Virtual memory section.
Step 5.Uncheck "Automatically manage paging file size for all drives".
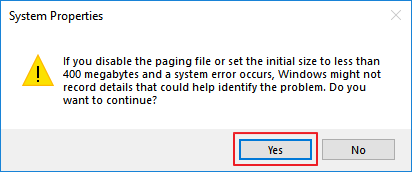
Step 6.Select C drive, check "No page file", and click "Set".
Step 7. Click "Yes" to continue.
Step 8. To create a new partition, choose a non-system partition, select the option to set a custom size, and set the same value for both the initial and maximum sizes.
The recommended value size for your computer's physical memory is twice its size.
Step 9. Click "Set" and "OK" to save the changes.
Method 6. Disable Superfetch Service
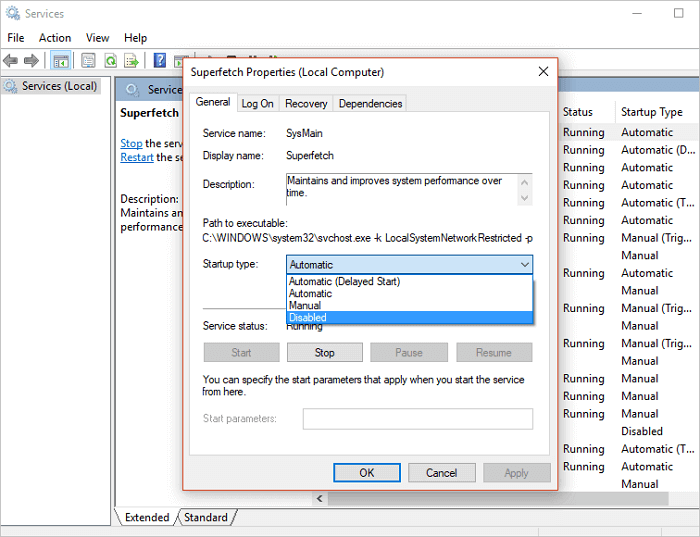
Step 1.Press Windows + R, type services.mscinto the Run box and click "OK".
Step 2.To stop the Superfetch service, locate it in the list of services, right-click on it, and select "Properties". In the Properties window, click on the "Stop" button in the bottom left corner to stop the service.
Step 3. Click "Disabled" from the 'startup type' drop-down menu.
Method 7. Set Registry Hack
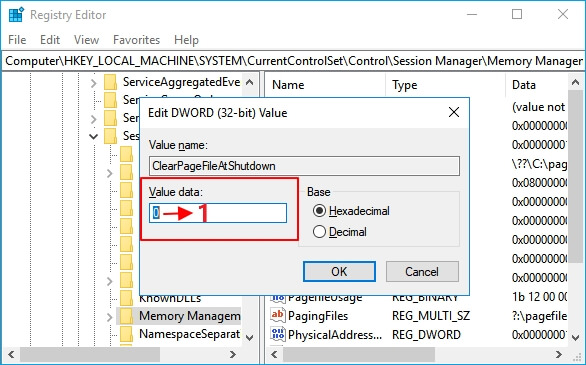
To release virtual memory by deleting page files in the Registry, follow these steps:
Step 1. Press Windows + R keys, type regedit to open the Registry Editor.
Step 2. Navigate to: HKEY_LOCAL_MACHINE/SYSTEM/CurrentControlSet/Control/Session Manager/Memory Management.
Step 3. To clear the page file at shutdown, find the "ClearPageFileAtShutDown" value in the registry, right-click on it, select "Modify", change its value to "1", and click "OK".
Method 8. Increase Physical Memory
When your computer is experiencing high memory usage, adding a new memory card can help extend the physical memory, thereby addressing the issue.
To increase your PC's physical memory, first check the type of memory your computer supports by referring to its parameters. Once you know the type, you can upgrade your physical memory by installing additional RAM (Random Access Memory) modules, which can be done by accessing your computer's BIOS settings and following the on-screen instructions to add the new memory. This provides your PC a boost in performance and allow it to handle more demanding tasks.
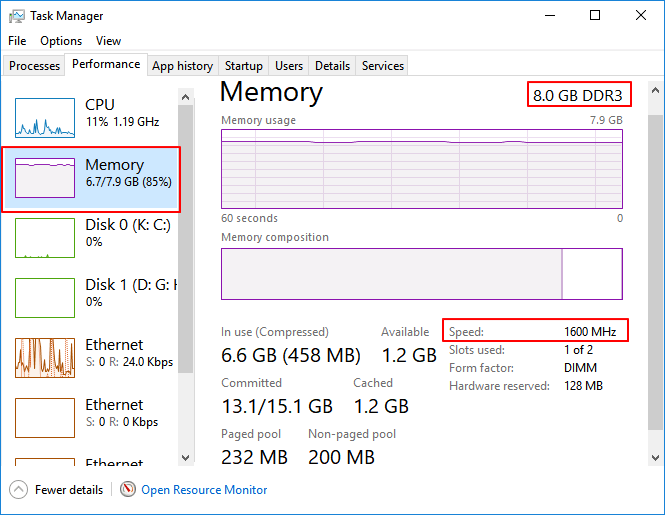
Step 1.Right-click on "This PC" and select "Properties" to check the physical memory size.
Step 2.Open Task Manager, go to the Performance tab, and click on "Memory".
Step 3. The speed of a computer refers to how quickly it can process information. A faster computer can perform tasks more quickly and efficiently.
Step 4. To upgrade your computer's storage, you will need to purchase a new memory card, such as a solid-state drive (SSD) or a hard disk drive (HDD). Once you have the new memory card, you will need to physically add it to your PC.
After adding the new memory to your computer, restart the PC and it will automatically detect the new memory.
Method 9. Disable NDU in Registry
Note: Qiling technical support experts warn that this method may impact internet connection usage.
If you would like to try, here are the steps:
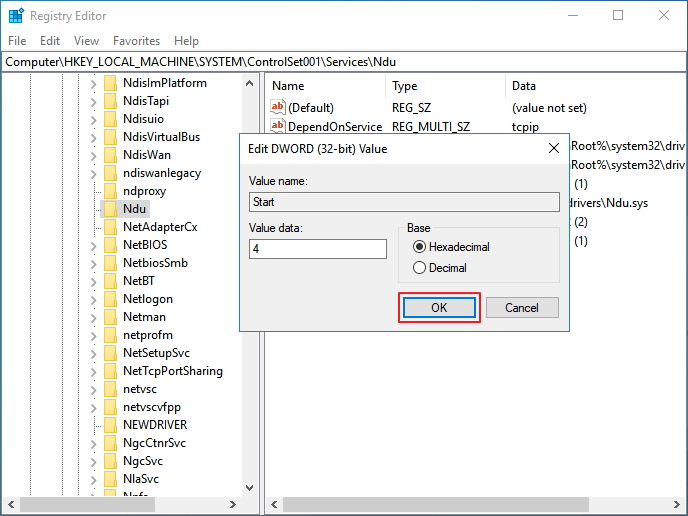
Step 1.Type regedit in Windows Search and click Registry Editor to open it.
Step 2. Go to: HKEY_LOCAL_MACHINE/SYSTEM/ControlSet001/Services/Ndu.
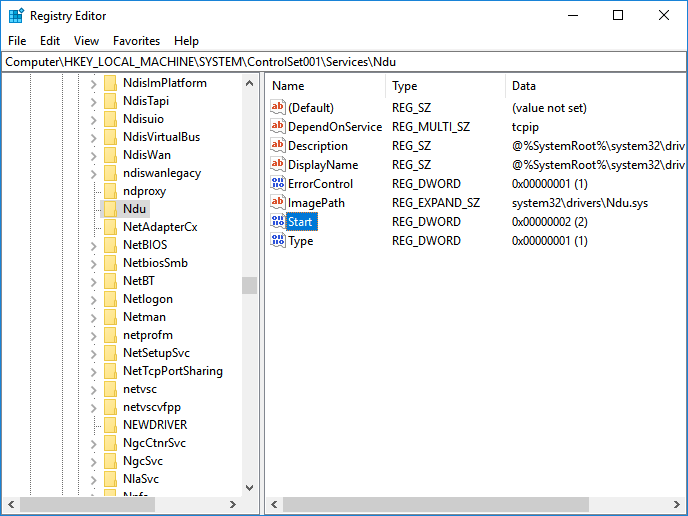
Step 3.Right-click on the Start DWORD and select "Modify".
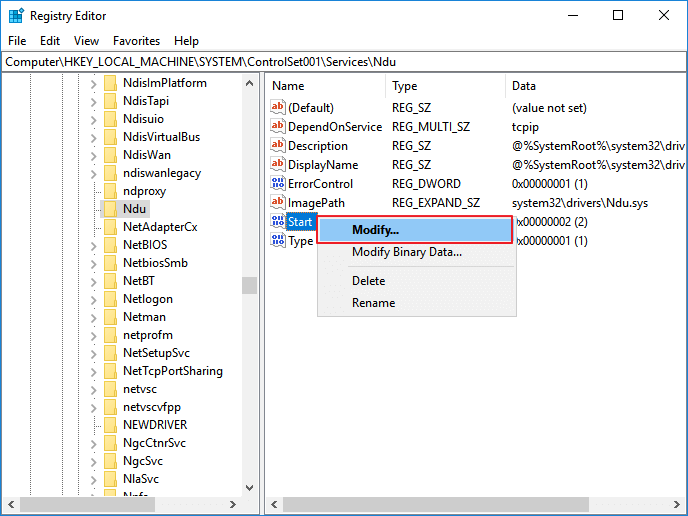
Step 4.The value of the variable was changed to 4. The changes were saved by clicking "OK".
To resolve the high memory usage issue, you can try closing unnecessary apps, restarting your PC, or updating your operating system to the latest version. If the problem persists, you may need to perform a system restore to a previous point when the issue was not occurring.
If your computer internet connection gets disabled, we recommend repeating the steps and resetting the Start word value back to its previous number, which is 2.
Method 10. Clean Up Virus
Running antivirus software on your PC is the best way to address high memory usage caused by virus infection or malware. This will help clean up existing viruses and malware, freeing up memory and resolving the issue.
Step 1.Download and install anti-virus software on your computer.
Step 2.Run the anti-virus software and choose to scan your whole computer drive.
Step 3. To clean up all found viruses or virus-infected files or devices, select the option to do so. This will initiate the cleaning process, removing any malicious software or infected files from your system.
Bonus Tips: How to Avoid High Memory Usage Issue on Windows 11/10
To prevent Windows high memory usage, you can try the following steps: disable startup programs, close unnecessary apps, update Windows and drivers, and run disk cleanup and disk defragmentation. Additionally, you can adjust the virtual memory settings, disable unnecessary services, and use the built-in Task Manager to monitor and manage resource-intensive processes.
To protect your Windows 10 computer from issues, update to the latest version, run System File Checker and Deployment Image Servicing and Management tools, check for malware and viruses, and run a System Restore to a point before the issue occurred. You can also check for corrupted system files and replace them, run a full disk cleanup, and check for any hardware issues. If the problem persists, consider reinstalling the problematic driver, checking for software conflicts, or even reinstalling Windows 10 if all else fails.
How to Avoid High Memory Usage in Windows 10 - Tips
Here are some tips to avoid high memory usage issues in Windows: Set your computer to run with the best performance by going to Settings > System > Display > Graphics settings and selecting "High performance" or "Power saver" depending on your needs. You can also disable startup programs that you don't use, close unnecessary applications, and check for malware. Additionally, consider upgrading your RAM or using a solid-state drive (SSD) to improve your computer's performance.
- #1. Add a big enough memory card to the PC
- #2. Run virus cleaner regularly
- #4. Disable unnecessary programs from Startup
- #5. Release virtual memory from hard drive
- #6. Fix file system error and defrag hard drive regularly
You May Also Interest In:
To define High CPU or High Disk Usage errors, you can follow these steps: Identify the system or application causing the issue, check the CPU usage and disk space to determine the cause, and then troubleshoot the problem by adjusting settings, closing unnecessary processes, or upgrading hardware as needed.
Step 1. Hold Ctrl+Alt+Del keys, click "Task Manager".
Step 2. On the Processes tab, check the Memory or the Disk usage state to see if there are any high usage processes that could be causing the issue.
- If the CPU column reaches up to 99% or even 100%, it's a "High CPU Usage" issue. For assistance, refer to Fix 99% or 100% High CPU Usage.
- The Disk column shows high usage or even displays 100%, indicating a "High Disk Usage" issue. To resolve this, follow the steps outlined in the article "100% Disk Usage" for a solution.

Take Action, Keep Your Computer from High Memory Usage Issue
This page provides tips to help you determine if your computer is experiencing high memory issues and offers 10 practical fixes to resolve high memory usage Windows 10 errors. It also includes tips to help you avoid this issue.
To resolve RAM and virtual high memory usage issues, we recommend using Qiling disk management software. Besides managing RAM, Qiling Partition Master helps to optimize disk performance by making full use of disk space and managing partitions, ensuring your computer runs smoothly again.
To prevent high memory usage and keep your computer running smoothly, consider implementing the following strategies:
Related Articles
- How to Clone SD Card in Windows 11/10/8/7 (5 Minutes Tutorial)
- SSD Slow Boot Windows 11 | Boot Windows 11 from SSD
- M.2 VS SATA, What's The Differerence and How to Install [2022 Guide]
- How to Convert Dynamic Disk to Basic Disk in Windows 11
- How to Add Unallocated Space into Partition in Windows 10 Safely?
This post explains how to add unallocated space in Windows 10 via Disk Management. Besides, we also share a great tool just in case that you can't add unallocated space as expected. - How to Solve C Drive is Full in Windows 10/8/7?
The issue C drive full windows 10 is a headache and can bring you quite a lot of trouble. If you want to find out where those extra files come from and the solution to this issue, this should be the right article for you.