What Is UEFI and How Do I Use It on Windows? [Full Guide]
The Unified Extensible Firmware Interface (UEFI) is a firmware interface that plays a crucial role in Windows, but what is it exactly? In this article, we'll break down what UEFI is, how it differs from BIOS boot modes, and provide a step-by-step guide on how to set up a computer and enable UEFI mode on Windows devices. We'll also cover troubleshooting tips to fix UEFI errors and boot issues, empowering you to resolve problems like an expert.
To set up UEFI on your PC, start by entering your PC's BIOS settings by pressing the designated key (usually F2, F12, or Del) as it boots up. Once in the BIOS settings, navigate to the "Boot" or "Advanced" tab and look for the UEFI settings.
In this article, you'll learn:
- What Is UEFI?
- The age-old debate between UEFI (Unified Extensible Firmware Interface) and Legacy BIOS (Basic Input/Output System) continues, with each having its own strengths and weaknesses. UEFI, the newer and more modern of the two, offers improved security, faster boot times, and better support for larger storage devices, making it the preferred choice for modern systems. Legacy BIOS, on the other hand, is more compatible with older hardware and operating systems, but is generally slower and less secure.
- To set up UEFI and use it on Windows 10/11, start by accessing the UEFI firmware settings by pressing the key that triggers the boot menu, usually F2, F12, or Del. Navigate to the Security tab and enable Secure Boot, then save your changes. Next, go to the Boot tab and select the UEFI firmware as the boot mode.
- Troubleshooting: Fix and Get Rid of UEFI Errors
What Is UEFI?
Definition of UEFI
UEFI (Unified Extensible Firmware Interface) is a specification that connects a computer's firmware to its operating system, replacing the traditional BIOS Legacy. It works on the motherboard via a specific firmware, which is pre-installed during manufacturing.
Why Is UEFI Important and How Does It Work
UEFI runs first when booting, connecting hardware to OS to allow the OS to boot and load hard drive information successfully.
An Operating System (OS) processes UEFI (Unified Extensible Firmware Interface) by utilizing the UEFI firmware to load and execute the OS. The UEFI firmware is responsible for initializing the hardware, loading the OS, and providing a platform for the OS to run on.
- UEFI (Unified Extensible Firmware Interface) is the firmware interface that manages the boot process of a computer, and it is the first program to run when the computer is powered on. It is responsible for loading the operating system and other boot-related tasks.
- UEFI checks if hardware components are attached.
- UEFI (Unified Extensible Firmware Interface) is a firmware interface that enables a computer to boot and run an operating system. When a computer is powered on, UEFI wakes up the components, such as the CPU, memory, and storage devices, and connects them to the operating system.
Operating Systems that Support UEFI:
- Windows 11 (Requires UEFI & Secure Boot Only)
- Windows 10 (x64)
- Windows 8.1 (x64)
- Windows 7 (x64)
- Windows Vista SP1 (x64)
- Windows Server 2022 (x64)
- Windows Server 2019 (x64)
- Windows Server 2016 (x64)
- Windows Server 2012 (x64)
- Windows Server 2008 R2 (x64)
- Windows Server 2008 (x64)
Note: Microsoft introduced UEFI for x64 Windows operating systems, but if your computer has an x86 or 32-bit OS, you'll need to set the BIOS Legacy boot mode instead of using UEFI.
History of UEFI:
- Mid-1990: Original EFI came out.
- 1998: EFI was renamed Extensible Firmware Interface.
- In July 2005, the EFI version 1.10 was contributed to the United EFI Forum, where it was further developed and renamed to Unified Extensible Firmware Interface (UEFI).
- January 31st, 2006: UEFI 2.0
- January 7th, 2007: UEFI 2.1
- March 2021: UEFI 2.9 (The latest version)
How Do I Access UEFI Firmware Settings
To access the UEFI firmware settings, you typically need to press a specific key during the boot process, such as F2, F12, or Del, depending on your motherboard. This key is usually indicated on the screen or in the user manual. Once you access the UEFI settings, you can change various settings, such as the boot order, time and date, and other advanced settings.
You have two options here:
Option 1: Use F2/F10 or F12 Keys to Access UEFI Settings
- Press the F2/F10/F12 or Del/Esc key when the Windows logo shows to turn on the computer.
- Let the computer enter its BIOS settings, and navigate to the Boot tab.
To access the UEFI firmware settings on your PC, look for the hotkeys listed below, which may vary by computer brand. Pressing these hotkeys will take you directly to the UEFI settings. A clear view of the settings will be displayed on your screen, allowing you to make any necessary adjustments. Note that the hotkeys may differ on different computer brands.
- Dell: F2 or F12.
- HP: ESC or F10.
- Acer: F2 or Delete.
- ASUS: F2 or Delete.
- Lenovo: F1 or F2.
- MSI: Delete.
- Toshiba: F2.
- Samsung: F2.
- Surface: Press and hold the volume up button.
Option 2. Access UEFI from Settings
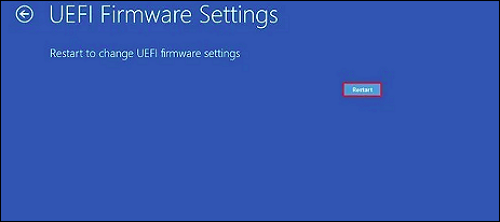
- To access the advanced startup settings, go to Settings, click on "Update & security", then select "Recovery" from the menu, and finally click on "Advanced startup". After that, click on "Restart now" to initiate the reboot process.
- Click "Troubleshoot > UEFI Firmware Settings >Restart".
From the UEFI firmware settings, you can switch between UEFI boot mode and BIOS Legacy mode, or configure the computer to better support UEFI. But what's the difference between UEFI and BIOS, and which is better for you? UEFI, or Unified Extensible Firmware Interface, is a newer, more secure and feature-rich alternative to traditional BIOS, offering improved performance, faster boot times, and better support for larger storage devices. On the other hand, BIOS, or Basic Input/Output System, is the older, more basic firmware that many computers still use.
Move forward to the next part, and you'll get the answers.
UEFI vs. Legacy BIOS, Which Is Better and What's The Difference?
The Legacy BIOS, also known as BIOS, was an older firmware setting that has been surpassed by UEFI in many aspects. While UEFI has taken over, it's still essential to understand the difference between these two settings and when to use each on your PC. In this part, we'll explore the differences between Legacy BIOS and UEFI, and provide guidance on when to choose each option. This will help you make an informed decision and ensure your PC is running with the most suitable firmware setting.
UEFI VS BIOS, What's the Difference
Similarity:
UEFI (Unified Extensible Firmware Interface) performs a similar function to BIOS (Basic Input/Output System), starting up first and connecting the operating system to firmware hardware before loading the OS. Both UEFI and BIOS serve as a bridge between the operating system and hardware, enabling the system to boot up and function properly.
Differences:
UEFI (Unified Extensible Firmware Interface) and BIOS (Basic Input/Output System) are two different firmware interfaces used in computers. The main differences between them are that UEFI is more modern and provides a graphical user interface, while BIOS is older and text-based.
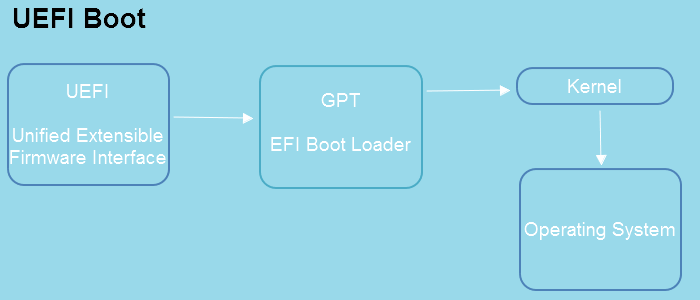
| Comparison | UEFI | (Legacy) BIOS |
|---|---|---|
| Boot Procedure | UEFI -> EFI Boot Loader -> Kernel -> Operating System | BIOS -> MBR -> Bootloader -> Kernel -> Operating System |
| Disk Device Compatibility | GPT Disk | MBR Disk |
| Support Drive Size | 8ZB | 2TB |
| Secure Boot | Yes | No |
| Supported Bit Mode |
|
|
| Location of Initialization and Startup Information | In a .efi file on an EFI System Partition | On the firmware |
| Boot Speed | Faster | Slower |
When to Use UEFI? And When to Use BIOS?
You may have a basic idea of whether your computer is suitable for UEFI boot, but if not, two lists of situations can help you understand when to use UEFI and when to use BIOS: one for UEFI and one for BIOS. The UEFI list includes situations where your computer has a UEFI firmware, supports Secure Boot, and has a 64-bit operating system. On the other hand, the BIOS list includes situations where your computer has a BIOS firmware, supports legacy boot, and has a 32-bit operating system. These lists can help you determine when to use UEFI and when to use BIOS.
When to Use UEFI:
- OS hard drive is 3TB or larger
- Update OS to the latest Windows 11
- The operating system is 32-bit or 64-bit
- The computer motherboard supports both UEFI and BIOS
When to Use BIOS:
- The hard drive is 2TB or smaller
- The computer motherboard only supports BIOS.
UEFI or Legacy, which is suitable for SSD?
- When installing the latest Windows OS on an SSD, it's recommended to use UEFI (Unified Extensible Firmware Interface) instead of the traditional BIOS. This ensures that the operating system is installed with the latest firmware and compatibility features, which can improve the overall performance and functionality of the system.
- If the SSD is less than 2TB and doesn't support new OS installation, it's recommended to use BIOS for older operating systems.
LEARN MORE
For more details about UEFI and BIOS, you can refer to this page: UEFI VS BIOS: Difference between BIOS and UEFI.
How to Set Up UEFI and Use It on Windows 10/11? [Full Guide]
To set up your computer with UEFI and install Windows 11, follow these steps: Enter your computer's UEFI settings by pressing the key that takes you to the UEFI settings, usually F2, F12, or Del. Navigate to the Boot Order settings and set the UEFI firmware to prioritize the UEFI boot mode. Save the changes and restart your computer. In the UEFI settings, ensure that Secure Boot is enabled and the UEFI firmware is set to prioritize the UEFI boot mode.
Guide 1. Confirm If I Need UEFI for Windows 10/11
To confirm if you need UEFI for your PC, check your motherboard manual or manufacturer's website to see if it supports UEFI. You can also check your PC's BIOS settings by restarting your PC and pressing the key to enter the BIOS settings (usually F2, F12, or Del). If your PC is running a 64-bit operating system, it's likely using UEFI.
First, Confirm If I Need UEFI
To install the latest Windows 11, you'll need to ensure your computer is 64-bit and enable UEFI, as UEFI only supports 64-bit operating systems.
Second, Tell If Windows Is Using UEFI
To determine if your computer is using UEFI or BIOS, you can either follow the guide above to access UEFI settings or check system information as shown here. This will confirm whether your computer is using UEFI or BIOS.
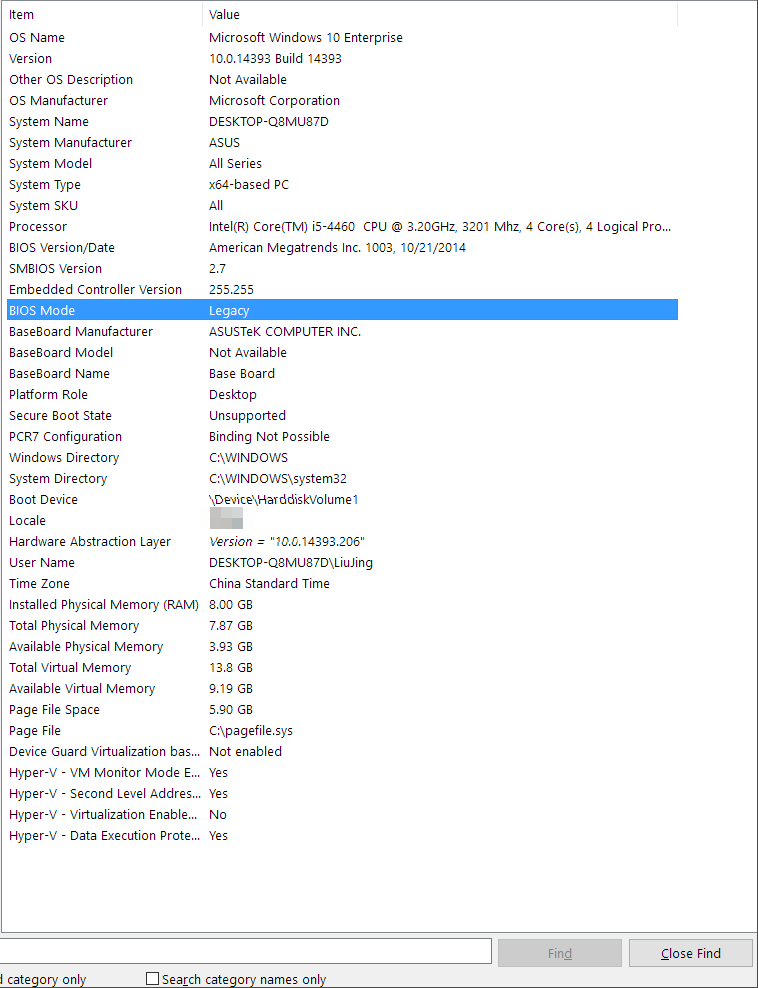
Step 1. Press Windows + R keys, type MSInfo32, and click "OK".
Step 2. To determine if your operating system is using Legacy or UEFI BIOS mode, look for the BIOS Mode setting. This setting will indicate whether your OS is operating in Legacy or UEFI mode. Simply locate the BIOS Mode setting, and you'll be able to see which mode your OS is currently using.
LEARN MORE
To check if Windows is using UEFI or Legacy boot mode, you can try rebooting your PC and using hotkeys like F2, F10, or F11 to enter the BIOS settings. Alternatively, you can follow this link to learn if Windows is using UEFI or Legacy on your PC.
Guide 2. Convert OS Disk to GPT for UEFI Boot
After understanding your Windows boot mode, it's time to check the disk type. Note that the UEFI boot mode is only compatible with GPT disk type.
To ensure proper functionality, it's necessary to check and configure your OS disk to use the GPT (GUID Partition Table) format. This can be done by following these steps: follow the steps below.
First, Confirm if Windows Is MBR or GPT
In Windows Disk Management, right-click the OS disk, select "Properties", and go to the Volumes tab to check the disk type.

You May Also Like:
Aside from checking disk type in Disk Management, you can also use Qiling Partition Master or CMD to help determine if your Windows is MBR or GPT. For more information, you can refer to the article on how to tell if Windows is MBR or GPT using these alternative methods.
If your Windows disk uses the Master Boot Record (MBR) system, you'll need to convert it to the GUID Partition Table (GPT) system, which can be done using the guide provided.
Next, Convert MBR Disk to GPT with Third-Party Disk Conversion Software, No Data Loss
Experienced Windows users may know how to convert a disk from MBR to GPT using Disk Management or a CMD command, but these methods require deleting all partitions, which can result in serious data loss.
To manage and protect your disk data, consider using third-party disk conversion software, such as Qiling Partition Master, for assistance.
LEARN MORE
If you prefer a step-by-step guide, follow this link, and you'll learn how to successfully Convert MBR to GPT for Windows 11.
Guide 3. Change BIOS Mode from Legacy to UEFI Windows 10/11
Here are the steps to switch your BIOS mode from Legacy to UEFI:
Step 1. To restart the PC and enter the BIOS setup utility, simply shut down your computer, wait for a few seconds, and then press the F2 key repeatedly as the computer boots up. This will take you to the BIOS setup utility, where you can make changes to the boot order, configure other settings, and save your changes.
Step 2. To access the Boot or System configuration tab, navigate to the appropriate section, and click on "Boot".
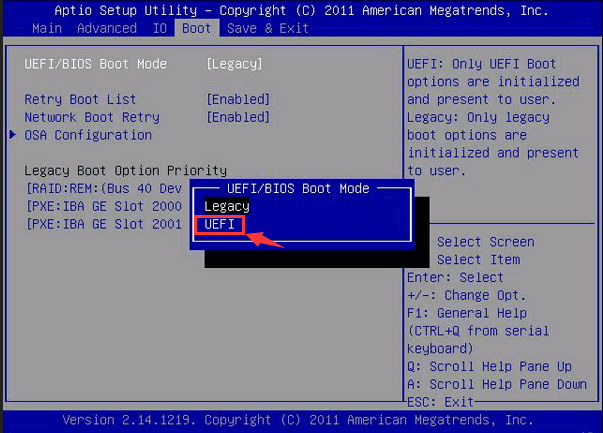
Step 3. To change the UEFI/BIOS boot mode, go to the Boot tab, select UEFI/BIOS Boot Mode, and press Enter.
Step 4. To switch the boot mode from Legacy to UEFI, use the up or down arrow to navigate to the boot mode option, and then select "UEFI" from the available choices. This will change the boot mode to UEFI, which is a more modern and secure boot mode.
Step 5. Save the changes by pressing F10 and closing BIOS settings.
Bonus Tip:
To enable or disable UEFI mode, you can follow the steps on the provided link to learn how to do it.
If you're about to install Windows 11 on your disk, you'll also need to enable Secure Boot for UEFI Boot Mode.
Step-by-Step Guide:
Bonus Tip: Install Windows 11 on GPT with UEFI
Here are the steps to install Windows 11 in UEFI mode:
Step 1. To download Windows 11 ISO, go to the Microsoft website, click on "Download Windows 11" and select the language, architecture, and edition. Then, create a Windows installation media on an empty USB by using the Media Creation Tool, following the on-screen instructions, and selecting the USB drive as the installation media.
Step 2. To install the operating system, reboot the PC and immediately press the F2 key to enter the BIOS settings. From there, set the computer to boot from the installation USB, which should contain the operating system installation files.
Step 3. Configure Language, Time and currency format, Keyboard or input method, and click "Next".
Step 4. Click "Install Now" and select the option to proceed without a product key to continue with the installation process.
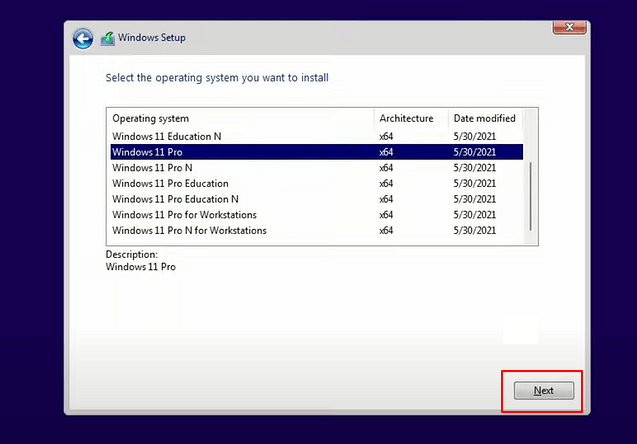
Step 5. Select Windows 11 edition and click "Next".
Follow the on-screen guidelines to complete the process.
Complete GUIDE:
If you're looking for a more detailed guide on how to install Windows 11 on a converted GPT disk, you can find a step-by-step tutorial on the link provided, which explains how to complete the installation process.
Troubleshooting: Fix and Get Rid of UEFI Errors
When setting up UEFI for a new Windows operating system, you may encounter various UEFI errors on your computer. If you're experiencing one of the listed errors, follow the respective solution to fix it. These errors can be frustrating, but with the right guidance, you can resolve them and get your computer up and running smoothly again.
Error 1: Can't Delete EFI Partition
The "Delete Volume" option is greyed out because of a Windows protection mechanism, which prevents accidental deletion of system volumes. This is a security feature to prevent users from deleting essential system components.
Fix: Full Guide to Remove UEFI NTFS Partition (EFI Partition)
Error 2: Windows 11/10 Fails to Boot Because There Is a Problem with the Master Boot Record
Cause: MBR corrupted, UEFI Boot mode is not enabled, more.
Fix: See How to Fix UEFI Boot on Windows 11/10.
Error 3: UEFI Bootloader Gets Corrupted, Windows Won't Be Able to Boot Up
Cause: EFI/UEFI boot loader gets corrupted or damaged.
Fix: Repair UEFI Bootloader for Windows 11
Error 4: Want to Restart Unbootable or Dead Computer with UEFI Bootable Disk
Your computer won't boot due to a virus, MBR damage, bad sector, or corrupted system files.
Fix: Create UEFI Bootable USB and Fix PC Unbootable Error
If you're experiencing computer boot issues due to UEFI or other reasons, You can opt for customized tech support to help resolve problems like a computer not booting or turning on, and get it fixed successfully.
Related Articles
- Partition Magic Software Free Download with How-To Tutorial [Full Guide]
- Computer Is Running Slow? Causes and Fixes Are Found! [Your Ultimate Guide]
- What Is SSD and How Do I Set Up and Make Use of SSD [Beginners' Guide]
- One for All Guideline: How to Format/Reformat A Hard Drive
- Convert MBR to GPT in Windows Server 2012 (R2) without Data Loss
This post details how to convert MBR to GPT Server 2012 R2 2016, 2019, and 2022 without data loss by using Disk Management, Diskpart, and powerful third-party software. - How to Securely Erase SSD Drive in Windows 7?
Before selling your SSD, you need to erase SSD drive securely to wipe data in Windows 10/8/7 so that your data on it won't be retrieved with despiteful purpose.