Easy VHD to Physical Disk Solution
| Workable Solutions | Step-by-step Troubleshooting |
|---|---|
| Fix 1. Copy VHD to a Physical Disk | Step 1: Select the source disk. Right-click the disk that you want to copy or clone. Then, select "Clone"...Full steps |
| Fix 2. Convert a VHD to Physical Disk | Step 1: Open Disk Management, right-click on the VHD disk, and select "Detach VHD"...Full steps |
If you're looking to restore a VHD or VHDX file to a physical disk on Windows 10/8/7/XP or Windows server platforms, this page is for you. It explains what a VHD is and provides practical methods to convert a VHD to a physical disk without losing any data.

What Is a VHD
VHD is a file format that represents a virtual hard disk drive (HDD).
A VHD is typically used to emulate a physical hard disk storage device, allowing you to save disk partitions, file systems, files, and folders, etc. on a virtual disk, which is used as the hard disk on a virtual machine.

Using Disk Management, you can create multiple virtual hard drives on your computer, allowing you to store files, folders, and more without affecting your actual disks or risking damage to vital data. This feature is also useful for testing purposes, enabling you to try out new software or configurations without compromising your main system.
Besides, it has many other advantages:
- IT organizations can deploy standardized, pre-built configurations on a single VHD, streamlining their process and reducing complexity.
- Changes to the contents of a VHD are easily undone.
- Many current operating systems support multiple users, but the level of protection between them varies.
Apart from these advantages, it still has limitations.
- The VHD has a maximum size limit of 2 TB for dynamic or differencing VHDs.
- It only allows a maximum of 65535×16×255 sectors.
A virtual disk, such as a VHD, only functions as a physical disk when the virtual machine is running, and once the virtual machine is shut down, access to the VHD and saved files on it is no longer possible.
Can I Copy VHD to Physical Disk
You want to upgrade your Lenovo laptop from Windows XP to Windows 7, but there's no direct upgrade path. You've set up Windows 7 on a VHD and want to clone it to a physical disk to move the content to your real hard drive. You can use a tool like Qiling Partition Magic to clone the VHD to a physical disk. Alternatively, you can use the built-in Windows feature called "Backup and Restore" to create a system image of your Windows 7 VHD and then restore it to a physical disk. You can also use a third-party tool like Qiling Backup to clone the VHD to a physical disk.
To convert a VHD disk to a physical disk, you can use the built-in Windows feature called "Disk Management" to attach the VHD file to your computer, then copy the files to your local hard drive. Alternatively, you can use third-party software like VHD to VDI or VHD to VHDX converters to achieve the same result. Once you've copied the files, you can delete the VHD disk and free up the space. To restore the VHD space to your local hard drive, you can simply delete the VHD file and the space will be made available again. You can then use the Disk Management tool to expand the local hard drive to use the newly freed space. This way, you can recover your VHD files to a physical disk and upgrade to the latest Windows 10 without any issues.
Many VHD users convert or restore the file to a physical disk when they no longer need to use a virtual machine. To help with this process, we've connected a simple solution for converting VHD to a physical disk, effectively restoring the file and its space back to a physical disk.
Best VHD to Disk Conversion Solution
Yes, you can copy a VHD to a physical disk or a VHDX file to a physical disk using the command line. You can use the command `copy` to copy the file to a physical disk.
When setting up a new computer or virtual machine, people often choose to copy a virtual hard disk to a physical hard drive. While manually copying files from the virtual disk to the physical disk is straightforward, it can be a time-consuming process.
To efficiently convert a VHD to a physical disk, you can utilize a VHD to disk migration tool, specifically Qiling partition software, which can help you achieve this task.
You can download Qiling Partition Master, create a disk clone task, and duplicate the contents of a virtual hard disk to a physical drive by choosing the virtual disk as the source and the physical disk as the target, and then executing the disk copy operation.
Once the process is complete, you can restore the VHD space to the physical disk by deleting the VHD file on your local disk.
Tutorial: Steps to Copy the VHD to a Physical Disk
To migrate your VHD disk data to a local disk and restore the VHD space, follow these steps: follow the steps below.
#1. Copy VHD to a Physical Disk
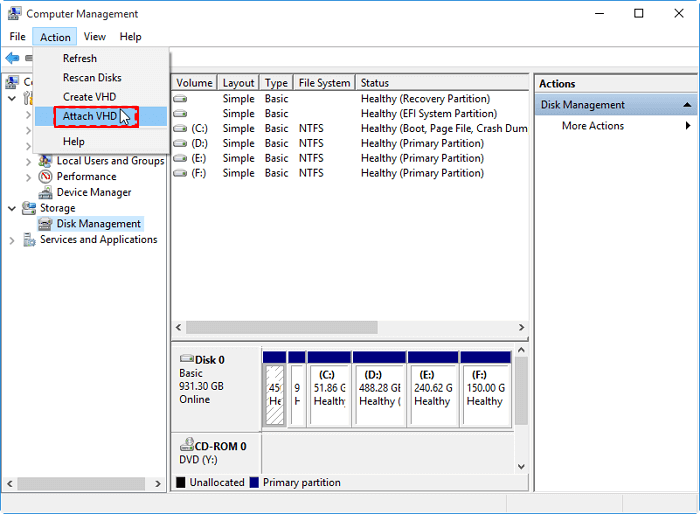
Right-To attach a VHD (Virtual Hard Disk) to your computer, follow these steps: click on My Computer, then Manage, followed by Storage and finally Disk Management. Once in Disk Management, right-click on it and select Attach VHD.
To clone a VHD to a physical disk, select an empty local physical HDD as the target disk, ensuring it's free from partitions. If the target disk has existing partitions, the cloning wizard will prompt you to delete them, so it's essential to back up your data beforehand.
Follow the steps below to copy your virtual disk:
Step 1. Select the source disk.
Right-Select the disk you want to copy or clone, then choose "Clone".
Step 2. Select the target disk.
Select the desired hard drive or solid-state drive as your destination and click "Next" to proceed.
Step 3. View the disk layout and edit the target disk partition size.
To wipe out all data on a target disk, first, make sure to back up any valuable data on the disk. Then, open the Disk Management tool, select the target disk, and click "Delete Volume" or "Delete Partition." Confirm the deletion by clicking "OK" in the warning message. If prompted, click "OK" again to confirm the deletion.
You can customize your disk layout by selecting "Autofit the disk", "Clone as the source", or "Edit disk layout", with the last option recommended if you want to leave more space for the C drive.
Step 4. Click "Proceed" to start the disk cloning process.
If you need to re-After cloning a virtual disk, you can partition it and apply advanced features using Qiling Partition Master, which can be found in the guide "Partition Hard Drive".
#2. Convert a VHD to Physical Disk
After the cloning, you can now start to restore your VHD space to a physical disk with the following steps:
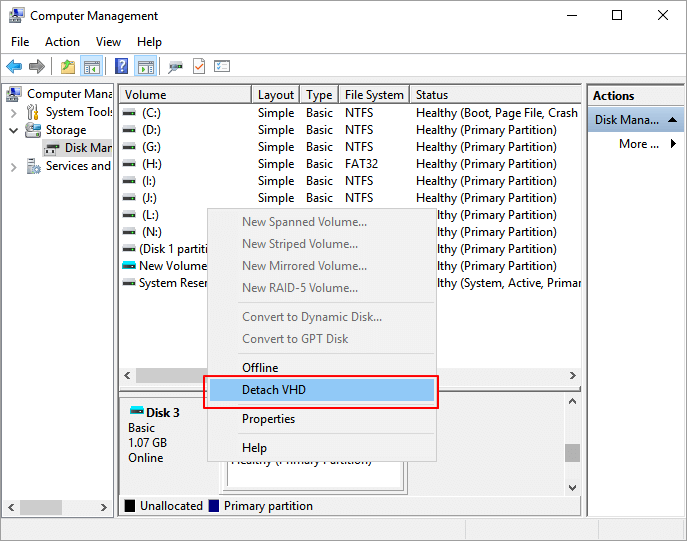
Step 1. Open Disk Management, right-click on the VHD disk, and select "Detach VHD".
Step 2. Open Windows File Explorer and locate your local virtual hard disk (VHD) file on your computer.
Step 3. To delete a VHD file, locate the .vhd or .vhdx file, right-click on it, and select the "Delete" option from the context menu. This will permanently remove the file from your system.
Step 4. Confirm the deletion.
After completing the steps, you've successfully returned the virtual disk space to the local disk on your PC, freeing up space that was previously occupied by the virtual disk.
Extended Reading
We introduced an efficient method to help users copy VHD content to a local HDD and restore virtual disk space to a physical disk. This aside, users also have questions about VHD and virtual machines.
Here, we collected several questions and listed a brief answer to each question. If you have the same doubts, follow and check out the answers.
1. How to extend VHD disk size?
Once a VHD is created on a Windows computer, its size cannot be changed. To increase the disk size, the original VHD file must be deleted and a new one created with a larger size.
Before you start the process of converting a VHD disk to VHDX, make sure to back up or clone the data on the VHD disk to your local disk first. This will ensure that your data is safe and can be recovered in case anything goes wrong during the conversion process.
To extend the size of a VHD disk, you can use either Disk Management or a virtual machine, but the methods differ. In Disk Management, you can increase the size of the VHD by adding a new virtual hard disk and then merging it with the existing one. In a virtual machine, you can extend the VHD by adding a new virtual hard disk and then expanding the existing one to the new size.
To extend VHD disk space on local Windows PC:
- First. Enter Disk Management, right-click to detach the VHD disk.
- To resolve the issue, locate the .vhd or .vhdx file on your computer and delete it. This file is likely the one that's causing the problem, and removing it should resolve the issue. Once you've deleted the file, you should be able to use your computer without any issues.
- Then. Re-To create a virtual hard disk, go to Disk Management, click on "Create VHD" under the Action section, and set a larger size for the new virtual disk.
To extend the disk space in Virtual Machine:
- To access the virtual machine console, open the application such as VMware Workstation, click on the OS, and then enter the virtual machine settings.
- To resize a virtual hard disk, select the Hard Disk, click Expand, and then set a new maximum size for your virtual disk.
2. How to recover VHD files?
If you mistakenly deleted or removed files on a virtual machine, you can try to find them in the Recycle Bin first. If nothing appears, you can install a file recovery software like Deep Data Recovery to scan and restore lost files.
3. What's the difference between VHD and VHDX?
The main difference between VHD and VHDX is that VHDX has a higher storage capacity limit, specifically 64TB, compared to VHD's 2TB limit.
A VHDX file supports storing up to 64TB in size and also helps prevent file corruption caused by power failures, making it a reliable format for storing large amounts of data.
4. What is Disk2vhd?
Disk2vhd is a tool that converts physical disks to virtual hard disks (VHDs) for use in Microsoft Virtual PC or Hyper-v virtual machines. It can run on an online system, allowing users to capture just system volumes and exclude data volumes, while preserving partitioning information. This enables users to create VHDs on local disks, making it a convenient option for virtualization.
Wrapping Up
If you need to convert a VHD file to a physical hard drive without losing any data, you can use Qiling Partition Master to copy the VHD content first and then delete the VHD file from the local disk. This straightforward approach ensures that all your data is preserved and can be easily transferred to a physical hard drive.
You can uninstall the virtual machine utility from your PC to free up more space.
Related Articles
- How to Convert GPT to MBR (Without Data Loss) with 3 GPT to MBR Converter
- How to Fix USB won't format to FAT32, Check Three Easy Ways
- Windows 11 Download Without TPM 2.0 [Windows 11 Installation Guide]
- Windows 11 Is Not Booting? Your Fixes Are Here!
- Wipe Hard Drive in Windows 7 from Command Prompt Completely
Want to know how to wipe a hard drive in Windows 7/XP/10 from command prompt? This page illustrates different ways of wiping hard drive for different purposes. - How to Convert Dynamic Disk to Basic Disk without Deleting?
Converting a dynamic disk to a basic disk can be a straightforward process that doesn't require deleting any data. To do this, you can simply open the Disk Management console, right-click on the dynamic disk you want to convert, and select “Convert to Basic Disk”. This will convert the dynamic disk to a basic disk, allowing you to continue using it as before, but with the added flexibility of being able to boot from it.