SMART Status Bad Error: How to Repair HDD Smart Error with Free Software
How to fix S.M.A.R.T. error on hard diskThe first step is to back up your failing hard drive. After that, you can use one of three methods to resolve the Smart error: follow the steps below.
| Workable Solutions | Step-by-step Troubleshooting |
|---|---|
| Fix 1. Use Windows disk repair utility | Hard drive errors can cause Smart error. So you can use the Windows Disk Check utility to scan & fix hard drive errors, bad sectors, file system errors...Full steps |
| Fix 2. Use a free disk manager | When your computer shows Smart status bad issue, you can use Qiling free partition management software to check and repair bad sectors on the hard drive...Full steps |
| Fix 3. Disable SMART error in BIOS | Facing Smart bad error, it is fine to continue using the hard drive. You can disable the Smart error in BIOS. But it is not recommended for data security...Full steps |
What Is a Smart Status Bad Error
S.M.A.R.T. is a monitoring system in computer hard disk drives and solid-state drives that detects and reports on indicators of drive reliability to anticipate hardware failures.
When S.M.A.R.T. data indicates a possible imminent drive failure, software on the host system may notify the user, allowing them to copy stored data to another device and replace the failing drive, preventing data loss.
The "Pri Master Hard Disk: S.M.A.R.T. Status BAD, Backup and Replace Press F1 to Resume" error message appears during system startup, indicating a predicted failure of the primary master hard disk. The message advises an immediate backup of the failing hard drive.

Rescue and Recover Data from Your Hard Drive When Smart Bad Error Occurs
When a S.M.A.R.T Status BAD error occurs, it indicates that your hard disk may fail at any moment. If your computer can still boot, immediately back up and store your essential files on an external hard drive. If your system can't boot due to the Smart error, the hard drive may be corrupted, and you'll need to recover your data. In this scenario, you can try using data recovery software to scan the corrupted hard drive and retrieve your files. This can be a complex process, but it's often the best option for recovering data from a failed hard drive.
Deep Data Recovery WinPE Edition allows you to recover and back up files from a failed hard drive in WinPE mode, creating a bootable USB to boot from a Data Recovery Wizard WinPE bootable disk to recover data from a corrupted or dead hard drive.
Using this powerful data recovery software, you can recover lost data from various devices and scenarios, including emptied recycle bin, memory card, flash drive, and hard drive, due to accidental deletion, OS crash, storage device damage, virus attack, and more.
To recover files from a failed hard drive, download the Qiling data recovery tool and use it in the WinPE recovery environment.
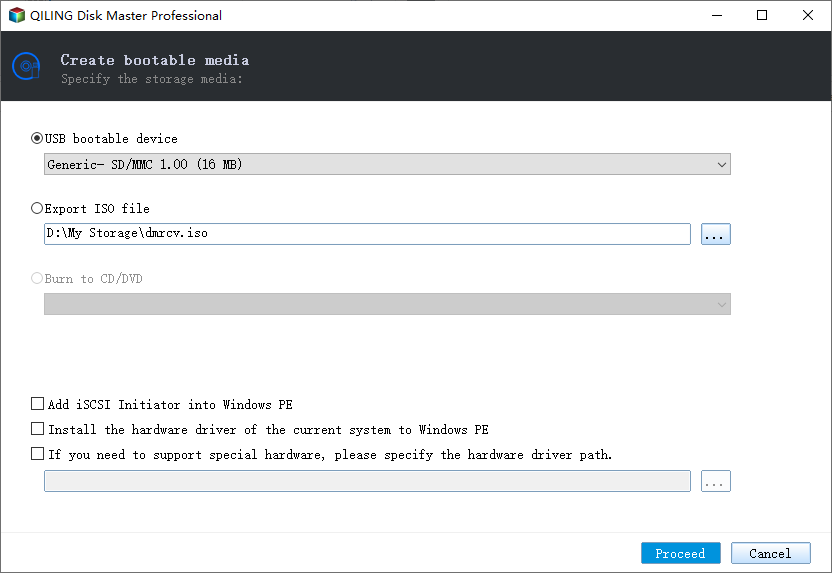
Step 1. Create a bootable disk
Before creating a bootable disk, make sure to back up any important data on the USB drive to another device, as the process will erase its contents. Once you've secured your data, you can use Deep Data Recovery WinPE Edition to create a bootable disk on the empty USB drive.
Connect a USB drive to your PC, then launch Deep Data Recovery WinPE Edition. Select the USB drive and click "Create" to create a bootable disk.
Step 2. Boot from the bootable USB
Connect a bootable disk to a PC that won't boot, then change the boot sequence in the BIOS settings to prioritize the disk. This can often resolve the issue by allowing the PC to boot from the disk instead of its internal storage, and can be accessed by restarting the PC and pressing F2 (or the designated key) to enter the BIOS settings.
To boot the PC from a device other than the hard drive, press the F10 key to save and exit the BIOS settings. This will allow you to select the boot device from the "Removable Devices" or "CD-ROM Drive" options.
Step 3. Recover data from a hard drive that won't boot
When booting from a USB, you can run Deep Data Recovery from the WinPE bootable disk, select the drive you want to scan to find all lost files.

Click "Scan" to start the scanning process.

After scanning, preview and select the files you want to recover, and then click "Recover" to save them to another location to avoid data overwriting.

How to Repair HDD S.M.A.R.T. Status BAD Error with Free Software
To fix a S.M.A.R.T. error on a hard disk, first back up all data, then follow these steps: after backing up your data, you can repair the S.M.A.R.T Status BAD, Backup and Replace error by following the methods below.
Method 1: Windows hard drive repair utility
If you're running a Windows operating system, you can use this free hard drive repair utility to fix smart errors. Simply set it as a priority choice when the error occurs, and it will help to repair your hard drive.
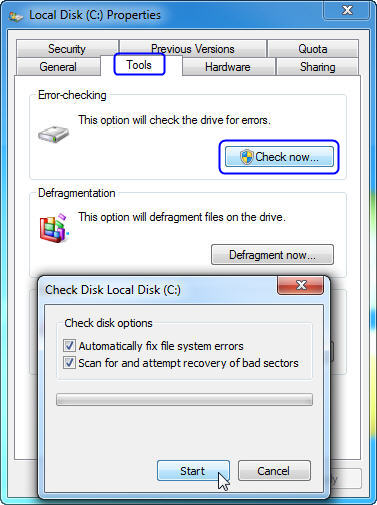
Step 1: In Windows 7, click "Start" -> "Computer", and in Windows 10, click "File Explorer".
Step 2: Right-click on any one partition on the hard disk with SMART failure error, then select the "Properties" option from the context menu to check the disk properties. This will provide information about the disk's status, including any errors or issues that may be causing the SMART failure error.
Step 3: Select "Properties" -> "Tools" and click "Check now" under "Error-checking".
Step 4: Enable the "Automatically fix file system errors" and "Scan for and attempt recovery or bad sectors" options.
Step 5: Click on "Start" to begin the process.
Method 2: Use Qiling free partition management Software to fix Smart error
If you encounter the Smart status bad error when starting your computer, you can use Qiling's free partition manager to check and repair bad sectors on the hard drive that may be causing the issue. Qiling Partition Master allows you to fix the corrupted file system and repair bad sectors with ease, making it a useful tool for resolving this problem.
Download this free disk management tool to learn how to repair a HDD with a SMART bad error.
Step 1. Right-click the target partition that has a problem.
Step 2. Choose "Advanced" > "Check File System".
Step 3. In the Check File System window, select the "Fix the error on the disk" option.
Step 4. Click "Proceed" to check errors on your partition.
Method 3: Disable SMART error in BIOS
If you're sure that no data will be lost, you can disable S.M.A.R.T. in BIOS and continue using your hard drive without being bothered by the S.M.A.R.T. status bad problem.
Step 1: Reboot your computer, and then press the F2 or Del key.
Step 2:To disable SMART self-test, go to "Advanced > SMART settings > SMART self-test" and set it to Disabled.
Conclusion
When you encounter the "SMART status bad, backup and replace press F1 to resume" issue, take immediate action to back up your files and then troubleshoot using the solutions on this page.
If you have any questions during the process, contact our technical support team for help. Email to support@idiskhome.com.
S.M.A.R.T. Status Bad Error FAQs
If you also have any of the following frequently asked Smart error fix questions, find solutions here.
How do I fix Smart status bad issue?
- Reboot your computer and recover data
- Disable S.M.A.R.T error from the BIOS
- Check bad sectors on the hard drive
- Back up and replace the hard drive
What causes smart hard disk error?
The SMART status bad error on a hard drive may be caused by bad sectors, and running chkdsk can potentially fix the corrupted file system and bad sectors, which may resolve the SMART hard disk error.
How do I fix smart hard drive detects imminent failure?
"Your hard drive is failing. Please save your data and replace the hard drive. Press F18 for setup or F2 to continue."
If your computer displays a "hard disk failure is imminent" error, it means your hard drive is not yet dead but will be soon. The error is often reported by SMART in various computers, including HP, ASUS, and Lenovo. To fix the issue, back up your crucial files immediately and use the disk check utility to resolve the problem.
Related Articles
- 6 Tips to Speed Up SD Card Transfer Speed and Fix Slow Micro SD Card
- Top 8 Ways to Fix Attempted Write to Readonly Memory BSOD Error in Windows 11/10
- How to Create Qiling WinPE Bootable Disk in Windows 10/8/7
- Effective Fixes for Windows Was Unable to Complete the Format SD Card and USB Drive
- Can I Make a System Clone on Windows 11? Yes, Sure! Your Guide Is Here
Do you need a full guide of the system clone on Windows 11 so to help yourself and your friends and families to upgrade the OS disk all by yourselves completely? This page provides you with a full guide to system clone on Windows 11, and any type of users, especially beginners, can follow to upgrade and switch OS disk on Windows 11 successfully. - Best System Clone Software Free Download 2024 [Your Checklist]
If you're looking for a reliable system clone software to download for free, this page recommends a trustworthy tool that allows you to clone your operating system to a new drive or disk on Windows computers, making it easy to upgrade your OS to a new disk with success.