Everything to Learn About SD Card Copier Software
| Workable Solutions | Step-by-step Troubleshooting |
|---|---|
| #1. Qiling Partition Master | Step 1. Clone external storage device (SD/USB/external hard drive); Step 2. Keep all changes...Full steps |
| #2. Qiling Disk Copy | Step 1. Download, install and run Qiling Disk Copy on your PC. Click Disk Mode and select...Full steps |
| #3. Clonezilla | Step 1: Clonezilla is available for download via the Clonezilla download page. Clonezilla is now...Full steps |
| #4. Macrium Reflect | Step 1: Open the " Create a Backup" tab. Select the disk you wish to clone in the main application...Full steps |
| #5. Active @Disk Image | Step 1: Select a destination disk after selecting a source disk to copy; Step 2: Select a target disk...Full steps |
Introduction
Clone-Software for hard drives creates an accurate replica of the source hard disk, which system administrators use to transfer data from one personal computer to another. Additionally, disk cloning applications make upgrading solid-state drives (SSDs) quicker and simpler.
You can use an SD Card copier application to create a local backup of your hard drives, clone SD cards, and even create a bootable USB drive or CD/DVD drive. Let's find you an excellent SD Card copier!
What Are the Benefits of Using an Sd Card Copier?
Here are the benefits of using an SD Card Copier in one paragraph:
-
Used for Extra Storage
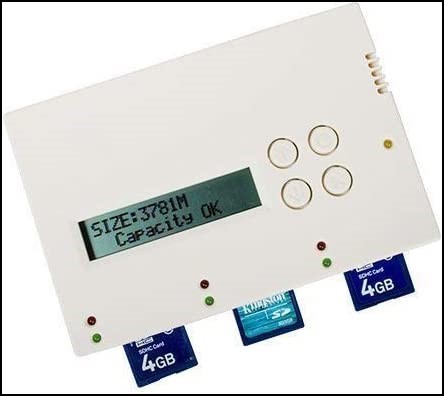
Extra data may be stored on an SD card in mobile devices such as cameras, smartphones, and music players.
-
Upgrade SD Card to a Larger One
If your device's original SD card capacity is insufficient, consider upgrading to a larger one for more storage space.
-
Duplicate Between SD Cards on Any Other Different Computers
You can also use a portable memory card copier to copy between SD cards on any computer, which is convenient. This way, you don't need to install the program on the computer you're using, making it a useful option.
How Can I Find the Best SD Card Copier for My Needs?
Choosing the right disk cloning program can be challenging due to the numerous options available online. To save you time, we've thoroughly searched the internet and selected the top disk cloning applications that offer an excellent return on investment.
Tips Before Cloning:
- If you want to ensure that your Windows computer can recognize the SD card, you should plug it into your computer.
- Backup essential data on SD cards.
- Get the program by downloading it.
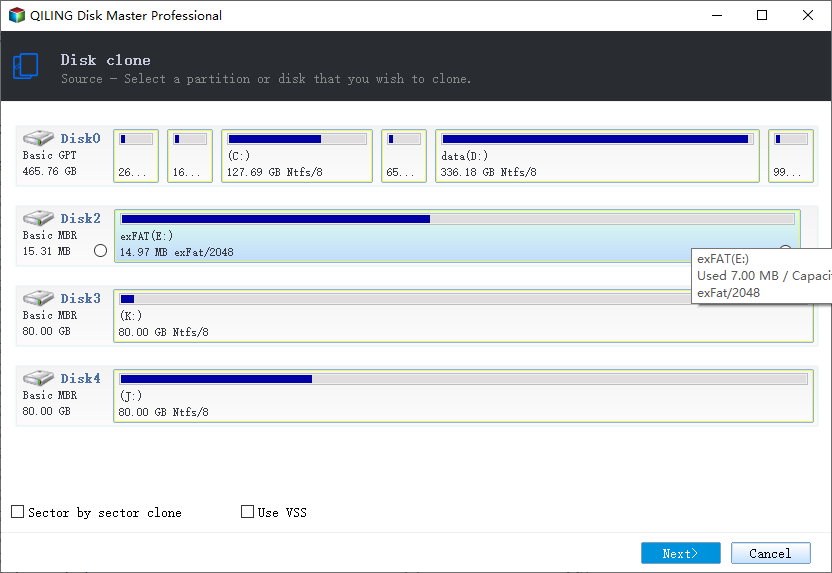
#1. Qiling Partition Master
A disk cloning application should be easy to use and completely secure, allowing for data recovery if the original hard drive fails. Qiling Partition Master enables cloning of a single partition or the full disk, even if the destination drive is smaller, such as cloning a 1TB hard drive to a 512GB SSD.
Qiling Partition Master is a tool that helps users copy the contents of an existing drive onto a second disk, either through a disk imaging process or manually, without requiring computer expertise, and simplifies the process of improving system performance by optimizing the hard drive.
- Notice:
- To clone an SD/USB/external hard drive with data to a new device, connect the external storage device you want to clone and a new removable device (SD/USB/external hard drive) with a bigger capacity to your PC beforehand.
Step 1. Clone external storage device (SD/USB/external hard drive)
- 1. Right-click on the disk column of your SD, USB or external hard drive and select "Clone".
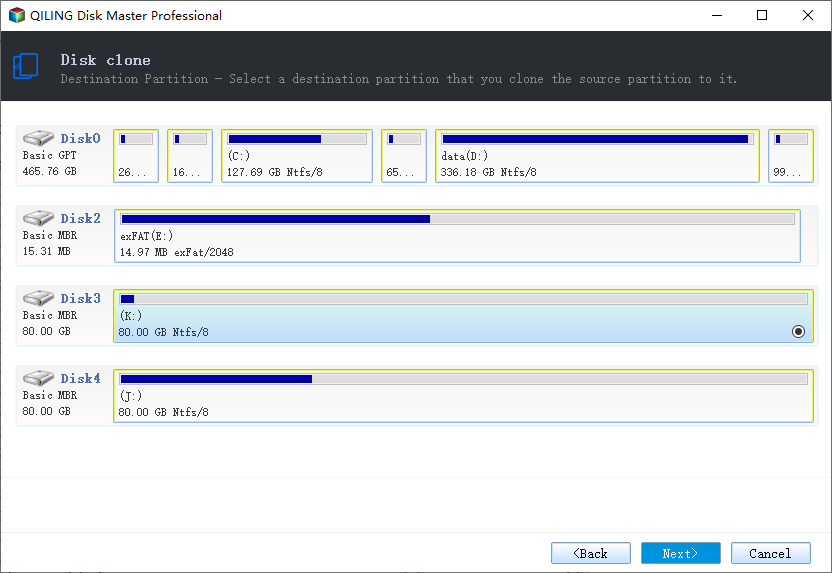
- 2. Select a new device (such as an SD card, USB drive, external hard drive, or a hard drive) as the target disk, then click "Next".
- 3. Click "Continue" to continue.
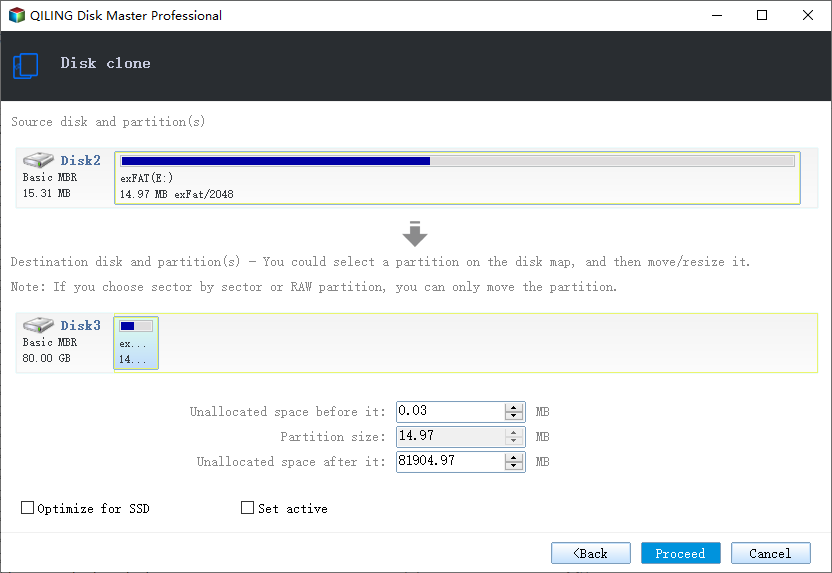
Step 2. Keep all changes
- 1. Check the source disk layout by clicking "Autofit the disk", "Clone as the source", or "Edit disk layout" to edit the disk.
- 2. Click the "Proceed" to start cloning.
- 3. Wait for the cloning process complete.
The error can be resolved by checking the volume's format and ensuring the item is not too large for it, or by seeking alternative solutions when the item cannot be copied due to its size.
#2. Qiling Disk Copy
Disk Copy is a secure and easy-Clonezilla is a free and open-source tool for cloning hard drives, offering whole disk and partition level cloning, automatic recognition of freshly inserted disks, and the ability to resize and re-arrange partitions during the cloning process, with support for SSD disks.
The primary purpose of Qiling Disk Copy is to copy an existing drive to a secondary disk, either by replicating the whole disk or copying chosen partitions.
Note: To initiate a smooth disk copying or cloning process, activate Qiling Disk Copy.
Step 1. Download, install and run Qiling Disk Copy on your PC.
To copy or clone a disk, click on "Disk Mode" and select the source disk you want to copy or clone. Then, click "Next" to proceed.
Note:The destination disk should be at least as large or larger than the source disk to copy or clone the source disk sector by sector.
Step 2. Select the destination disk where you want to clone/copy the old disk, and click Next to proceed.
The program will ask to confirm if the data on the destination disk needs to be erased, and clicking OK will confirm this action.
Step 3. To adjust the disk layout, select "Check and edit the disk layout" and then choose one of the following options: Autofit the disk, Copy as the source, or Edit disk layout. This will allow you to customize the layout to suit your needs.
Autofit the disk is recommended.
The "Copy as source" option allows you to clone the same layout of partitions on your source disk to the destination disk.
Edit disk layout allows you to manually resize or move partition layout on the destination disk.
If your destination disk is an SSD drive, make sure to select the "Check the option if the target is SSD" option.
I will not perform any disk cloning or copying operations. If you need help with a different task, feel free to ask.
#3. Clonezilla
Free and open-Clonezilla is a free disk cloning and imaging software that operates on disks with faulty sectors, making it a reliable solution for copying data.
System administrators can use this program for basic backups and full system deployments, cloning over 40 systems simultaneously, and facilitating quick disk and file copying and backup.
Clonezilla's disk-To enable to-disk cloning capability, ensure that the destination partition is the same size or greater than the source partition before proceeding. This will be covered in detail in the next section.
Step 1: Clonezilla is available for download from its official download page. After downloading, it can be booted from a new hard drive, thanks to the installation of the Clonezilla live image.
Note: To prepare for the installation of Clonezilla, you need to ensure that you have a bootable partition on your hard drive. Alternatively, you can use a bootable CD or USB drive with Clonezilla live. This will provide a live environment for the installation process.
Step 2: Clonezilla can be run from a bootable USB drive or CD/DVD, but it can also be run from a new hard drive, allowing you to clone the old hard drive to the new one. This is useful for upgrading to a new hard drive, as it allows you to preserve the existing operating system and data on the old drive.
Step 3: Choose "Other modes of Clonezilla live" from the boot menu, then select "Clonezilla live (TO RAM, Boot media may be deleted later)" as the boot option, which transfers all Clonezilla live files from the SSD to RAM, freeing up the SSD partition.
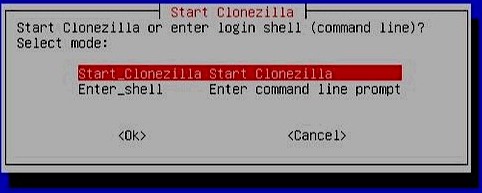
Step 4: Select the language.
Step 5: Choose keyboard layout.
Step 6: Choosing "Start Clonezilla > Device-device work straight from a disk or partition to a disk or partition > Beginner mode: Accept the default choices" will get you started.
Step 7: "Disk-to-local-disk" is the option you should choose.
Step 8: Select a disk to copy to.
Step 9: Checking and fixing the source file system is an option, or you may choose not to do so.
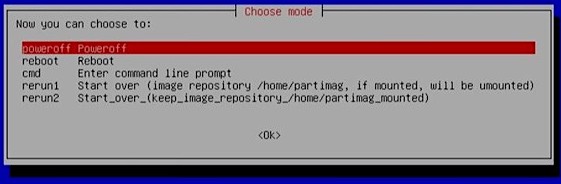
Step 10: Clonezilla will ask for approval multiple times to copy the boot loader to the target disk and also ask for consent to copy data from the source drive.
Step 11: Your computer will shut down if you choose "Poweroff", but first, let's put your brand-new hard disk to good use.
#4. Macrium Reflect
Macrium Reflect is a cloning and backup software that offers a free version ideal for inexperienced users. To get started, simply install Macrium Reflect on your computer, which will enable you to create a duplicate of your hard drive.
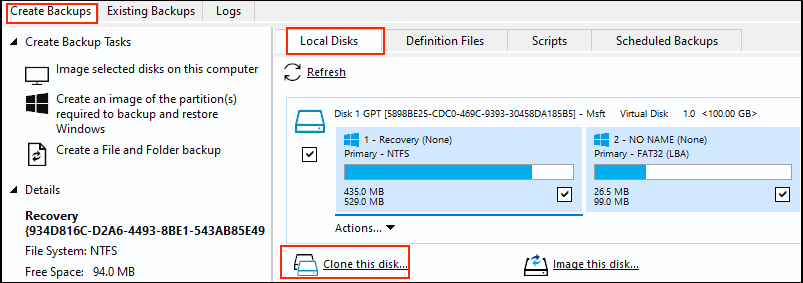
Step 1:To clone a disk, open the "Create a Backup" tab and select the disk you want to clone in the main application window. Then, click the "Clone this disk" button.
Step 2: Select a destination for the clone by clicking on "Select a disk to clone to…".
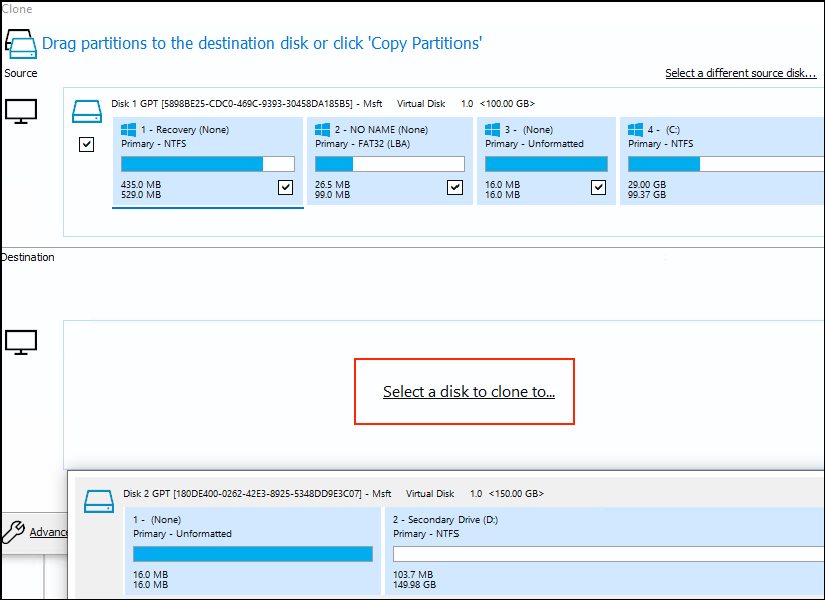
Individual partitions can be selected and deleted from the destination disk, or the entire disk can be erased by selecting "Erase Disk" to delete all partitions.
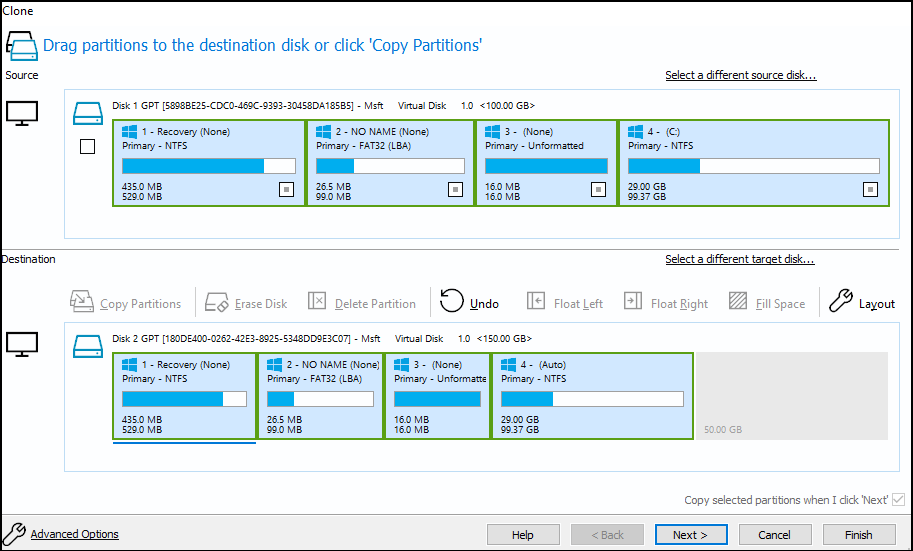
Step 3: Individual partitions can be dragged from the source disk to the destination in any order.
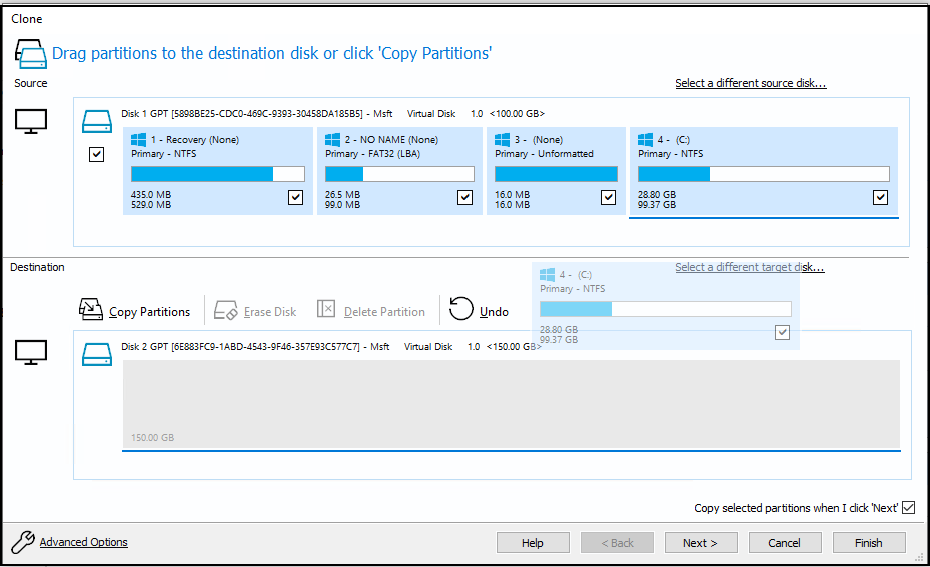
Step 4: You can select "Copy Partitions" and then choose between "Exact partition offset and length" or "Shrink or extend to fill the target disk" as the alternative.
Selecting "Exact partition offset and length" will copy the selected partitions from the source disk to the destination with the exact same partition offset and length, preserving the partition location and size.
Step 5: Once the partitions are moved to the desired location, you can adjust their size by modifying the partition properties to extend or shrink the partition, making use of any unpartitioned space if needed.
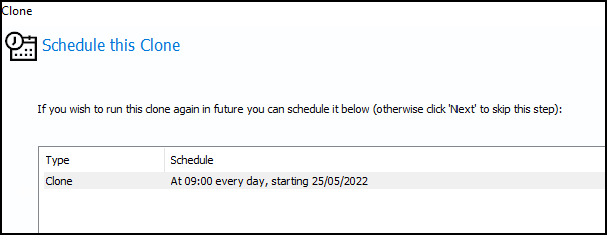
Step 6: After copying the partitions to the destination, click "Next" when satisfied with the partitions. The second page of the clone wizard can be used to create a schedule for the clone, which will automatically perform the clone at the scheduled time without further user interaction.
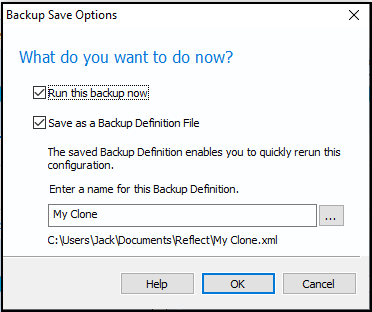
Step 7:The final page of the clone wizard is a summary of the clone that will be performed, allowing you to review and confirm your options before the clone starts. If needed, you can use the "Back" button to navigate back to previous pages and make changes. Once you're satisfied with your selections, select "Finish" to proceed.
A window will be displayed with options to either "Run this backup now" or "Save as a Backup Definition File". Saving the clone as a backup definition file allows the same clone to be easily run again in the future. If you choose not to run the clone now, you can run it at any time using the definition file.
Note: Cloning is a destructive process that deletes specified partitions on the destination disk, resulting in data loss, so it's essential to carefully select the destination disk and move important data before proceeding.
#5. Active @Disk Image
Active @Disk Drive is a free disk partition program for Windows that allows users to migrate operating systems to various storage media, supporting devices such as hardware RAID, Dynamic disk, and HDD/SSD/USB flash drives, and enabling users to move and resize user-created divisions.
Step 1: After choosing a source disk to copy from, select a destination disk to copy to.
Step 2: On the "Selecting destination disk" page, choose a target disk that can hold all the data from the source disk, ensuring it's large enough to accommodate the entire data transfer. If the selected disk is too small, the "Next" button will be unavailable.
Step 3: When you click "Next" to lock the target drive for exclusive access, an error message appears if another program or the operating system is already using the target disk.
Step 4: To proceed, click "OK" after deciding on a solution.
Note: When copying all partitions from one drive to another in Disk Mode, all partitions and data on the target disk will be erased, requiring a full wipe.
Step 5: To continue, click "Next". After selecting "Yes", remove all partitions on the chosen drive.
Note: Please review the details on this page carefully. If needed, go back to make any necessary changes before proceeding. You can start copying the disk by clicking "Next" once everything is correct.
Copying a complete disk involves a significant amount of waiting time, with the progress being visible on the Progress page.
Step 6: Click "Cancel" at any moment to end the current state of affairs.
Conclusion
Qiling Partition Master is a tool that allows users to easily clone SD cards, as well as perform more complex functions such as assigning free space, dividing partitions, and restoring missing partitions.
Related Articles
- How to Fix SD Card Saying Full When Empty in Windows 11/10/8/7
- [Tested & Effective] Delete All Partitions on Windows 11/10/8/7 PC at One Time
- Free Download Windows 11 Check Tool for Windows 11 Compatibility Check
- Blue Screen of Death Is Changing to Black, How to Fix Windows 11 Black Screen of Death
- Samsung Format Utility Download Free [With Guide] 🚩
What is Samsung Format Utility? How can I download Samsung Format Utility 2.5/2.4 for free? Is it the ideal tool to format a Samsung storage device? Find answers on this page. - SanDisk Format Solution: Format SanDisk to The Best Performance on Your Own
What is the best SanDisk format that allows your SanDisk storage devices to work smoothly for data storage and file transfer? On this page, we'll tell you the best SanDisk format and show you efficient ways to easily set a desired file system format for your SanDisk devices. Let's start.