Disk Read Only Fix: How to Change Drive from Read Only to Read Write (5 Ways)
Read-Shortly, shortly only is a file system permission that allows a user to read or copy data, but not write or edit it. It prevents accidental changes to the file's contents and is also referred to as write-protected.
To change a hard drive from read-only to writable, the troubleshooting methods are the same as removing write protection from a hard drive, USB flash drive, pen drive, or SD card.
- 1. Clear read-only with Diskpart
- 2. Remove read-only with software
- 3. Change read-only permission in Property
- 4. Fix disk read-only in Registry
- 5. Format read-only drive to a recognized file system
Drive Is Read Only
"After updating to Windows 10, my separate D drive (not a partition) is now read-only, allowing me to open files but preventing me from modifying them."
The hard drive's read-only status means you can't modify the data on it, only read it. This is a common issue with HDDs, as well as with removable storage devices like SD cards and USB flash drives, where once the data is written, it can't be changed or deleted.
If data is truly read-only, it can only be accessed with a device, but not modified, erased, appended to, concatenated, copied, or moved, allowing control over how it is used.
Method 1. Manually Remove Read-only with DiskPart CMD
Devices and media can be changed from read-only mode to read-write mode by the user, allowing for further usage. If a drive becomes locked in a read-only state, try to fix the read-only error using the Diskpart cmd with the following simple instruction.
Step 1. To open the Command Prompt, click on your "Start Menu", type cmd in the search bar, then hit "Enter".
Step 2. Type command diskpart and hit "Enter" to open a new command line window.
Step 3. To list the disks on your system, type the command `list disk` and press Enter. This will display a list of all the disks detected by your system, including their disk numbers (e.g.
Step 4. Type the command select disk 0 and hit "Enter".
Step 5. Type attributes disk clear readonly and hit "Enter".
Now you've removed the read-You can only select one attribute from the storage devices. Type 'exit' and hit "Enter" to leave the DiskPart utility.
cmd
command diskpart
list disk
select disk 0
attributes disk clear readonly
exit
Method 2. Automatically Clear Read-only with Third-party Write Protection Removal Software
If you're not tech-savvy, ! There are graphical-based solutions to help you remove write-protection from your hard drives, USB drives, and even SD cards, making it easy to access and use them.
Qiling CleanGenius is a tool that helps fix issues on drives without requiring command-line knowledge.
Here's an easy-To get your issues sorted using this tool, follow these simple steps: First, identify the specific problem you're facing and what you hope to achieve. Next, use the tool's features to gather relevant information and data.
Step 1: DOWNLOAD and install Qiling CleanGenius (free) on your computer.
Step 2: Run Qiling CleanGenius on your PC, select Optimization and choose the Write Protection mode.
Step 3: Select the device that is write-protected and click Disable to remove the protection.
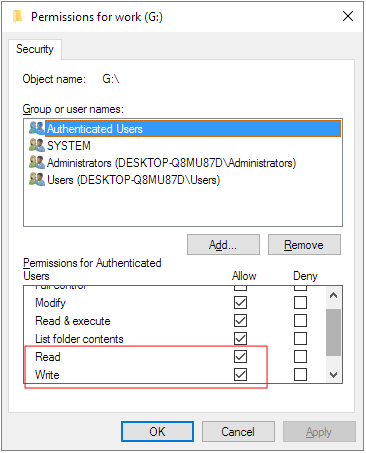
Method 3. Change the Read-only Permission in Windows 10/8/7
If your device or specific file/folder permission has changed to read-only, it's likely due to a Windows upgrade or update. To resolve this, go to the Windows Property settings and adjust the permissions to include both read and write access. This should restore the ability to edit and write to the affected files or folders.
Step 1. In Windows 7, go to My Computer, while in Windows 10, go to This PC.
Step 2. Right-click on the drive that is currently read-only and then click Properties.
Step 3. Under the Security tab, select the option of Read and Write in the Allow column, then click Apply.
Method 4. Change Hard Drive Read-only Status in Registry Editor
Windows Registry for disk read-To fix the issue, only experienced users should try the most advanced method, which is also the most sophisticated. Before attempting this method, it's essential to backup the Registry to prevent any potential damage.
Editing the Windows Registry can help remove write protection and read-only from a storage device, but it's often more effective on earlier Windows versions such as XP and Vista.
Step 1. Connect your pen drive to your computer.
Step 2. Press the Windows key + R keys to open the Run box, type "regedit" in the box, and press Enter to open the Registry Editor.
Step 3. Hit "HKEY_LOCAL_MACHINE" to expand "System".
Step 4. To find the "Current Control Set", click on the "System" list and select "Control".
Step 5. Check if there is a key named "Storage Device Policies" and if so, change the "DWORD value" to "0" and press "OK" to save the change.
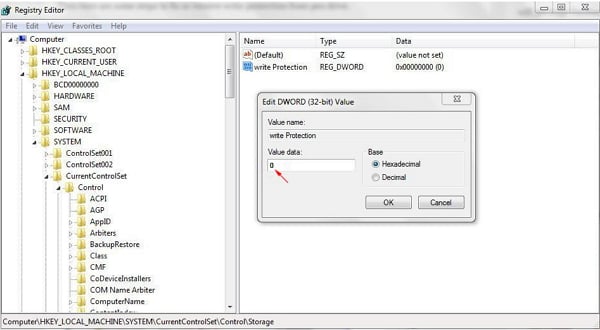
If you can't find the key named "Storage Device Policies", create a new key by right-clicking "Control" and naming it as "Storage Device Policies". Then, right-click this new key to add a "DWORD Value" named "write protect".
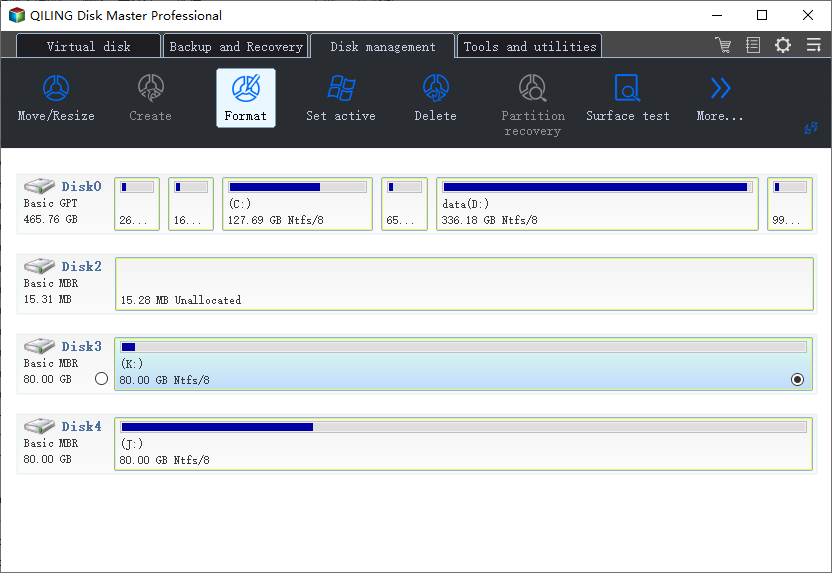
Method 5. Format Read-only Disk to a Recognized File System
Many storage devices are preformatted with a file system that may not be compatible with a Windows computer or a Mac, making them read-only. To fix this, you can convert the file system to a recognized one by Windows, Steam, or a device, making it writable again.
You can download Qiling Partition Master, a free partition manager, to reformat the disk to the desired file system, such as NTFS, FAT16/32, or EXT2/3/4, and back up your important information before doing so, as formatting will erase all data.
Step 1. Launch Qiling Partition Master, click the partition on your external hard drive/USB/SD card which you want to format and choose the "Format" option.
Step 2. Assign a new partition label, file system (NTFS, FAT32, EXT2, EXT3, EXT4, exFAT), and cluster size to the selected partition, and then click "Proceed".
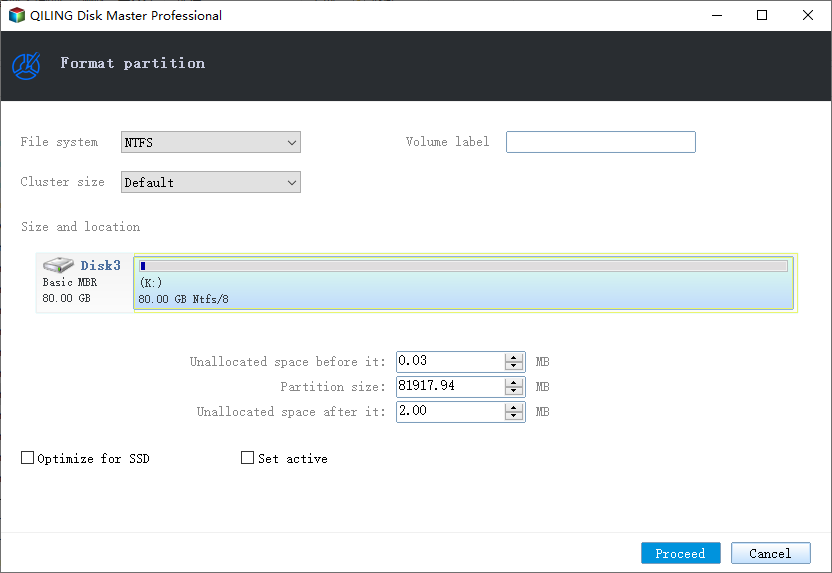
Step 3. Click "OK" to start formatting your external hard drive, USB, or SD card in the Warning window.
A smaller cluster size on a disk means less wasted space, but it also means a larger file allocation table (FAT), which can slow down the operating system's performance.
Related Articles
- How to Troubleshoot Critical Process Died Error in Windows 10/8/7 (10 Solutions)
- USB Partition Tool/Manager: Partition USB or Create Portable USB Drive
- Locate, Remove and Delete Large Files in Windows
- How to Move Partition in Windows 11/10/8/7? [New]
- How to Delete FAT32 Partition [Step-by-Step Guide]
Deleting a FAT32 partition is sometimes necessary, and there are three ways to do it. First, you can use built-in disk management tools, such as Disk Management in Windows or Disk Utility in macOS, to delete the partition. Alternatively, you can use a third-party tool, such as EaseUS Partition Master, which offers a user-friendly interface and advanced features to manage partitions. - How to Delete Unallocated Space Windows 10 [Three Efficient Ways]
To delete unallocated space in Windows 10, you can create a new partition on the unallocated space, extend the existing partition into the unallocated space, or merge the unallocated space with the existing partition. This can be done using built-in tools like Disk Management or by using third-party software such as EaseUS Partition Master.