5 Ways to Hide Drives in Windows 10 | Check Your In-depth Tutorial
To prevent data from being prying or accidental deletion, many users want to hide drives or partitions. This article provides 5 coping strategies to hide drives in Windows 10, including using Disk Management, free third-party software, the Local Group Policy Editor, the Registry, and the Command Prompt. Each method is fully detailed and includes steps to revert changes, allowing users to try without worrying about potential consequences.
- Option 1. How to Hide Drives in Windows 10 via Disk Management
- Option 2. Apply Third-party Software to Hide Drives in Windows 10
- Option 3. Using Local Group Policy to Hide A Drive
- Option 4. Hide Drives with Registry
- Option 5. How to Hide Drive in Windows 10 Using CMD
Option 1. How to Hide Drives in Windows 10 via Disk Management
Step 1. Press Windows + X and click on Disk Management.
Step 2. Right-click the drive you want to hide and select the "Change Drive Letter and Paths..." option.
Step 3. Remove the drive letter.
Click the drive letter and click the Remove button.

Step 4. Click OK to confirm.
Step 5. When the warning message pop up, click Yes to confirm.
To reverse changes and unhide drives, you can follow these steps:
- Right-To change the drive letter and paths of a drive, click on the drive in File Explorer, right-click on it, and select "Change Drive Letter and Paths..." from the context menu.
- To assign a drive letter to a new drive, click the "Add..." button, select "Assign the following drive letter", and click "OK" to confirm.
Option 2. Apply Third-party Software to Hide Drives in Windows 10
To hide drives, you can use the Qiling Partition Manager, which offers a simple "Hide" feature. This allows you to easily conceal a partition by selecting it and clicking the Hide option. If you need to show the drive again, you can simply click Unhide. This is a straightforward process suitable for beginners.
Download the software and do as follows:
Option 1 - Hide Partition
- Click the partition you want to hide, and select "Hide" from the dropdown menu.
- To hide a partition, go to the Disk Management window, select the partition you want to hide, right-click and select "Change Drive Letter and Paths", then uncheck the box next to "Assign the following drive letter" and click "OK". A window will appear asking if you want to delete the drive letter. Click "OK" to confirm.
Option 2 - Unhide Partition
- To view and access a hidden partition, click on the partition you want to view and access, and then choose "Unhide" from the drop-down menu.
- To unhide a partition on Windows, follow the instructions and click "OK" to reveal the hidden partition.
Read also:
Option 3. Using Local Group Policy to Hide A Drive
You can hide drive icons from Windows Explorer using the Local Group Policy, but you can still access the data by typing the drive path on the File Explorer address bar.
1. Press the Windows + R shortcut to open the Run command window.
2. Input gpedit.msc and click OK start Local Group Policy Editor.

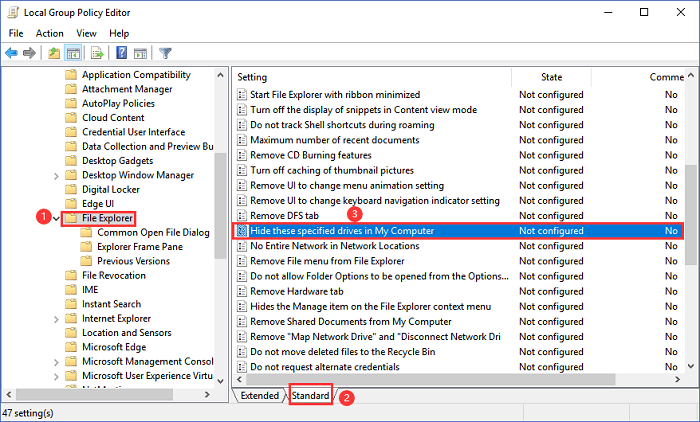
3. Expand User Configuration > Administrative Templates > Windows Components.
4. Under the Windows Components section, double-click the File Explorer.
5. Go to the right panel, click the Standard button.
6. Scroll down to find the "Hide these specified drives in My Computer" option and double-click it.
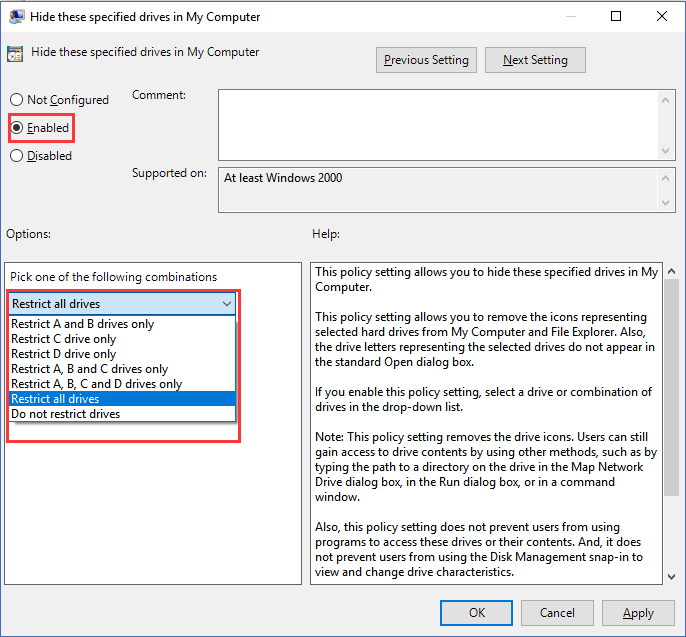
7. Click on Enabled.
8. Under the "Options" part, select the drive you want to restrict or select "Restrict all drives".
9. Click Apply and click OK.
To show or hide drives, go back to step 7 and click on the "No Configure" option. This will allow you to toggle the visibility of drives on your system.
Option 4. Hide Drives with Registry
To hide a drive, you can use the Registry method, but be warned that this is not suitable for beginners as incorrect changes can cause severe damage to your computer. If you still choose to use the Registry, please back up your entire data on your device first.
Step 1. Press Windows + R shortcut to open the Run window.
Step 2. Type regedit and click OK.
Step 3. On Registry Editor, follow the path:
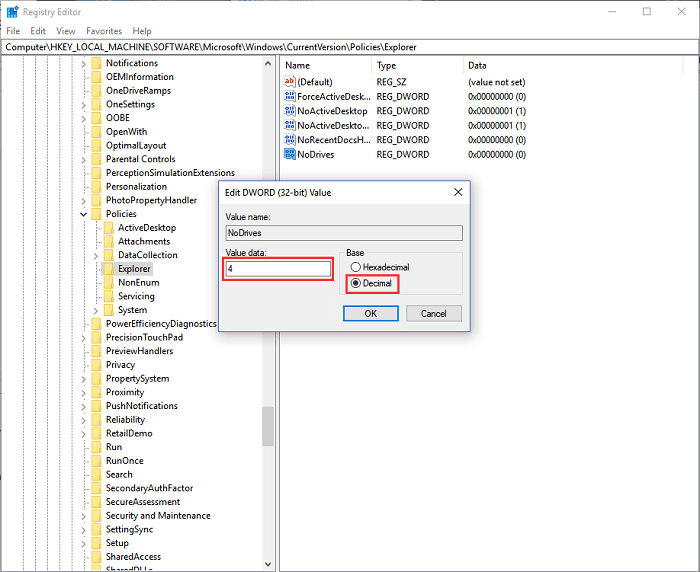
HKEY_LOCAL_MACHINE\Software\Microsoft\Windows\CurrentVersion\Policies\Explorer
Step 4. Right-click the Explorer > Choose New > Click DWORD (32-bit)Value.
Name New Value as NoDrives. Press Enter to ensure.

Step 5. Double-click the NoDrives and edit DWORD (32-bit) Value.
Under the "Base" part, click on the Decimal.
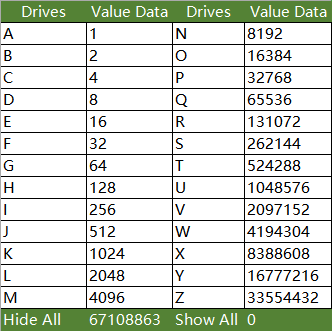
To hide specific drives, add their decimal values and type the resulting number in the box. For example, to hide drives C and D, add 4 (C) and 8 (D) to get 12, and type 12 in the box. If you're using a different drive letter, calculate its decimal value accordingly.
Step 6. Click OK and restart your computer.
When your computer starts, hidden drives are not visible in the Windows File Explorer. To access them, you can either input the drive path (e.g. C:) in the address bar or, if you previously deleted the NoDrives option, show hidden drives by following the same steps.
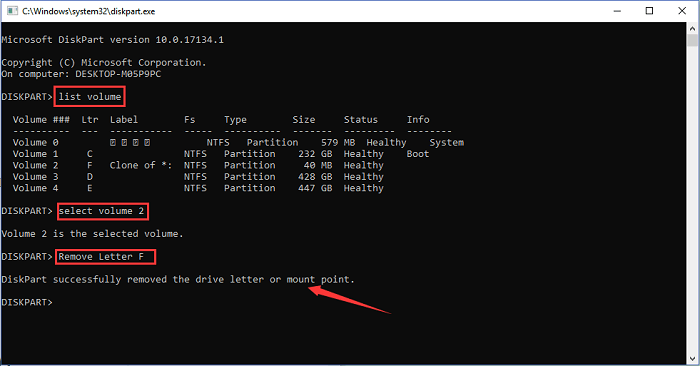
Option 5. How to Hide Drive in Windows 10 Using CMD
Step 1. Press Windows + R to open the Run window.
Step 2. Type diskpart and click OK.
Step 3. Type each command line and then press Enter.
- List volume
- Select volume * (* stands the drive you want to hide.)
- Remove Letter *
Once the update is finished, you can open Windows File Explorer, click on "This PC", and your drive should be listed under "Devices and drives".
To revert changes, open Diskpart, replace "Remove Letter" with "Assign Letter" and assign a drive letter to the hidden drive, then you can access it through File Explorer.
To Sum Up
To try a method, you can choose one of the options listed above. For a beginner, options 1 and 2 are recommended as they involve simple steps. However, it's advised to avoid option 4 without proper knowledge and caution.
Related Articles
- [Server Helper] Convert NTFS to FAT32 in Server 2008/2012/2016/2022 without Data Loss
- Free Download Partition Magic for Windows 11/10 64 Bit
- Set Up the Boot Mode in MBR for BIOS, Legacy or UEFI - Qiling
- DiskPart: Tips and Tricks for Using DiskPart Effectively in Windows
- I Need Help: How to View the User Password in Windows 10
Are you struggling to recall a forgotten Windows 10 user password and want to know how to view the user password in Windows 10? This post provides the 2023 latest and most comprehensive answer. - I Need Solid Ways That Can Create a New Partition on the Hard Drive, Help
If you are looking for practical ways to create a new partition on the hard drive, read this article, in which you can find the partition methods with detailed tutorials.