How to Fix Can't Download Windows 11 Error | 2022 Guide
If you have tried to download Windows 11 as part of the Insider Program, you may have encountered the compatibility issue and get the error "Can't download Windows 11." The demands of Windows 11 are slightly strict for its host system than the previous version of Windows, such as dedicated storage space, more RAM, and a recent-generation processor.
If you face any issue while downloading Windows 11, there is a possibility that your PC isn't compatible. Here are a few common issues that you might be struggling with and some helpful solutions if your PC is compatible.
| Workable Solutions | Step-by-step Troubleshooting |
|---|---|
| How Do I Download Windows 11 | Download with Qiling Windows 11 Builder > Enable UEFI Mode > Extend C Drive Space...Full steps |
| How to Install Windows 11 Manually | Try every USB port available; Determine you're using USB 2.0 or 3.0...Full steps |
Why Windows 11 Not Downloading
While trying to download or upgrade to Windows 11, users face the error "This PC can't run Windows 11" it happens due to the following reasons:
1. Unified Extensible Firmware Interface (UEFI) secure boot needs to be enabled.
2. Trusted Platform Module (TPM) is not enabled, or the TPM version is too old to meet the minimum requirements of Windows. TPM 2.0 is the minimum requirement for Windows 11.
3. Your disk space is running out of storage.
Can I still Download Windows 11?
If you have a compatible PC with Windows 11, you can download Windows 11 and fix the issues by following the below solutions.
How Do I Download Windows 11?
Here are a few solutions to try if Windows 11 not downloading on your PC.
1. Download with Qiling Windows 11 Builder
Windows 11 offers a wide range of new features and tools to improve the overall user experience. It offers many new features like a new taskbar, a new start menu, and more. However, if you plan to perform a clean install of Windows 11, you will need a bootable USB drive to do so. Here, we will tell you how to create Windows 11 bootable USB to install the new OS by using a USB drive.
You need to use Qiling Windows 11 Builder to create a Windows 11 bootable USB. It is a free tool that helps create a bootable USB drive easily by downloading files from the internet. Thus, you don't need to find Windows 11 files manually, and this tool will do the work for you.
First of all, download Qiling Win11 Builder on your PC and follow these steps:
Step 1. The Windows11 builder is integrated with the Qiling OS2Go software. Click the download button and launch the program after installation.
Step 2. Switch WinToGo Creator to Windows Install Drive Creator. The obtained system information is available on the home screen, and it keeps updating all the time. Apart from Windows 11, Win11 builder also supports you to download Windows 10/8.1.
Step 3. Connect your USB flash drive to the computer. Win11 builder will automatically detect your USB device, so all you need to do is click the Create button.
Step 4. The software will empty your USB drive data if it's a used one. Once the downloading process begins, wait there until it finished or leave for a while to do you own job.
Step 5. After successfully downloading the Windows 11 iso image file on the USB drive, start to install Windows 11 from the bootable USB drive on your computer by following the installation wizard step by step.
Now this application will start downloading Windows 11 files and make your pen drive bootable. Dowloading files will take time depending on your internet speed and create a bootable USB drive for Windows 11.
Once the process is completed, the bootable USB drive will be ready to use, and you can install Windows 11 on your PC.
This application is portable and free, so you don't need to install anything; download and run the application for creating a bootable USB drive.
2. Enable UEFI Mode
The UEFI mode is treading system firmware because it offers a faster and secure boot. It can support up to 2.2 TB HDD or SSD, a great replacement for the traditional BIOS boot. In order to root your computer in UEFI mode, your hardware's partition should be in GPT style.
Here's how you can enable UEFI mode:
A. Run Qiling Partition Master to Convert MBR to GPT
The Legacy mode is compatible with MBR, and the UEFI mode is compatible with GPT. To perform a boot from UEFI mode, you will need to convert your partition, and you will need to modify your system firmware to UEFI, and it needs to convert MBR to GPT. Use Qiling Partition Master for reliable partition conversion from MBR to GPU without losing your important data.
B. Set UEFI Mode
Follow these steps to enable UEFI mode on your PC:
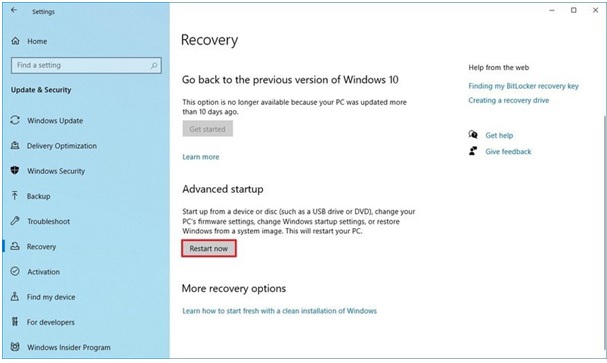
1. Open Settings on your PC.
2. Go to Update & Security.
3. Open Recovery.
4. You will find the Restart Now button under the Advanced startup section.

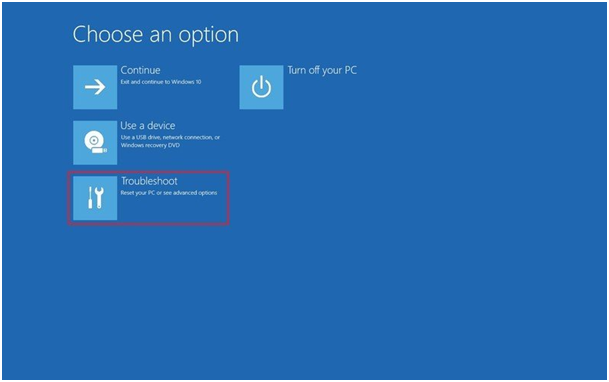
5. Once the system has entered the advanced startup after restarting, click on troubleshoot.

6. Now, click on Advanced options.
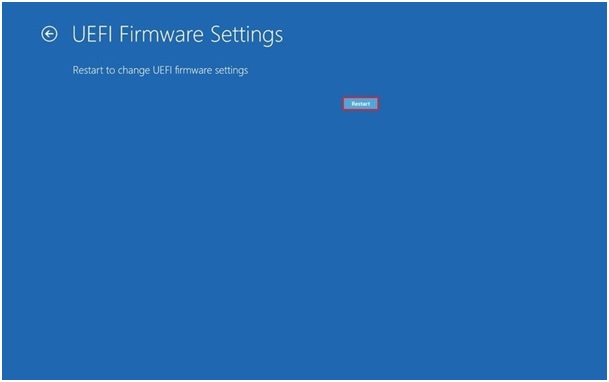
7. Once you have entered into advanced options, click on the UEFI Firmware Settings.
You won't be able to see the UEFI Firmware settings option if you have a legacy BIOS.
8. After choosing the UEFI Firmware setting, click on the restart button.

3. Extend C Drive Space
If your PC has low space or you need to allocate more space to C drive, you can use Qiling Partition Master to easily resize/move to extend your disk space and install Windows 11.
Option 1. Extend System C drive with unallocated space
- 1. Click on the System C: drive and select "Resize/Move".
- 2. Drag the system partition end into the unallocated space so to add it to the C: drive.
- 3. Click "Proceed" to execute the operations and extend the C drive.
Option 2. Extend System C drive without unallocated space
- 1. Click a big partition with enough free space on the system disk, select "Resize/Move".
- 2. Drag the end of big partition to shrink it for the unallocated space. Click "Proceed" to confirm.
- 3. Select the system drive at "Disk management" page, and dselect "Resize/Move".
- 4. Drag the end of System C drive into the unallocated space. Click "Proceed" to extend the C drive.
How to Install Windows 11 Manually
Once you are done downloading Windows 11 files on your USB drive with the help of Qiling Windows 11 Builder. You can easily install Windows 11 manually with the help of a USB device.
Follow the steps below to install Windows 11 manually:
Step 1: Connect the Windows 11 bootable USB to your computer and go to File Explorer. Open the connected USB drive.
Step 2: Open the file named "setup.exe" and launch Windows 11 setup.
Step 3: Choose Yes to confirm the User Account Control window.
Step 4: Once the Windows 11 setup starts, click "Change how Setup downloads updates" and then choose "Not right now" and then choose next to continue.
Step 5: You will find the three options on the screen:
- Keep personal files and apps.
- Keep personal files only.
- Nothing.
Choose your desired action and click on the Next button.
Step 6: Check the "Ready to install" message and then click on Install.
Step 7: Your system will now start to install Windows 11.
Step 8: Wait for a few minutes, and Windows 11 will be installed on your PC. Enjoy the latest version of Windows!
Final Words
We have explained the possible issues and solutions to help if you can't download Windows 11. This guide will help our readers to install Windows 11 on their PC easily. It is helpful for all the users with compatible and non-compatible PCs, download the latest version of Windows and enjoy all the new features. Drop your comments below if you have any questions or feedback!
Related Articles
- Fix 'Windows Cannot Be Installed to This Disk MBR'
- How to Restore USB Drive/Flash Drive/Pen Drive Back to Full Capacity
- How to Make C Drive Bigger Windows 7/10| Assigning More Space to C Drive
- Android Deleted Files and Photos Keep Coming Back (Get 4 Easy Fixes)