A Starter Guide to the Windows Disk Management
Main Content of This Guide:
About Disk Management? Who Is This Guide for?
I. What Is Disk Management Windows 10/11?
II. How to Open Disk Management in All Windows PC?
To set up a hard drive using Windows Disk Management, follow these steps: Open the Disk Management console by searching for it in the Start menu. In the Disk Management window, look for the unallocated space on the hard drive you want to set up. Right-click on the unallocated space and select "New Simple Volume" from the context menu. Follow the wizard to assign a drive letter, file system, and label to the new volume.
IV. Troubleshooting of Disk Management Windows 10/11 Error
V. Disk Management Software for Windows
People Also Ask about Disk Management
About Disk Management? Who Is This Guide for?
If you're looking to manage disks or partitions using Windows Disk Management, this guide is for you. Whether you're a beginner or just looking to learn the basics, this guide will walk you through the process in a way that's easy to understand. We'll cover the essentials of the disk manager utility, including how to run it and troubleshoot common errors, without getting bogged down in complex terminology. So, if you're interested in learning the fundamentals of Windows 10/11 disk management, this guide can help.

I. What Is Disk Management Windows 10/11?
Windows Disk Management is a software utility that provides a graphical interface for managing disk drives and partitions in a computer system. Its primary goal is to optimize disk space use and improve system performance.
In older Windows versions, disk management was done through the Disk Administrator tool, but starting with Windows Vista, it's integrated into the Computer Management console.
Windows Disk Management Availability:Windows operating systems, including Windows 2000, XP, Vista, 7, 8, 10, and 11, as well as all Windows Server versions, have been affected by the vulnerability.
Disk Management is a built-in utility in Windows that allows users to manage and configure disk storage. It provides a range of features, including creating and formatting partitions, assigning drive letters, and converting disk types. The software is strong enough to handle most disk management tasks, but its capabilities may be limited compared to third-party disk management tools. Despite this, Disk Management remains a reliable and user-friendly option for managing disk storage on Windows devices.
Essential Feature 1 of Disk Management - Manage Disks
- Initialize a new disk - After obtaining or replacing a new drive, initialize it before utilizing the disk on the computer.
- Converting an MBR disk to a GPT disk or vice versa involves changing the partition style of the disk. MBR and GPT are two different partition styles, and converting between them can be done for various reasons. If you're interested in learning more, you can read about what GPT and MBR are.
- Change or assign a drive letter.
- Change a dynamic disk to a basic disk.
- Manage virtual disk: It enables to create and attach VHD.
- Check disk's properties.
Essential Feature 2 - Manage Basic Volumes with Disk Management
- Create a new simple volume.
- To manage basic volumes, you can extend, shrink, delete, or format an essential volume. This allows you to adjust the size of the volume, remove it, or prepare it for use with a specific file system.
- Set partition as active.
Benefits and Drawbacks of Disk Management Windows 10/11
Disk Management is a free and user-friendly tool that offers basic partition functions, making it an attractive option for those tired of downloading third-party software that promises free features but ultimately requires an upgrade for a fee.
We don't like Disk Management because it's difficult for novices to use, especially when extending or shrinking volumes, which requires changing the disk size in megabytes, making it hard to count. Additionally, the tool often experiences unexpected errors, such as the extend volume option being greyed out or the hard drive not showing up.
II. How to Open Disk Management in All Windows PC?
To open Disk Management in Windows, you can run it from the Disk Management command in the Control Panel.
To Access Disk Management with Shortcut (Disk Management Command)
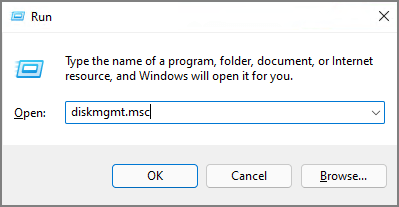
To access the disk management console on Windows, press the Windows key + R to open the Run dialog box, type "diskmgmt.msc" and press Enter. This will open the disk management console, where you can view all your hard drives and partitions and perform various actions on them.
To Get into Windows Disk Management from Control Panel
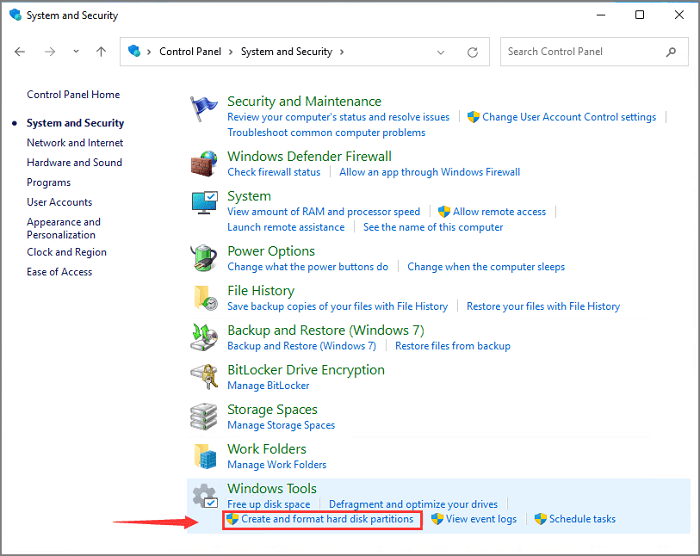
To access the Disk Management tool, open the Control Panel from the Start menu, then click on "System and Security", and type "disk management" in the top-right box. Click on the "Create and format hard disk partitions" option under the Windows Tools section.
Get More Opening Options
If you're still curious about other options, you can also access the Disk Management tool in Windows 11 through various methods, including opening it from the quick access menu, a dialog, task manager, and more.
III. How to Use Windows Disk Management to Set Up Hard Drive?
Here are the easy step-by-step tutorials to partition a hard drive:
1. Initialize A New Disk
2. Create A New Volume
3. Extend or Shrink Volume
4. Format Partition
5. Convert MBR to GPT or Vice Versa
6. Change A Drive Letter
7. Convert Basic to Dynamic Disk
1. Use Windows 10 Disk Management to Initialize A New Disk
Step 1. Install or connect a new hard drive to the computer.
Step 2. Open Disk Management with the former options. (Forget it? Back to the "how to open disk management" part.)
Step 3. Locate and find the hard drive and click on the "Initialize Disk" from the menu.
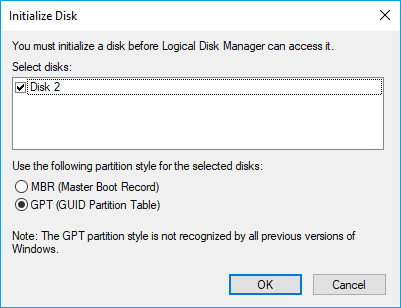
Step 4.In the Initialize Disk dialog box, select the correct disk to initialize and choose the desired partition style.
Here are some ways to initiate a hard drive:
2. Create A New Volume by Disk Management
Step 1. Launch Disk Management.
Step 2.You can see the free space marked as "Unallocated". To utilize this space, right-click on it and select "New Simple Volume..." from the context menu. This will initiate the process of creating a new partition on the unallocated space.
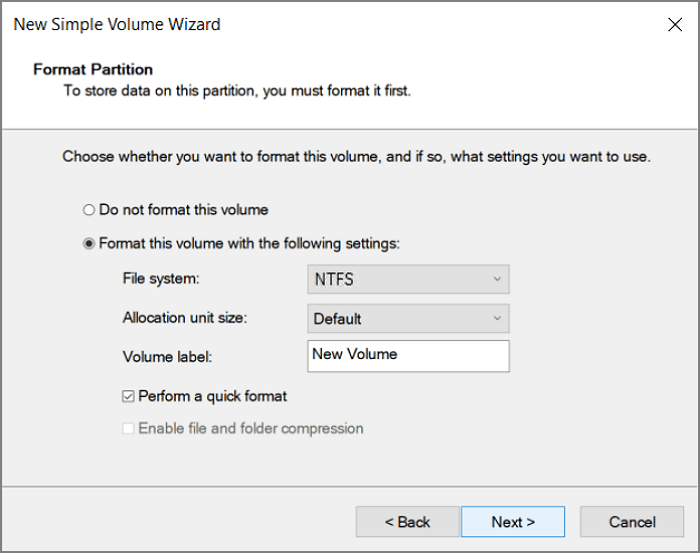
Step 3.Set the file system, allocation unit size, and volume label, then click Next.
Get More Info
Still, want to get more tips? Check to read the complete guide of new simple volume.
3. Extend or Shrink Volume via Windows Disk Management
Step 1. Run Disk Management.
Step 2.To extend or shrink a volume, click on the volume you want to modify. Then, click on the "Extend Volume" or "Shrink Volume" option.
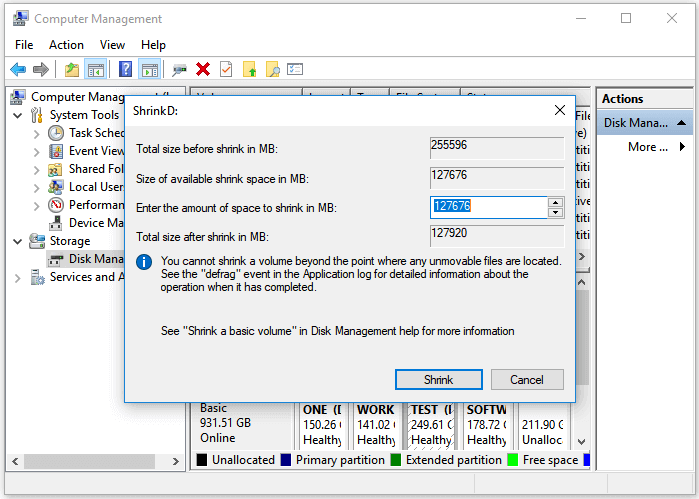
Step 3. Adjust the size in MB.
On the "Extend Volume Wizard", change the space size and proceed to Next, then Finish.
On the Shrink dialog box, enter the amount of space to shrink in MB and click "Shrink".
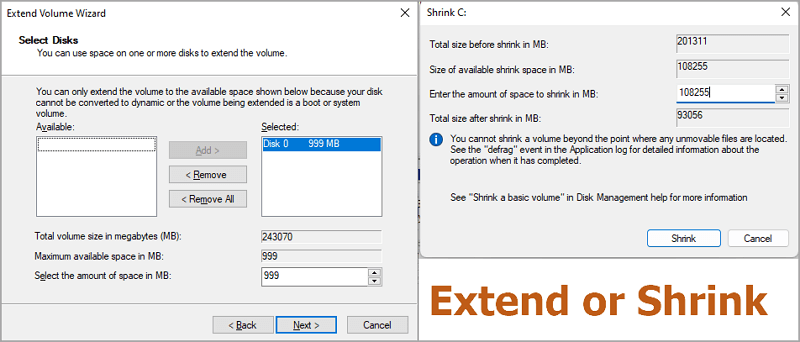
If the extended volume greyed out, it might be due to the volume being set to the maximum or minimum, or the extended volume feature being disabled in the settings. Try adjusting the volume to a different level or enabling the extended volume feature in the settings to resolve the issue.
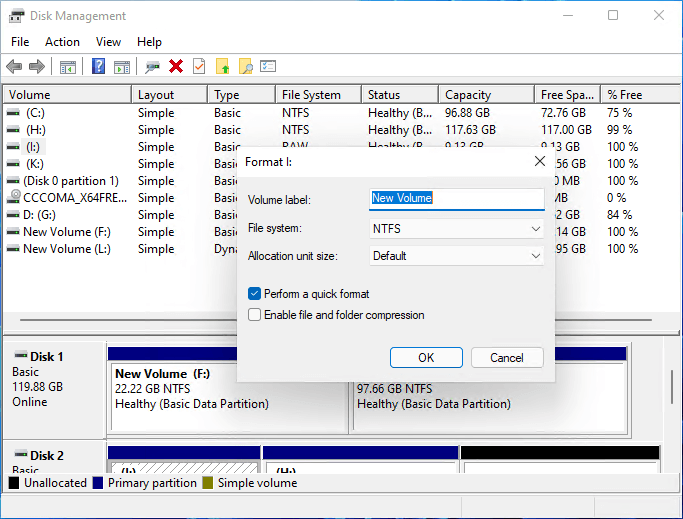
4. Format Partition by Disk Management Windows 10
Note: Format function indeed causes data loss. Remember to back up all important data first.
- Open Windows partition utility.
- Right-click a volume you want to format and choose "Format...".
- To change the volume label, file system, and allocation unit size, select the "Format" option and choose "Perform a quick format".
- Click OK.
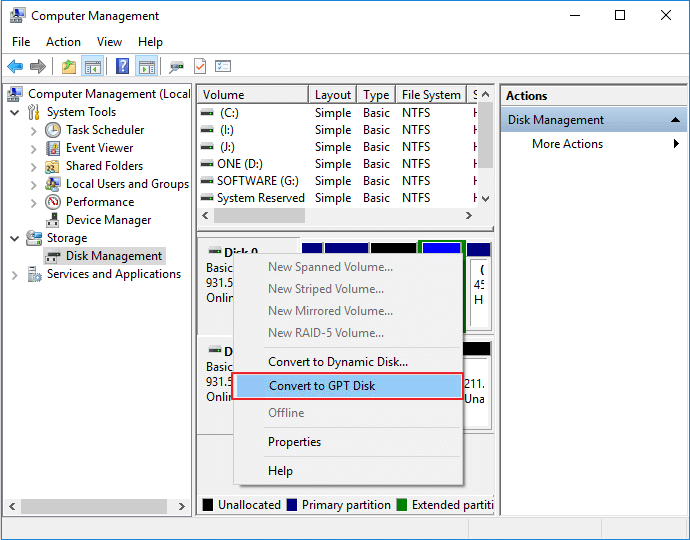
5. Convert MBR to GPT or Vice Versa
Be cautious of data loss when converting the partition style from MBR to GPT or vice versa. This process allows you to delete partitions in Disk Management, so make sure to back up your essential data before proceeding.
- To delete a volume, launch Disk Management, right-click on the volume on the targeted disk, and click "Delete Volume". Then, confirm the deletion by clicking "Yes".
- To change the partition style of a disk, right-click the targeted disk and select either "Convert to GPT Disk" for a GUID Partition Table (GPT) style or "Convert to MBR Disk" for a Master Boot Record (MBR) style. This action will convert the disk's partition table to the chosen format.
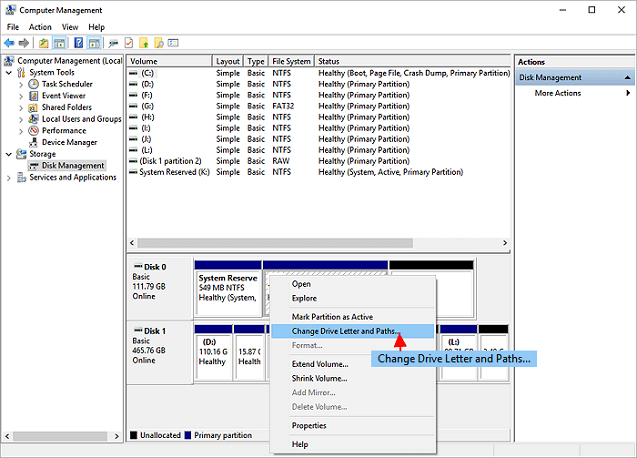
6. Change A Drive Letter with Windows 10 Disk Management
Run Disk Management > Right-Click on the partition you want to change the drive letter for, then click on "Change Drive Letter and Paths..." in the context menu. Select a new drive letter from the list, then click "OK" to confirm the change.
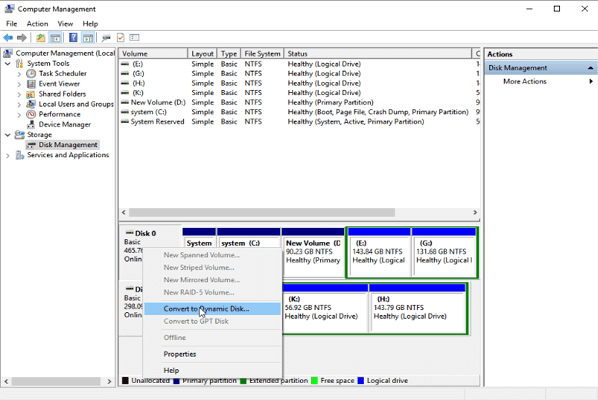
7. Convert Basic to Dynamic Disk
Launch Disk Management > Right-To convert a basic disk to a dynamic disk, click the disk for which you want to convert and then click the "Convert to Dynamic Disk" button. This will initiate the conversion process, which may take a few moments. Once complete, the disk will be converted to a dynamic disk, allowing for more flexible and efficient disk management. You can verify the conversion by checking the disk properties in the Disk Management console.
Here are the other features in Disk Management that you can apply:
Disk Management isn't a one-size-fits-all solution. If you encounter greyed-out errors or issues with hard drives not showing up, refer to the troubleshooting section. If that doesn't help, consider alternative methods to Disk Management for addressing errors.
IV. Troubleshooting of Disk Management Windows 10/11 Error
(X )Error 1. Extend Volume Greyed out
Extending volume greyed out is a standard error that can occur when trying to expand the partition size on a hard drive, often due to the hard drive being out of space, preventing the ability to make unallocated space. To resolve this, you can try shrinking a volume in Disk Management that has enough space to create unallocated space. This may allow you to expand the volume and free up some space on the hard drive.
- To free up disk space, run Disk Management, look at the partition next to the targeted volume, select "Shrink Volume" and click OK.
(X )Error 2. New Simple Volume Out
When trying to create a new volume on a disk with the Master Boot Record (MBR) scheme, a new simple volume greyed out may appear if the disk has more than four primary partitions. To resolve this, delete one of the existing primary partitions and replace it with a new one, or convert the disk to the GUID Partition Table (GPT) scheme, which supports up to 128 partitions.
Back to change MBR to GPT with Disk Management.
LEARN MORE
Try more solutions to fix New Simple Volume Greyed out
(X )Error 3. Format Volume Greyed Out
Disk Management format greyed out. This issue often occurs when a storage drive is corrupted or contains bad sectors, preventing the format option from being available. In such cases, the format option is usually greyed out, and a third-party tool is required to format the drive.
Other Quick Troubleshooting in Disk Management:
V. Disk Management Software for Windows
Managing hard drives can be done manually via Disk Management, but manual management can be time-consuming and error-prone. An alternative to Disk Management is a free program that can finish tasks in seconds, making it a more efficient option for managing hard drives.
Free Partition Manager - Qiling Partition Master
Qiling Partition Master is a free tool that lets you resize, move, merge, convert and manage partitions on your hard drive, and also has a partition recovery feature to recover deleted or lost partitions.
Check More Tools
Move to get the other nine free disk manager.
People Also Ask about Disk Management
1. Why does my hard drive not showing up?
- The drive is properly connected to your computer.
- The drive has become corrupted or damaged.
- The drive hasn't been appropriately formatted.
2. How much storage does a dynamic disk require for the disk management database?
When creating a dynamic disk, you must specify the storage allocation for the disk management database, which tracks changes to the dynamic disk and stores information about its layout. The database size depends on the number of disks and partitions on the dynamic disk, as well as the number of updates made to the disk, and should be at least 2MB.
3. Which of the following is not a linux/unix file or disk management command?
A. cfdisk
B. xfsdump
C. tar
D. xterm
The Right answer is "xterm".
Related Articles
- Computer Won't Boot? Causes & Fixes for PC Not Turning On [Full Guide]
- What Is Diskpart? How to Master and Use Diskpart Commands on Windows [Full Guide]
- One for All Guideline: How to Format/Reformat A Hard Drive
- Computer Is Running Slow? Causes and Fixes Are Found! [Your Ultimate Guide]
- How Do I Force Format SD Card on Windows 11/10? Your Guide Here
Formatting an SD card is usually a simple process, but if it's not working properly, you can try force formatting it to fix errors. This can be done using a card reader or by plugging the SD card into a device like a camera or phone, and then using the device's formatting feature to force format the card. This can help resolve issues with the SD card. - Forgot BitLocker Password: How to Recover?
Forgot BitLocker Password? This guide offers step-by-step solutions to help you recover your encrypted drive, regardless of your tech experience level.