The 7 Best Disk Partitioning Tools Free Download for Windows 11/10 [2022]
Disk partitioning is the process of dividing a hard drive or solid-state drive into multiple logical drives, allowing for better organization and management of data. The benefits of disk partitioning include improved system performance, enhanced security, and easier backup and recovery. For Windows users, there are several disk partitioning tools available, including built-in options like Disk Management and third-party software such as Qiling Partition Master.
When it comes to partitioning hard drives in Windows without partition manager software, things can get complex and inconvenient, making it difficult to resize or move a partition.
To manage a hard drive or external storage device efficiently, finding a handy and efficient disk partitioning tool is necessary. Fortunately, there are various paid and free disk partition software options available that can help you execute disk management tasks efficiently. By following this guide, you can view a list of these tools and choose the best one to suit your needs.
In this article, you'll learn:
- What Is Disk Partitioning
- What Is the Best Partition Tool? Top 7 Recommends
- White List of Disk Partitioning Tools Recommend
What Is Disk Partitioning
--Wikipedia
Disk partitioning is the process of creating one or several partitions on a hard drive, SSD, or external storage device using a partition manager tool or software in Windows computers.
In addition to creating partitions on a new or used hard drive, Windows users may also need to extend the C drive, merge partitions, convert disks, clone disk, or migrate OS to a new SSD, among other partition management tasks.
With the increasing demands, it's necessary to find a comprehensive disk partitioning tool to help manage disk space on Windows systems, including partitioning hard drives.
The Benefits of Disk Partitioning: Why Do I Need It
Partitioning a hard drive or external storage device allows you to divide it into separate sections, each with its own file system and storage capacity. This enables you to manage your storage space more effectively, ensuring that each partition has enough space for its specific use, such as storing operating systems, programs, or data files. By partitioning your disk, you can also improve system performance, reduce clutter, and enhance overall disk management.
| Items | Benefits of Disk Partitioning |
|---|---|
| For Storage Devices |
|
| For Windows System |
|
| For Hard Drive or External Storage Users |
|
Aside from the above-Professional disk partitioning tools are also time-saving and freeing your hands in tackling disk management issues, allowing you to focus on more complex tasks.
What Is Disk Partitioning Tool?
A Disk Partitioning Tool, also known as partition manager software or disk utility for Windows, is a software designed for Windows users to manage partitions on a physical disk drive, allowing them to create, resize, format, and delete partitions.
The disk partitioning tools could be divided into two types:
- Free disk partition manager tools
- Paid disk partition software
Both types of tools can perform basic disk management operations. However, for users who need to execute more advanced tasks, such as cloning a large HDD to a smaller SSD or migrating the OS from HDD to SSD, a paid and reliable disk partitioning software is recommended.
To partition your disk, you'll need a software tool that can handle the task. There are many options available, both free and paid, that can help you partition your hard drives, SSD, or external storage devices. We'll be covering 7 top recommended disk partitioning tools in the next part, so you can choose one that suits your needs and start partitioning your disks instantly.
What Is the Best Partition Tool? Top 7 Recommends
Searching for disk partitioning tools or disk partition managers online can yield a lengthy list of recommendations, requiring time and effort to review each one. This can be a frustrating process, especially when you have to spend money and energy testing these tools to find the right one.
After testing and comparing various partition manager tools, we have compiled a list of the top 7 best disk partitioning tools in 2022 to help you manage your storage space effectively.
- #1. Qiling Partition Master
- #2. Paragon Partition Manager
- #3. Acronis Disk Director
- #4. Gparted
- #5. PartitionMagic
- #6. Disk Management [Free]
- #7. DiskPart [Free]
All the recommended tools can partition hard disk partitions and perform advanced operations, so you can take a quick look at them and choose the one that suits you best.
#1. Qiling Partition Master
Easiest Windows Disk Partitioning Tool & Disk Manager
Qiling Partition Master is a reliable disk partition software that supports Windows 11/10, older Windows users, and Server users to quickly solve disk partitioning, low disk space, disk conversion, and OS migration issues on HDD/SSD.
Its user-friendly interface and simple guide enable users to easily manage their disks without requiring any IT knowledge or technical skills, making complex tasks easier with just a few clicks.
How to Download:
Supported OS: Windows 11/10/8.1/8/7/Vista and XP
Feature List:
- Basic Disk Partitioning:
- Create, resize/move, extend, shrink merge, split partitions
- Delete, format, wipe partitions
- Change drive letter, change partition label
- Hide, unhide partitions, explore partition
- Initialize disk to MBR or GPT
- Advanced Disk Management:
- Clone disk or partition
- Migrate OS to HDD/SSD
- Convert disk to MBR/GPT, Basic/Dynamic
- Convert partition to FAT32/NTFS, Primary/Logical
- Extend C with 2nd disk, allocate disk space
- New disk guide
- Partition recovery
- Adjust disk layout
- WinPE creator
- 4K alignment, change cluster size
Versions: Free, Pro, Server
Pros & Cons:
| Pros | Cons |
|---|---|
|
|
How to Partition a Hard Drive/SSD:
Step 1. Check for free space
To divide a disk partition into multiple ones, you must ensure that there is adequate free space to be allotted.
Step 2. Shrink a disk partition to create unallocated space
To resize or move a partition with a lot of free space, right-click on it and select the "Resize/Move" feature. This will allow you to adjust the partition's size and position on the disk.
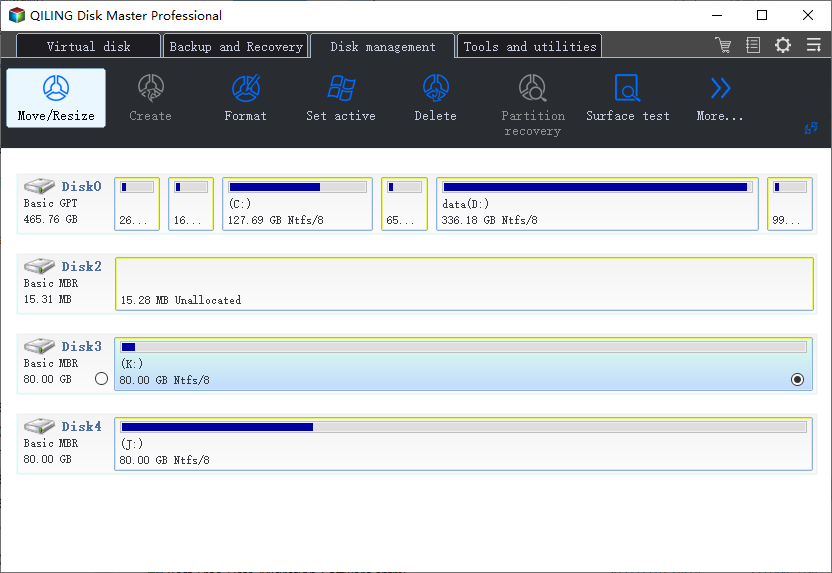
To free up more space on your device, drag either end of the partition to the right or left, allowing you to shrink its size. This can be done by moving the red arrow. You can monitor the amount of space you've reduced in the "Partition size" area.

To conclude, after shrinking a disk, you need to click "Proceed" to apply the changes, and a new unallocated space should appear under the same disk in the main window.
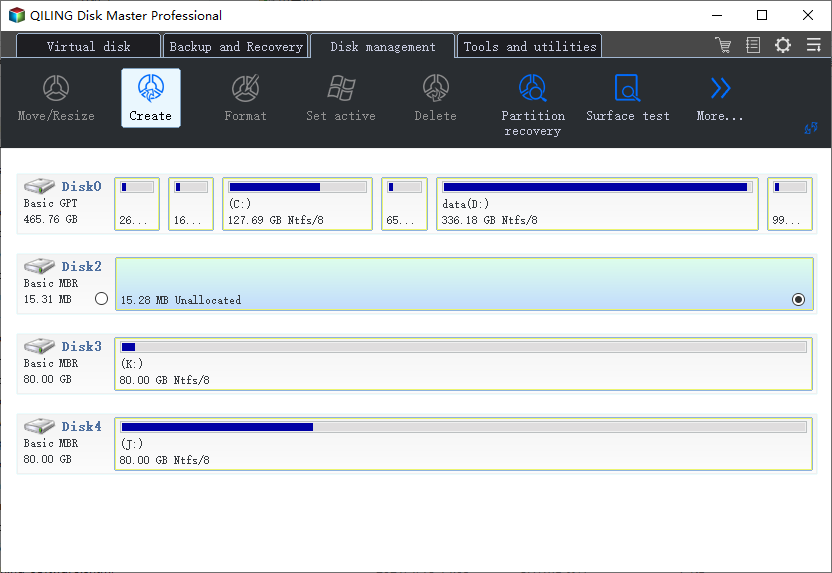
Step 3. Create a new partition on unallocated space
To create a usable partition drive with a recognized file system, right-click on the unallocated space and choose "Create".
You can customize the partition information by selecting a drive letter, partition label, and file system (such as NTFS, FAT32, EXT2/3/4, or exFAT) among other settings in the Advanced Settings.
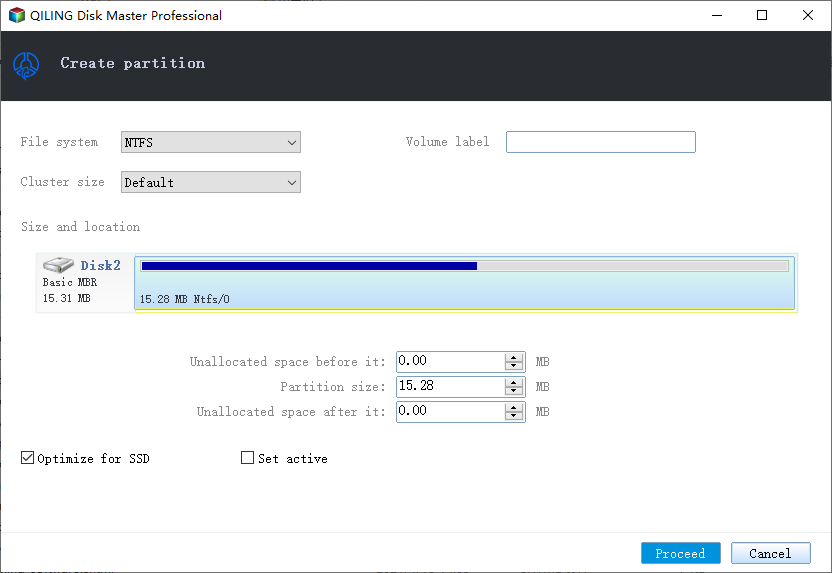
To create a partition on unallocated space, select the unallocated space and click "New" to create a new partition. Choose the file system type, set the partition size, and assign a drive letter. Then, click "Apply" to apply the changes.
#2. Paragon Partition Manager
Basic Free Disk Partitioning Tool
Paragon Partition Manager is a third-party tool that helps personal users organize their hard drive and gain additional space in existing partitions, similar to Qiling disk partitioning manager. It allows users to manage disk partitions on both internal and external hard drives.
Paragon's disk partitioning software is primarily intended for personal and home users, with business users needing to upgrade to Hard Disk Manager.
How to Download:
This link should be opened in a browser to download software on a PC: https://www.paragon-software.com/free/pm-express/
Supported OS: Windows 7 SP1 and newer
Feature List:
- Resize/Move partitions
- Undelete partitions
- Create/delete partitions
- Change drive letter/volume label
- Hide/unhide partition
- Check file system
- Convert the partition to NTFS, FAT32, APFS, FS 3
- Surface test
- Convert MBR to GPT, GPT to MBR
Versions: Community Edition, Hard Disk Manager
Pros & Cons:
| Pros | Cons |
|---|---|
|
|
How to Partition a Disk with Paragon Partition Manager:
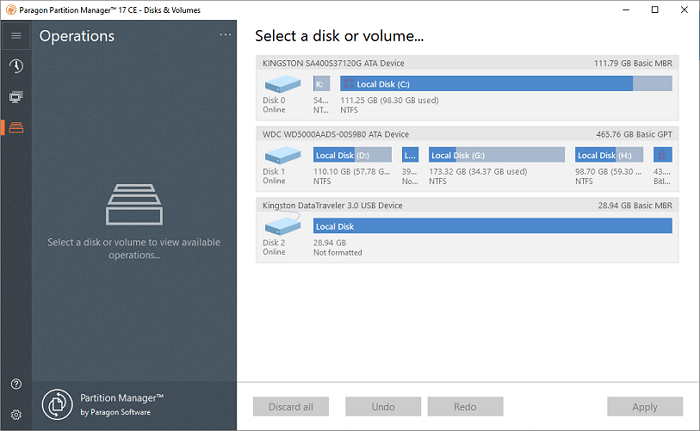
Step 1.To proceed, run Paragon Partition Manager, click on the unallocated disk, and then select the option to "Create volume".
Step 2.To set up the disk, you'll need to set the Volume Label, File System, and Drive letter, then click "Place in queue" to finalize the process.
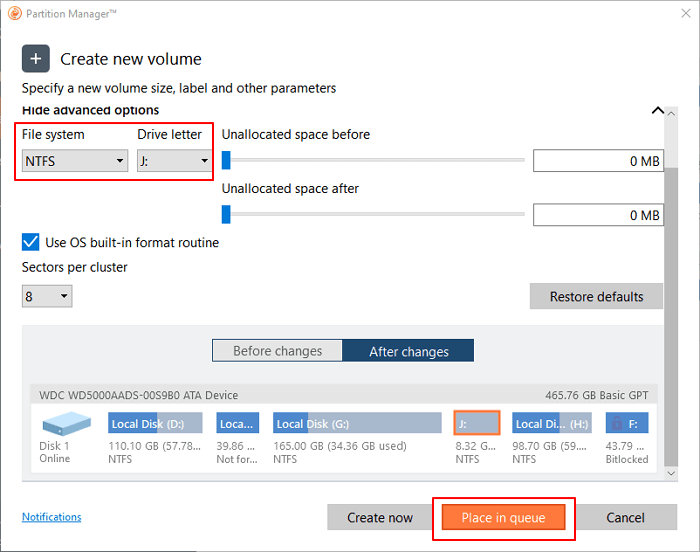
Step 3. Click "Apply".
#3. Acronis Disk Director
Basic Disk Partitioning Software
Acronis Disk Director is a third-party software that provides basic disk management tools to help Windows users optimize their disk usage and protect their data.
Acronis Disk Director may not be the most cost-effective tool for disk partitioning, but it still offers users control over their systems and data through features like disk cloning, volume recovery, and partition management.
How to Download:
This link provides access to download Acronis Disk Director Home.
Supported OS: Windows 10/8.1/8/7/Vista/XP
Feature List:
- Create partition, change labels, format, and activate a partition
- Partition recovery
- Clone disk
- Convert disk from Basic to Dynamic, and vice versa.
- Change partition type
- Delete volume, check partition
- Clone basic MBR disk
- Convert MBR to GPT or vice versa
Versions: Home version, Workstation, Server
Pros & Cons:
| Pros | Cons |
|---|---|
|
|
How to Create a Partition with Acronis Disk Director:
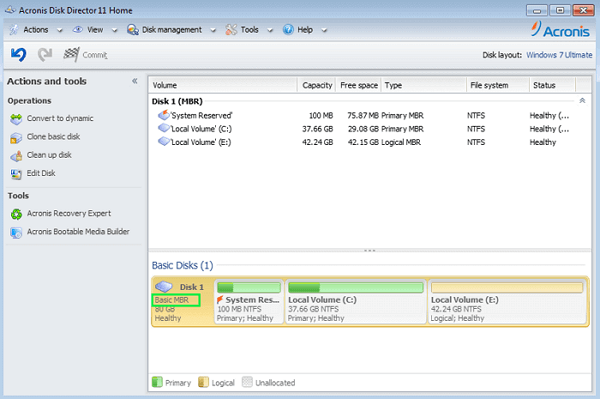
Step 1. Run Acronis Disk Director, right-click on the unallocated space, and select "Create volume" to create a new volume on the disk.
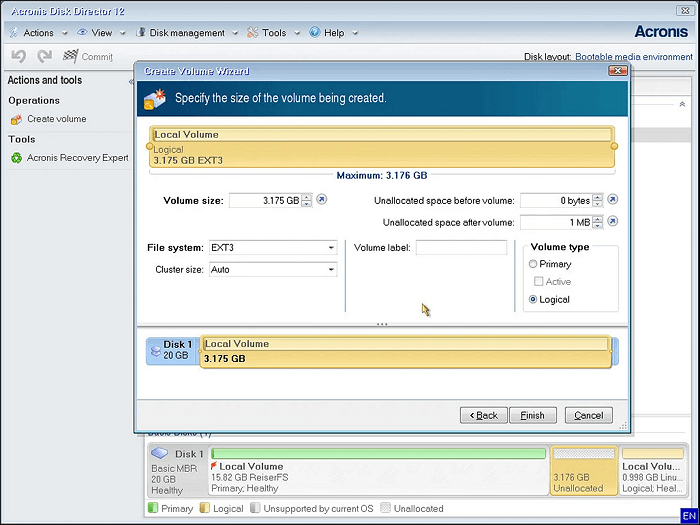
Step 2. Set volume type: Basic, Simple/Spanned, Striped, Mirrored, and click "Next".
Step 3. Configure the volume settings, select the file system, label, and other options, and then click "Finish" to finalize the process.
#4. GParted
Free Partition Editor for Disk Partitions
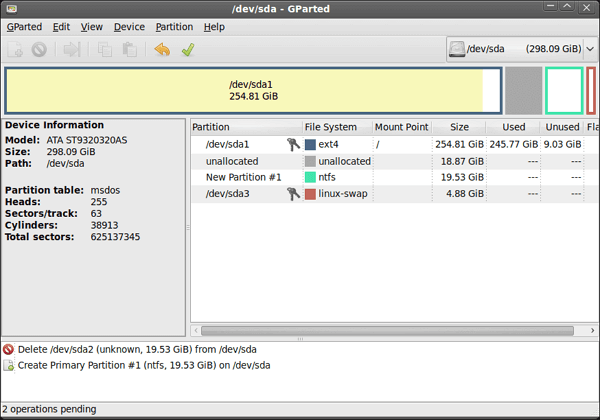
GParted, also known as GNOME Partition Editor, is a free partition editor that allows users to manage disk partitions on Windows, Linux, and Mac computers, enabling them to resize, copy, and move partitions without losing data.
GParted is an open-source tool that allows anyone to access, use, modify, and improve it.
How to Download:
The link provided is for downloading GParted, a free and open-source partition editor, which can be used to manage and manipulate disk partitions. By accessing this link, users can download the GParted software and use it to perform various tasks such as creating, resizing, and deleting partitions, as well as checking file system integrity and managing disk space. The software is available for various platforms, including Windows, macOS, and Linux. By downloading and using GParted, users can gain greater control over their disk partitions and perform tasks that would otherwise require technical expertise.
Supported OS: x86 and x86-64 Linux, Windows, Mac OS X.
Feature List:
- Create or delete partition
- Resize or move partition
- Check partition, change the label
- Copy partition
- Extend or shrink C drive
- Lost partition recovery
- This system supports a wide range of file systems, including btrfs, exfat, ext2/3/4, fat16/32, linux-swap, lvm2 pv, nilfs2, ntfs, reiserfs / resizer4, udf, ufs, and xfs.
Versions: Windows version, Linux version, Mac OS X version.
Pros & Cons:
| Pros | Cons |
|---|---|
|
|
How to Partition Hard Drive with GParted:
Step 1. Select an unallocated space on the disk, then click "Partition -> New" to create a new partition.
Step 2. Specify the size, alignment, type, file system, and label of the partition.
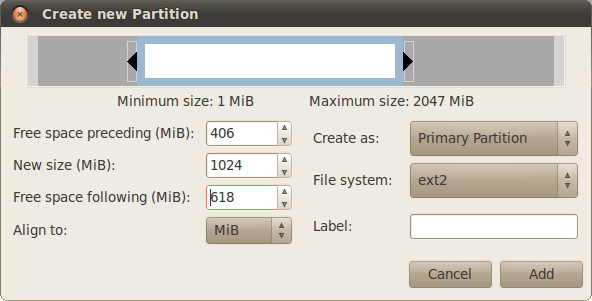
Step 3. Click "Add" to create the partition.
#5. PartitionMagic
Old-Fashioned Disk Partitioning Utility
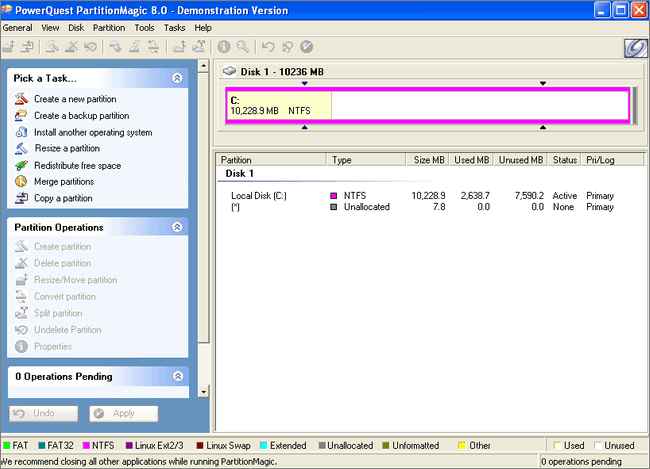
PartitionMagic is a utility software for hard drive partitioning that was originally made by PowerQuest and later owned by Symantec, but is no longer offered by Symantec as of December 8th, 2009.
Old Windows users can use this old disk partitioning tool to resize NTFS, FAT32/FAT16 partitions, copy and move partitions, and more.
How to Download:
Partition Magic is no longer available for download from its official site, but a third-party platform, Uptodown, offers a version for Windows at https://partition-magic.en.uptodown.com/windows.
Supported OS: Windows 2000/XP
Feature List:
- Resize partition (with NTFS, FAT32/16)
- Convert FAT32 to NTFS
- Change cluster size of NTFS, FAT
- Merge volumes
Versions: No longer available.
Pros & Cons:
| Pros | Cons |
|---|---|
|
|
Editors' Advice:
PartitionMagic, a once popular disk partitioning tool, is no longer compatible with new Windows operating systems and its company has ended support, rendering it obsolete. Therefore, it's recommended to stop using and downloading this software and instead opt for a more modern and reliable tool.
#6. Disk Management [Free]
Windows Built-in Disk Partitioning Tool
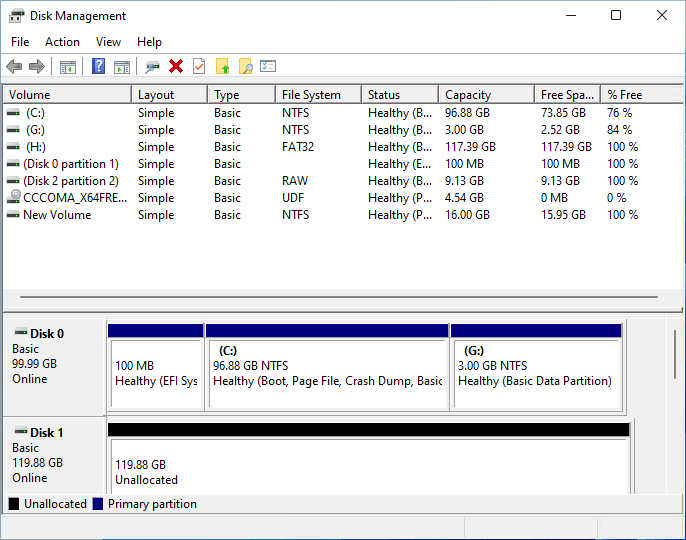
Disk Management, a Windows built-in tool, allows users to create, extend, delete, format, or shrink partitions without installing third-party software, making it a reliable disk utility for Windows users. It works as efficiently as professional partition manager software, providing a convenient solution for disk partitioning needs.
How to Download:
Disk Management was pre-installed in Windows operating systems. You don't need to install it. See how to open Disk Management in Windows.
Supported OS: Windows 11/10/8.1/8/7/XP and Windows Servers.
Feature List:
- Create partition
- Delete partition
- Shrink volume
- Format partition
- Convert Basic to Dynamic
- Convert MBR to GPT, GPT to MBR
- Extend volume
Versions: None
Pros & Cons:
| Pros | Cons |
|---|---|
|
|
How to Create New Simple Volume with Disk Management:
Step 1. To access Disk Management, right-click the Windows icon and select "Disk Management" from the menu. This will open the Disk Management window, where you can view and manage your computer's disk storage.
Step 2. To free up space on the target disk, right-click on the unallocated space and select the option to create a new simple volume. This will allow you to assign a drive letter and file system to the newly created partition, effectively making the unallocated space usable.
Step 3. Specify partition label, file system, volume size, etc., with the onscreen guidelines, and click "Next" to continue.
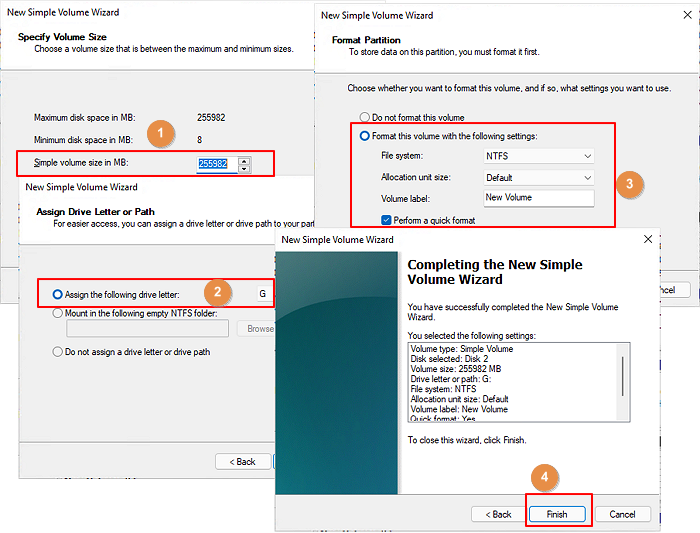
Step 4. Click "Finish" when the setup guide completes.
#7. DiskPart [Free]
CMD Command-Line Disk Partitioning Tool
DiskPart is a utility that processes command lines to execute disk partitioning operations on Windows computers, allowing for both basic and advanced partitioning tasks. In addition to partitioning, DiskPart can also run other computing commands such as chkdsk, SFC, and DISM to fix disk file system errors.
DiskPart is a useful tool for experienced Windows administrators and developers, offering more power than Disk Management. However, for beginners, it's not the most ideal option for handling disk-related tasks.
How to Download:
DiskPart is a built-in tool in Windows OS, similar to Disk Management, that allows users to manage and manipulate disk partitions without the need for installation. It can be accessed directly from the operating system, making it a convenient option for users who need to perform disk-related tasks.
Supported OS: Windows 11/10/8.1/8/7/XP and Windows Servers.
Feature List:
- Create partition
- Delete Volume
- Format Partition
- Assign Drive Letter
- Extend Partition
- Shrink Partition
- Mark Partition as Active
- Clean Disk or Erase Disk
- Convert Disk to MBR/GPT, Basic to Dynamic
- Check disk error, fix file system error
- Check IP address
- Clean Disk or Erase Disk
- Convert Disk
- More...
Versions: fdisk (old), DiskPart(now)
Pros & Cons:
| Pros | Cons |
|---|---|
|
|
How to Create Partition with DiskPart:
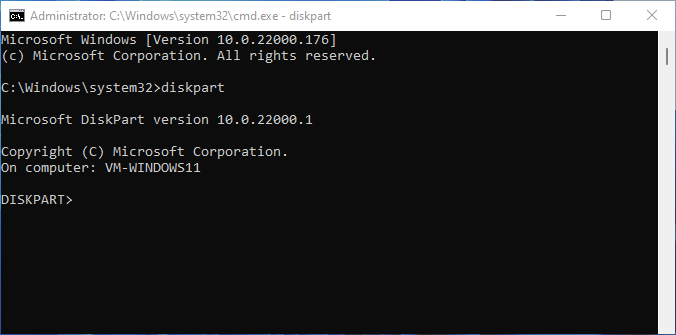
Step 1. To open Command Prompt as an administrator, right-click the Windows icon, click "Search", type "cmd" and select "Command Prompt" from the list, then click "Run as Administrator".
Step 2. Type the following command lines one by one and hit Ener each time:
- list disk
- select disk * (Replace * with your selected disk.)
- create partition primary size=10241024MB is equal to 1 GB, so you can replace the command with "create partition extended size =*" and "create partition logical =*".
- assign letter=*
- format fs=ntfs quick
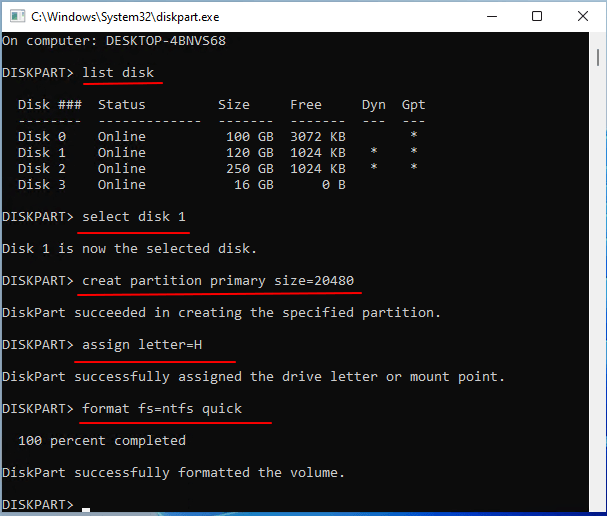
Step 3. Type exit and hit Enter when the process completes.
White List of Disk Partitioning Tools Recommend
After reading through the basic review information about the 7 disk partitioning tools and software, you may have a favorite already in mind. Each tool has its own strengths and weaknesses, and some are better suited for specific needs, such as creating bootable media or managing large disk spaces.
Despite not having made a decision, here is a list of top disk partitioning tools recommended by Qiling Editors:
- Easiest & professional disk partitioning tool Qiling Partition Master offers a user-friendly interface and robust capabilities, setting it apart from other partition management tools.
- Open source disk partitioning manager The GParted project is still active and available for users to use, allowing developers to continue improving the software.
- Free disk partitioning tool Windows Disk Management is a built-in tool that meets the most basic operation demands in managing hard drives or SSDs on Windows, making it an essential utility that you shouldn't miss.
To optimize your computing experience and make the most of your disk space, consider using a powerful disk partitioning tool to help you manage your storage effectively.
Related Articles
- Windows 11 Gets/Adds a Watermark on Unsupported Hardware, How to Remove It
- 3 Best Disk Repair Tools for Windows Server Free Download 2022
- How to Resize USB Flash Drive Partition with Magic Partition Software
- How to Safely Resize Partitions in Windows 11 Without Losing Data
- How to Convert Dynamic Disk to Basic Disk without Deleting?
Converting a dynamic disk to a basic disk can be a straightforward process that doesn't require deleting any data. To do this, you can simply open the Disk Management console, right-click on the dynamic disk you want to convert, and select “Convert to Basic Disk”. This will convert the dynamic disk to a basic disk, allowing you to continue using it as before, but with the added flexibility of being able to boot from it. - Effective Ways to Repair Invalid Dynamic Disk without Data Loss Using CMD
How to repair invalid dynamic disk without data loss using CMD in Windows 7/8/10/11? Effective ways are provided in this article for you to reactivate invalid dynamic disk.