Full Guide: How to Format the MacBook Pro/Mac
Quick Navigation:
- 1. Why Should You Format the MacBook Pro/Mac
- 2. Things to Consider Before You Format the MacBook Pro/Mac (5 Things You Should Keep in Mind)
- 3. How to Format the MacBook Pro or Any Other Mac Computer (3 Effective Methods!)
- 4. What to Do if Data Is Erased During the Formatting Process (Best Data Recovery Tool Recommended!)
To format your Mac and restore it to factory settings, you'll need to understand the process and take precautions to recover files if something goes wrong. Before formatting, it's essential to back up your data, and consider using Mac data recovery software in case of accidents. This ensures your files are safe and can be recovered if needed. If you're unsure about the formatting process, consider seeking help or using a reliable guide to avoid data loss. This approach will help you format your Mac correctly and recover any lost data.
This guide walks you through the process of formatting your MacBook Pro or any other Mac computer, whether for troubleshooting underlying issues or starting fresh. It also addresses what to do if you accidentally erase your data during formatting, providing a comprehensive solution for resolving Mac formatting issues.
Why Should You Format the MacBook Pro/Mac
Formatting your Mac to factory settings can be a solution for various reasons, such as reinstalling the operating system, removing malware or viruses, or selling or giving away the device. This process essentially restores the computer to its original state, erasing all data, settings, and applications.
To prepare it for a new owner: To sell, trade in, or give away your Mac, you'll need to erase the data to give the new owner a fresh device.
Booting and performance issues: If your Mac is slow or has booting issues due to many applications or age, you can speed it up.
Viruses or malware attacks: Formatting a Mac can help remove viruses and malware by deleting all data on the device, including any malicious programs that may be present. This can be a good option if you're experiencing issues with your Mac and can't troubleshoot the problem otherwise. However, keep in mind that formatting will erase all of your files, so make sure to back up any important data before proceeding.
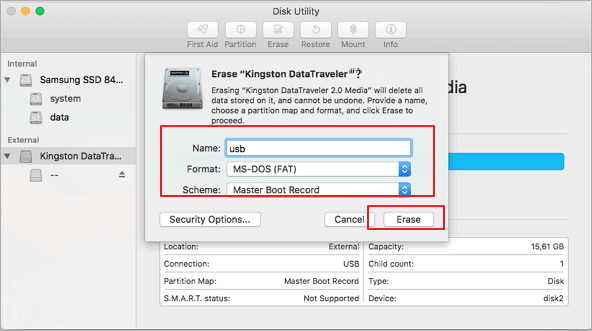
To format a USB flash drive to FAT32 on a Mac without losing data, you can use the built-in Disk Utility app. First, connect the USB drive to your Mac and open Disk Utility.
Computer users who rely on USB drives may need to format them to the FAT32 file system, which is a common file system used for USB drives.
Things to Consider Before You Format the MacBook Pro/Mac
To prevent data loss and unauthorized access, consider backing up your Mac before formatting it. This can be done by connecting an external hard drive or cloud storage service to your Mac and selecting the files and folders you want to save.
- 1. Back-Up Your Data
- 2. Unlink Your Apps and Accounts
- 3. Sign Out of iCloud
- 4. Sign Out of Messages
- 5. Unpair Bluetooth Devices
1. Back Up Your Data
Before erasing your Mac, make sure to back up all data and files, as you will lose them if you don't. You can use Time Machine to automatically back up contacts, photos, documents, mail, and other selected data. Alternatively, manually copy files to an external drive for a backup. This ensures your data is safe and can be easily restored if needed.
2. Unlink Your Apps and Accounts
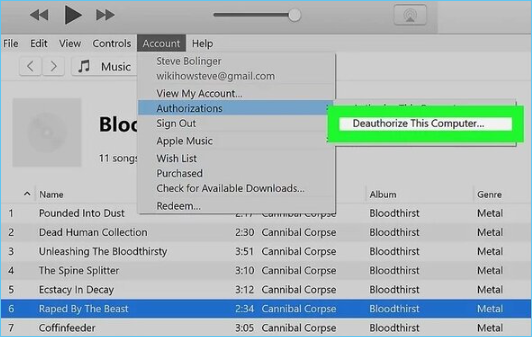
To erase all data from your Mac, you need to manually sign out of all your accounts and apps, and unlink them from the Mac. This involves deauthorizing individual apps, such as iTunes Music, TV, and Books, from your accounts to remove access to purchased content like music, apps, movies, and books. You can't use iTunes anymore to do this, so you'll need to manually remove access to these services. This process is necessary to ensure that all your data is erased and you start with a clean slate.
Step 1. To deauthorize an app on your computer, open the app, go to the account settings, select "Authorizations" or "Deauthorize This Computer", and follow the prompts to complete the process.
Step 2. Enter your Apple ID and password
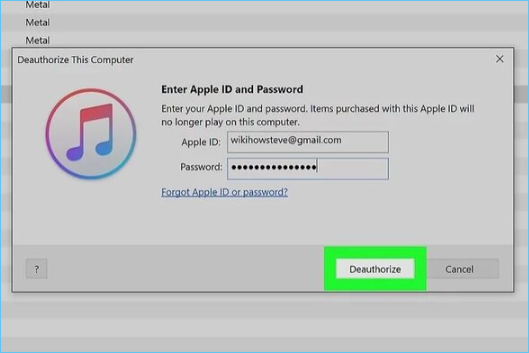
Step 3. Hit the Deauthorize button
Also, sign out of other third-Some party apps on your Mac, such as music and video streaming services, come with licenses that are only compatible with a limited number of devices. This means that you can only install and use the app on a specific number of Macs, and any additional devices will require a separate license or subscription.
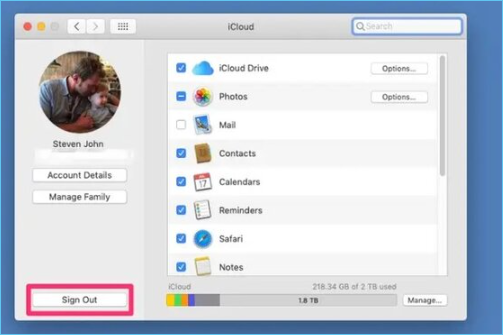
3. Sign Out of iCloud
To remove all lingering information linking your Apple ID to the device, you'll need to sign out of all accounts associated with you from the device, including signing out of iCloud. This will ensure that your Apple ID is completely removed from the device.
Step 1. To access System Preferences on a MacBook Pro, click the Apple symbol located in the top left corner of the screen, then select System Preferences from the dropdown menu.
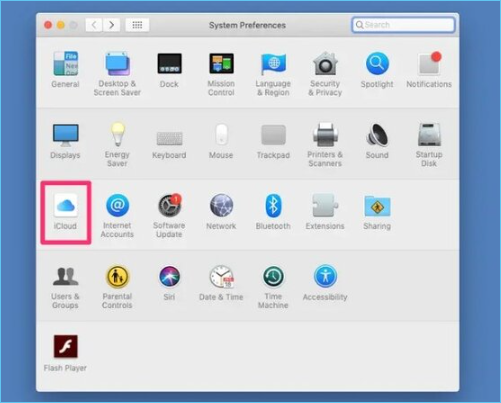
Step 2. To remove iCloud data from a Mac, go to System Preferences, click on iCloud, and uncheck all boxes to remove related data. Then, click on Sign Out.
4. Sign Out of Messages
To comply with the new privacy policy, you'll need to sign out of your Mac's Messages app and delete all messages and associated data from the device. This will ensure that your personal conversations and data are completely removed from the Mac.
Step 1. To access the Messages app on your Mac, open the Messages app, then go to Messages > Preferences.

Step 2. Click the iMessage tab > Sign Out.
5. Unpair Bluetooth Devices
To unpair any Bluetooth devices from a Mac, go to System Preferences, then Bluetooth, select the device, and click "X" to remove it. This will prevent any interference with the new user's mouse or keyboard controls.
Step 1. To unpair a device from your Mac, go to System Preferences, click on Bluetooth, and hover over the device you want to unpair, which will prompt you to disconnect.
Step 2. Click the X button on the right of its name.
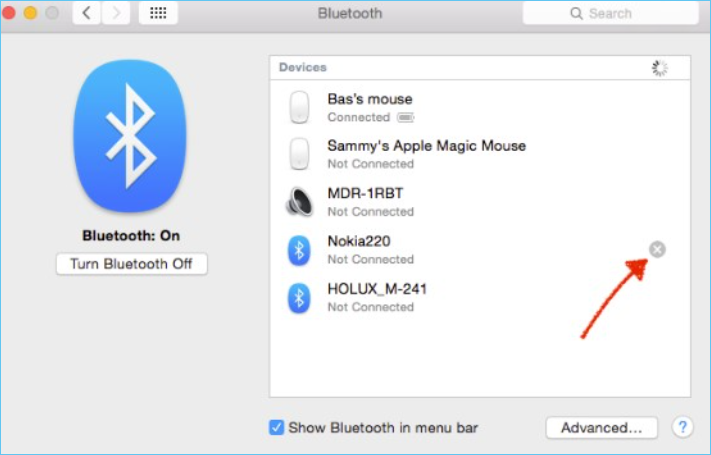
Step 3. Click Remove.
The Mac is now prepared for a factory reset, ensuring that your data is safe and you won't inadvertently share it with others.
How to Format the MacBook Pro or Any Other Mac Computer
There are different methods to format a MacBook Pro or any other Mac computer. The following are the key methods you can use.
- Method 1. Format By Disk Utility feature
- Method 2. Format By Reinstalling OS
- Method 3. Format By Terminal
Method 1. Format By Disk Utility feature
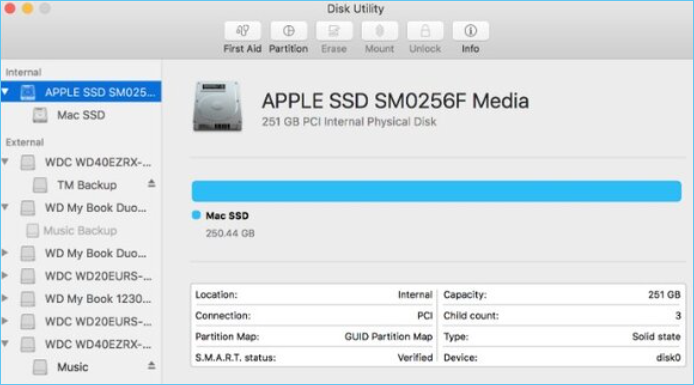
Disk Utility is Mac's built-in tool that can help erase your Mac. Use the following steps to format your Mac using the disk utility:
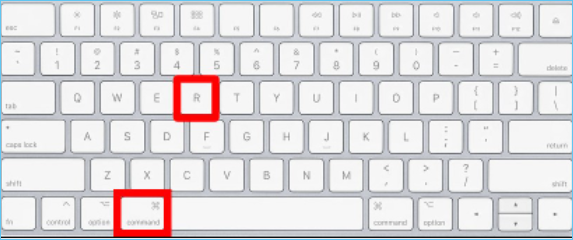
Step 1. To start your MacBook Pro from macOS Recovery, follow these steps: Turn on or restart your MacBook Pro, then press and hold the Command (⌘) and R keys together. This will boot your MacBook Pro into macOS Recovery mode, allowing you to access various tools and options for troubleshooting and recovery.
Step 2. To select the user password, open the macOS utility window and select Disk Utility, then click Continue.
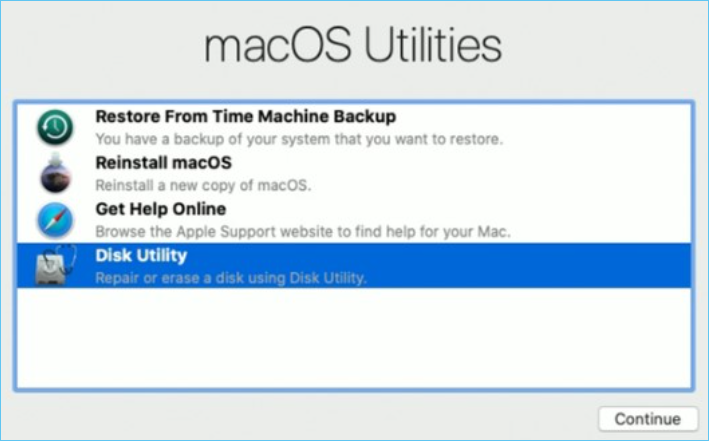
Step 3. To erase your Mac's system drive, which is named Macintosh HD, click the Erase button in the toolbar. This will prompt you to enter the requested format details, which you should complete to initiate the erasure process.
Format: Mac OS Extended (Journaled) or APFS (or recommended by Disk Utility).

Step 1. Click Erase and enter your Apple ID and password if prompted and wait for the formatting to complete
If you see an "Erase Volume Group" button, click on it instead.
After the erase is complete, you can delete any other internal volumes from the sidebar, except for the ones with the name "Macintosh HD" or "Macintosh HD Data".
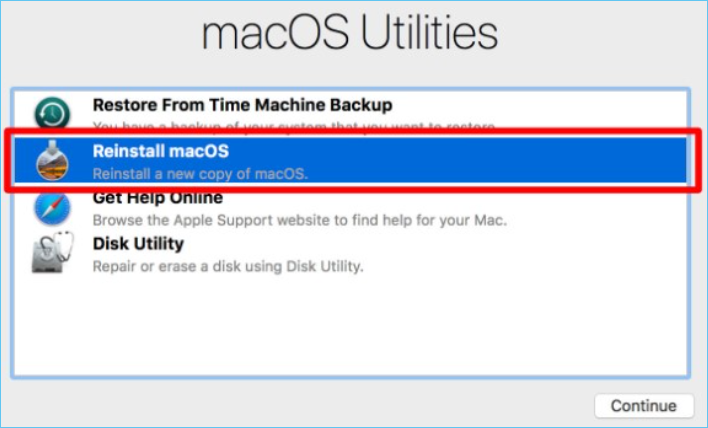
Step 2. To complete the factory reset, quit Disk Utility and reinstall macOS from the macOS utility window. This will finalize the formatting of your Mac.
Step 3. To reinstall macOS, go to the macOS utility window, select the "Reinstall macOS" option, and click "Continue".
Step 4. Follow the on-screen prompts/instructions to reinstall a new macOS
Method 2. Format By Reinstalling OS
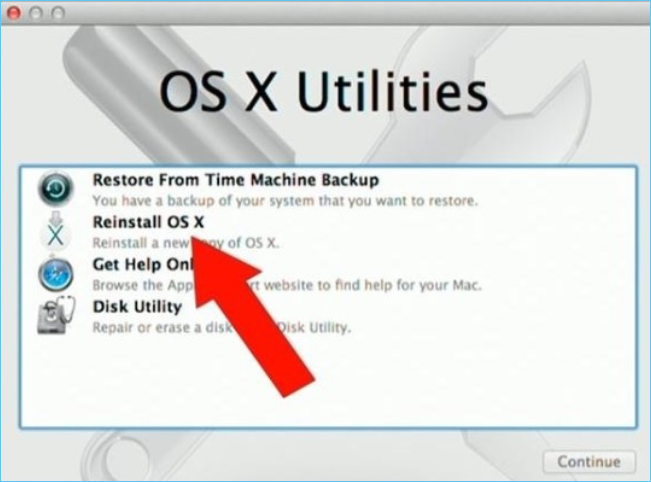
To reinstall OS X on a Mac, start from macOS recovery, which requires an internet connection. This process allows you to erase the existing operating system and install a fresh copy of OS X. It's a straightforward way to format your Mac, similar to using Disk Utility. However, keep in mind that this method also requires an active internet connection to complete the installation of the new OS.
Step 1. To start up your MacBook Pro in recovery mode, turn it on or restart it and press and hold the Command (⌘) and R keys together until you see the Apple logo or other startup screen or image.
Step 2. To reinstall macOS or OS X, click the "Reinstall macOS" or "Reinstall OS X" option, then select your startup disk, which is typically named "Macintosh HD" by default.
Step 3. If your disk was renamed, select the name it was renamed to, click Install, wait for the installation to complete, and your MacBook Pro will restart.
Step 4. If you're keeping the Mac within the house, continue the setup process. If selling the Mac, transfer your saved files onto an external drive, then press Command ⌘ + Q to quit the setup assistant.

Step 5. Power down the Mac, and you're good to go.
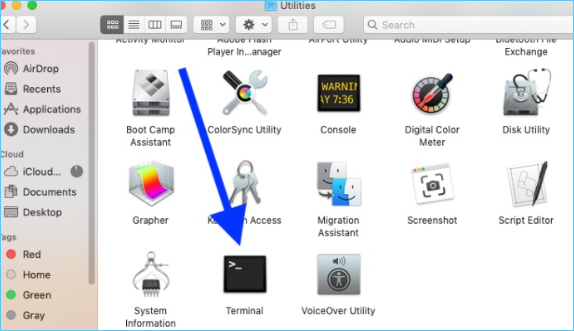
Method 3. Format By Terminal
Formatting a Mac using the Terminal or command line approach requires precision syntax to ensure a correct erase. This method is only suitable for advanced users, but if you're up for the task, follow these steps:
Step 1. Navigate to Applications > Utilities and choose Terminal.
Step 2. To restart your Mac and access the Utilities and Terminal, follow these steps: Hold the Command (⌘) and R keys simultaneously as you restart your Mac. This will automatically boot your Mac into the Recovery Mode.
Step 3. In the Terminal, type xartutil –erase-all, press Return, confirm with yes, and then press Return again. Quit Terminal by selecting Terminal and clicking Quit.
What to Do if Data Is Erased During the Formatting Process
Formatting a MacBook Pro will erase all data on the device, so it's essential to back up any important information before proceeding. If you haven't backed up your data, you can still recover it, but it's crucial to act quickly.
You can still try and recover the erased data using Deep Data Recovery for Mac, which helps to recover data loss from different cases such as deletion, formatting, system crash, macOS wrongly restored, virus attack, hard driver damage, and more.
iBoysoft Data Recovery is a powerful tool that can recover various types of data, including trash data, music files, photos, videos, emails, documents, and more, from different Mac-based devices, such as SSD, HDD, fusion drive, and Time Machine backup, regardless of the data size.
Here are the steps to download, install, and use Deep Data Recovery for Mac in one paragraph:
Step 1. Launch Deep Data Recovery. Choose file types and click "Next" to start the recovery process.

Step 2. Click the "Scan" button on the selected disk location where you lost data and files.

Step 3. Deep Data Recovery for Mac will immediately scan your selected disk volume and display the scanning results on the left pane.

Step 4. Select the file(s) from the scan results and click the "Recover" button to have them back.
Conclusion
Formatting your MacBook or any other Mac computer before selling, trading-in, or giving it away is crucial to secure your data. To do this, you can use one of three methods: Disk Utility, Reinstalling Mac OS X, or Mac Terminal, all of which will help erase your data and accounts, giving you peace of mind when parting with your Mac.
We've also provided you with pointers to help prevent data loss when formatting your MacBook Pro. If you do accidentally erase your files, apps, photos, and other data during formatting, consider using Deep Data Recovery for Mac to recover them.
Related Articles
- Solved: How Can I Stop Trash Deleting Files Immediately on Mac
- Screenshots Management - How to Crop a Screenshot on Mac
- Movie File Recovery | Recover Deleted Movie Files
Stop using your computer hard drive or external hard drive, USB once your lost movie files by deletion, formatting, or other reasons. The 2023 best movie file recovery software offered by Qiling is available here for you to download and apply to recover your lost movies in 3 simple steps. - How to Find Missing Drives on Windows 10/11?
How to find missing drives on Windows 10/11? This guide lists five ways for you to find missing computer drives. Meanwhile, you can also learn how to recover missing files in Windows 10/11. - How to Recover Latest Windows Update Deleted Files (21H2/2004)
Windows updates do not intentionally delete files from your hard drive, SD card, or SSD. However, users often experience missing files after updating to Windows 10 or 11. Professional solutions are available to help restore lost documents and missing files. - Restore Missing Fonts After Windows 10 Creator Update
If you're experiencing missing fonts after the Windows 10 Creator update, don't worry! This article provides a quick fix and reliable solutions to restore the installed fonts on your computer. Follow the steps to resolve the issue and have your fonts back in no time.