Upgrade 32 Bit to 64 Bit in Windows 10 Without Losing Data
PAGE CONTENT:
- 1. Make Sure Your Processor is 64-Bit Capable
- 2. Back-Up Important Files Before Windows 10 64-Bit Upgrade
- 3. Upgrade to Windows 10 64-Bit
Microsoft gives you the 32-Upgrading from the 32-bit version of Windows 7 or 8.1 to Windows 10 64-bit is possible, but it's not a straightforward process. The 64-bit version of Windows 10 offers more memory support and can handle larger files, making it a good option for users with high-performance requirements. However, the upgrade process may require a clean installation of Windows 10 64-bit, which can result in the loss of some installed programs and settings. It's recommended to back up all data and programs before upgrading to ensure a smooth transition.
The reason is that the 32-The 32-bit version of Windows is limited to 4GB of RAM, which is relatively small compared to the 8GB or more that many modern PCs have. Upgrading to 64-bit Windows would allow you to run more applications simultaneously, and apps like Google Chrome could handle more open tabs, while also supporting more memory-intensive programs like AutoCAD, Photoshop, and video editing software.
Changing Windows from 32 bit to 64 bit can be a smooth process if done correctly. However, some users have reported losing their files during this transition. To avoid this issue, follow these three steps below.
1. Make Sure 64-Bit is Compatible with Your Processor
You can only install the Windows 64-bit on compatible hardware. To check if your computer has a 64-bit processor, you can follow these simple steps:
- Open the "Start menu".
- Search for "System Information".
- Press "Enter".
- Look for "System Type".
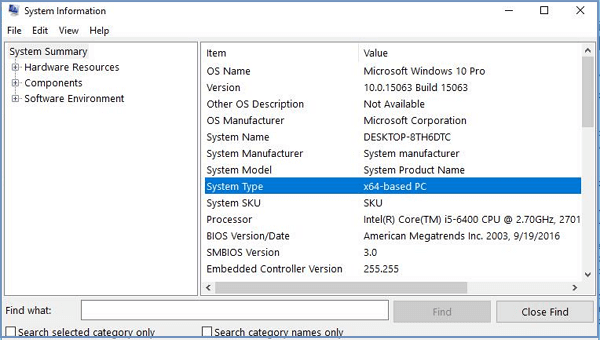
Then, you will see one of the following system types:
1. 64-bit operating system, x64-based processor: Your CPU supports 64-bit and you have already installed the 64-bit version of Windows 10, so you don't need to upgrade.
2. 32-bit operating system, x64-based processor: Your CPU supports 64-bit, but you have installed the 32-bit version of Windows. This means you're using only half of your CPU's capabilities, and you might encounter issues with running 64-bit applications.
3. 32-bit operating system, x86-based processor: The system has a CPU that supports 32-bit operations and is based on the x86 architecture, and it is running a 32-bit version of Windows.
If you see the first type, it means your computer can only run a 32-bit version of Windows. If you see the second type, then your computer can run a 64-bit version of Windows. If you see the third one, it means you can't install another architecture of the operating system because your CPU doesn't support it.
2. Back Up Important Files Before Windows 10 64-Bit Upgrade
To avoid data loss, make a full backup of your PC using a data backup utility like Qiling Backup, which can complete the task quickly and effectively, even allowing you to schedule backups.
To quickly make a backup of your important files, download Qiling Backup and use it to safeguard your data.
Step 1: Open Qiling Backup and select "File backup" as the backup mode.
As time passes, you'll likely accumulate a substantial amount of important data, including documents, photos, music, and videos. To safeguard this valuable information, it's a good idea to create regular backups. File Backup is a reliable option for recovering from unexpected data loss.
Step 2: Select the files that you want to back up.
To customize your backup settings, go to the top left corner and select the "User Defined" option. From there, you can browse your computer or external storage device to choose specific file types to back up.

Step 3: Select a destination to save your backup file.
If you don't back up your data to a separate storage device or drive, there's a chance that your backup file could get corrupted or destroyed. So, it's best to save it somewhere else.
Step 4: Click "Proceed" to execute your operation.
Notice:
You can transfer programs to an external hard drive with Qiling backup and run them directly from the device, or use a USB with enough free space if you don't have an external hard drive.
3. Upgrade Windows 10 32 bit to 64 bit
To get to the 64-bit version of Windows 10 from the 32-bit one, you'll need to perform a clean install. There is no direct upgrade path.
Check that your current 32-bit version of Windows 10 is activated under Settings > Update & security > Activation.
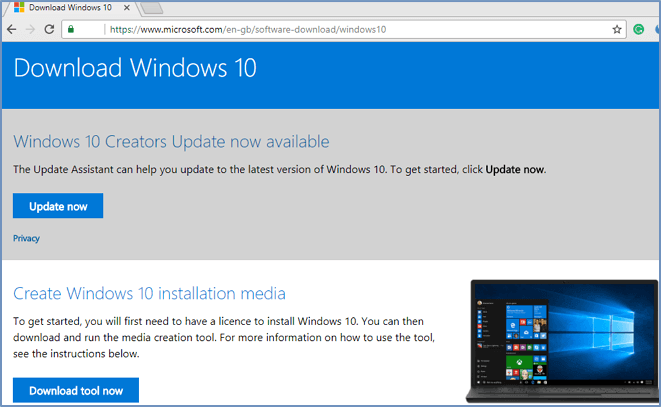
Step 1. Create the installation media
1. To download Windows 10, go to Microsoft's Windows 10 download page, click the "Download tool now" button, and save the Media Creation Tool on your desktop.
2. Connect a USB drive with at least 4GB of available space to your computer.
3. Double-click the MediaCrationTool.exe file.
4. Click the "Accept" to agree on the terms.
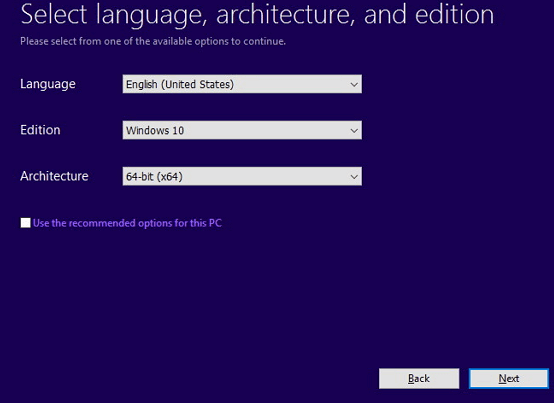
5. Select the Create installation media (USB flash drive, DVD, or ISO file) for another PC option. Click Next. This option will guide you through the process of creating installation media for another PC, such as a USB flash drive or DVD.
6. Uncheck the "Use the recommended options for this PC" option.
7. Install the operating system by selecting the installation location, choosing the disk to install on, and selecting the disk to boot from. Then, click Next.
8. Select the USB flash drive option. Click Next.
9. Select the removable drive from the list. Click Next.
Step 2. Windows 10 32 bit to 64-bit install
1. Restart your computer, press F2 when it restarts, select boot, and choose to boot from the USB installation media.
2. On "Windows Setup," click the Next button.
3. Click "Install Now", and click the "I don't have a product key" link to continue.
4. Select the edition of Windows 10 that matches the edition of the license you're activating.
5. Accept the license terms and continue.
6. Click the Custom: Install Windows only (Advanced) option.
7. Select and delete system partitions - usually: Drive 0 Partition 1 and Drive 0 Partition 2.
8. Click Next and follow the instructions to install Windows 10.
After completing the installation, Windows 10 will automatically activate itself by checking in with Microsoft. This will allow you to run the 64-bit edition of Windows on your PC. You will then need to follow the on-screen directions to finish the out-of-box experience, which includes creating a new account, setting preferences, and choosing privacy settings.
Other Topics You May Like
- How to Create Windows To Go with Non-certified USB Flash Drive
- Create Windows 10 Backup System Image
- How to Copy/Clone Bootable USB Drive in Windows 10/8/7 (2021 Tips)
- How to Clone Windows 8 Hard Drive Easily Along with Operating System And Applications
- [Solved] This Application Was Unable to Start Correctly (Error Code: 0xc000007b)
Related Articles
- 4 Solutions to Active Partition Not Found in Windows 10
Find active partition not found in Windows 10? Read this article patiently to get effective solutions to the issue. A handy freeware is offered to backup Windows before errors occur. - P2V Windows 10 | The Simplest Way to Convert Physical to Virtual
P2V Windows 10 has plenty of benefits. But if you're not computer savvy, the process may seem complicated and confusing. Therefore, I'd like to provide a very easy solution to convert physical machine to virtual machine. - Windows 10 Backup 0 Bytes? Get Clear Ideas Here!
Are you confused with Windows 10 backup 0 bytes problem? Get clear ideas from this article. - How to Repair Windows 7 without CD Easily
Get clear ideas below and follow the stepwise guide to repair Windows 7 without CD. You have three choices, please check them and select one per your needs. - Does Resetting Windows Wipe All Drives?
Factory resetting is a practical repair tool for correcting problems on your PC. But does resetting Windows wipe all drives? This article will describe whether resetting your computer will wipe all drivers and offer a tool to protect your data. - Does Windows 11 Have Cloning Software?
Does Windows 11 have cloning software? Do you want to know the right answer? This article will tell you whether Windows 11 has disk cloning software and introduce a better cloning tool to help you.