How to Use and Allocate Unallocated Space in Windows 11/10
What Is Unallocated Space
Unallocated space refers to the unused portion of a hard drive that isn't assigned to a partition, meaning no data can be written or saved to it until it's allocated to a partition.
You won't see unallocated space in Windows Explorer, but a hard drive may show less space than actual, such as 1TB showing 700GB. However, you can view the whole disk space allocation state, including unallocated space, in Disk Management on Windows 11/10/8/7 computers.
To utilize unallocated space on Windows 11/10, we'll use it as an example to demonstrate how to make use of unallocated space on a hard drive, external hard drive, and other storage devices. This process allows you to allocate the unallocated space to create a new partition, which can then be used to store files, install an operating system, or expand an existing partition.
What To Do with Unallocated Space
You can either extend an existing partition to use the unallocated space, or you can create a new partition from the unallocated space.
[2]. Extend an existing partition
If you're running low on disk space on your C drive or other data partitions, you can create a new partition in the unallocated space to store specific files or data. Alternatively, you can extend an existing partition to free up some space.
How to Use and Allocate Unallocated Space in Windows 11/10
To ensure optimal performance and efficiency on Windows 11/10/8/7, it's essential to choose the right tools and allocate unallocated space on your disks. This involves selecting the appropriate software for specific tasks, such as disk cleanup, partition management, and data recovery, and utilizing unallocated space to create new partitions or expand existing ones, thereby maximizing storage capacity and streamlining system operations.
If you want to create a new partition or extend a partition using unallocated space, you'll need a handy tool to help. Three tools are available, each with its own tutorial steps.
Let's start with the tutorial steps below to make use of unallocated space on your hard drive or external hard drive:
1. To Create a New Partition with Unallocated Space
To create multiple partitions on a hard disk or a partition on an external storage device, you can use the built-in Disk Management tool in Windows. This tool allows you to create, delete, and format partitions on your computer's hard disk and external storage devices.
To make use of unallocated space on Windows 11/10/8/7 and even older Windows computers, you can utilize built-in tools like Disk Management, which allows you to view and manage disk partitions, including unallocated space. Alternatively, you can use third-party tools like MiniTool Partition Wizard, a free partition manager that enables you to resize, move, merge, and split partitions, including unallocated space.
#1. Qiling Partition Master - Easiest, For beginners
#2. Disk Management - Medium, For experienced users
#3. Diskpart CMD - Hard, For professionals
To create partitions with unallocated space on your disk or external hard drive, follow these steps:
#1. Use Qiling Partition Master - Easiest
You can create a partition on your Windows 11/10/8.1/8/7/XP/Vista using the unallocated space. This can meet all your demands for utilizing the unused space. To do this, you can follow the steps to create a partition on your own.
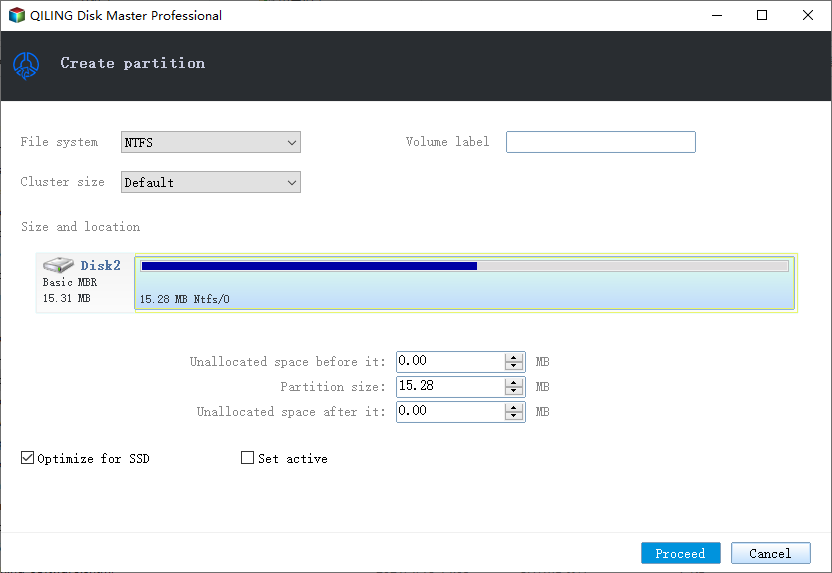
Step 1: Launch Qiling Partition Master. On the Disk management window, select the partition that you want to format and click "Create".
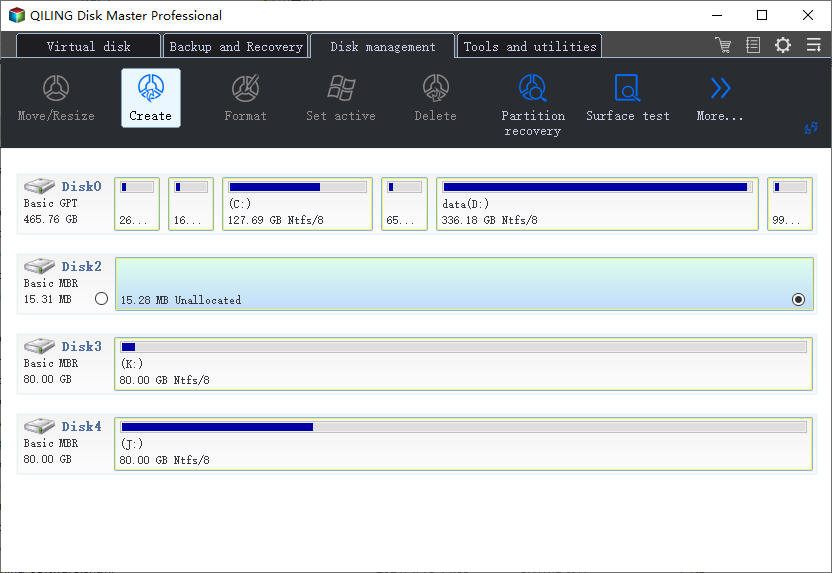
Step 2: Set a new partition label, file system (NTFS/FAT32), and cluster size to the selected partition, and click "Proceed" to continue.
#2. Use Disk Management - Medium
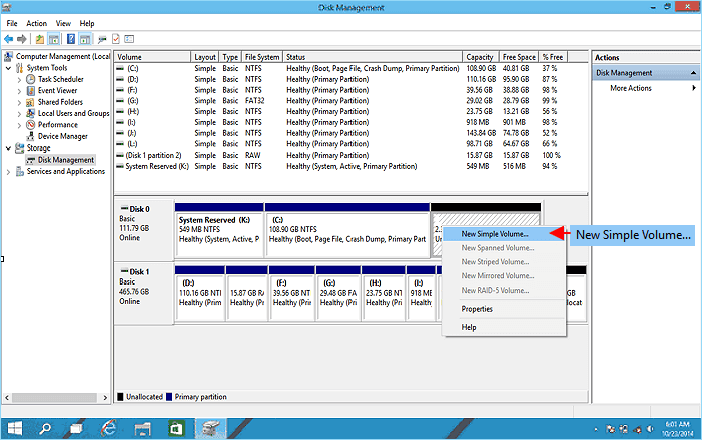
To create a new partition in Windows 10 Disk Management, you can use the built-in feature to optimize the unallocated space. This process involves selecting the unallocated space, right-clicking on it, and choosing "New Simple Volume" from the context menu. Follow the wizard to assign a drive letter, file system, and label, and then format the new partition.
Step 1: Right-click Windows icon and select Disk Management.
Step 2: Locate and right-click on unallocated space in Disk Management, select "New Simple Volume".
Step 3: Specify the partition size and click "Next" to continue.
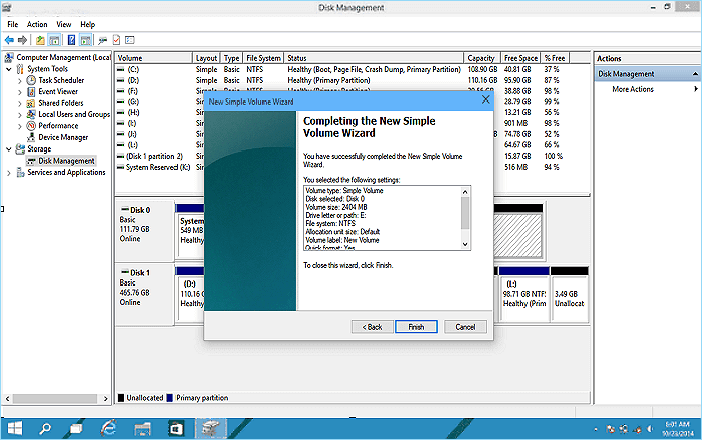
Step 4: Set a drive letter, file system - NTFS, and other settings to the new partitions, then click "Finish" to complete creating a new partition.
#3. Use DiskPart CMD Command - Hard
Step 1: Open DiskPart command prompt:
Type cmd in Search > Right-To proceed, right-click on Command Prompt and select "Open as Administrator". Then, type "diskpart" and press Enter.
Step 2: Type the following command and hit Enter each time:
- list disk
- select disk 0 (Replce 0 with your disk number)
- You can create a partition with a specific size in MB using the command `create partition primary size=x` or `create partition logical size=x`, where `x` is the desired partition size in MB.
- The letter "H" should be replaced with a new partition drive letter, which is typically denoted by a letter such as "D", "E", "F", or "G", depending on the available drive letters in the system. For example, if the system has available drive letters "C", "D", "E", and "F", the new partition drive letter could be "D".
- format fs=ntfs quick
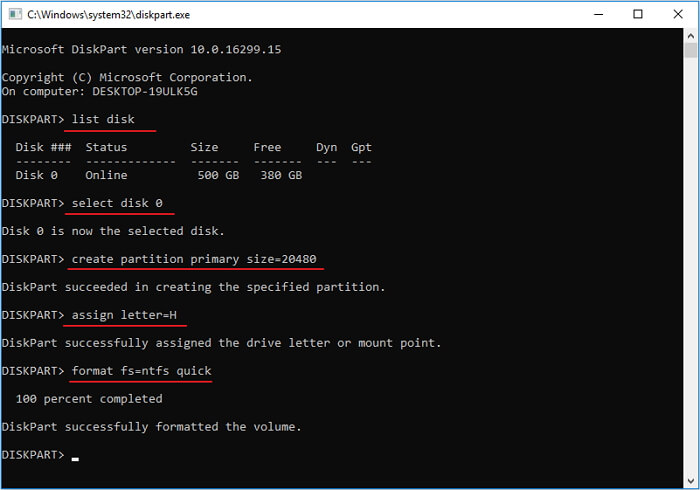
Step 3: Type exit to close DiskPart.
If you need to create more than one partition with the unallocated disk space, repeat the process with the chosen tool, selecting the unallocated space each time to create additional partitions.
2. Extend an Existing Partition Using Unallocated Space
You may also use the following three tools to extend partition with existing unallocated space on your disk:
#1. Use Qiling Partition Master
Adding unallocated space to an existing partition is a good way to fully utilize free space and solve low disk space warnings on the target partition.
#1. Use Qiling Partition Master - Beginners 1st Choice
Qiling Partition Master allows users to drag and move unallocated space to anywhere they like, making it possible to extend a partition even if the unallocated space is not adjacent.
Step 1. You should first select the drive/partition that want to adjust its size and select "Resize/Move" in the "Disk management" page.

Step 2. Extend the Target Partition
To shrink a partition, drag one end of it to free up unallocated space and click "Proceed" to start the resize process.
To extend the partition, ensure there is unallocated space available. If not, create some by following previous steps. Then, drag the mouse into the unallocated space and click "Proceed" to resize the partition.
To move a partition, you need to leave unallocated space next to the target partition. If there's no unallocated space, free some up first. Then, drag the whole partition left or right to adjust its position and click "Proceed" to start the move.

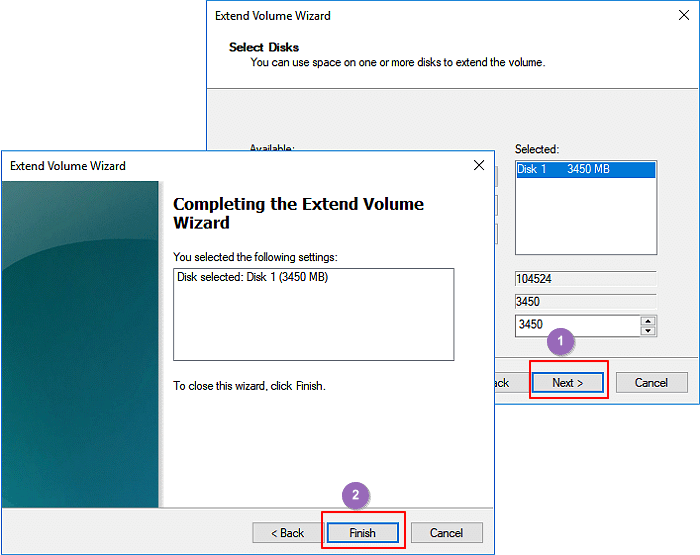
#2. Use Disk Management - For experienced users
Step 1: Open Disk Management by right-clicking on Windows icon and select "Disk Management".
Step 2: Right-click on the partition that you want to extend and select "Extend Volume".
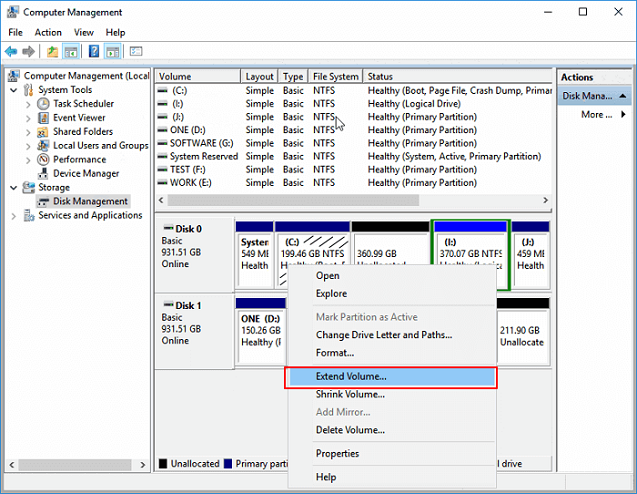
Step 3: Click "Next" to continue, adjust the size of unallocated space to add to the selected partition.
Step 4: Click "Next" and "Finish" to complete the process.
#3. Usk DiskPart Command - For professionals
Step 1: Open DiskPart command prompt:
Type CMD in Search > Right-To access the Command Prompt as an administrator, follow these steps: Click on the Start menu and select "Command Prompt" > Right-click on it and select "Run as Administrator" > Type "diskpart" and press Enter.
Step 2: Type the following command links and hit Enter each time:
- list disk
- select disk 0 (replace 0 with your disk number)
- list volume
- To extend a partition, you need to select the volume x (replace x with the target partition number) that you want to extend.
- To extend the size of a selected volume by a specified number of MB, you can use the following command in the Disk Management console: `diskpart` and then `select volume X` (where X is the number of the volume you want to extend), `extend size=number` (where number is the number of MB you want to add), and finally `assign` to apply the changes. Alternatively, you can use the `resize` command in the Disk Management console to extend the volume.
Step 3: Type exit to close DiskPart.
Bonus Tip: Fix Unallocated Space in Windows 11/10 Can't Use Error
To resolve the issue of unallocated space in Windows 11/10 or Windows 8/7 computer cannot be used error, you can try running the built-in Check Disk utility (chkdsk) or using a third-party disk management tool like Qiling Partition Master. This will scan and fix any errors or inconsistencies in the disk, potentially resolving the issue.
If you're unable to create or extend a partition using the unallocated space, don't worry. You can still make full use of this space by following the guidelines provided, which will help you utilize the unallocated space on your disk.
1st. Check Disk Capacity - Larger or Smaller than 2TB
Step 1: Open Windows Disk Management.
Step 2: Check the total disk capacity:
If the disk is larger than 2TB, you can continue with the process of creating a bootable USB drive for the installation of Windows 11. This is a necessary step to ensure a successful installation.
Step 3: Right-click the disk and select "Properties".
If the disk is with MBR, convert it to GPT as guided in the 2nd tutorial.
If your disk is smaller than 2TB but you cannot use the unallocated space in Disk Management with "Extend Volume greyed out" or "New Simple Volume greyed out" error, you can use Qiling Partition Master to create a partition or extend a partition.
2nd. Convert MBR to GPT
If your disk is larger than 2TB and is using MBR, you can convert it to GPT using Qiling Partition Master.
To convert a disk from MBR to GPT, open Qiling Partition Master, select the target disk, and click on the "More..." options. From the additional options, choose "MBR -> GPT".
To allocate the unallocated space, you can use the `resize2fs` command. This command will resize the file system to fill the newly unallocated space.
Conclusion
To allocate unallocated disk space on Windows 10/8/7, users can utilize various tools and methods, including Qiling Partition Master, Disk Management, and DiskPart. These tools allow users to resize, move, or extend partitions, thereby utilizing unallocated space and optimizing disk usage.
Qiling Partition Master allows you to either create a new partition or extend existing partitions to utilize unallocated space on your disk, making it a useful tool for managing your hard disk and partitions, especially for Windows OS and Windows Server users.
The new disk management tool is more user-friendly, easier to handle, and more intelligent than the native Windows disk management and DiskPart.
People Also Ask About Unallocated Space
Windows 11/10 and older versions have a built-in disk cleanup tool that can help recover unallocated space. To access this tool, follow these steps:
1. Where does unallocated space come from?
Unallocated space is created by manufacturers as a default state on storage devices like hard drives and SSDs. It can also be generated when a partition is deleted or shrunk, leaving behind unallocated space.
2. What to do if Disk Management option greyed out on unallocated space?
When you're unable to allocate unallocated space using Windows Disk Management, don't worry! The "Extend Volume" and "New Simple Volume" options might be greyed out, but there are alternative solutions.
Here are two ways to help you out:
[1]. Use Qiling Partition Master and continue allocating the unallocated space;
[2]. Convert the hard disk with unallocated space to GPT and retry again.
3. Can't extend C drive without unallocated space?
When your hard drive is full and you can't extend your C drive using Disk Management, you'll need to free up space by deleting or shrinking the partition next to C drive. This provides you the space needed to extend C drive.
Qiling Partition Master offers an alternative to allocate free space from other partitions to the C drive using its Allocate Space feature, or to resize and move free space to the C drive using its Resize/Move feature.
To move space from D drive to C drive, you can use the built-in Disk Management tool in Windows. First, open the Disk Management tool by searching for it in the Start menu.
Related Articles
- How to Partition Hard Drive Disk without Formatting
- Clone Hard Drive to Larger Drive Without Reinstalling Windows and Programs
- Fix Diskpart Clean Not Working on Disk/USB/SD Card [5+ Fixes]
- MBR VS GPT | What's the Difference and Which Is Better
- How-to: Create USB Bootable Partition Manager to Manage Partitions Safely
- 3 Easy Ways on How To View Partitions (2022)
- How to Clone Hard Drive for Disk Upgrade, Data Transfer, SSD Migration
Cloning a disk can quickly transfer data, programs, and the system to a new hard drive, making it a good choice for upgrading disks, migrating SSDs, or transferring data.