Migrate OS to SSD: How to Migrate OS from HDD to SSD/HDD with Qiling Partition Master
The "Migrate OS to SSD/HDD" feature of Qiling Partition Master enables you to transfer all data on system and boot partitions, including the OS and applications, to a new SSD or HDD, all without the need to reinstall Windows OS and apps, making the OS migration process easy and time-efficient.
Follow the step-If you want to migrate your OS from a hard drive (HDD) to a solid state drive (SSD) with ease, follow these simple step-by-step tutorials. Alternatively, if you prefer a clean installation of Windows 10 or other Windows OS versions, you can learn how to do a fresh install on your SSD instead.
Note: Migrating an operating system to a new SSD or HDD will erase all data and partitions on the target disk if it doesn't have enough unallocated space, so it's essential to back up important data beforehand.
Step 1. Connect the GPT/MBR HDD and the SSD to your PC, launch Qiling cloning software and click "Clone".
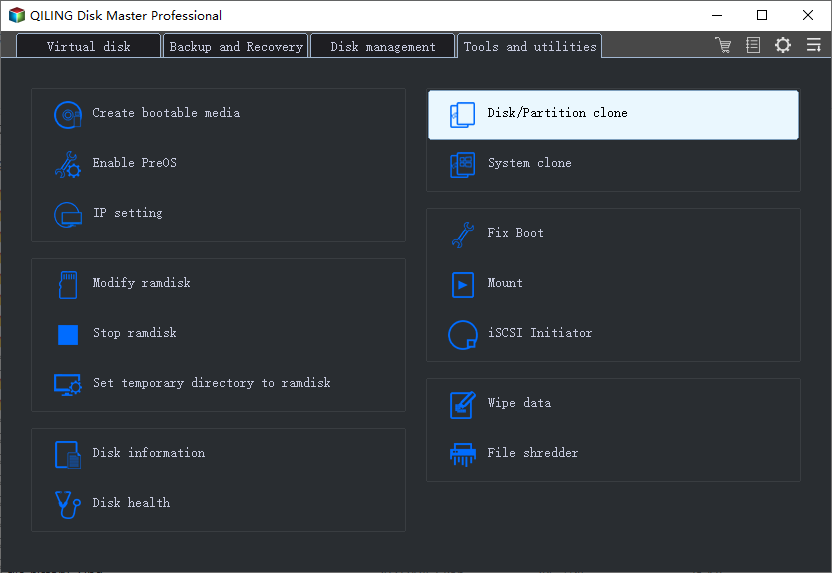
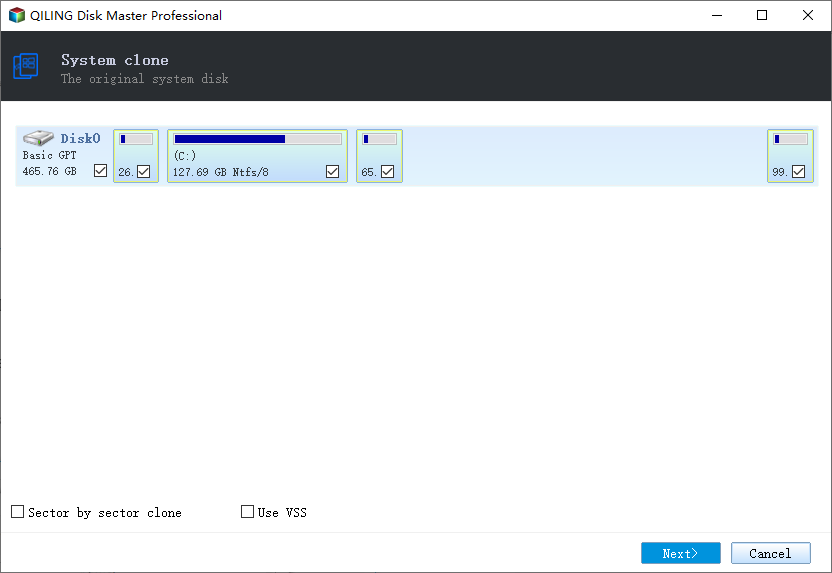
Step 2. The current system partition and boot partition will be automatically selected. And then click "Next" to continue.
To clone a disk sector by sector, select the "Sector by sector clone" option in the Advanced settings, allowing for the cloning of all sectors from the source disk to the destination disk.
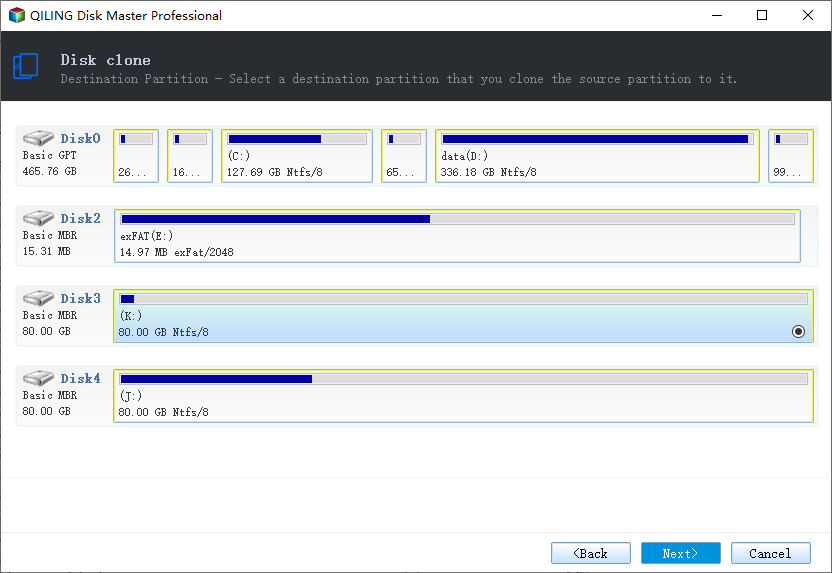
Step 3. Select the SSD or HDD as the destination disk and click "Next".
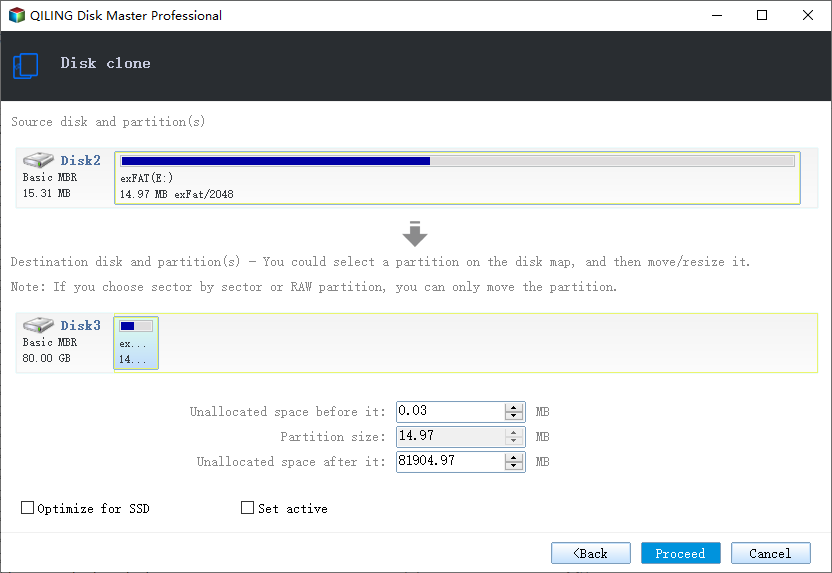
Step 4. Preview the layout of your target disk, and customize it if needed, before clicking "Proceed" to initiate the OS migration to a new disk.
If the destination disk is an SSD, select the "Optimize for SSD" option.
Complete the steps to migrate OS from HDD to SSD. Then, finish the following steps to make your computer boot from the cloned SSD.
Step 1. Restart PC, press F2/F8/F11 or Del key to enter the BIOS.
Step 2. Go to the boot section, set the cloned SSD as the boot drive in BIOS.
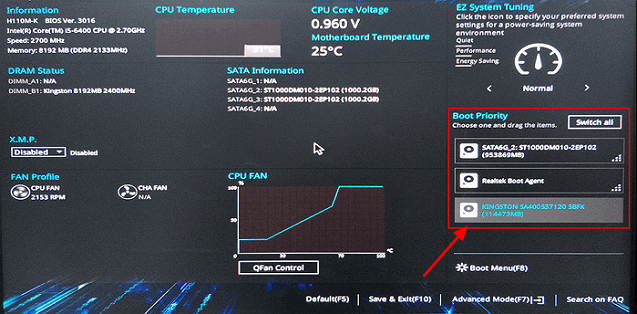
Step 3. Save the changes and restart the PC. Now you should boot your computer from the cloned SSD.
Qiling Partition Master allows users to easily partition their hard disk drives (HDDs) or solid-state drives (SSDs), making it simple to utilize their full storage capacity.
- You can transfer free disk space directly from one drive to another, allowing you to move unused space from one drive to another, such as moving free space from the D drive to the C drive.
- Resize/move partitions, create, format, delete, and merge partitions.
- Copy and clone an entire disk to another even the target partition is smaller than the source.
- Convert a logical partition to primary or primary partition to logical, FAT to NTFS partition, MBR disk to GPT, or GPT disk to MBR.
- Erase all data on the hard disk to prevent unauthorized access or recovery.
More Relevant Topics About Qiling Migrate OS
The following questions about Qiling Partition Master and its Clone and Migrate OS features have been identified as highly relevant. Brief answers are provided below to address these concerns. If you're experiencing any of these issues, please refer to the answers below for assistance.
1. How to clone a hard drive to SSD?
With Qiling Partition Master, you can clone a hard drive or solid state drive using the Clone option. This feature allows you to duplicate the contents of a larger hard drive onto a smaller solid state drive, making it a useful tool for upgrading or replacing storage devices.
Step 1. Open Qiling Partition Master. Right-click the source disk that you want to copy or clone. Then, select "Disk Clone".
Step 2. Choose the target SSD as your destination and click "Next" to continue.
Step 3. You can select "Autofit the disk", "Clone as the source" or "Edit disk layout" edit your disk layout.
Step 4. Click the "Proceed" to start cloning a hard drive to SSD.
2. Qiling Migrate OS VS Clone
Qiling Partition Master allows you to clone a partition or entire disk using its Clone feature, which is ideal for duplicating data disks. However, for system disks, it's recommended to use the Migrate OS option instead.
Migrate OS can clone your system disk to a larger HDD or SSD without needing to reinstall or experiencing any boot issues. The process involves copying the system partition and boot drive together, ensuring the target disk can be correctly booted after the operation.
3. Can't migrate OS to SSD?
Due to an unspecified cause, migrating the OS from a hard drive to a solid-state drive may not be possible. In such cases, using a reliable system migration software is the most effective approach. A suitable option is to utilize Qiling Partition Master to migrate the OS to the SSD.
To migrate OS to SSD:
- Click Migrate OS from the top Toolbar.
- To begin, select the target disk where you want to install the operating system. Once selected, you can customize the partition layout on the target disk.
- Click OK to begin the clone.
4. Cloned SSD won't boot?
There are a few reasons your cloned SSD won't boot, such as incomplete clone, clone failure, BCD error, improper boot order, and so on. You can try these solutions to fix SSD not working after cloning.
- Re-clone HDD to SSD with Qiling Partition Master
- Check and fix BCD error
- Add necessary drivers to the cloned SSD
- Change the boot order in the BIOS
- Set system partition as an active partition
- Connect SSD to the computer via SATA cable
Related Articles
- Create Portable Windows 10 Creators To Go USB Drive
- 6 Solutions for Windows 10 Can't Create Recovery Drive
- What is Dynamic Foreign Disk, How to Import Foreign Disk Without Data Loss
- How to Fix My Computer Freezes When USB Plugged in Windows 11/10/7
- Easy Solutions to Fix "You cannot format this volume" on Windows 11/10
- How to Fix Windows 10 Start Menu Not Working/Opening When Clicked [2022]