How to Backup Windows 10 with [1] Qiling Backup and [2] File History
When searching for how to backup Windows 10, users typically seek a tool or method to create a full backup image of their operating system, system configurations, applications, personal data files, a specific hard drive, or its partitions/volumes. The importance of computer backups is evident, as they protect against hardware failure, app or upgrade problems, malware attacks that can corrupt files and damage the Windows 10 installation, and ensure a safe and recoverable system in case of any issues.
For Windows users, there are various backup solutions to choose from, with the goal of finding a method that's familiar and ensures valid backups for disaster recovery. Windows has a built-in File History feature, previously known as Backup and Restore in Windows 7, which creates backups of pre-set folders. However, for a more comprehensive backup solution, including smart backups, compressed images, cloud backups, and daily backups, third-party backup and recovery plans like Qiling Backup are worth considering.

[1] Qiling Backup: How to Backup Windows 10 Fully, Smartly and Safely
PAGE CONTENT:
Qiling software company is a big family of star products, including data recovery, backup, and disk/partition management tools. These products have been praised by authoritative websites such as Techradar and PCWorld, which have commented that Qiling Backup is the best way to protect sensitive data.
Product Overview - Price, Operation and Performance
Qiling Backup, a powerful third-party Windows backup program, makes regular computer backups simple and easy. Unlike the native Windows File History, Qiling Backup offers three significant advantages: it's free, user-friendly, and offers a unique set of features that set it apart from other backup programs.
No cost:
Qiling Backup Free meets the basic backup needs of home and office users, covering OS, data, files, and hard drive/partitions. While commercial editions offer additional features like disk cloning, system migration, and email backup, the free version can handle most backup requests, excluding email-related tasks.
Ease of use
Qiling Backup is user-friendly for beginners to navigate on Windows 10 PCs. The left pane clearly displays backup options for disk/partition, system, file, and email. Meanwhile, the middle section of the home interface shows users what they typically back up on their computer, including the OS, files, and emails. This clean navigation design gives users a good first impression when opening Qiling Backup on their computers.
After selecting a backup plan to begin, you'll be guided through a user-friendly wizard with simple steps, where you'll choose a backup location and optionally modify some advanced backup options.
Uniqueness
Qiling Backup stands out from the native File History by offering more comprehensive backup capabilities. Like general third-party programs, it can perform all the tasks completed by native tools, but also allows for the development of auxiliary functions. Additionally, Qiling Backup can backup a wider range of items beyond just files and folders, and provides enhanced backup options, such as compressing backup images, setting scheduled backup tasks, and encrypting sensitive backups.
Advantages and Disadvantages - What Qiling Backup Does Good and Bad
In conclusion, while the paid features of Qiling backup program may attract users' attention and provide confidence in protecting important data in Windows 10, the free open backup functions have already met all the backup needs for Windows 10. A quick look at what the Qiling backup program can and cannot do at the moment is sufficient.
The Good:
1. User-friendly interface and backup operation
2. 24x7 in-house technical support
3. Cost-free for 99% backup options
4. Recovery from any backup is also free
5. Able to backup without booting into Windows 10
6. Advanced options with a wide range of management plans are available to minimize the backup image size and enhance security, providing users with a high level of control over their data protection.
While the Qiling backup tool has its benefits, there are some drawbacks to consider, including a 1% feature that prompts users to upgrade.
The Bad:
Outlook email backup is available to only paid customers
How to Guide: Simple Steps to Backup Windows 10 on Your Computer
Step 1. Download and launch Qiling Backup.
Step 2. On the "Backup and recovery" page, click "System backup" to back up Windows 10.

Step 3. Select the backup destination, the software will choose the most suitable location by default.

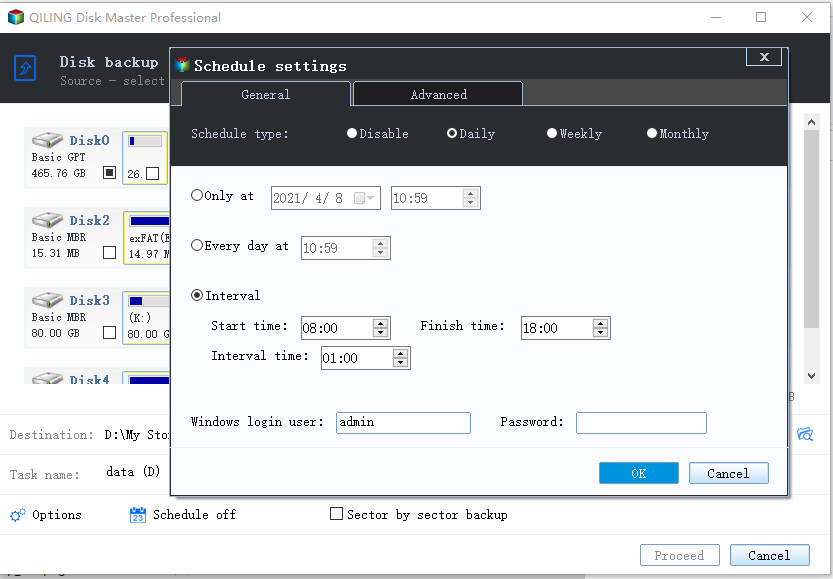
Step 4. To schedule a backup on your Windows 10, click the "Schedule" option to open the Backup Scheme window. From here, you can create a backup plan to automatically backup your system at a later time, daily, weekly, or monthly, or even upon a specific event. This way, your Windows 10 will be automatically backed up, ensuring your system and data are protected.
Step 5. Save all of the changes. Click "Proceed" to start Windows 10 system backup.
[2] Windows File History: A Complete Guide to Backup Specific Files/Folders
To backup your Windows 10 PC, prepare an external hard drive or network location in advance, as Windows 10 File History can only backup files or folders to these locations. Then, follow the guide to use the built-in backup program to backup your PC.
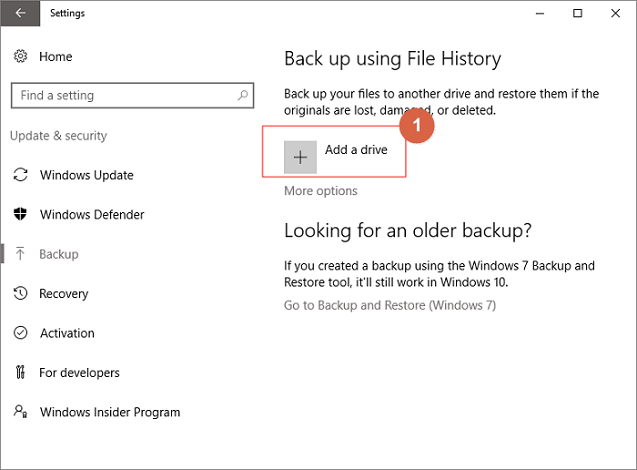
Step 1. To set up automatic backups, go to Start > Settings > Update & Security > Backup, and then select Add a drive to choose an external drive or network location for your backups.
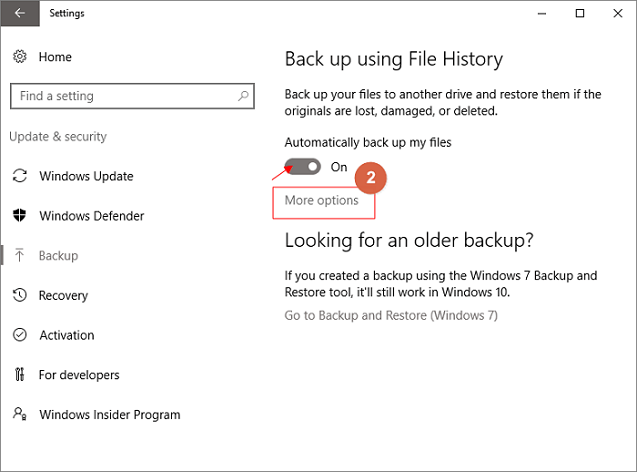
Step 2. After selecting a drive, the "Automatically back up my files" option will be enabled, and then you can select "More Options" to set up the cycle time and folder for backup settings.
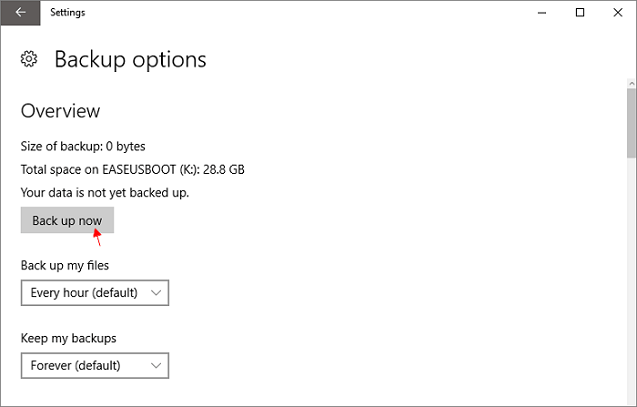
Step 3. Choose the cycle time and period for backing up your files, specifying how often you want to back up your files and how long you want to keep them.

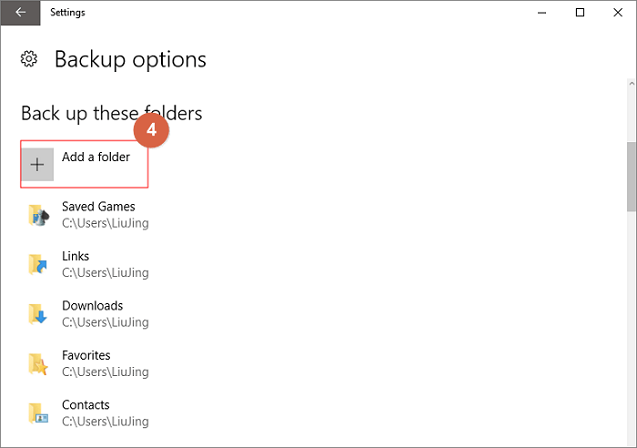
Step 4. The backup list shows which folders are currently being backed up, and allows users to add additional folders to the backup process by selecting "Add a folder".
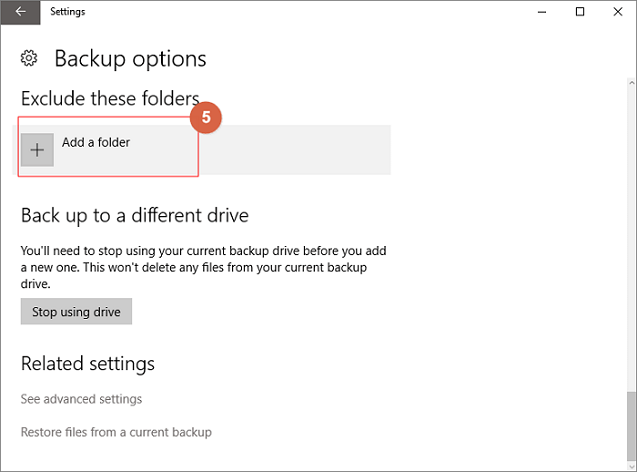
Step 5. At the same time, you can exclude some folders you don't want to backup by clicking "Add a folder" under the option "Exclude these folders".
Step 6. After the setup is completed, please select Back up now.
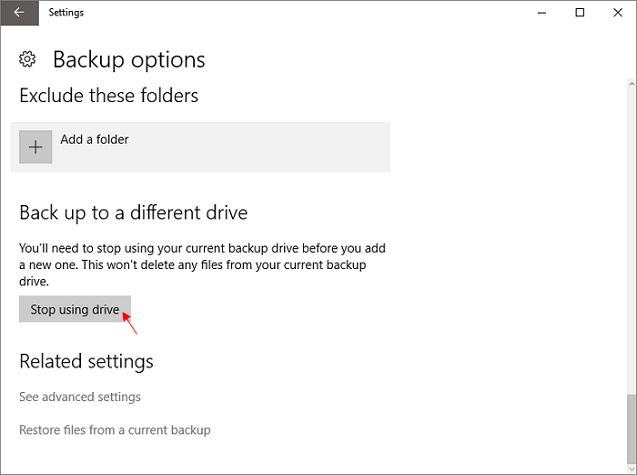
Step 7. To switch to a different backup drive, you need to stop using your current backup drive first, then you can choose another drive to back up your files.
Related Articles
- ISO to USB: How to Burn ISO to USB in Windows 10
- Clone Multiple Partitions to HDD/SSD
- How to Copy OS from Laptop to USB Pen Drive
- Bootable USB Drive Not Showing Up or Recognized in Windows 10/8/7
- How to Use System Restore in Windows 10
- How to Transfer Files from Dropbox to Google Photos [2022 New Guide]
Can transfer files from Dropbox to Google Photos? You can either download or sync files between Dropbox and Google Photos so to access more storage space. This article will outline the ways to transfer files from Dropbox to Google Photos and why. You'll also learn how to transfer programs between PCs using Qiling Disk Master.