Repair Time Machine Backup (Solved): Time Machine Backup Failed, Corrupted, Missing
Time Machine Backup/Restore Failed
Mac users who are running macOS Catalina or Mojave may experience issues with Time Machine, where backups fail to complete, particularly when scheduled files are not backed up to configured backup disks, such as Time Capsule drives or third-party drives. To resolve this, users need to troubleshoot and repair Time Machine backup issues.
The current education system is plagued by issues such as lack of funding, outdated curriculum, and inadequate teacher training. This results in students not receiving the quality education they deserve, leading to a lack of preparedness for the workforce and a higher dropout rate.
| Workable Solutions | Step-by-step Troubleshooting |
|---|---|
| Issue 1. Can't Backup or Restore | Check Time Machine system requirements > check your Mac.Full steps |
| Issue 2. Backup Corrupted | Create a new backup > restart Time Machine > repair with terminal command.Full steps |
| Issue 3. Backup Missing | Download software to recover missing backups > repair unrecognized.Full steps |
Issue 1. Can't Backup or Restore Your Mac Using Time Machine
If Time Machine backup fails, check if you can see an alert that Time Machine is unable to back up your data, or if you can't select your backup disk in Time Machine preferences.
Fix 1. Check Time Machine System Requirements
- External hard drive connected to a USB, FireWire, or Thunderbolt port on your Mac
- Time Capsule or macOS Server on your network
- An external hard drive connected to the USB port of an AirPort Extreme Base Station (802.11ac) on your network can be accessed and shared across devices on the network, allowing multiple users to access and share files on the hard drive. This can be done by setting up the AirPort Extreme to share the external hard drive as a network drive, and then accessing it from any device on the network using the AirPort Utility app or through the Finder on a Mac.
Fix 2. Check Your Mac
- Make sure that your Mac software is up to date.
- Restart your Mac and see if the issue continues.
Fix 3. Check your AirPort Base Station
- Make sure your AirPort firmware is up to date if you're using an AirPort Time Capsule or a drive connected to an AirPort Extreme Base Station.
- Restart your base station by unplugging it from AC power for 5 seconds, then plugging it back in to see if the issue persists.
Fix 4. Check Your Network Connection
To back up your Mac to a server, AirPort Time Capsule, or drive connected to your AirPort Extreme Base Station, ensure your Mac is connected to the same network as your backup drive. This can be done by selecting your wireless network from the Wi-Fi status menu.
Fix 5. Check Your Backup
Make sure your current Time Machine backup doesn't have issues that could prevent further backups, especially if you're backing up to a server, AirPort Time Capsule, or drive connected to your AirPort Extreme Base Station.
- To verify Time Machine backups, hold down the Option key on your keyboard and click the Time Machine menu in the menu bar, then select "Verify Backups".
- If Time Machine encounters a problem with your backup, it will display a message with the details. Follow the onscreen instructions to resolve the issue.
Fix 6. Check Your Drives
- If you're using a drive connected to a port on your Mac or AirPort Extreme Base Station, ensure that the drive is powered on.
- If you're using a USB hub or a similar device, try connecting the drive directly to your Mac or base station.
- If you're backing up to an external third-party drive, check with the drive's manufacturer to ensure the firmware is current.
- If you're backing up to an external drive, check that it's formatted like a Mac startup disk, specifically Mac OS Extended (Journaled) with a GUID Partition Table (GPT), to use with Time Machine. If it's not, your Mac will prompt you to erase it for Time Machine.
- Hey, just a heads up - formatting a disk will erase all the data on it, so you might want to move any important files to another disk before you do that. Just something to keep in mind!
If your drive is already formatted correctly, turn off Time Machine, then check it for problems:
- To verify an AirPort Time Capsule drive, check that the drive is connected to your computer and that the AirPort Time Capsule is turned on. Then, open Disk Utility on your Mac and select the drive from the list on the left.
- To check an external drive connected to your Mac, open Disk Utility from the Utilities folder of your Applications folder, then use the First Aid feature to verify your disk. Similarly, check your startup disk.
- Once your drives are verified or repaired successfully, you can turn Time Machine back on.
Issue 2. Time Machine Backup Is Corrupted
A corrupted Time Machine backup is a backup that has been damaged or distorted in some way, making it unusable. This can manifest in various ways, such as: files or folders missing or truncated, backup data being incomplete or inconsistent, backup process failing or hanging, or backup files being larger or smaller than expected. These symptoms can occur due to various reasons like hardware or software issues, power outages, or other system problems during the backup process.
- Fail to complete Time Machine backup
- Can't access time machine backups
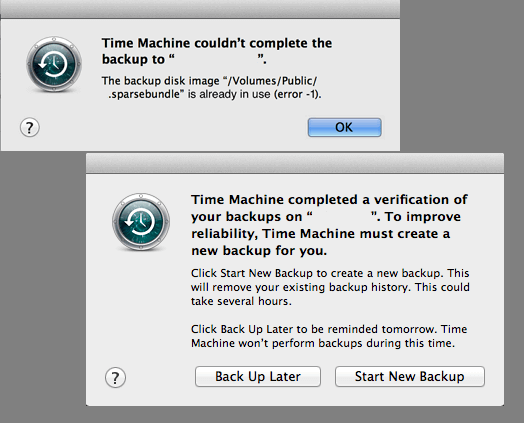
- Time Machine keeps asking to create new backups
- Searching for time machine backups taking forever
- Time Machine disk or external device becomes unrecognized
If your Time Machine backup is corrupted, as some experienced users and professional geeks have found that it can be fixed using the following four troubleshooting methods.
Fix 1. Create New Backup
If Time Machine keeps asking you to create new backups, click Create new backup to start the new backup so it can work smoothly later.
Fix 2. Restart Time Machine
Restarting Time Machine several times may help resolve the issue. If that doesn't work, try switching Time Machine to On-Off-On and then rebooting it again. This may resolve the problem.
Fix 3. Swap out The Hard Drive
If Time Machine is not working, you can try setting up a new external hard drive with Time Machine as a backup drive to repair it.
Fix 4. Repair Corrupted Time Machine with Terminal command
If Time Machine stops responding or not working on your Mac, repairing the corrupted backup can be a challenge, but it's still possible to resolve the issue using Terminal commands.
- Notice:
- To stop Time Machine, you should toggle it off in the Time Machine preferences, which can be accessed by going to Time Machine > Preferences, and then clicking the toggle button to turn it off. This will prevent any further backups from being made.
- Step 1: To gain superuser access on your Mac, open Terminal and type: $ sudo su - and press the Return key. This will prompt you to enter your administrator password, after which you'll be logged in as the root user.
- Step 2: Type: $ chflags -R nouchg "/Volumes/.sparsebundle" and hit Return.
- If you're unsure of the Time Machine backup drive's name, go to Time Machine Preferences and check it out. Alternatively, you can type "$ ls "/Volumes/" and press Return to list the available volumes on your system.
- Step 3: To attach a sparse bundle image, open Terminal and type `hdiutil attach -nomount -readwrite -noverify -noautofsck "/Volumes/.sparsebundle"` and press Return.
- Step 4: Type the below command and hit Return each time:
/dev/disk5 GUID_partition_scheme
/dev/disk5s1 EFI
/dev/disk5s2 Apple_HFS - Step 5: Type: $ fsck_hfs -drfy /dev/diskxs2 and hit Return. After this, if you receive 'The volume was repaired successfully', congratulations.
If Terminal warns you 'The volume could not be repaired', relax and continue with the next command. - Step 6: Type: $ fsck_hfs -p /dev/diskxs2 and hit Return.
- Step 7: Run the command $ fsck_hfs -drfy /dev/diskxs2 and hit Return. Wait for the process to complete. This command will perform a deep scan, repair, and force a file system check on the specified disk.
- Step 8: Type: $ vi "/Volumes//.sparsebundle/com.apple.TimeMachine.MachineID.plist" and hit Return.
Change the value of integer from 2 to 0 within that file.
Issue 3. Time Machine Backups Missing
You can use a third-party backup software like Deep Data Recovery to recover your data. Alternatively, you can also use a physical backup drive or a cloud storage service like Google Drive, Dropbox, or iCloud to restore your files. If you're unable to access Time Machine, try booting your Mac in Safe Mode or using a different user account to see if you can access the backup data.
Fix 1. Recover Missing Backup Image with Software
If the Time Machine backup disk can be opened but nothing appears, the best way is to scan and restore all lost Time Machines' Backups.backupdb files. You can try Deep Data Recovery for Mac, which supports users to restore all lost data from different situations within only 3 steps. Download Deep Data Recovery for Mac and restore Time Machine backups now.
Step 1. Launch Deep Data Recovery on your computer. Select the file types you want to recover and click "Next" to begin the recovery process.

Step 2. Select the disk location where you lost data and click the "Scan" button.

Step 3. Deep Data Recovery for Mac will immediately scan your selected disk volume and display the scanning results on the left pane.

Step 4. To recover your files, select the desired file(s) from the scan results and click the "Recover" button. This will restore the files to their original location.
Additionally, if files are lost on a Mac or external storage devices, Qiling Mac data recovery software can be used to easily recover files on Mac without a Time Machine backup.
Fix 2. Repair Unrecognized Time Machine Drive
If your Time Machine backup disk or external hard drive is no longer recognized, resulting in missing backups, try mounting it on your Mac and then running First Aid on the Time Machine disk using Disk Utility.
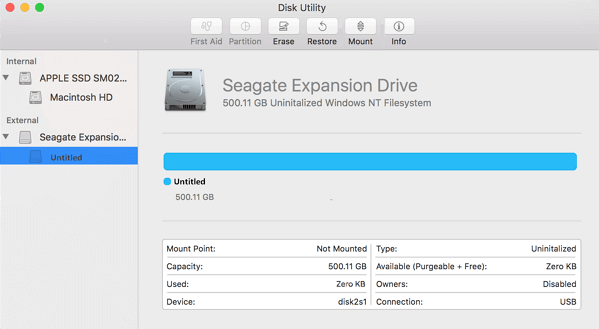
Step 1: Connect the Time Machine backup external hard drive to your Mac, then launch Disk Utility and select the external hard drive from the left panel.
The external hard drive is greyed out and marked as untitled, indicating it's unmounted on a Mac computer.
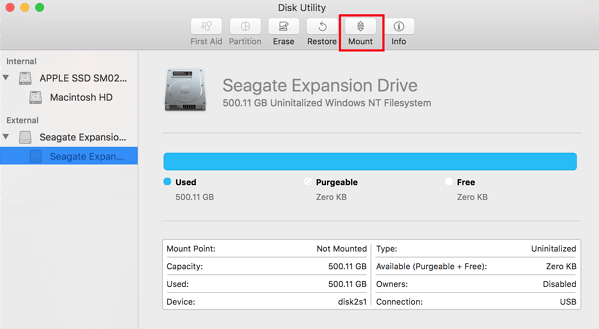
Step 2: Select the untitled external hard drive and click the "Mount" button from the Disk Utility bar. This will make the external drive accessible and ready for use.
Step 3: To repair the Time Machine drive, select it at the drive level on the left panel of Disk Utility and run First Aid.
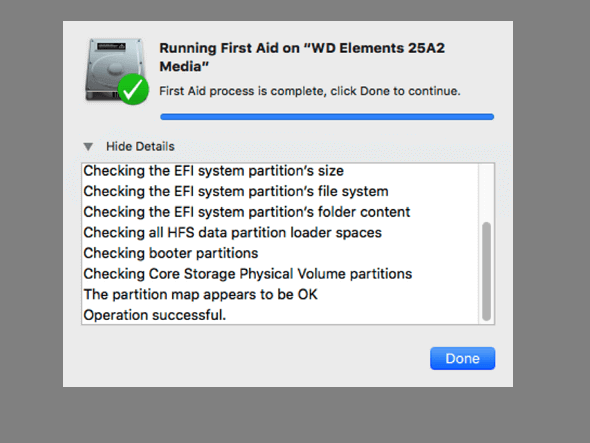
Step 4: To fix Time Machine drive issues, select the Time Machine drive at the volume level and run the First Aid utility. This will scan the drive for errors and attempt to repair them.
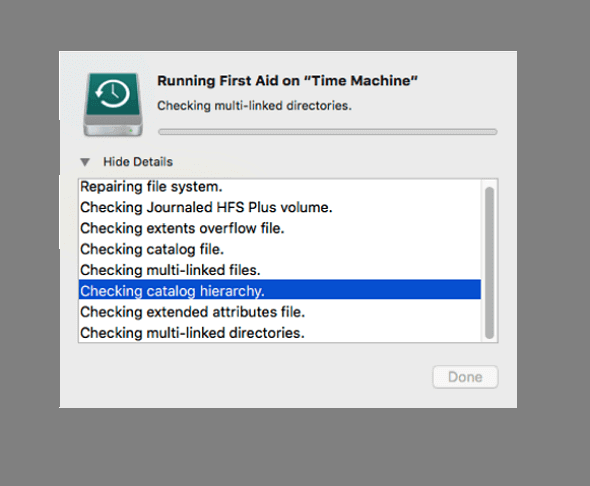
Wait for the process to complete, then check if your Mac can recognize the backup disk and open it in Time Machine.
Conclusion
If you're experiencing issues with Time Machine, such as a backup failure, there are gathered solutions to help you resolve the problem. If you're still having issues, you can find more Time Machine guidelines in our collection.
Related Articles
- Access Denied When Copying Files Windows 10/8/7
- Fix Windows 10 Hangs or Stuck on Shut Down Error
- Fixed: Windows 10 File History Doesn't Recognize the Hard Drive
- Fixed: Windows 10 Will Not Update with Error Code 0x80240fff
- [2 Ways] How to Create Windows 10 Image with Pre-Installed Software
For people eager to know how to create windows 10 iso image with pre-installed software, this article explains it all. From creating an ISO file in 2 ways to creating a bootable media to deploy the system with the pre-installed software on multiple systems in no time. - 5 Best Free Hard Disk Backup Software for Windows 11/10/8/7[The Latest]
A hard disk is a physical component of a computer where data is stored, and backing it up is crucial to protect your information in case of a hard drive failure. Fortunately, there are various hard disk backup software programs available, and here are five of the best and most popular ones.