Convert FAT32 to NTFS Without Losing Data
This page compares FAT32, FAT16, FAT12, and NTFS to help you choose a suitable file system for your storage device. To convert FAT to NTFS without losing data, you can try one of the following methods: you can use a software tool to convert the file system, use a disk management tool to change the file system, use a command-line interface to convert the file system, use a bootable USB drive to convert the file system, or use a third-party software to convert the file system. By following one of these methods, you can switch the file system on your storage device to NTFS while keeping your data intact.
PAGE CONTENT:
- Why Do You Need to Convert FAT to NTFS - NTFS vs. FAT32
- How to Convert FAT32, FAT16, FAT12 to NTFS
- Bonus Tips for FAT32 to NTFS Conversion (By Formatting)
The provided methods for FAT to NTFS conversion can be applied to various storage devices, including SD cards, USB flash drives, external or internal hard drives, on Windows 10, 8, 7, XP, and Vista. This conversion can help optimize the usage of your computer's hard drive by switching to a more reliable file system, NTFS, without losing any data.
Why Do You Need to Convert FAT to NTFS
If you're unsure about choosing the right file system for your storage devices, such as an external hard drive, USB, or SD card, you're not alone. Many ordinary people face this dilemma, and it's essential to make the right choice. By reading on, you'll learn how to select the best file system, whether it's NTFS or FAT32, for your specific needs.
NTFS vs. FAT, Which Is Better
When deciding which file system format to use for your device, consider the following comparison table: NTFS, FAT32, FAT16, and FAT12 have different characteristics that make them more or less suitable for your needs. NTFS is the most modern and secure option, offering support for large files, permissions, and encryption, making it ideal for modern devices.
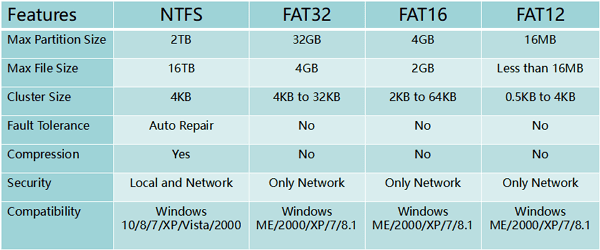
- NTFS is a file system that supports transferring large files without any size limitations, making it ideal for use on hard drives and external hard drives.
- FAT32 is a file system that supports transferring a single file up to 4GB in size. It is commonly used for SD cards and USB flash drives, making it a popular choice for portable storage devices.
NTFS has more advanced features than FAT, making it suitable for high-capacity storage devices like hard drives, but FAT32 is better for smaller devices like SD cards and USB flash drives.
If you have decided to set NTFS as the file system for your device, follow and try any method in the below to switch your device file system to NTFS without losing any data.
How to Convert FAT32, FAT16, FAT12 to NTFS
Changing a volume's file system is not a straightforward task, especially for those unfamiliar with computer management and command line. Therefore, a user-friendly and safe solution is required. Fortunately, there are two reliable methods for converting FAT to NTFS without losing any data. These methods provide a simple and effective way to achieve the desired file system for your drive, making it accessible to users of all levels.
Convert FAT to NTFS by Using CMD [Manual]
This tutorial is designed for experienced computer users who are familiar with Command Prompt lines. It assumes a high level of knowledge and comfort with using commands to navigate and interact with the operating system. If you're looking for a beginner's guide or want to learn the basics of Command Prompt, this tutorial may not be the best fit for you.
Users familiar with computer management can use the CMD convert command to switch a FAT partition or storage device to NTFS.
Convert a FAT or FAT32 drive to NTFS:
1. Find the letter of drive you want to convert.
2. To open the Run dialog box on Windows, press the Windows logo key + R. This will bring up a small window where you can type a command or program name to run.
3.Enter cmd to open the command prompt window.
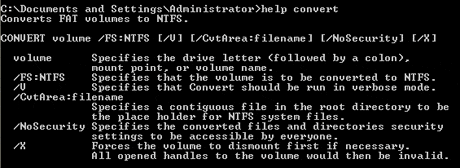
4.Type help convert and then press "Enter".
The information about converting FAT volumes to NTFS is made available as shown below.
5.At the command line prompt, type convert drive: /fs:ntfs.
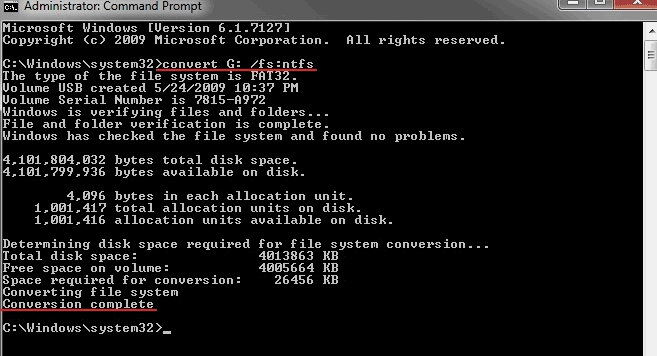
6.Type exit when the converting process completes.
The target device's file system has been successfully switched to NTFS, allowing users to access and utilize the previously saved data on the drive once more.
Bonus Tips for FAT32 to NTFS Conversion (By Formatting)
Besides using CMD or third-Party conversion software can help users change their device file system, but another method is also available. Users can format storage devices from FAT to NTFS, which is an alternative way to change the file system.
When planning to format a device to switch file systems, it's essential to back up important data to a secure location beforehand, as formatting can result in file loss.
There are three ways that you can apply to format device to NTFS. The former the tip listed, the easier it would be for you.
# 1. Format to NTFS in File Explorer
Step 1. Connect your external storage device to PC and open Windows File Explorer.
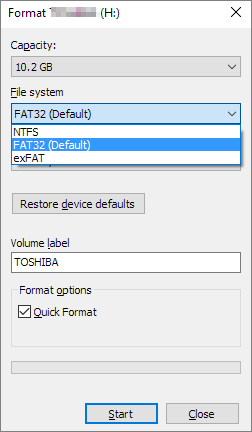
Step 2. Locate and right-click the target device, select "Format".
Step 3. Tick "Quick Format", set the file system as "NTFS" and click "Start" to begin the formatting.
The formatting process will finish, and once it's done, close the formatting window. The device is now formatted to NTFS, allowing you to copy backed up files back to the device.
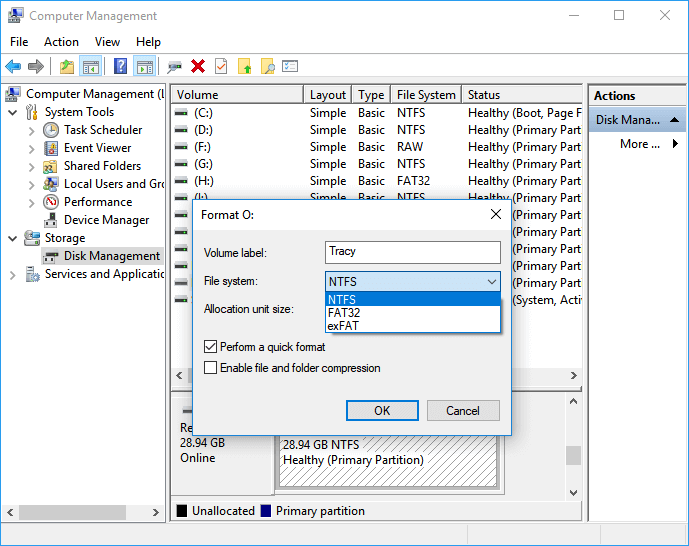
# 2. Format FAT32 to NTFS in Disk Management
Connect your external hard drive or USB drive to the PC before you start the formatting with the following steps:
Step 1. Right-click This PC or My Computer, select "Manage".
Step 2. Enter Device Manager and click "Disk Management"
Step 3. Open Disk Management and right-click the target device, select "Format".
Step 4. Set "NTFS" for the selected device, tick "Quick Format" and click "OK" to confirm.
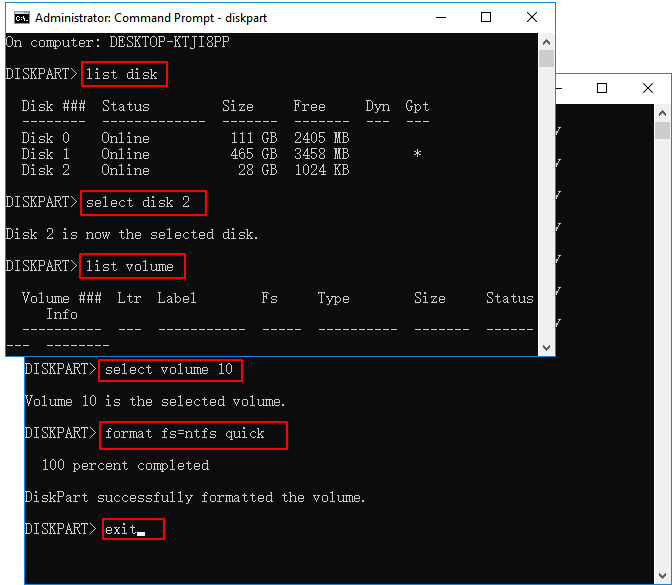
# 3. Quick Format FAT32 Device to NTFS in CMD
Step 1. Right-click on the Windows icon, select "Search" and type cmd.
Step 2. Right-click to run Command Prompt as administrator, type diskpart, and hit Enter.
Step 3. Type below command lines and hit Enter each time:
- list disk
- select disk 2 (Replace 2 with your USB disk number)
- list volume
- select volume 10 (Replace 10 with the volume number of the USB drive that you want to format)
- format fs=fat32 quick
Step 4. Type exit and hit Enter to close DiskPart when it reports to successfully format the volume.
Conclusion
This page compares NTFS and FAT32, providing two reliable methods to convert FAT32, FAT16/12 to NTFS without formatting using Qiling partition manager software or a CMD conversion command. The comparison between NTFS and FAT32 is discussed, with NTFS being considered better due to its ability to support larger file sizes, improved performance, and enhanced security features.
This tutorial article provides two methods to convert FAT32 to NTFS, as well as three manual formatting ways to format the device from FAT32 to NTFS. If choosing the formatting method, remember to back up data from the target device to another location first.
If you format the device without a backup, you can use a reliable file recovery software like Qiling Data Recovery to help recover your lost files.
People Also Ask
Besides converting FAT to NTFS, some people have more questions on file system conversion between FAT32 and NTFS. And here below, we collected 4 top concerned questions and left answers below each question. Let these answers release your doubts and help you out.
1. Can I convert NTFS back to FAT32 after FAT32 to NTFS conversion?
Once you've converted a FAT to NTFS, you can't easily switch back to FAT or FAT32. To do so, you'd need to reformat the drive or partition, which would erase all data, including saved files and programs.
Before converting NTFS to FAT32, it's essential to back up your data first. You can refer to this page for solutions on how to perform the conversion. Keep in mind that it's always a good idea to have a backup of your data before making any changes to your file system.
2. Will converting from FAT32 to NTFS erase data?
If you use the command line "convert" to change the file system of a drive from FAT to NTFS, or use the "Convert to NTFS" feature in Qiling Partition Master, your data will remain safe and won't be deleted. The process will save your data securely on the device.
To avoid data loss, back up your files before formatting your device. This will ensure that your saved data is safe and can be restored later. If you have already backed up your files, you can proceed with the formatting process without worrying about losing your data.
3. How can I change FAT32 to NTFS without losing data?
To protect your data from loss while converting FAT32 to NTFS, create a backup in advance.
You can use the Convert to NTFS feature in Qiling Partition or the CMD conversion command to convert the file system without losing any data.
4. How do I change my USB from FAT32 to NTFS without formatting?
The process of changing a USB drive from FAT32 to NTFS is similar to the methods described on this page. If you prefer a conversion method over formatting, features like Convert to NTFS in Qiling Partition Master or the CMD conversion command can also be used to achieve this.
To convert a USB drive to NTFS using Qiling Partition Master, connect the USB to your PC, run the software, right-click on the USB drive and select "Convert to NTFS", and then execute the operation.
To convert a USB drive to NTFS format using the Command Prompt, follow these steps: Open the Command Prompt as an administrator, then type "diskpart" and press Enter. Next, type "list disk" and press Enter to view a list of available disks.
Related Articles
- MBR to GPT: How to Convert MBR to GPT in Windows 11/10/8/7 [2021 New]
- Change GPT Disk to MBR Disk Without Formatting
- CHKDSK Not Working in Windows 11/10/8/7? Fix It Now!
- Unable to Change Letter or Assign Drive Letter to D/E/F/G
- Backup Computer to USB Flash Drive in Windows 10/8/7
- 5 Best Disk Imaging Software for Windows 10/7 in 2022 | Paid & Free
Do you know what is disk imaging software? What is the difference between disk cloning and disk imaging? And how to select the best disk imaging software to back up everything on your computer disk? Follow us, you'll learn 5 best disk imaging software with paid and free versions for disk imaging and file backup on Windows 10/8/7.