Best Way to Backup OST File in Outlook 365 [2022]
400 million people are expected to use Microsoft Outlook as their primary emailing solution in 2022, leveraging its robust security and extensive features, all under the control of Microsoft.
Saving files or backing them up from Outlook can be a challenge, prompting many to secure their OST files. But what exactly is an OST file, and how does it work? To understand its purpose and functionality,

The differences between Gmail and Outlook are significant, with Gmail being a cloud-based email service and Outlook being a desktop email client. To backup your PST file, you can use the built-in backup feature in Outlook or third-party software.
Introduction
If you're concerned about securing your files and emails on Outlook, you might be worried about backing them up. Some people use software to achieve this, while others rely on the built-in techniques available within Windows.
When you rely on offline files created by Outlook, you can easily move your settings, emails, attachments, and more to another computer or account, ensuring continuity. This process is crucial for backing up your data, and this article will delve into the details of how it works and provide guidance on how to do it. So,
To backup Outlook emails to a hard drive, you can use the built-in feature in Outlook called "Export" or a third-party tool like Outlook DigiScope. First, open Outlook and select the folder you want to backup, then go to "File" > "Open" > "Export" and choose the "Export to a file" option.
To backup and save Outlook emails to a hard drive automatically, there are three ways to consider. Firstly, you can use the built-in Outlook feature called "Export" to save emails to a PST file, which can then be saved to a hard drive.
You can backup Outlook emails by saving them to a hard drive automatically with a professional file backup tool, or by using Outlook's Import/Export Wizard to backup the Outlook data file (.pst) to a hard drive. Alternatively, you can manually copy OST or PST files to save your Outlook emails.

What Is OST File
Microsoft Outlook saves many files for it to work correctly, including the OST file with the extension (ost), which allows users to continue operations manually offline, except for sending or receiving emails.
This file synchronizes with the inbox as soon as the internet is connected, ensuring a smooth operation of Outlook, particularly for users with shaky or slow internet connections, allowing them to work efficiently.
This extension also serves to connect with the Exchange server whenever the internet is working smoothly, which is especially useful in times of internet distress or slow operation.
Why Users Need to Backup OST File
OST files are a crucial part of MS Outlook's offline functionality, but their importance extends beyond offline use. Even when connected to the internet, OST files remain vital for maintaining email continuity. Despite this, backing up these files is often overlooked, leaving many users without a reliable safety net in case of data loss.
If you don't backup OST files, a few problems can arise, including data loss, corruption, and incompatibility issues with new versions of Outlook or Exchange servers. Additionally, OST files can become unlinked from the Exchange server, making it difficult to synchronize changes or recover deleted items.
- Inability to synchronize OST
- OST Authentication issues
- A bad case of data recovery
- Corrupted OST with no backup
If an OST file is synchronized with the exchange server and a connection error occurs, it can become unusable, potentially losing valuable emails, settings, and other preferences. This is a risk when any OST file is synchronized with the exchange server.
Having a backup is crucial for resolving issues such as OST corruption, authentication problems, and data recovery, as it allows you to recover lost or deleted emails and access your data even when faced with file corruption.
To avoid losing your Outlook data, it's essential to save your OST files regularly using various methods, such as manually saving them or using add-ins like OST to PST Converter, which can convert OST files to PST format for safe storage. This way, you can protect your data from any potential issues and ensure its availability when needed.
How to Backup OST File
Securing your OST file is crucial, and there are several methods to achieve this. While all the methods listed can help secure your OST file, some are recommended over others in a ranked list.
- Method 1. Backup OST File with Qiling Backup
- Method 2. Backup OST File Manually
- Method 3. Backup OST File with Archive Option
Method 1. Backup OST File with Qiling Backup
You can use a professional and reliable backup tool like Qiling Backup Home to help you backup and restore files quickly and conveniently. This program allows you to save your emails or files like OST, making it a popular choice among users worldwide.
The tool is exceptionally easy to use compared to other conventional backup methods, making it a convenient alternative. Its ease of use is just one reason why you might prefer it over other methods or programs.
- Creates reliable backups
- Offers free cloud storage—250GB
- Ensures the upkeep of backup files
- Creates whole system clone, including Outlook
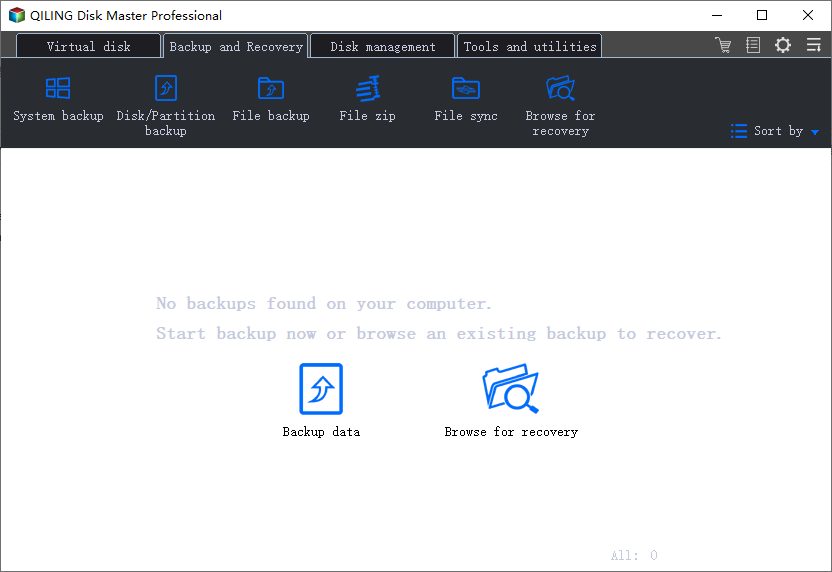
Launch Qiling Backup on your computer, and click File Backup on the home screen.
Step 2. To make a backup of your Microsoft Outlook emails, contacts, or calendars, select the mailbox addresses you want to back up in the database folder.
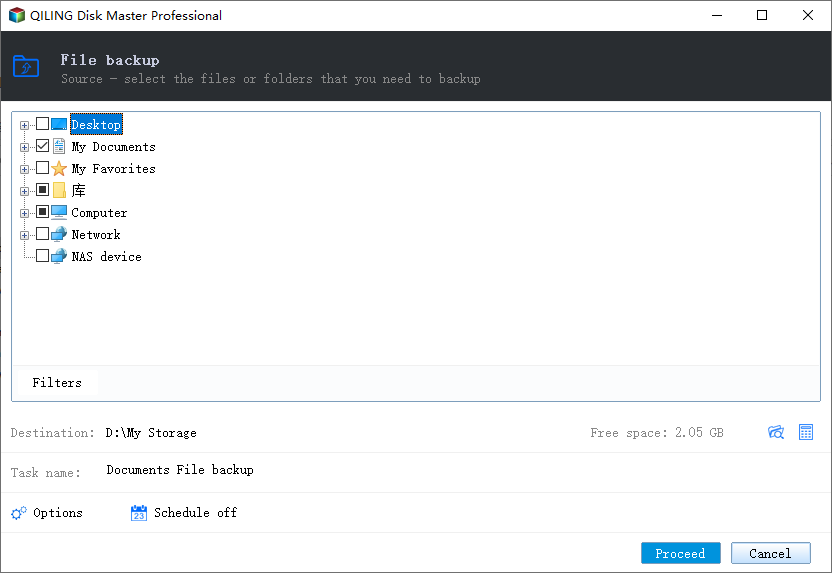
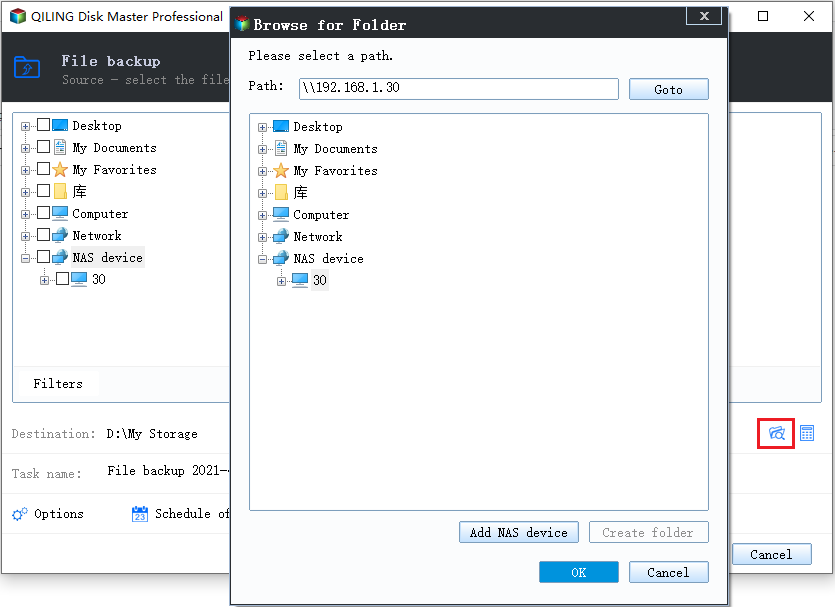
Step 3. To save the Outlook backup, click on the illustrated area to choose a location.
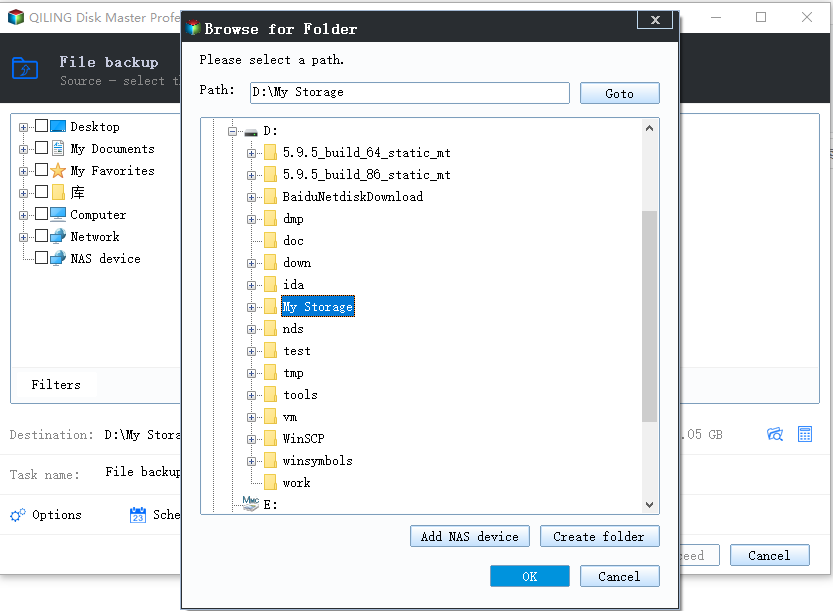
Step 4. The backup location can be a local drive, external hard drive, network, cloud, or NAS, with external physical drives or cloud storage being recommended for preserving backup files.
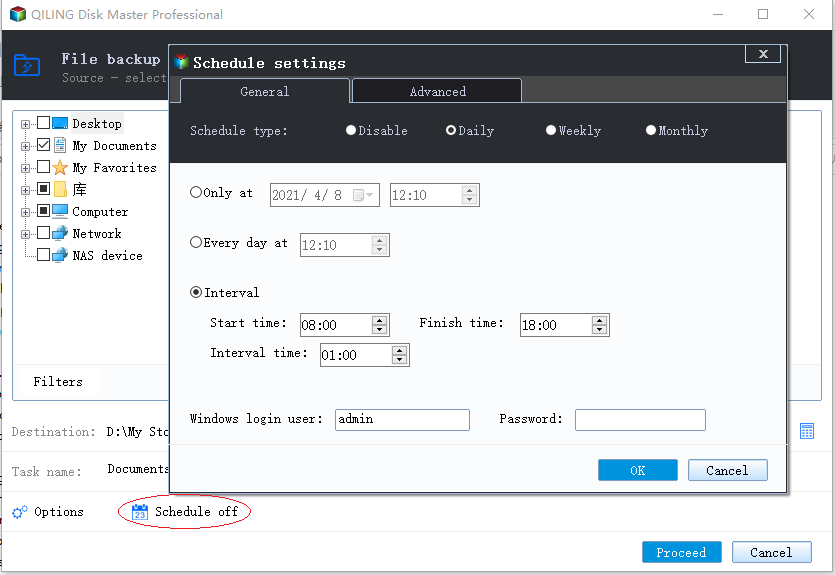
Step 5. The customization settings, including setting an automatic backup schedule in daily, weekly, or monthly intervals, or upon a specific event, are accessible through the Options button. Upon selecting the desired schedule, clicking Proceed initiates the Outlook backup process, which can be monitored on the left side of the interface in a card-style format, displaying the completed backup task.
If you're an Outlook user, you're likely aware of the importance of backing up your data. To ensure your Outlook mail and other essential information are safe, consider using a reliable backup software.
Method 2. Backup OST File Manually
To back up an OST file manually, first ensure your Outlook account is signed in. Then, follow these steps:
Step 1. Open Outlook.
Step 2. Head to Options.
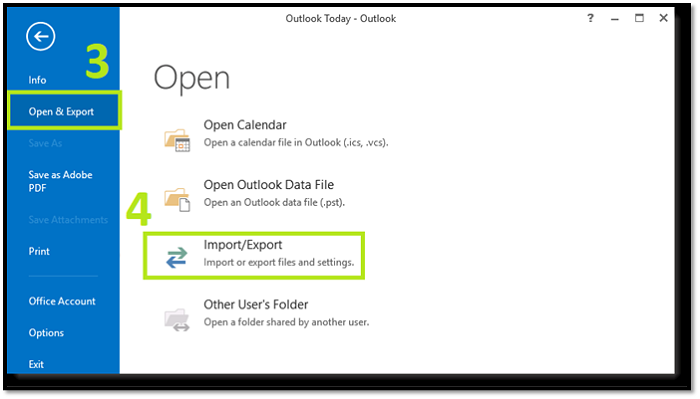
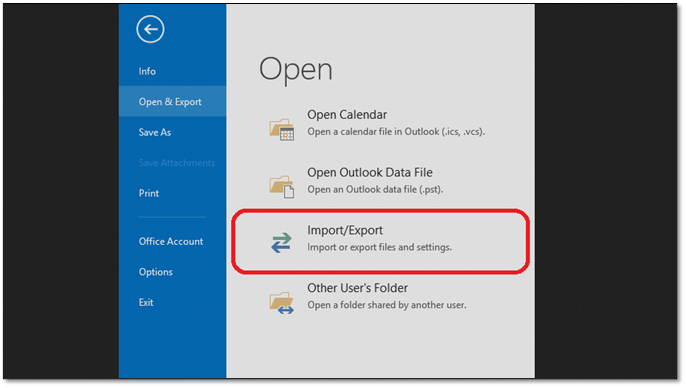
Step 3. Click "Open & Export" from the left.
Step 4. Click the "Import/Export button".
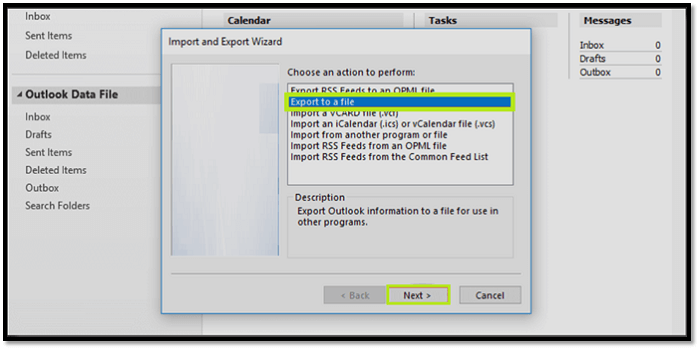
Step 5. Tap on "Export to a file" and click "Next".
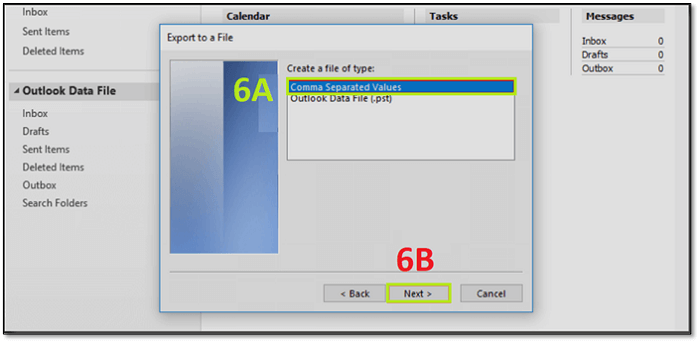
Step 6. Click on "Comma Separated Values" & tap "Next".
Step 7. Save the file to your desired location.
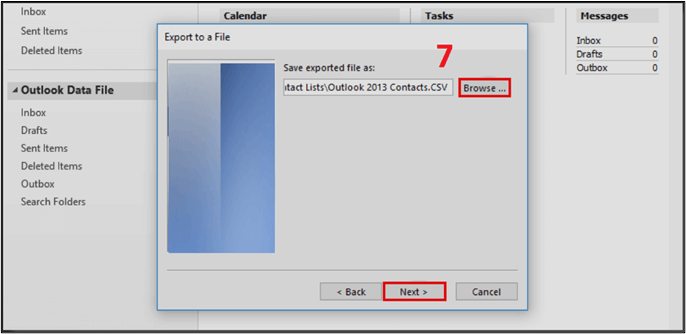
Save the OST files to your desired location, such as an external device, for added security and safety.
Method 3. Backup OST File with Archive Option
To secure your OST file or create a backup, use the Archive option. This process can be complex for those unfamiliar with it, but it's still achievable. To accomplish this, follow these steps:
Step 1. Open your Outlook.
Step 2. Head into the "File menu" and then "Options".
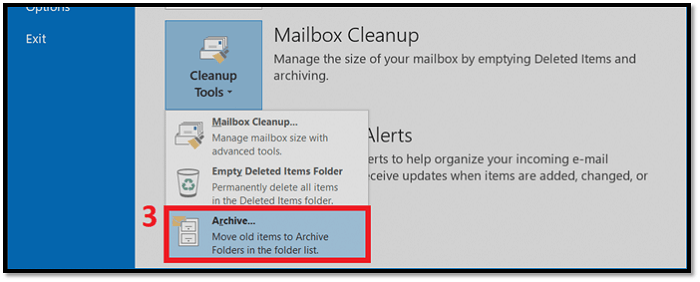
Step 3. Click on the "Mailbox Cleanup" option, then select "Archive".

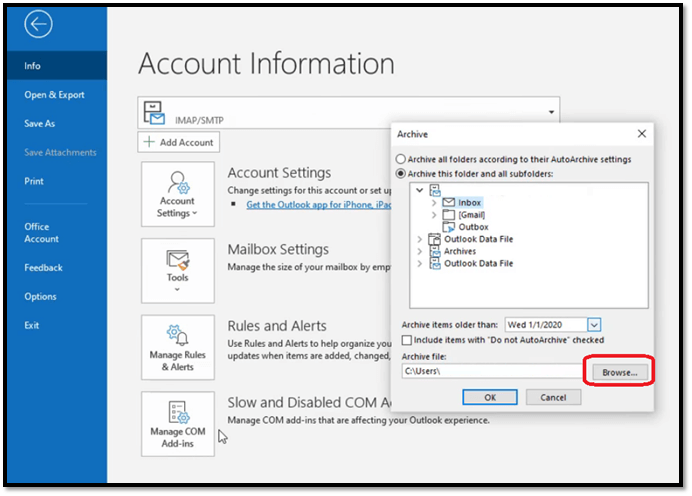
Step 4. Select the desired files and folders you wish to archive.
Step 5. Browse the destination folder for backup.
To secure your OST file to a location of your choosing, ensure your internet is working correctly to avoid missing emails or inbox contents. This will allow you to access your emails and contents from the designated location.
How to Open and View OST files
Here are two methods to view the OST files you've secured: you can use the built-in viewer in Microsoft Outlook or you can use a third-party viewer. To view the files using Microsoft Outlook, simply open the application, go to the "File" menu, and select "Open & Export". From there, you can select the OST file you want to view and open it. Alternatively, you can use a third-party viewer such as OST Viewer or OST to PST Converter, which can read and display the contents of the OST file without the need for Microsoft Outlook.
- Way 1. Open and View OST Files with Outlook Archive Feature
- Way 2. Open and View OST Files with Mailbox Items
Way 1. Open and View OST Files with Outlook Archive Feature
To view a backed-up file in Microsoft Outlook, simply navigate to the Archive feature, select the desired date range, and click on the "Restore" button to view the file. This allows you to access the file that you have previously backed up.
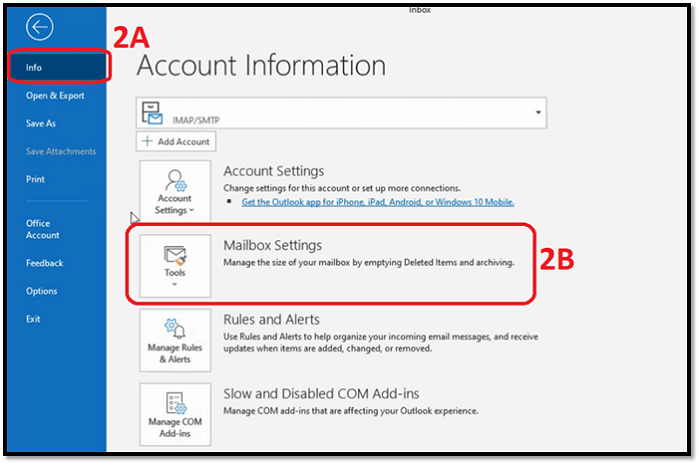
Step 1. Head to "Microsoft Outlook's File" options.
Step 2. Head into "Info", then "Mailbox Settings/Mailbox Cleanup".
Step 3. Click on "Archive".
Step 4. Click "Browse", then Select the folder with your OST file.
Restoring an OST file in Microsoft Outlook allows you to recover saved emails and other information, and view or modify them as needed. This process may have slightly different settings in Microsoft Outlook 2013 and older versions.
Way 2. Open and View OST Files with Mailbox Items
To view files using Mailbox Items, you can follow these steps:
Step 1. Head to your "Files" in Outlook.
Step 2. Go to "Open & Export" and click on "Import/Export".
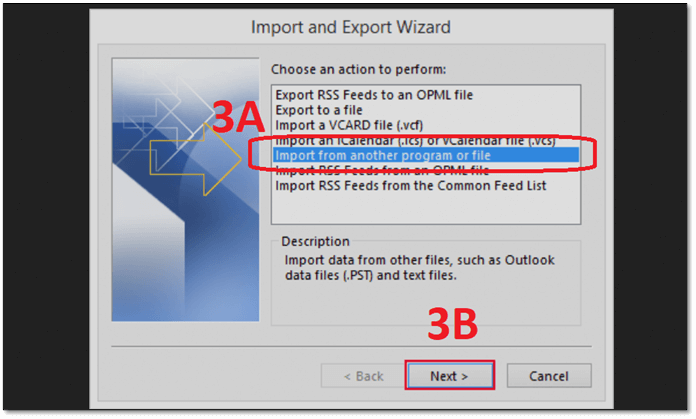
Step 3. Click on "Import from another program or file" and "Next".
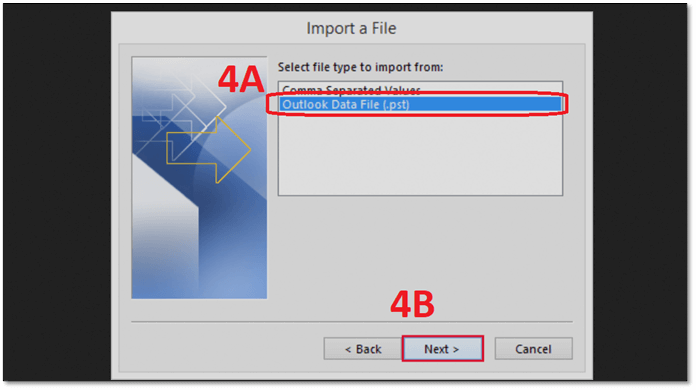
Step 4. Select "Outlook Data File" and "Next".
Step 5. Head to the location of your file.
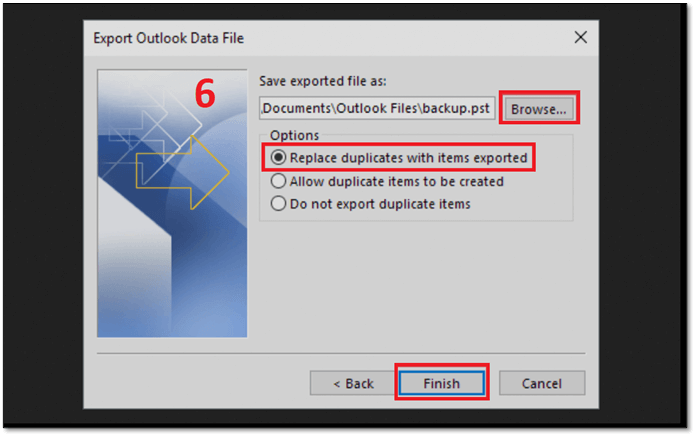
Step 6. Click on "Replace duplicates with items exported".
The Epilogue
To back up your OST file from Outlook, you can use various methods, but it's highly recommended to use Qiling Backup, which ensures proper backup and makes recovery easier. This approach is suggested for its effectiveness in both backing up and recovering OST files.
FAQs on Backup OST File
If you have more questions, check out our FAQ section to find your answers.
1. Can I copy the OST file to a new computer?
Once you've extracted an OST file using a method mentioned in the article, you can place it anywhere, but you'll need to use the Import/Export feature to use that OST file in a new Outlook.
2. Can I recover emails from an OST file?
After saving your OST file to another computer, online storage, or external device, you can import it into your Outlook, allowing you to access your older emails again.
3. Where do deleted OST files go?
The usual location of the deleted files would be:
"C:\Users\Admin\AppData\Local\Microsoft\Outlook"
To access the AppData folders in Windows Explorer, simply copy and paste the following into the address bar: `%appdata%`, `%localappdata%`, `%roamingappdata%`, and `%programdata%`. Note that these folders are hidden by default, so you'll need to use this trick to view them.
4. What are the differences between OST files and PST files?
OST and PST files in Outlook serve different purposes, with OST storing data for offline access and PST saving it on the local disk, allowing users to access their emails and data even when disconnected from the server.
Related Articles
- How to Backup Data from Hard Drive without OS in 3 Ways
- Top 7 Best Backup Software for Windows 7 64 Bit/32 Bit Recommends [Free & Paid]
- 10 Best OS Deployment Software [Updated 2022]
- How to Backup/Save Favorites Mailbox in Outlook[Manual & Automatic Ways]
- How to Backup Windows 11 to Synology NAS (3 Working Ways)👍
Backing up Windows 11 to a Synology NAS can be easily done in three convenient ways, making recovery and collaboration a breeze. - How to Backup Windows to Box - Safe & Quick Solutions
To create a backup to Box through Windows, users need to have a Box account, the Box Sync software installed on their computer, and a stable internet connection. They also need to have enough storage space on their Box account to store the backup files. Additionally, users may want to set up automatic backups by scheduling a task in Windows Task Scheduler, which can be done by creating a new task and specifying the Box Sync executable and the backup files to be uploaded.