Access GPT Protective Partition Without Losing Data
Quick Navigation:
- What Is GPT Protective Partition
- What Causes or Makes Your Disk Show Up as GPT Protective Partition?
- Part 1. Access GPT Protective Partition and Restore Data
- Part 2. Remove and Clear The "GPT Protective Partition" Error
- Part 3. Convert GPT to MBR after Removing GPT Protective Partition Error
- Method 1. Convert GPT to MBR using Qiling Partition Master
- Method 2. Initialize and Convert GPT to MBR using Disk Management
- Method 3. Convert GPT to MBR using Diskpart Command
- Extra Tips: Re-partition Disk After Removing GPT Protective Partition
- #1. Create Volumes on Disk using Qiling Partition Master
- #2. Create Partitions on Disk using Disk Management
- Conclusion
- People Also Ask
Learn how to remove GPT protective partition on Windows 10/8/7/XP, and regain access to your saved data without losing any information. This page explains what a GPT protective partition is, the causes of this issue, and step-by-step guides to resolve it. By following the instructions, you can make your GPT protective partition accessible again and recover your valuable data.
PAGE CONTENT:
- Part 1. Access GPT Protective Partition and Restore Data
- Part 2. Remove and Clear The "GPT Protective Partition" Error - 3 Methods
- Part 3. Convert GPT to MBR after Removing GPT Protective Partition Error
What Is GPT Protective Partition
A GPT protective partition is a type of hard drive partition that is protected by the GUID partition table, making it inaccessible for modification or deletion via Disk Management.
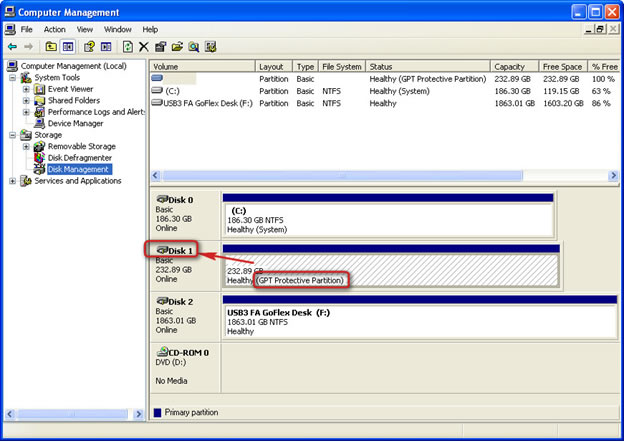
The GPT protective partition is a type of partition that cannot be partitioned, formatted, deleted, or accessed. It typically appears as a single partition or entire disk in Disk Management, labeled as "Healthy (GPT Protective Partition)".
What Causes or Makes Your Disk Show Up as GPT Protective Partition?
Before working out a way to remove the "GPT protective" partition from your Windows computer, first of all, you need to know what causes GPT protective partition.
A Healthy (GPT Protective Partition) disk partition may be caused by one of the following reasons: the partition is not properly aligned, the disk has a protective partition, there's an issue with the disk's GPT (GUID Partition Table) structure, or the disk has been converted from MBR to GPT format.
1. Windows couldn't read or support a GPT Protective Partition
Windows XP doesn't support GPT disks, so when a GPT disk is connected, its partitions appear as "GPT protective partitions".
2. GPT disk errors that cause GPT partitions protective
3. To manually create one or multiple GPT protective partitions, you would need to use a tool like `gdisk` or `parted` to partition the disk and then format the partitions with a file system. This process can be useful for specific reasons such as creating a protective partition to protect the MBR (Master Boot Record) from being overwritten, or to create a separate partition for a specific purpose like a recovery partition.
GPT protective partitions are primarily used on servers to safeguard confidential information and ensure data redundancy, while some personal users utilize them to maximize partition size or bypass size restrictions.
The protective partition on a GPT disk, even if recognized by Windows, cannot be read or booted from, making data inaccessible.
To access the GPT protective partition data and resolve the error, follow these steps: check the disk for errors using the built-in disk checking tool, run the command "chkdsk /f" in Command Prompt, or use a third-party disk checking tool like Qiling Disk Master. If the issue persists, try converting the GPT protective partition to a MBR partition using the command "convert mbr" in Command Prompt. If you're still experiencing issues, consider seeking professional help or reinstalling your operating system.
Part 1. Access GPT Protective Partition and Restore Data
In order to recover data from the GPT protective partition, it's recommended to take precautions beforehand. This involves creating a backup of the data you want to recover, as well as ensuring the GPT partition is not deleted or modified.
When GPT disk partitions become protective, they become inaccessible, and you can't perform operations like deletion or formatting on them. This is because the protective flag is set, indicating that the partition is not available for use.
To remove the GPT protective partition, you should first find a reliable data recovery solution to restore the saved data from the problematic partition. This is a crucial step to ensure that any important information is preserved before proceeding with the partition removal.
Here, you can take Deep Data Recovery for help. As long as your disk can be detected by Windows Disk Management, it will recognize your GPT protective partition and effectively scan and find all your data.
To access and restore the GPT protective partition data, follow these steps: first, ensure the system is powered off, then enter the BIOS settings and set the SATA mode to AHCI, save the changes and exit the BIOS. Next, boot from a Linux live USB or CD, mount the file system and locate the GPT protective partition, typically located at /dev/sda1 or /dev/nvme0n1p1.
Step 1. Launch Deep Data Recovery on your computer. Run it and click "Next".

Step 2. Identify the hard drive that has become inaccessible on your PC. Then, click "Scan" to initiate the program's scanning process, which will search for and recover data from the hard drive.

Step 3. After scanning, you can view and check found files on the scanning result window. You can filter the results to quickly find a specific type of file and preview the file by double-clicking it.

Step 4. Finally, select the items you want to get back and click "Recover". Choose a secure location, such as a second hard drive partition on your PC or another external storage device, and then click "OK" to start recovering all lost data from your inaccessible hard drive.
To prevent data loss, save the restored data to another secure location on your computer or an external hard drive after restoring from a backup. This ensures that your data is safe and can be easily retrieved if needed. Next, proceed with the solutions in the next two parts.
Part 2. Remove and Clear The "GPT Protective Partition" Error
To resolve the "protective" issue on a GPT partition, you'll need to run the command `sgdisk --clear-gpt-flag /dev/sdX` (replace `/dev/sdX` with the actual device path of the affected partition), followed by `sgdisk --rebuild-gpt /dev/sdX`. This will clear the GPT protective flag and rebuild the GPT partition table, making the partition usable again.
This solution can be applied to various Windows operating systems, including Windows 10, 8, 7, XP, and Windows Server 2003.
To remove a GPT protective partition, IT professionals recommend using the Diskpart command-line utility, which is a efficient and effective solution.
Important
The Diskpart command allows you to clean the GPT Protective Partition, completely erasing all data. To remove the GPT protective partition without losing data, follow the steps in Part 1 and restore your precious data in advance.
To remove a GPT protective partition using Diskpart, you can use the "clean" command. This will allow you to access and manipulate the disk without the protective partition in the way.
Step 1: Type cmd and hit Enter to bring up Command Prompt. Run as administrator.
Step 2: In the command prompt, enter the command diskpart.
Step 3: Enter the command list disk.
Step 4: To remove a GPT protective partition, enter the command `select disk x` in the command prompt, where `x` is the drive letter of the GPT protective partition.
Step 5:& Enter the command clean.
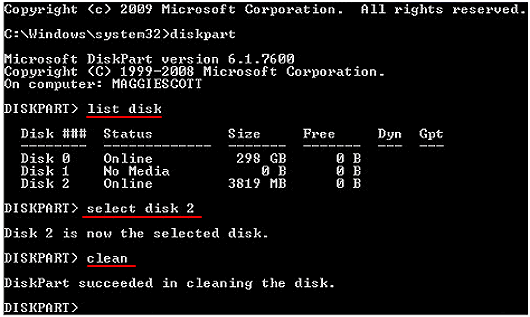
To remove the GPT protective partition, you can use the built-in Command Prompt in Windows. First, type `diskpart` and press Enter to open the Diskpart utility. Then, type `list disk` and press Enter to list all the disks connected to your PC. Next, type `select disk X` (replace X with the number of the disk containing the GPT protective partition) and press Enter to select that disk.
To convert the GPT disk to MBR or create new partitions on the disk, follow the steps outlined in Part 3 of the instructions. This will allow you to modify the disk's partition table and create new partitions as needed.
Part 3. Convert GPT to MBR after Removing GPT Protective Partition Error
The cleaned GPT disk can be used on new Windows 10, as well as older operating systems such as Windows XP and Windows Server 2003, allowing for a seamless transition and utilization of the disk's full potential.
After removing the GPT protective partition style, you'll be left with an "Unknown, Not initialized and unallocated' disk. To resolve this, simply initialize the disk or convert it to MBR, allowing Windows to recognize the disk again.
If you're in need of help, consider reaching out to a friend or family member, using a search engine like Google to find relevant information, or leveraging a productivity app or tool to stay organized and focused. These options can provide a helpful boost, and the sooner you try one, the easier it will be.
Method 1. Convert GPT to MBR using Qiling Partition Master
We recommend trying a third-party partition manager software first because it can simplify the operating process for you.
Qiling Partition Master offers a secure solution to thoroughly fix GPT Protective Partition errors on Windows operating systems, providing a reliable way to resolve this issue.
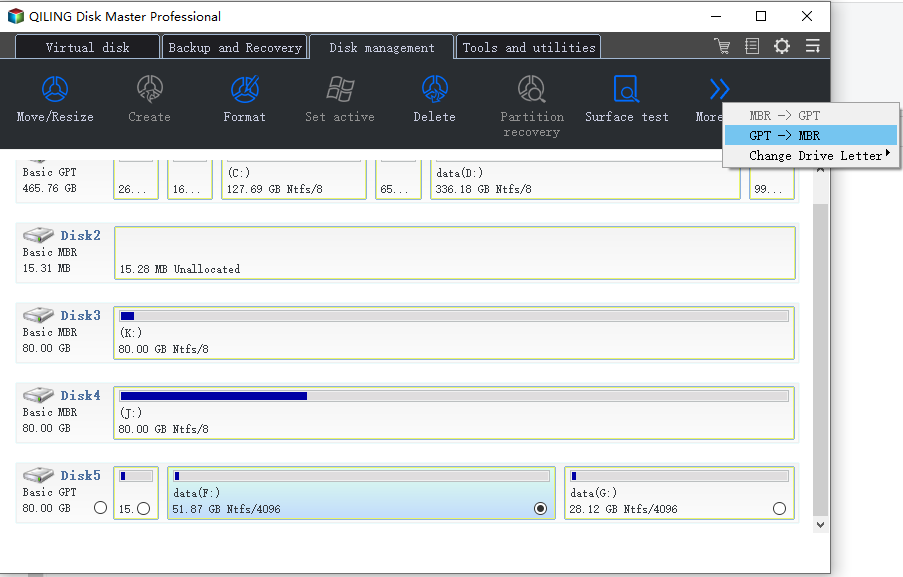
You can use this software to convert a healthy GPT to MBR without destroying data with just a few clicks. Follow the guide to work through the process.
- Select the GPT disk you want to convert and click "More..." in the Disk management page, then select "GPT -> MBR".
Method 2. Initialize and Convert GPT to MBR using Disk Management
To quickly convert a disk to MBR, you can use Disk Management, a Windows built-in tool that allows you to perform the conversion for free.
Step 1. Right-click "My Computer" or "This PC", click "Manage" and select Disk Management.
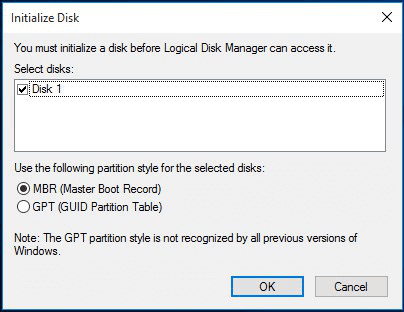
Step 2. Here, right-click the unallocated hard drive and click "Initialize Disk".
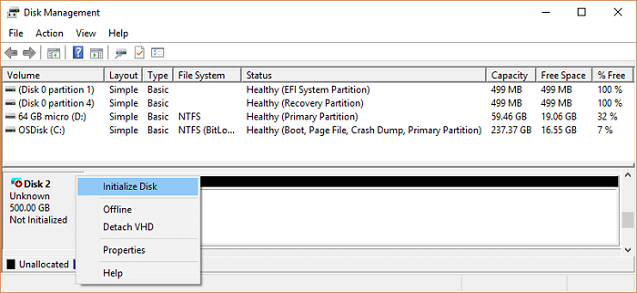
Step 3. In the dialog box, select the disk(s) to initialize and choose MBR or GPT partition style.
Method 3. Convert GPT to MBR using Diskpart Command
To resolve the issue of Windows not booting due to a GPT disk, you can try running the Diskpart command to convert the GPT disk to MBR. This involves opening Command Prompt as administrator, typing "Diskpart", and then executing the "convert mbr" command. Be cautious when following these steps, as they can potentially lead to data loss if not executed correctly.
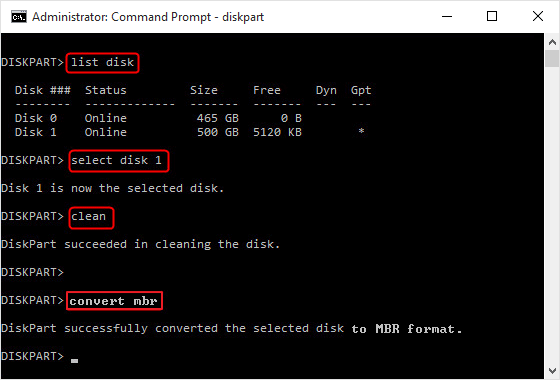
Step 1. Open Command Prompt on your computer, and type diskpart in the cmd and hit Enter.
Step 2. Click "Yes" to open Diskpart.
Step 3. Type the following command and hit Enter each time:
- list disk
- select disk 1 (Replace 1 with the disk number of the disk you need to convert).
- This will completely erase the disk, removing all partitions and data. Make sure to have backed up all data from Part 1 before proceeding.
- The command to convert a GPT disk to MBR is "convert mbr". This command will change the disk's partition table from GPT to MBR, allowing it to be used on older systems that only support MBR.
Step 4. Type exit when the conversion completes.
After completing all operations in Parts 1, 2, and 3, you've successfully removed the GPT protective partition from your disk, making the entire disk available for creating new partitions.
Extra Tips: Re-partition Disk After Removing GPT Protective Partition
After completing the process with the provided solutions, the GPT protective partition has been thoroughly removed from your disk, leaving it as an unallocated drive.
To make use of the disk, you will need to re-partition it, creating new partitions on it. Two workable tools to achieve this are available, and we will list them with tutorial steps to guide creating volumes on a Windows PC. You can choose either one to make your disk available to save data again.
#1. Create Volumes on Disk using Qiling Partition Master
Works for: All Windows beginners.
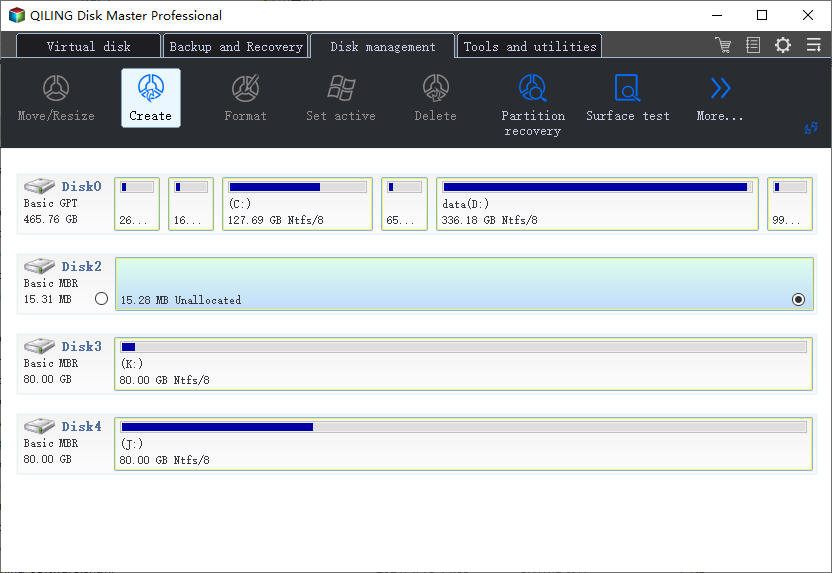
Step 1: Launch Qiling Partition Master
On the main window, click on the unallocated space on your hard drive or external storage device and select "Create".
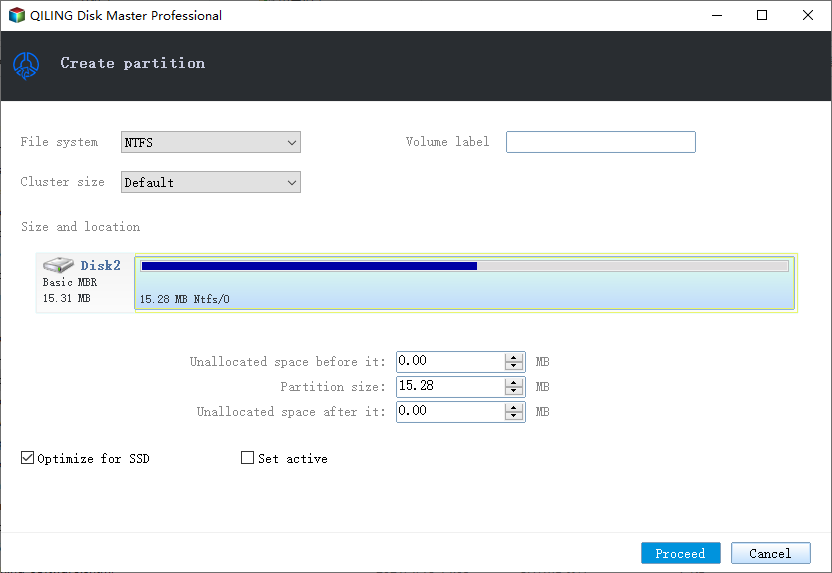
Step 2: Adjust the new partition size, file system, label, etc.
Set the size, partition label, drive letter, file system, etc. for the new partition and proceed to create it.
#2. Create Partitions on Disk using Disk Management
Works for: Experienced and advanced Windows users.
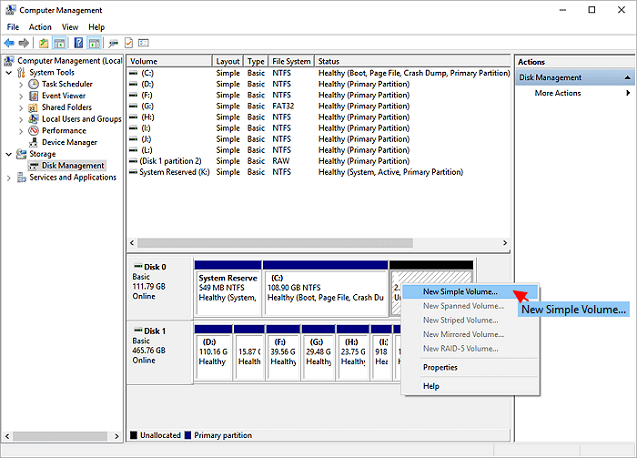
Step 1. Open Disk Management by right-clicking "This PC" and select "Manage".
Step 2. Click Disk Management, locate the empty disk which was inaccessible, displaying as "Healthy (GPT Protective Partition).
Step 3. Right-click on the unallocated space on the disk, select "New Simple Volume".
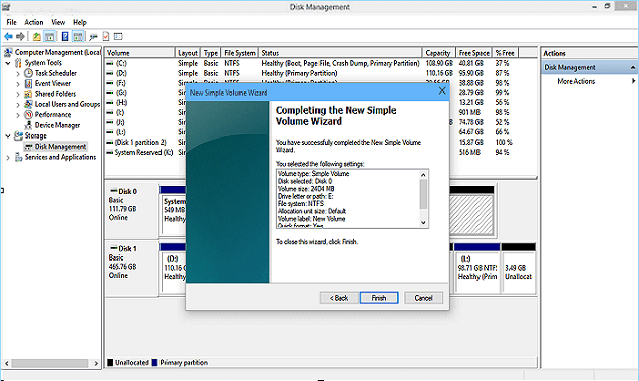
Step 4. Set the partition size, drive letter, file system, etc.

Step 5. When you finish all the processes, click "Finish" to end the process.
To create multiple partitions on a disk, you can repeat the process of creating a new partition by running the `fdisk` command, specifying the desired partition size and file system type, and then writing the changes to the disk. This process can be repeated as many times as needed to create the desired number of partitions.
Conclusion
A GPT protective partition is a type of partition used in Windows PCs. It's created when the system's firmware is set to UEFI mode, which is a more modern and secure way of booting the operating system.
For most Windows users, the issue can be resolved by accessing data and restoring them from the GPT protective partition using a reliable data recovery software such as Deep Data Recovery.
To resolve the error, run the Diskpart clean command to remove the error from the GPT disk. Then, use a tool like Qiling Partition Master, Disk Management, or Diskpart to convert the GPT disk to MBR. This will thoroughly get rid of the issue.
To make the disk usable for saving data again, connect it to your computer, open the Disk Management tool, select the disk, right-click and select "New Simple Volume", follow the wizard to create a new partition, assign a drive letter, format the partition
People Also Ask
1. How do I get rid of GPT protective partition?
How to delete GPT Protective Partition:
- Type in "DiskPart" in command line.
- To view all disks connected to the interface, simply type "list disk" in the command line. This will display a list of all available disks.
- To set the focus to a specified partition, use the command "select disk*" followed by the number of the partition you want to focus on, such as "select disk 1".
- Use "clean" command.
2. What causes GPT protective partition?
1. Windows couldn't read or support a GPT Protective Partition.
2. GPT disk errors that cause GPT partitions protective.
3. Creating a GPT (GUID Partition Table) protective partition can be done manually for various reasons. This process involves creating a protective partition on a disk that uses the GPT partitioning scheme, which is different from the MBR (Master Boot Record) partitioning scheme used by older systems.
3. How do I access data from GPT protective partition?
How to Access GPT Protective Partition Data:
Step 1: get the software and launch it. Download Qiling Partition Master and install it properly.
Step 2: scan the GPT disk with protective partition. You should select the GPT disk under Hard Disk.
Step 3: choose the needed files to recover.
Related Articles
- How to Format 128GB USB Flash Drive to FAT32
- How to Convert GPT to MBR (Without Data Loss) with 3 GPT to MBR Converter
- Fixed: Windows Could Not Format A Partition on Disk 0 (Error Code 0x80070057)
- Windows OS Migration Software: Migrate OS to New Hard Drive
- NTFS or exFAT, Which is Better for HDD, SSD, M.2, or NVMe? Find Your Answer Here
- What Is GPT Disk and How to Manage GPT Disk
- How to Create and Manage Client Computer Backups?
Are you looking for a way to create and manage client computer backups from one central server? Keep reading and learn how to perform Windows Server client backup.