How to Fix the System Cannot Find the File Specified
Quick fix: Use SFC to fix the system cannot find the file specified error
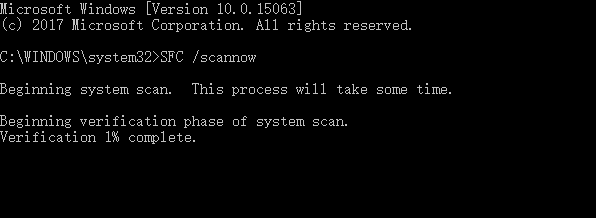
In the Command Prompt, type the following command: sfc /scannow. Press Enter. This will start the System File Checker tool, which will scan and replace any corrupted system files with a cached copy.
After scanning and correcting errors, restart the computer and check if the "the system cannot find the file specified" error is resolved.
"The system cannot find the file specified"
The "The system cannot find the file specified" error, also known as Error Code 0x80070002, may occur on Windows 10 or earlier versions, and is often caused by an issue with finding a specific file. This error can occur under various conditions, but is commonly seen when users attempt to access or run a program, install software, or access a file that is not found or is corrupted.
- In Disk Management, you can access and manage various types of storage devices, including local hard drives, external hard drives, USB drives, and more. This utility allows you to view and manage the storage devices connected to your computer, including their capacity, file system, and status.
- Access files and folders on your computer
- Launch a program
- Install Driver
- Back up system
How to Fix "The system cannot find the file specified"
The solution to the "The system cannot find the file specified" error depends on your specific situation. If you're trying to run a program or access a file, check if the file path is correct and the file exists in the specified location. If you're trying to install an application, ensure you have the correct installation files and that your system meets the minimum requirements.
| Workable Solutions | Step-by-step Troubleshooting |
|---|---|
| Case 1. Error while accessing the drive | Recover data from the hard drive > fix the hard drive via Diskpart...Full steps |
| Case 2. Error while accessing folders | Check the system log file > look for files via Regedit > check for RTHDCPL in Registry key...Full steps |
| Case 3. Error while launching programs | Update driver > reinstall program > end nginx.exe Process...Full steps |
| Case 4. Error while installing drivers | Look for files via Regedit > check for RTHDCPL in Registry key...Full steps |
| Case 5. Error while backing up system | Install the latest Windows updates > check Services settings...Full steps |
Situation 1. Receive "The system cannot find the file specified" While Accessing a Hard Drive
When encountering the "system cannot find the file specified" error, it's often due to a corrupted or damaged file system on the target device, making hard drives, USBs, or external hard drives inaccessible. To resolve this, running the chkdsk command can repair the corrupted file system, and then using reliable data recovery software can help retrieve lost data. Additionally, cleaning and re-partitioning the hard drive using the diskpart command in CMD can further resolve the issue.
First. Run CHKDSK Command to Fix "System Cannot Find File Specified" Device
- Right-click the Start button, type cmd in the Search and select Command Prompt (Admin).
- To repair a corrupted file system on drive x, type `chkdsk x: /f /r` into the Command Prompt, replacing "x" with the actual drive letter, and press Enter. The command will initiate the file system repair process, which may take some time to complete.
- Type exit and press Enter to leave this command.
After this, you can try to re-To access your saved files, open the drive and check if they are visible. If any files are missing or not showing up, you can try recovering data from your storage device using reliable data recovery software, as covered in the next tutorial.
Next. Recover Data from Problematic Hard Drive or Device
You can use Deep Data Recovery to retrieve deleted, formatted, or lost files from external storage devices or local hard drives, even if they've been formatted or become inaccessible. This tool can help you regain access to your precious files.
Last. Fix the Hard Drive via Disk Clean Diskpart
Now that you have kept your files safe, you can follow the steps below to fix the device without any worries. To fix the device, you can try booting it in safe mode, uninstalling recently installed software, or running a system file checker to identify and fix any corrupted system files.
Step 1. Run Command Prompt as an administrator.
Step 2. To enter Diskpart, you can press the Windows key + X and select Command Prompt (Admin) or PowerShell (Admin) and type "diskpart" and press Enter. This will open the Diskpart utility in a Command Prompt window.
Step 3. Enter the following commands one by one:
- list disk
- select disk 1 (Replace "1" with the number of your problematic disk)
- list disk To correct the previous response, the star in front of the disk you selected is actually a star cluster. The star cluster is a group of stars that are gravitationally bound together and are often found in the same region of space.
- clean To resolve the issue, cancel the disk insertion notification, and repeatedly run the "clean" command until it succeeds.
Step 4. If you have successfully cleaned your disk, enter the following commands in order: `sudo apt-get update`, `sudo apt-get autoclean`, `sudo apt-get autoremove`, `sudo apt-get clean`, and `sudo apt-get autoclean --purge`. These commands will ensure that your system is up to date and remove any unnecessary packages and files.
- list disk
- select disk X
- create partition primary
- select partition 1
- active
- format fs=fat32 quick The command to assign a file system to a partition is `mkfs.fs quick`. This command uses the `mkfs` utility to format the partition and assign the specified file system, with the "quick" option indicating a quick format. For example, to assign FAT32 to a partition, you would use `mkfs.
Once the process is complete, your hard drive or USB drive should be functional again, allowing you to store and access your data as needed.
Situation 2. Get the Prompt "The system cannot find the file specified" While Accessing Files/Folders
When trying to open a folder or file by double-clicking, you may encounter an error message. This issue can be resolved by checking the file associations in the Control Panel, resetting the Windows Explorer, or reinstalling the operating system.
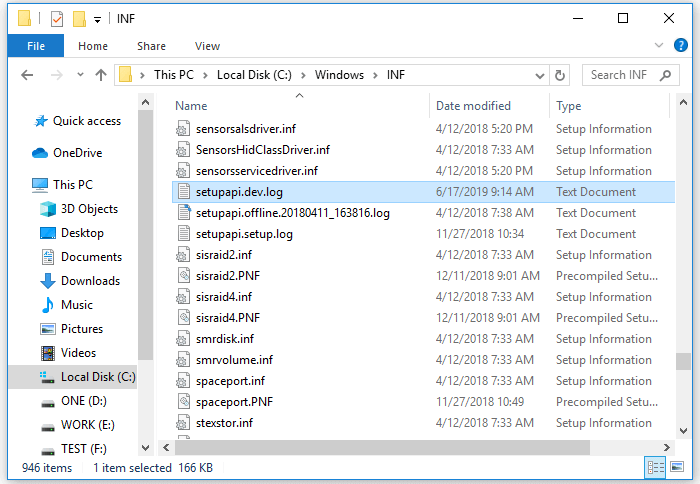
Method 1. Check the System Log File
Step 1. Navigate to the C:/Windows/inf directory and open Inf folder.
Step 2. Locate the setupapi.dev or setupapi.dev.log file and open it.
Step 3. Press "Ctrl + F" hotkey and type cannot find the file in the search.
Step 4. Press "Enter" to run the search. You should get the missing file.
Step 5. Copy and paste it into the Windows/inf folder.
Step 6. Reinstall the hard disk driver and reboot the system.
Method 2. Look for Files via Regedit
Step 1. Press "Windows + R" and enter regedit. If there is a prompt asking for permission, click "Yes".
Step 2. Go to HKEY_LOCAL_MACHINE\SOFTWARE\Microsoft\Windows\CurrentVersion and check if there is "RunOnce". If not, add it manually.
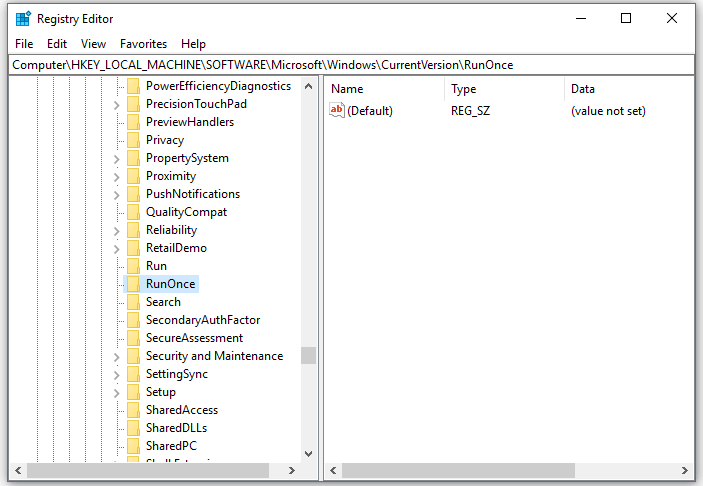
Step 3. Go to HKEY_CURRENT_USER\Software\Microsoft\Windows\CurrentVersion and check whether there is "RunOnce". If not, create it manually.
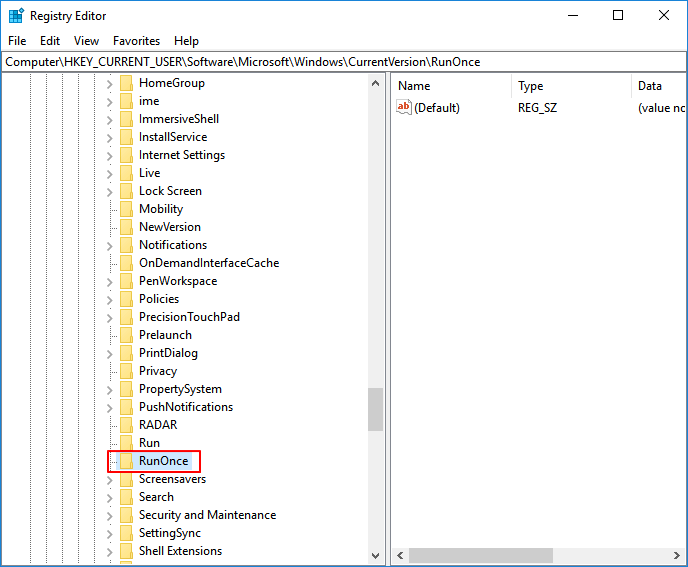
Step 4. Quit Registry Edit, restart your computer and install hard disk drivers again.
Method 3. Check for RTHDCPL in Registry Key
Step 1. Press "Windows + R" and enter regedit. If there is a prompt asking for permission, click "Yes".
Step 2. To resolve the issue, go to the HKLM\Software\Microsoft\Windows\CurrentVersion\Run registry key, look for RTHDCPL, and if it's not found, check the "Run" property and set the Admin-user permission to "Full Control".
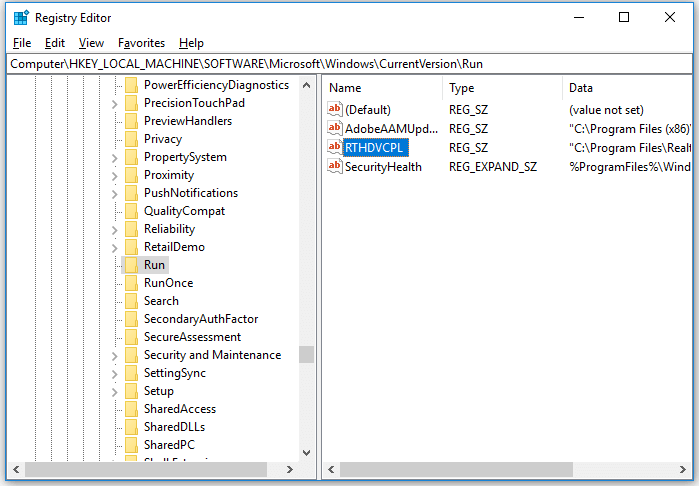
Be careful not to delete content from your registry since it may result in serious issues on your computer.
Situation 3. See the Prompt Saying "The system cannot find the file specified" While Launching Programs
Users often struggle to provide a concise answer. To overcome this, you can try one of the following methods: (1) break down the question into smaller parts, (2) identify the main keywords and focus on them, or (3) summarize the question in your own words. By applying these techniques, you can provide a clear and concise response.
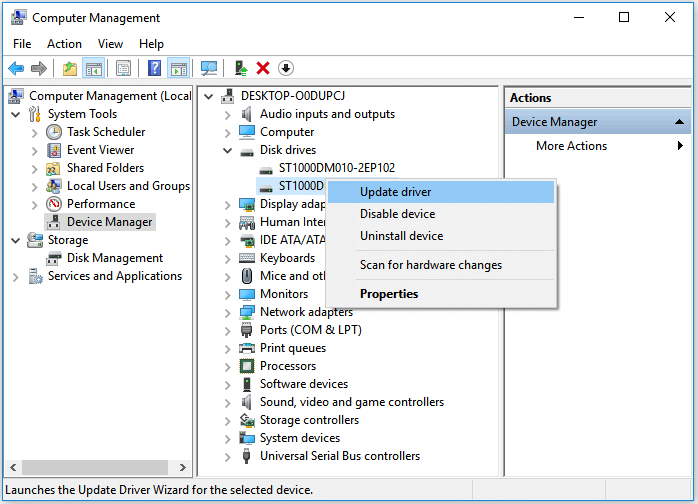
Method 1. Update your hard disk driver
Step 1. Go to "This PC" > "Manage" > "Device Manager".
Step 2. Expand "Disk drives"
Step 3. Right-click the disk and choose "Update driver"
Method 2. Reinstall the Program
Step 1. Quit the program.
- Right-click on your taskbar and choose "Task Manager"
- Under the Processes tab, select the program and choose "End Task" to close it.
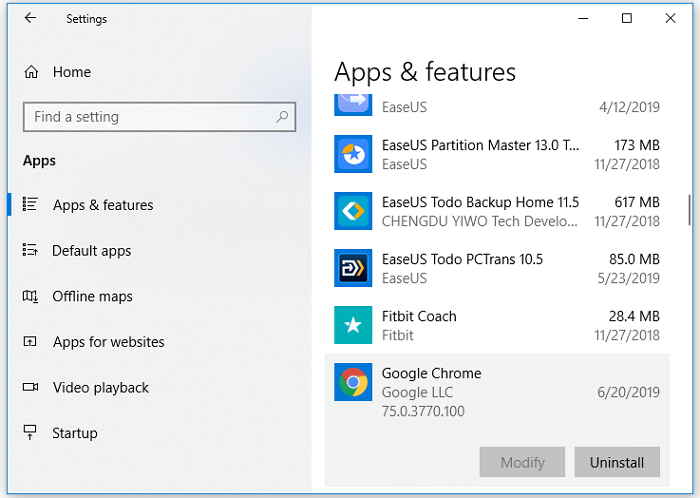
Step 2. Reinstall your program
- Go to "Windows Settings" > "Apps" > "Apps & features"
- Click the problematic program and choose "Uninstall"
- To resolve the issue, go to the Microsoft Store, download the application, and then install it again.
Step 3. Restart your computer.
Method 3. End nginx.exe Process
If you're experiencing issues with nginx.exe, a crucial Windows process, you may encounter the "The system cannot find the specified" error. This can occur when the Windows OS abnormally starts or restarts nginx.exe, leading to the error. To resolve this, you can try fixing the issue by restarting the Windows OS in safe mode, then checking and fixing the abnormal restart of nginx.exe.
Step 1. Right-click on your taskbar and choose "Task Manager".
Step 2. Under the Processes tab, select nginx.exe, and then choose "End Task"
Step 3. Download nginx.exe again and restart it.
Situation 4. Receive "The system cannot find the file specified" While Installing Drivers
If you receive the notification while installing a driver on your PC, you can try method 2 or method 3 in Situation 2 to get rid of the "The system cannot find the file specified" error.
Situation 5. Get the Error Message "The system cannot find the file specified" While Backing Up System
If your condition fits this situation, you have several options to try. In addition to trying method 3, you can also try two additional tips, which are detailed below.
Method 1. Install Windows updates
If you haven't updated Windows for a long time, a "The system cannot find the file specified" error is a sign that it's about time to install all pending updates. To do this, you need to follow the steps: 1. Go to the Start menu and click on Settings.
Step 1. Press "Windows + I" keys and select Update & Security.
Step 2. Click "Check for Updates" and wait.
Step 3. When the list of available updates is revealed, install all of them.
Step 4. Repeat the same procedure several times to ensure that all needed updates have been installed.
Step 5. Don't forget to restart the system to finish the installation of updates.
If you find files are missing after a Windows update, you can restore them using Qiling's free data recovery software. This tool allows you to recover lost files in Windows 10, 8, 7, and other versions, due to system upgrades, crashes, careless deletions, or virus attacks, in just three simple steps.
Method 2. Check Services Settings
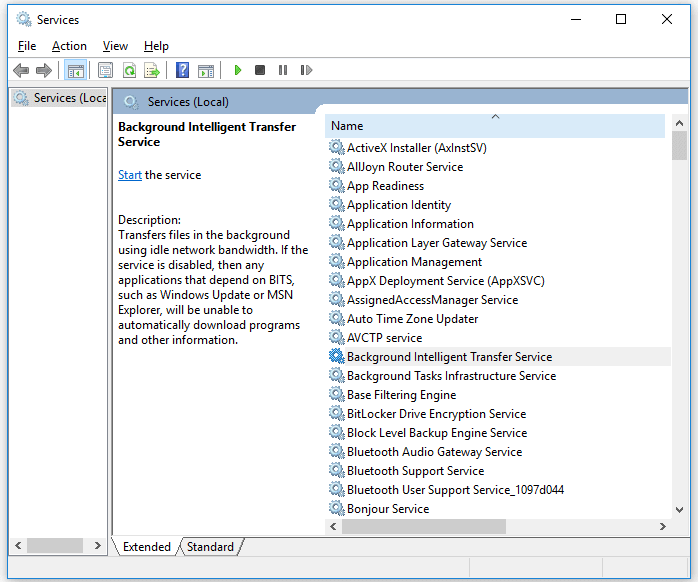
Step 1. Go to the Start menu and type services.
Step 2. To enable Background Intelligent Transfer Services, go to the "Background Intelligent Transfer Services" in the Services window, right-click it, and set the "Startup type" to "Automatic" or "Automatic (Delayed Start)". Then, click "Start" to start the service.
Step 3. Go back to find "Cryptographic Services" and "Windows Update", then set their "Startup type" to "Automatic", too.
Step 4. Don't forget to click "Start" to initiate the service and click "Apply" > "OK".
The Bottom Line
The error message "The system cannot find the file specified" can occur in various situations, making it challenging to provide a comprehensive solution in one article. However, we've identified four common scenarios where this issue often arises, and provided effective fixes for each case, hoping that one of these tips will successfully resolve the problem for you.
Related Articles
- Fix macOS Sierra 10.12.1 Update Stuck or Fail to Download Error
- How to Fix Windows Update Freezes Computer with 7 Solutions
- Short DST Failed! How to Fix Hard Disk DST Short Test Failed
- 5 Ways to Fix Hard Drive Read Speed Slow Error
- How to Find Autodesk Civil 3D Serial Number and Product Key
If you've lost your Autodesk Civil 3D serial number and product key, you can use various tools to find it. You can use software that can instantly locate the key and keep a record, making it the best option. Alternatively, you can try searching the registry entry on Windows, which can also help you find the product key. Using any of these methods, you can retrieve your serial number and product key. - How to Find Autodesk Survey (2021-2005) Product Key
Entering an incorrect product key will result in activation errors for that product. If you're looking for Autodesk 2022 Product Keys, this article provides information on that.