Fix Page_Fault_In_Nonpaged_Area Error
Page fault in nonpaged area errors have been a Windows issue since XP. They occur when Windows or a program tries to access memory that's being used by another software or reserved for another purpose, causing a Blue Screen of Death and a Windows error.
Windows 10 Page_Fault_In_Nonpaged_Area Error (Content)
The error syntax often indicates what went wrong. This issue typically occurs after making changes, such as installing new hardware or software, updating Windows or apps, or adding a new graphics card. To troubleshoot, try undoing your recent changes, such as removing RAM, deactivating an app's service, deleting it, or rolling back to an older version.
| Workable Solutions | Step-by-step Troubleshooting |
|---|---|
| 1. Troubleshoot the BSOD | Open the Settings app in Windows 10. Open Updates & Security > Troubleshoot...Full steps |
| 2. Troubleshoot the Hardware | Go to the Start menu and choose "Settings". Continue by clicking "Update & Security"...Full steps |
| 3. Take a Look at Your RAM | Remove the side panel and turn the computer off entirely. Remove the battery...Full steps |
| 4. Perform a Memory Diagnosis | Search for or press the Windows key + R on your keyboard to bring up the Run...Full steps |
| Other Effective Solutions | Repair Corrupted System Files > Update/Re-install Corrupted or Incompatible Drivers...Full steps |
What Is Page_Fault_In_Nonpaged_Area Error
The NONPAGED area in your computer's RAM is where the Windows Operating System (OS) is stored and executed. This area is swapped with the page file, causing Windows to encounter a PAGE FAULT IN NON PAGED AREA error when trying to read the data from RAM, resulting in a Blue Screen of Death.
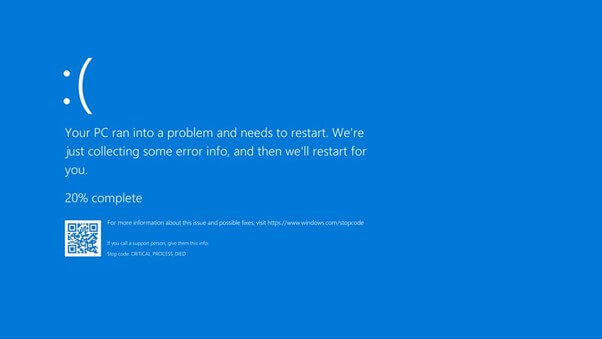
If your computer displays a blue screen with the stop code "PAGE FAULT IN NON PAGED AREA", it indicates that the system is under stress and an invalid system memory has been referenced, possibly due to a wrong memory address.
The system requires data stored in the RAM (RAM), but the operating system can't recognize it, resulting in a problem. When the system searches for data in the RAM's paging file, it displays this error as a false positive.
Sometimes, data that cannot be retrieved is shown as if it exists in a portion of RAM that was not paged out to the hard drive, but it's unclear if it can actually be accessed.
8 Fixes For PAGE_FAULT_IN_NONPAGED_AREA
Windows 10's catastrophic failures often stem from software bugs or broken drivers, but a Page Fault in Nonpaged Area crash is usually caused by a hardware issue, particularly with the computer's RAM. Windows' handling of virtual memory may also be to blame for the problem.
To resolve the Page_Fault_In_Nonpaged_Area blue screen of death, users will need to identify and address both hardware and software issues. Eight quick fixes can help resolve this problem, including identifying and removing faulty hardware, disabling unnecessary drivers, checking for malware, updating drivers, checking for overheating, running a full system scan, checking for corrupted system files, and running a memory test.
Fix 1. Troubleshoot the BSOD
A BSOD can occur even if you can still access the desktop, possibly due to outdated drivers or software updates, or a recent Windows, program, or device driver upgrade. Troubleshooting is a good first step to identify the issue.
Step 1. Open the Settings app in Windows 10.
Step 2. Open "Updates & Security > Troubleshoot > Additional Troubleshooters > Blue Screen".
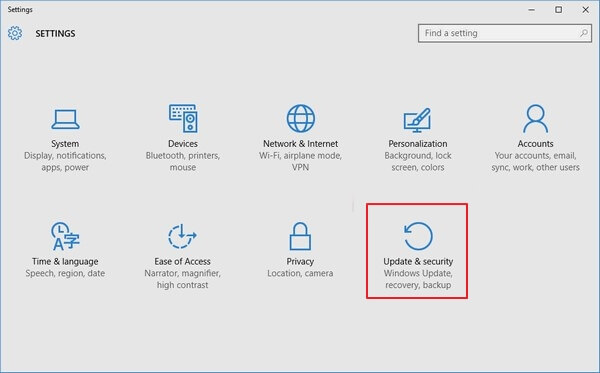
Step 3. Select "Run the Troubleshooter" in the enlarged Blue Screen area.
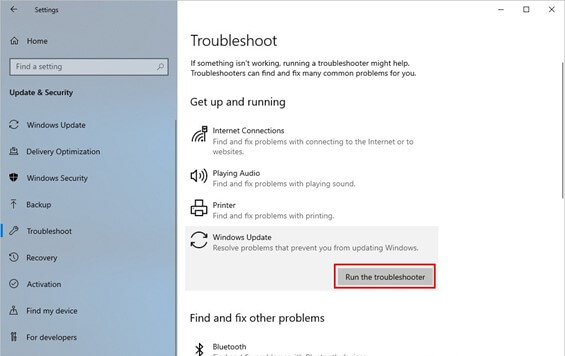
The UI will search the system for faults and resolve them without interfering with the Troubleshooter. When you encounter a Page Fault in Nonpaged Area issue on your computer, check the event viewer for details.
Fix 2. Troubleshoot the Hardware
Hardware problems can also cause page Fault in Nonpaged Area errors. To troubleshoot, run the Hardware Troubleshooter to check if your hardware is malfunctioning. To launch the troubleshooter, follow the instructions.
Step 1. Go to the Start menu and choose Settings.
Step 2. Continue by clicking "Update & Security" on the Settings screen.
Step 3. Click on "Hardware and Devices" in the "Troubleshoot" menu, then click "Troubleshoot" again.
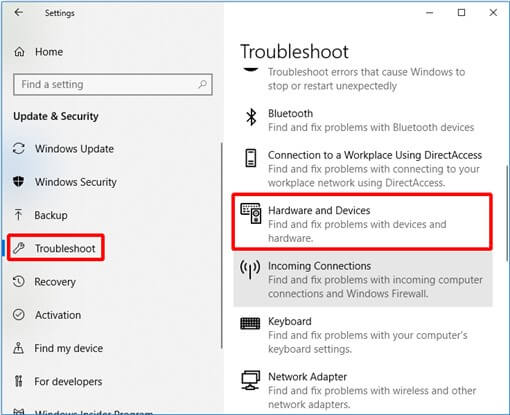
Step 4. Continue with the Troubleshooter by clicking on the "Run" button.
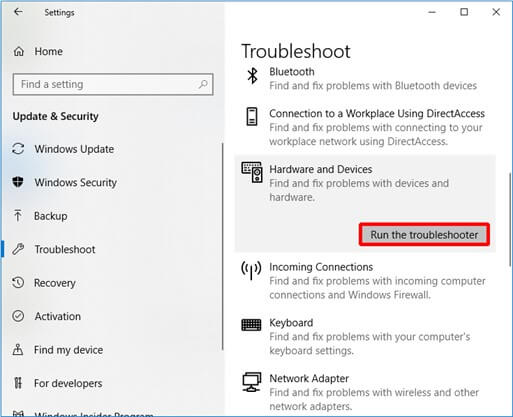
Step 5. After running a scan, the computer will identify any issues it finds. If there are any problems, the computer will notify you once the scan is complete, and you can take steps to address the issue.
Fix 3. Take a Look at Your RAM Stick(s)
The CPU's memory, specifically the RAM, is the key factor in this situation. It's essential to ensure that the RAM is properly secured within the CPU cabinet to prevent damage, as the RAM sticks can be prone to damage due to their protrusion from the motherboard. If a RAM stick is damaged, the operating system may not recognize it, but it will still be used to request data, potentially causing issues. To troubleshoot this problem, running a RAM test can help determine if the issue can be resolved.
Step 1. Remove the side panel and turn the computer off entirely.
Step 2. Remove the battery and disconnect any power wires from your device.
Step 3. To check for dust on the RAM chip, remove it from the motherboard and inspect it. If dust is present, clean it off. If the RAM chip is free of dust, consider replacing it with a new module if it's not functioning correctly.
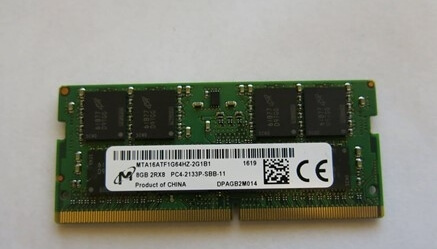
Step 4. To troubleshoot the PAGE FAULT IN NON PAGED AREA error, simply remove the RAM stick, wait for 10 seconds, and then reinsert it securely. Restart your computer to see if the issue persists.
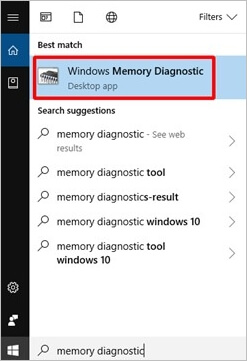
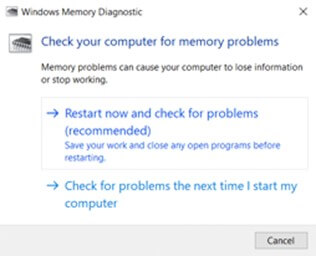
Fix 4. Perform a Memory Diagnosis
If your computer's RAM is corrupted, it may cause a blue screen of death. To troubleshoot, you can use the built-in Memory Diagnostic Tool to test your RAM and determine if it's the culprit behind the issue.
Step 1. To access the Run utility on your computer, press the Windows key + R on your keyboard. This will bring up a window where you can type in commands to perform various tasks.
Step 2. To run a memory diagnostic on Windows, search for "memory diagnostic" in the search box, select "Windows Memory Diagnostic" from the search results, and follow the prompts to run the diagnostic.
Step 3. Click on "Restart now" and "Check for Problem" to see if there are any issues using the Windows Memory Diagnostic program. This will check for any problems with your computer's RAM.
Fix 5. Repair Corrupted System Files
The Check Disk scan checks a specific hard disc partition, restores damaged system files, and identifies corruption. It allows you to check a specific hard disc partition, restore damaged system files, and identify corruption. The SFC (System File Checker) examines all system files, replacing corrupt ones with newer versions to prevent system disruption.
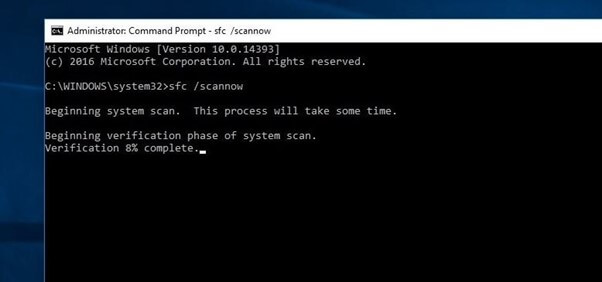
Step 1. To run Command Prompt as System Administrator, right-click on a shortcut to Command Prompt and select "Run as Administrator".
Step 2. To run System File Checker (SFC), enter the command sfc /scannow in the command prompt window and press Enter.
Fix 6. Update/Re-install Corrupted or Incompatible Drivers
If your driver is faulty, outdated, or incompatible with your computer's operating system, you may get the PAGE FAULT IN NON PAGED AREA issue, which can be resolved by updating the driver or uninstalling the device.
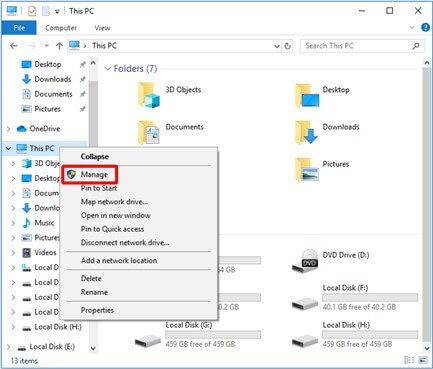
Step 1. Open File Explorer and select "This PC" from the shortcut menu that appears.
Step 2. To proceed, choose Manage.
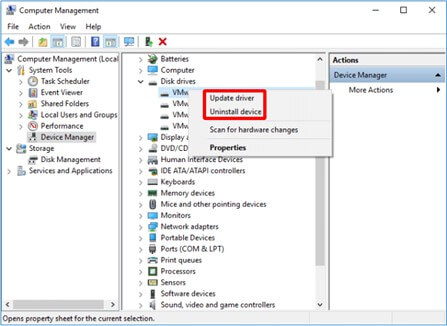
Step 3. Select Device Manager from the System Tools menu to proceed.
Step 4. When you right-click the disc drive under Disk Drives, you can choose to update or uninstall the driver.
Step 5. If you're experiencing issues with your computer, try restarting it to see if the problem is resolved. This simple step can often resolve technical issues and get your computer running smoothly again.
Fix 7. Download and Install a Windows OS Update
Sometimes low-Installing the latest Windows updates, which include numerous bug fixes and security upgrades, should resolve the issue of level applications operating in the Windows kernel generating BSODs.
Step 1. Pressing Windows + I on your keyboard allows you to access the Settings menu, where you can make various adjustments and changes to your computer's settings.
Step 2. To access the Windows Update page, select the "Updates & Security" option from the left-hand menu. This will redirect you to the Windows Update page.
Step 3. To see whether there are any available updates, you can select the option to "Check for updates".
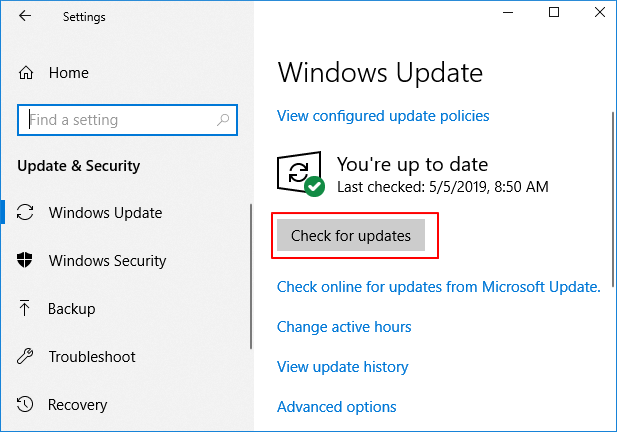
Step 4. If there are any software updates available, click "Download and Install" to install them.
Step 5. Restart your computer to complete the installation of these updates.
Fix 8. Reset Your Windows 10 PC
If using the procedures above doesn't resolve the PAGE FAULT IN NON PAGED AREA issue, try restarting your Windows 10 PC as a final option.
Step 1. Go to the Settings page and choose Update & Security.
Step 2. On the Recovery page, click Get Started on the right and follow the on-screen instructions.
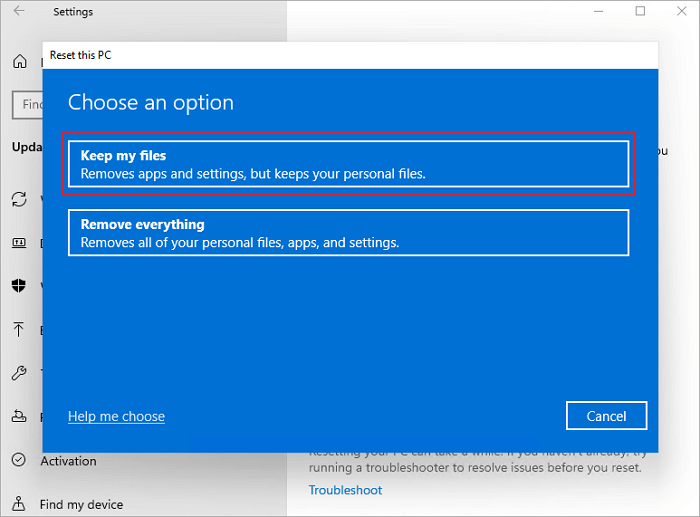
Step 3.When restarting your computer, you have the option to keep your files, remove everything, or choose the third option, which is not explicitly stated in the provided text. The third option is likely a default or a generic choice that allows the user to select a different option, such as restoring a previous version of Windows or reinstalling Windows with some data preserved.
Step 4. Follow the wizard's instructions to go on to the next step.
How to Recover Data After in Windows 11/10/8/7
Re-installing Windows can be a viable solution for computers experiencing the Page Fault in Nonpaged Area Problem, also known as the blue death screen error, as it can give the machine a fresh start and improve performance.
Deep Data Recovery Free makes it easy to recover data that has been lost or destroyed on Windows 11/10/8/7 and other operating systems, allowing users to quickly recover mistakenly deleted files, folders, or directories.
You can download this data recovery software for free and use it to easily restore lost Windows files.
Step 1.Launch Qiling file recovery software on your Windows computer, select the desired file types, and click "Next" to initiate the file recovery process.

Step 2. Click on the location where you lost the files, and then click the "Scan" button. This will initiate a search for the files in that location.

Step 3. The software will immediately start scanning the drive, displaying deleted files soon. If you find the files you need during the scan, you can stop it. To quickly locate the target file, use the file format filter.

Step 4. To recover files, select the desired files such as Word, Excel, PDF, photos, videos, or emails, and click the "Recover" button. You can then choose a different location to save the recovered files.
You can use this method to recover RAW file systems that your computer's operating system doesn't recognize. The application's pre-recovery preview allows you to quickly search for lost files or scan storage sector-by-sector, depending on the situation, and check the data before restoring it to its original state.
Part 4. Conclusion
The Blue Screen of Death, specifically the 'Page_Fault_In_Nonpaged_Area' error, is caused by a faulty memory or malfunctioning hardware, often due to mismatched drivers or damaged hard disc partitions, and can be resolved using various methods such as checking for hardware issues, updating drivers, and performing a disk check.
Even if you have to restart or reinstall your system, you can still recover your data with Qiling's free data recovery software, which is both safe and effective.
Related Articles
- How to Use CMD to Remove Virus from Any Drive in Windows 10/11
- [Solved] 2018-11 Update For Windows 10 Version 1803 For X64-Based Systems (Kb4023057) – Error 0x80070643
- Getting Word Runtime Error 53? Here Is How to Fix Run-Time Error
- Recover Data from Formatted Transcend External Hard Disk/SD Card
- FAT32 Structure Information - MBR, FAT32 Boot Sector Introduction
This article provides detail introduction of FAT 32 file system structure information, FAT 32 boot sector, FAT 32 partition table, FAT 32 MBR. If you lost data by accident, free download Deep Data Recovery to undelete files and recover lost data, unformat disk, restore formatted or deleted hard drives, partitions under FAT 32 file system. - How to Find Adobe Premiere Product Key? 8 Full Solutions
To install, reinstall, or activate Adobe Premiere or other versions, you need a product key. If you've lost or can't find your product key, follow these easy steps to locate it.