System_Thread_Exception_Not_Handled on Windows 10/11, Fixed Now
How to fix system_thread_exception_not_handled issue in 6 ways:
| Workable Solutions | Step-by-step Troubleshooting |
|---|---|
| Fix 1. Boot Into Safe Mode | Press the Shift key while clicking on the "Restart" option to enter the Windows Recovery Environment. This will allow you to access various troubleshooting and repair tools, including the System Restore feature.Full steps |
| Fix 2. Uninstall Incompatible Programs | Click on the start menu and go to "Settings". The above screen will appear. Go into "Apps"...Full steps |
| Fix 3. Uninstall or Upgrade Faulty Driver | Click on the Start menu and search for the "Device Manager". Once it appears, click on it...Full steps |
| Fix 4. Repair System Files | Launch the command prompt through the Start menu and run it as an administrator...Full steps |
| Fix 5. Perform Startup Repair | Click on "Troubleshoot" and "Advanced options". Click on "Startup Repair"...Full steps |
| Fix 6. Perform System Restore | Go to "Settings" and click on "Updates & Security". Now, click on the "Recovery" option...Full steps |
Windows users often encounter the error "system_thread_exception_not_handled" due to outdated drivers, which can affect users of Windows 10 and 11. This error is typically associated with the nvidia or ati graphics drivers, specifically nviddmkm.sys or atikmpag.sys.
The "system_thread_exception_not_handled Windows 10" error can occur suddenly on your computer or laptop screen, even after turning it on. This error can be frustrating, especially when it's unexpected, and some users refer to it as a "death screen" due to the assumption that their Windows OS has crashed.
To fix the system_thread_exception_not_handled nvlddmkm.sys error on Windows 10/11, there are some quick fixes available. In this article, we will discuss how to resolve this issue.
What Does System Thread Exception Not Handled Mean
This error indicates that an exception was thrown by the system thread, but the error handler was unable to catch and handle it.
This error is often caused by outdated or damaged device drivers, which can lead to system difficulties.

This error may be caused by a faulty system file, which is essential for Windows to function correctly. If system files become damaged, it can lead to numerous problems, such as issues with the Registry or Winsock files. Fortunately, this error can be fixed using various methods.
System Thread Exception Not Handled Error Causes
This system error can occur due to various reasons, including corrupt files, incompatible background programs, and malfunctioning device drivers.
Corrupt Files
The blue death screen can be caused by corrupt system files, which can ruin your experience. To fix this issue, it's best to address the corrupt files, and this approach can help get rid of the blue death screen.
Issue with a Running Background Program
The "system_thread_exception_not_handled" error occurs when a program running in the background, responsible for tasks like graphics and sound, experiences a problem.
Malfunctioning Device Driver
The "system_thread_exception_not_handled" error is usually caused by a malfunctioning device driver, which is a program that enables communication between the computer and hardware devices. When there's an issue with a device driver, it can lead to a system thread failure, resulting in the error message.
Solutions to Solving System Thread Exception Not Handled in Windows 10/11
To fix the "system_thread_exception_not_handled Windows 10" error, you can try any of the following 6 solutions. Run the System File Checker (SFC) to scan and replace corrupted system files, update your Windows 10 to the latest version, run a full disk cleanup, disable any recently installed drivers or software that may be causing the error, run a full system restore to a point before the error occurred, or perform a System Restore to a point when your system was working fine. These fixes can be implemented to get rid of this error.
Fix 1. Boot Into Safe Mode
To resolve the error, you can try booting your PC in Safe Mode, which allows you to identify potential causes of unexpected Windows errors. This mode lets you troubleshoot and isolate issues that may be causing the error. By booting in Safe Mode, you can determine if the problem is hardware or software related, and take corrective action accordingly.
To fix the "system_thread_exception_not_handled Windows 10" error, start by booting your system into safe mode. This can be done by restarting your computer and pressing the F8 key before the Windows logo appears. From there, you can select Safe Mode with Networking to boot into a minimal version of Windows where only essential drivers and services are loaded. This can help you troubleshoot and resolve the error.
Step 1. Click on "Start". While pressing the Shift button on your keyboard, click on "Restart" from the Start menu.
Step 2. After initiating the Windows RE (recovery environment), a screen will appear prompting you to click on "Advanced options".
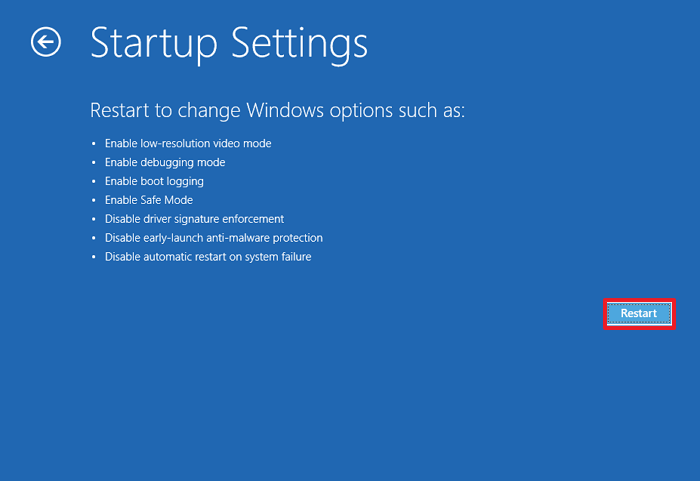
Step 3. To view the available booting options, click on the "Startup Settings".
Step 4. From here, click on "Restart".
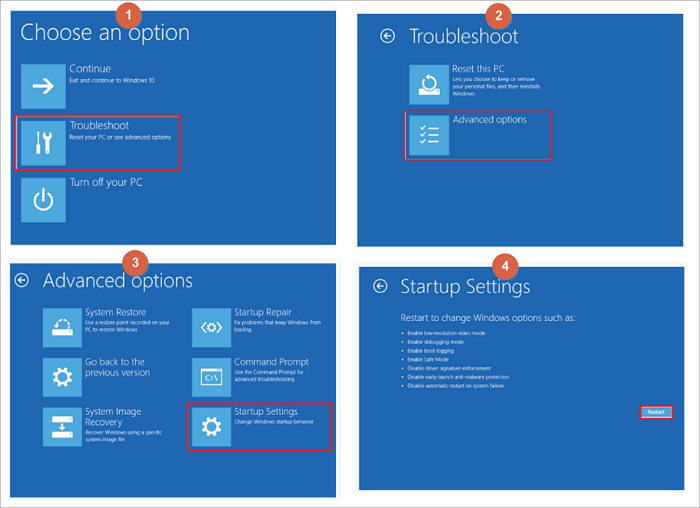
Step 5. After Windows restarts, you'll be given options to boot the system. To boot in safe mode, click on option 4, "Enable safe mode".
To boot your system in safe mode, follow this step, as some fixes require Windows to be enabled in Safe Mode. This is a necessary step for some of the fixes to the error you're trying to resolve.
Fix 2. Uninstall Incompatible Programs
The system thread exception error can occur due to an incompatible program installed on Windows 10/11, often without the user's knowledge of which specific program is causing the issue.
To resolve the issue, try uninstalling the recently installed software or application that's likely causing the problem. Follow these steps to uninstall the specific program that's creating the issue. This should help resolve the problem.
Step 1. To access the settings, click on the start menu and go to "Settings", then navigate to "Apps".
Step 2. To uninstall a recently installed program, select it from the list of installed apps and click on "Uninstall".
To uninstall a recently installed program on Windows 10/11, follow these steps.
Fix 3. Uninstall or Upgrade Faulty Driver
The system_thread_exception_not_handled error in Windows 10/11 can also be caused by recently updated or faulty drivers, similar to the issue with recently installed programs. This highlights the importance of ensuring that drivers are up-to-date and functioning correctly to prevent system errors.
To resolve the problem, you need to remove or update the problematic driver.
Step 1. To open the Device Manager, click on the Start menu and search for "Device Manager", then click on it when it appears.
Step 2. The Device Manager in Windows 10/11 displays all installed drivers, and you need to identify the faulty or recently installed driver from this list.
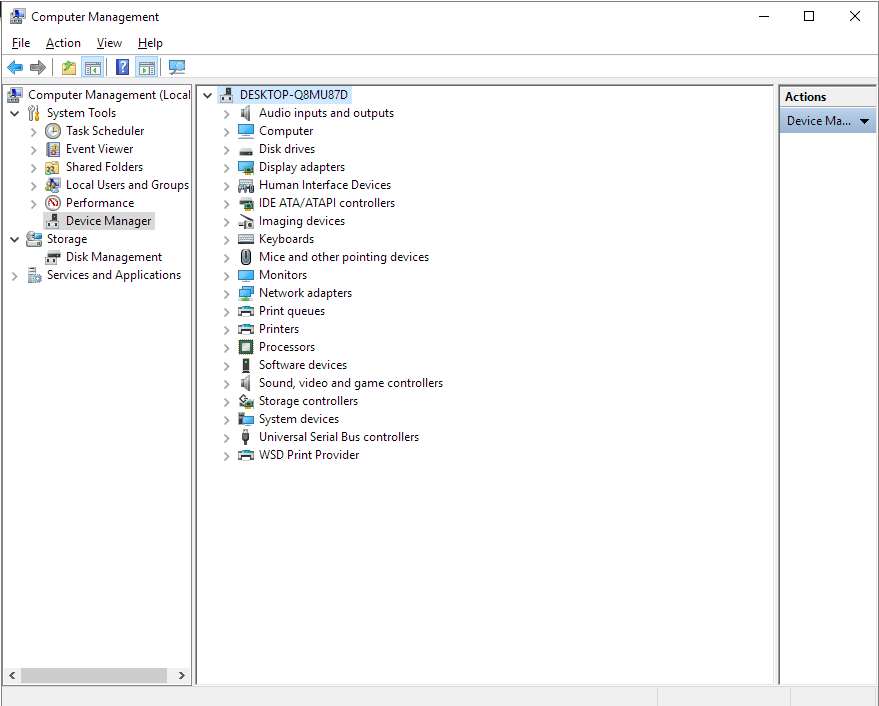
Step 3. To fix the faulty driver, right-click on it and select "Uninstall" from the options that appear. This will remove the problematic driver and resolve the issue.
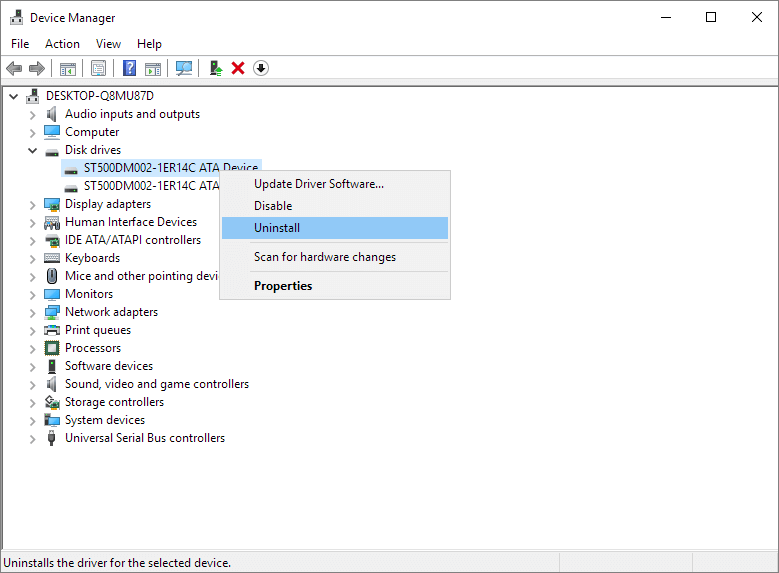
Step 4. After uninstalling the driver, restart your computer for the changes to take effect.
Fix 4. Check and Repair Problematic System Files
Another reason for system crashes and errors, such as the one you're experiencing, could be due to problematic system files. This can occur when a faulty program or driver causes damage to these files, leading to system instability. To resolve this issue, it's essential to repair these faulty files, which can help restore system stability and prevent future crashes.
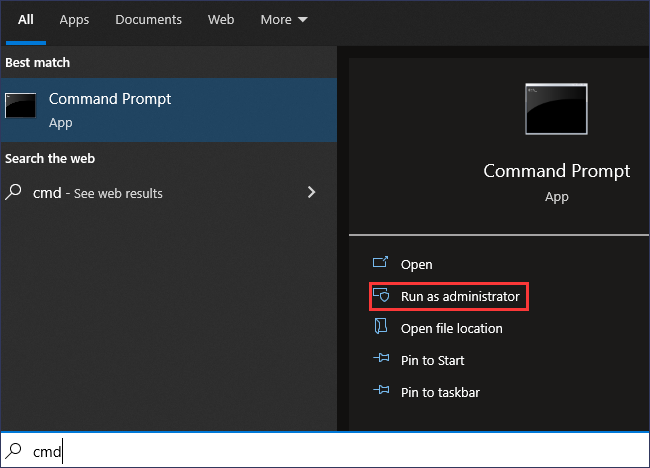
Step 1. To launch the Command Prompt as an administrator, follow these steps: Launch the Start menu, click on "All apps," scroll down and find "Command Prompt," and select it. Right-click on the Command Prompt icon and choose "More" from the context menu. From the "More" menu, select "Run as administrator.
Step 2. Now type DISM/ Online /Cleanup Image /ScanHealth. Press the enter button to run this command.
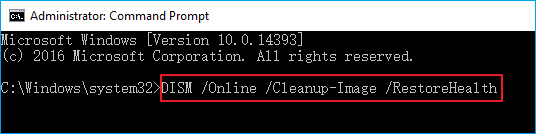
Step 3. Once you have entered the command, Windows will automatically repair corrupted files, and you'll need to wait for the process to complete.
Fix 5. Perform Startup Repair
Performing a startup repair is another way to solve the common error. This method is easy and will repair broken, old, and malfunctioning files in your system. To do this, follow the steps to perform a startup repair, which will help fix the issue.
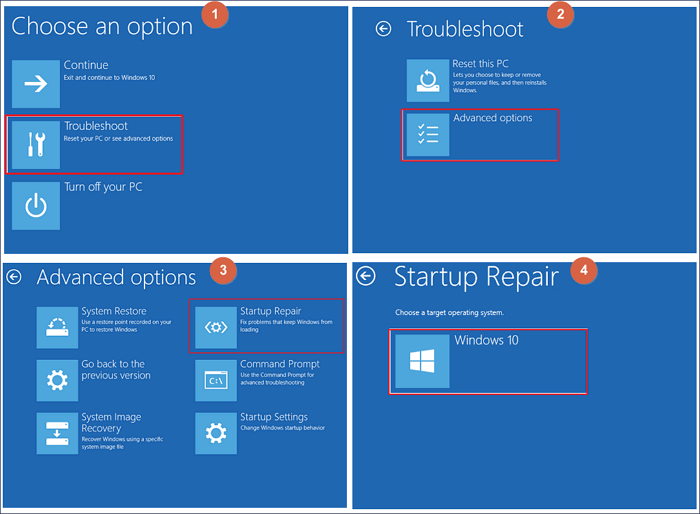
Step 1. To perform a startup repair on Windows, you need to access the Advanced Startup options. This can be done by pressing F11 as soon as your system boots up. From there, click on "Troubleshoot" to continue the process.
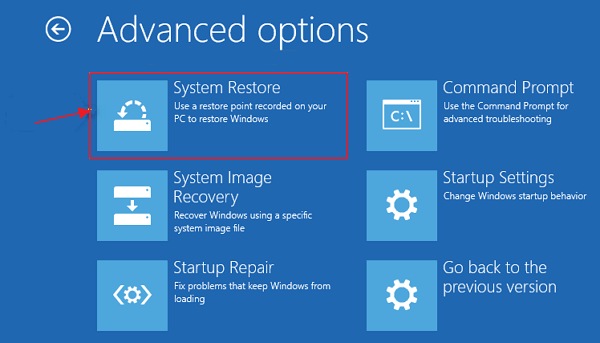
Step 2. When you access the Advanced Startup options, click on "Advanced options".
Step 3. Click on "Startup Repair" and enter your account name and password to initiate the process. The Windows system will then start repairing corrupted files, making it easier for you to resolve the issue.
Fix 6. Perform System Restore
If none of the above solutions work, you can perform a System Restore to return your system to its original settings. Back up your important files and data, then go to Settings > Update & Security > Recovery, and select "Get started" under the "Reset this PC" option. Choose whether you want to keep your files or remove everything, and then follow the prompts to complete the process. This will erase all installed applications, settings, and user accounts, and return your device to its original factory settings.
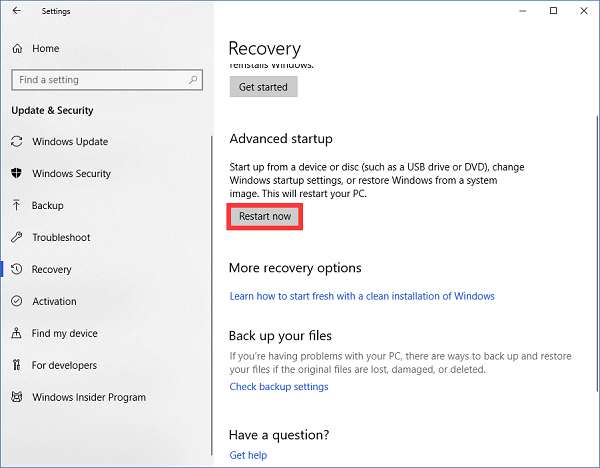
Step 1. To update Windows 10, go to "Settings" and click on "Updates & Security", then click on the "Recovery" option.
Step 2. You will be directed to the Advanced startup of Windows. Click "Restart now."
Step 3. Now, click on "System Restore". Again, the windows will ask you to choose the account name and its password. Just enter that. The system will start to restore.
How to Restore Data from a Computer That Cannot Boot Windows 10/11
When a BSOD system_thread_exception_not_handled problem error or other boot issues occur, you won't be able to access your system's files and data. Reliable data recovery software like Deep Data Recovery can help you solve this issue and recover your important files and data.
This data recovery program allows for easy recovery of over 100 file types from various storage devices, including PC/laptop hard drives, NAS devices, and even Linux systems, with the added feature of recovering data from a non-booting PC/laptop hard drive in a WinPE environment.
To restore files efficiently, download a 100% safe and secure data recovery software.
Step 1. Create a bootable disk
To create a bootable USB, start by preparing an empty USB drive. If the USB contains important data, transfer it to another device to avoid losing it. Once the USB is empty, you can proceed with creating a bootable disk using Deep Data Recovery WinPE Edition. This tool will assist you in setting up the USB as a bootable drive.
Connect a USB drive to your PC and open Deep Data Recovery WinPE Edition. Select the USB drive and click "Create" to create a bootable disk.
Step 2. Boot from the bootable USB
To fix a computer that won't boot, connect a bootable disk to the non-booting computer and change the boot sequence in the BIOS settings. This often resolves the issue when the computer is restarted and the BIOS settings are accessed by pressing F2 at the same time.
To boot the PC from a device other than the hard drive, press F10 to save and exit the BIOS settings. This allows the PC to boot from a removable device, such as a bootable USB drive, or a CD/DVD drive.

Step 3. Recover data from a hard drive that won't boot
When you boot from a USB drive, you can run Deep Data Recovery from the WinPE bootable disk, select the drive you want to scan to find all your lost files.
Click "Scan" to start the scanning process.

After scanning, you can preview all recoverable files, select the targeted files, and click the "Recover" button to restore your files. To avoid data overwriting, it's recommended to save all recovered data to another place. This will ensure that your recovered files are safe and intact.

Conclusion
With more than 5 fixes, you can now resolve the system_thread_exception_not_handled nvlddmkm.sys error on Windows 10/11. This error can occur due to various reasons. If the above-mentioned methods don't work, Deep Data Recovery is available to help recover your data.
Deep Data Recovery is a tool that can help you recover your data files quickly and easily, with a clean and straightforward user interface.
Related Articles
- What Happens to the Data on an SSD When the Power Is Lost?
- How to Get Your Account Back on TikTok
- PhotoRec Review: Pros, Cons, Alternatives
- [Solved] Disk Unknown Not Initialized in Windows 10/8/7
- Does Formatting Laptop Make It Faster? HereAre The Full Answers!
Formatting your laptop can potentially make it faster by removing unnecessary files, freeing up disk space, and updating the operating system. However, the actual speed improvement depends on various factors, such as the laptop's hardware, the type of files stored, and the formatting method used. Additionally, formatting your laptop will erase all data, so it's essential to back up important files before proceeding. Other computer formatting-related tips include regularly cleaning temporary files, disabling unnecessary startup programs, and updating the operating system to the latest version. - Does SSD Need the Power to Retain Data? Answers Are Here!
You plan to keep all backups on an SSD drive, but do you know how long an SSD can hold data? SSDs don't need power to retain data, but they have drawbacks, such as being fast but built differently from HDDs. If you have data loss problems, consider Qiling data recovery software.