How to Stop Windows 10 Deleting Files Automatically
If you're experiencing issues with deleted files on Windows 10, this page offers helpful solutions to recover lost files and prevent Windows 10 from deleting files without asking.
| Workable Solutions | Step-by-step Troubleshooting |
|---|---|
| Fix 1. Stop Windows Defender | Open Windows Defender > click Virus & Threat protection > click Exclusions...Full steps |
| Fix 2. Turn off Storage Sense | Go to Settings > System > Storage > toggle Storage Sense to "Off"...Full steps |
| Fix 3. Uninstall faulty updates | Open Control Panel > click Programs and Features > click View Installed Updates...Full steps |
Q: Windows Defender Keeps Deleting Files
You're experiencing an issue where Windows Defender is deleting files with .exe extension, which you want to keep, due to false positives. You can try adding the program's publisher to the list of allowed publishers in Windows Defender, or disabling the Real-Time Protection feature for specific files or folders, or even turning off Windows Defender altogether. You can also try to exclude the specific file or folder from being scanned by Windows Defender. If the issue persists, you may want to consider reinstalling the program or seeking further assistance from a Windows support specialist. Would you like me to elaborate on any of these steps?
Windows Defender and the new Storage Sense feature in Windows 10 may be deleting files, such as downloaded videos, documents, and .exe programs, without asking for confirmation. This can be frustrating, but you can recover deleted files using a professional data recovery tool. To prevent this issue in the future, you can use the methods demonstrated below to stop Windows from automatically deleting files.
- Notice:
- If you've lost important files due to Windows 10, first recover them from backup or other means if possible. Once your files are safe, you can proceed to implement measures to prevent future file deletions without notification. This can be done by following specific methods to adjust Windows 10 settings and ensure you receive warnings before any files are deleted.
Part 1. Restore Files Deleted by Windows 10
If your important files got deleted by Windows 10 and you can't get them back, don't worry. Deep Data Recovery software can recover your lost files in just three steps, restoring files from the recycle bin, HDD, SSD, USB, external hard drive, and more.
To restore the removed files deleted by Windows 10, download and install the software on your PC, then follow the next steps.
Step 1.Launch Deep Data Recovery in Windows 11/10/8/7. Select the desired file types and click "Next" to initiate the recovery process.

Step 2. Choose the place where you lost data. Then, click "Scan".

Step 3. After scanning, use the file format filter to locate the desired files, and then click the "Preview" button or double-click a file to view its content.

Step 4. To recover lost data, select the file you want to recover and click the checkbox next to it. Then, click the "Recover" button to save the file to a safe location.
Part 2. Fix Windows 10 Automatically Delete Files Error
If your Windows 10 system has been deleting your files, you can try to resolve the issue by following the solutions provided to prevent the operating system from deleting your files in the future.
Method 1. Stop Windows Defender from Deleting Files Automatically
1. Open "Windows Defender" > Click on "Virus & threat protection".
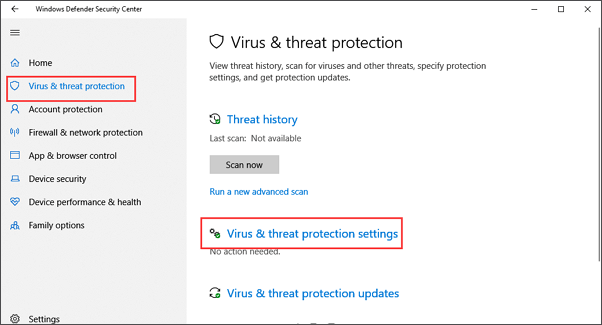
2. Scroll down and click "Virus & threat protection" settings.
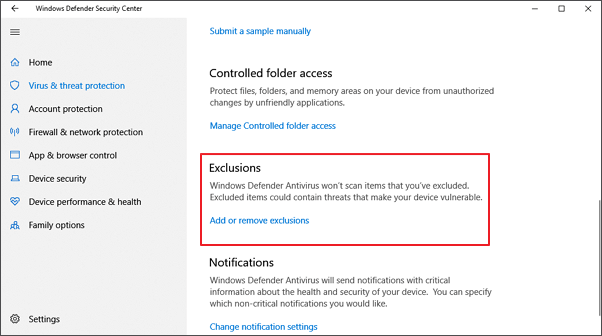
3. Scroll down to "Exclusions" and click "Add or remove exclusions".
4. To add an exclusion to Windows Defender, click on the plus icon next to Exclusions and select the type of item you want to exclude (File, Folder, File Type, or Process). Then, specify the exact files, folders, or file types that you want to be left alone by Windows Defender.
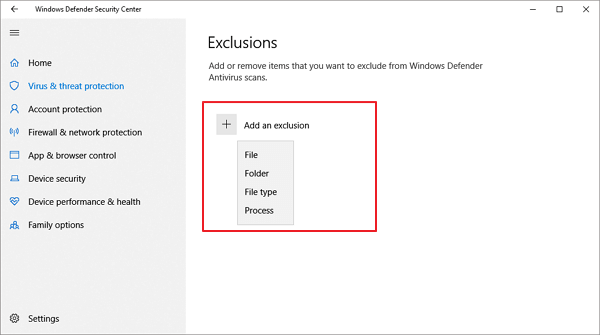
5. To prevent Windows Defender from removing .dll and .exe files, go to File Types, add the .dll and .exe file extensions, and they will be excluded from deletion.
Method 2. Turn off Storage Sense to Stop Windows 10 Deleting Files Automatically
Storage Sense in Windows 10 is a feature that automatically deletes unused files when the computer is low on disk space, freeing up space by deleting files older than 30 or 60 days from the Recycle Bin or temporary files, and also deleting older files in the Downloads folder.
To prevent Windows 10 from automatically deleting files you want to keep, you can change the default settings of Storage Sense to prevent it from deleting files on its own.
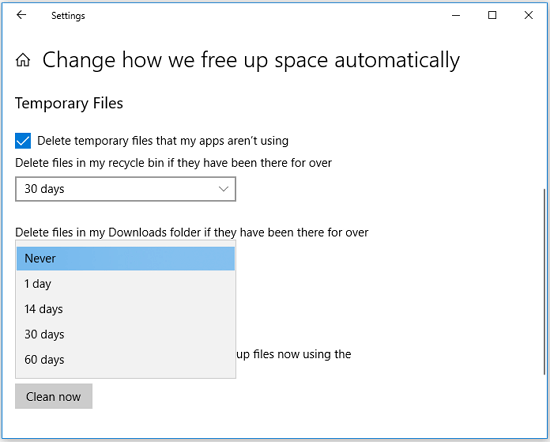
Step 1. Open the "Settings" app. Click the "System" > "Storage". You can flip the Storage Sense switch to "Off".
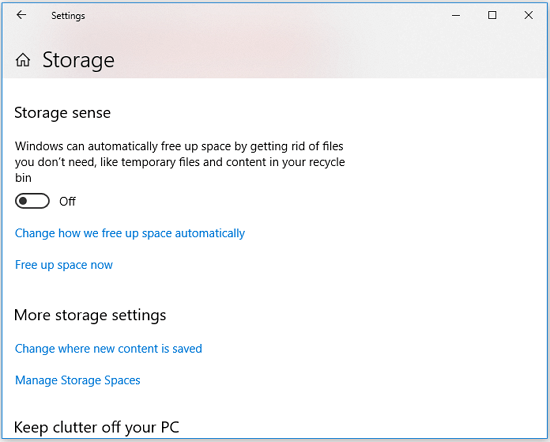
Step 2. If you don't want to completely disable the feature, you can reconfigure Storage Sense by clicking on "Change how we free up space automatically".
Step 3. To prevent files from being automatically deleted from your Recycle Bin and Downloads folder, click the box under "Delete files in my recycle bin if they have been there for over" and select "Never". Similarly, click the box under "Delete files in my Downloads folder if they have been there for over" and choose "Never".
Method 3. Uninstall Faulty Updates that Delete Files on Windows 10
Sometimes, newly installed Windows systems can remove or delete files without permission, often due to incompatible or faulty Windows 10 updates. To resolve this issue, the most straightforward solution is to uninstall the faulty updates that are causing the problem. This should help restore your files and prevent further deletions.
To uninstall a faulty update, first, go to the Start menu and select the Settings app. Then, click on the "Update & Security" option.
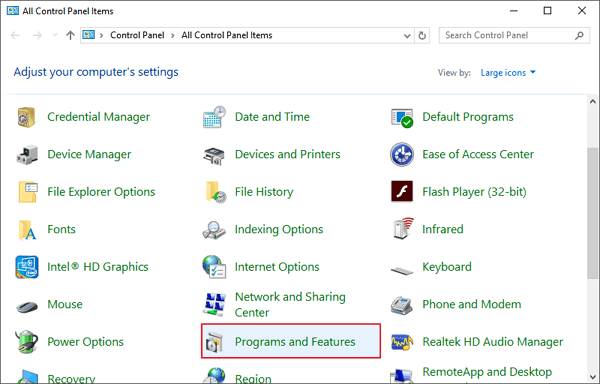
Step 1. Press Windows + X keys and select "Control Panel".

Step 2. Click "Programs and Features" and select "View Installed Updates".
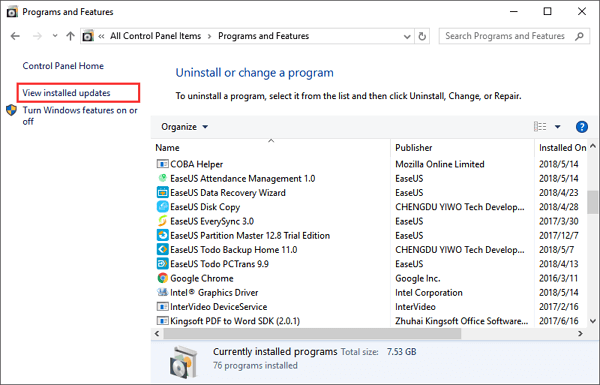
Step 3. Click the "Installed On" column header to sort the updates by dates.
Step 4. Locate and right-click on the large-sized, major updates that you've recently downloaded, and select "Uninstall".
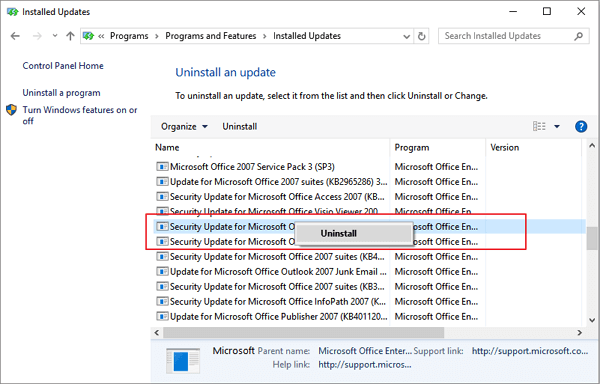
Step 5. When the uninstall process completes, reboot your PC.
PS: To install the latest Windows 10 update, refer to Microsoft's official website for the Windows 10 ISO download and follow the installation process on your PC.
Related Articles
- [Fixed] Office 365/2016/2013 Won't Open with 'Stopped Working' Error in Windows 10
- Computer Freezes When Playing Games in Windows 10
- Fix WD External Hard Drive Not Showing Up/Recognized Error [2022 Tutorial]
- Fix Deleting Files Does Not Free Up Space Error in Windows 10/8/7
- Bitlocker Encryption: The Guard of Your Data [All You Need to Know]
If you're concerned about data security threats or want to safeguard your private data, Bitlocker Encryption is a reliable solution. It ensures that your data remains protected, and you can learn more about its benefits by reading on. - What Is Bootrec.exe? Everything You Need to Know About This Tool
Utility tools like Bootrec.exe are designed to enhance user functionality on Windows, particularly in troubleshooting startup errors. Bootrec.exe is a built-in utility in Windows that allows users to resolve startup issues on Windows 10, making it a useful tool for users who encounter problems booting their computer. This article provides an overview of Bootrec.exe and related information.