5 Ways | How to Fix Data Error Cyclic Redundancy Check
To fix the Data Error Cyclic Redundancy Check issue on an external hard drive, USB, SD card, or HDD/SSD in Windows, follow these steps: Run the built-in Check Disk (chkdsk) utility to scan and fix errors, disable the floppy disk emulation, and check for bad sectors. If the issue persists, try running the command prompt as an administrator and use the chkdsk utility with the /f and /r options to force a scan and repair any errors.
Learn what the "Data error (cyclic redundancy check)" error is and how to fix it on your device in 5 reliable ways. This page will guide you through the process of resolving data CRC errors.
| Workable Solutions | Step-by-step Troubleshooting |
|---|---|
| Fix 1. Fix Cyclic Redundancy Check Data Error via CHKDSK | CHKDSK can scan and repair file system corruption and bad sectors that cause the CRC error...Full steps |
| Fix 2. Fix CRC Data Error using Disk Check | Disk Check utility can also fix file system errors. Open File Explorer, find the inaccessible hard drive...Full steps |
| Fix 3. Remove CRC Error with System File Checker | System File Checker works to repair corrupted system files. Press Windows + R keys, type cmd...Full steps |
| Fix 4. Format the Inaccessible Device | If your device became RAW with a CRC device error, try formatting the hard drive to troubleshoot...Full steps |
| Fix 5. Look for Manual Repair | If the Cyclic Redundancy Check error can't be solved by using the disk repair tool. Use a manual repair...Full steps |
Overview: What Is Data Error Cyclic Redundancy Check (CRC)
# Definition: A Data Error Cyclic Redundancy Check, or CRC error, indicates that the operating system has found a drive with bad sectors or an intermittent problem on your storage devices, according to Microsoft.
# Symptoms: With Cyclic Redundancy Check error, you'll receive pop-up error messages that appear on your screen, indicating a data transmission error that occurred during the process.
- 1. "Drive is not accessible. Data error (cyclic redundancy check)."
- 2. "Virtual Disk Manager. Data error (cyclic redundancy check)."
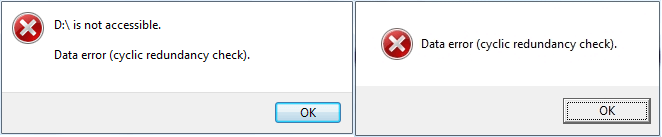
# Result: Storage devices that contain the CRC error will become inaccessible, unopenable, RAW, and not initialized due to corrupted data.
Data recovery experts at Qiling recommend recovering data first, as some fixes may cause file loss, and then follow their steps to remove the CRC error on your own.
Part 1. Recover Files from Data Error Cyclic Redundancy Check Device
Deep Data Recovery is a reliable hard drive recovery software that enables you to directly recover files from a Cyclic Redundancy Check error, thanks to its powerful data recovery features.
Deep Data Recovery
- Recover lost files from inaccessible cyclic redundancy check devices.
- Recover files from recycle bin, SD card, internal/external HDD/SSD.
- Recover all types of files, like images, documents, videos, etc.
- Complete scan devices can find all hidden files on both Windows and Mac operating systems.
- Easy to operate, protect your privacy.
Here are the 3 steps to restore your data from the device with Cyclic Redundancy Check error in one paragraph:
Step 1. Select file types and click "Next" to start
Launch Deep Data Recovery, select the desired file types, and click "Next" to initiate the recovery process.

Step 2. Scan the hard drive partition
Select the drive on your hard disk where you lost or deleted files, click "Scan" and let the software scan for all lost data and files on the selected drive.

Step 3. Check the results
After the scan is complete, you can apply the filter feature or click the search files or folders option to find the lost files on the hard drive.

Step 4. Restore lost hard drive data
Select the files you want to recover and click "Recover" to save them to another location.
RememberTo save the recovered files from the device with a CRC error, you can copy them to an external hard drive, a cloud storage service like Google Drive or Dropbox, or a USB drive. This will ensure the files are safely stored in a separate location, away from the problematic device, and can be easily accessed and managed.
Part 2. How to Fix Cyclic Redundancy Check Data Error - 5 Ways
Here we collected 5 practical methods that can fully help you fix the "Data error (cyclic redundancy check)" issue and make your storage devices function normally again.
Fix 1. Fix Cyclic Redundancy Check Data Error via CHKDSK
The CHKDSK utility in Windows scans and repairs file system corruption and bad sectors that may be causing the cyclic redundancy check data error on your device.
- Warning
- Running chkdsk can hopefully fix the cyclic redundancy check error, however, it can also result in total data loss. So, perform data recovery in advance, and then continue with the CMD method.
Step 1. Press Windows + S keys, type cmd in the Search box.
Step 2. Right-click Command Prompt, and select "Run as Administrator".
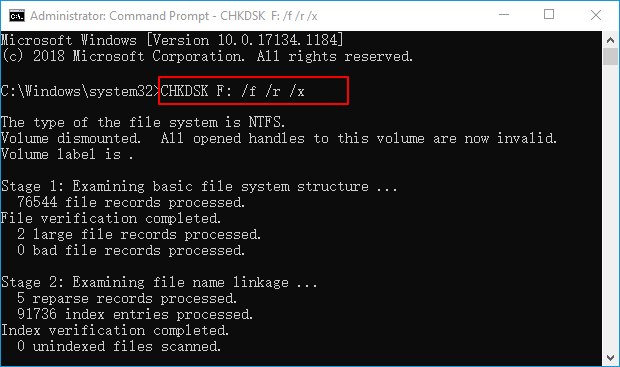
Step 3. To run the Check Disk utility on the F: drive with the fix option, open Diskpart and type "chkdsk F: /f" and press Enter. If you want to perform a thorough scan and extract any recoverable data, type "chkdsk F: /f /r /x" and press Enter.
Replace 'F:' with the drive letter of your hard drive with the Cyclic Redundancy Check error.
Step 4. When the scan completes, type 'exit' and hit Enter to close the window.
After this, you can restart the computer and see if your device is accessible and workable now.
Fix 2. Fix CRC Data Error Using Disk Check
Here are the steps to fix a Cyclic Redundancy Check (CRC) error on your drive using the Disk Check utility in Windows:
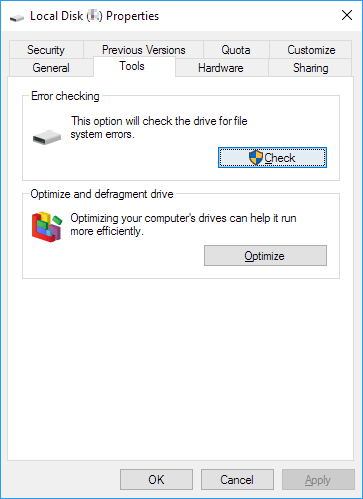
Step 1. On Windows File Explorer, right-click the inaccessible hard drive or device, choose "Properties".
Step 2. Under the Tools tab, click "Check" in the Error-checking section.
Step 3. Choose "Scan drive" or "Repair drive" if errors were found.
After the scan is complete, reboot your computer and verify that you can access the device and utilize the saved data once more.
Fix 3. Remove CRC Error with System File Checker
The other Windows built-System File Checker can also repair the missing or corrupted system files on your computer, which may help fix the cyclic redundancy error caused by system file corruption.
Step 1. Press the Windows key + R keys on your keyboard, type "cmd" in the Run dialog, and click "OK" to open the Command Prompt.
Step 2. Type DISM.exe /Online /Cleanup-image /Restorehealth and hit Enter.
This will make a Windows image to protect your data.
Step 3. When the DISM command completes, type sfc /scannow and hit Enter.
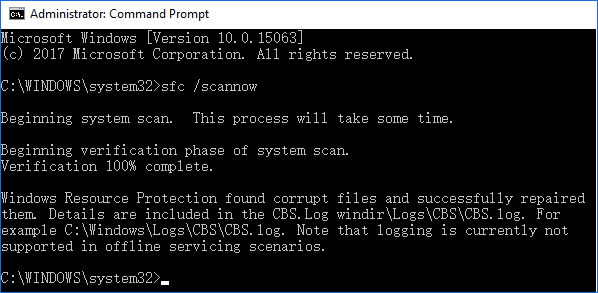
Step 4. Wait for the process to complete, then type exit and hit Enter to close the process.
After this, restart your computer and then you can reopen the device and make use of the saved data again.
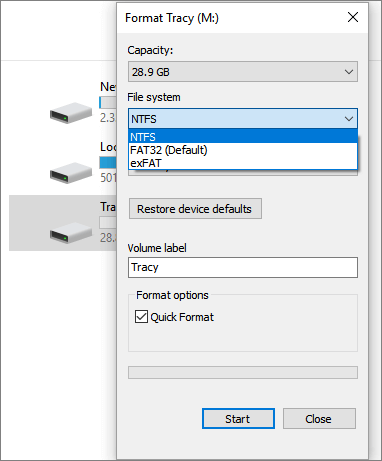
Fix 4. Format to Fix CRC Error on RAW/Inaccessible Device
If your device still has a RAW or CRC device error after trying the above fixes, you can try formatting the drive as a last resort. This will reset the file system to a readable format, which can fix the CRC error. To do this, you can follow the steps to format the drive.
Step 1. Press "Windows key + E" to open Windows Explorer.
Step 2. To resolve the CRC error on a device, right-click on it and select the "Format" option. This will erase the device and allow you to start fresh.
Step 3. Select a suitable file system - NTFS or FAT32 for your device.
You can use NTFS for your hard drive or external device, but FAT32 for your SD card if it's 32GB or smaller.
Step 4. Check "Quick Format" and click "Start".
Fix 5. Send for Manual Repair
If none of the fixes work, you can send your hard drive to a local disk repair center or the manufacturer's after-sales service center for repair.
For an alternative solution, you can consider Qiling Manual Data Recovery Service. A professional tech support team can remotely help you remove the "Data error cyclic redundancy check" error and fix your device's drive to work again.
Consult with Qiling Data Recovery Experts for one-on-one manual recovery service, which includes a free diagnosis, followed by a range of services such as data recovery, manual recovery, and more.
- Repair corrupted RAID structure, unbootable Windows OS and corrupted virtual disk file (.vmdk, .vhd, .vhdx, etc.)
- Recover/repair lost partition and re-partitioned drive
- Unformat hard drive and repair raw drive (BitLocker encrypted drive)
- Fix disks that become GPT-protected partitions
If you're experiencing an error, try closing and reopening the app, checking for software updates, or restarting your device. You can also try uninstalling and reinstalling the app, or clearing the app's cache and data.
What Causes Data Error Cyclic Redundancy Check Error
The "Data Error Cyclic Redundancy Check" error could be caused by a faulty hard drive, corrupted data, or a malfunctioning USB drive, resulting in the system being unable to verify the data's integrity.
- A corrupted file system on storage devices
- Registry corruption
- Interrupted file transferring process
- Misconfiguration in files and storage devices
- Unsuccessful program installation
- Misconfigured system files
- Virus or malware infection
When you encounter the error message 'data error (cyclic redundancy check)', it's likely due to an issue with the files or hard drive, so it's crucial to recover any saved data from the affected device first before attempting to resolve the problem.
Stop Using Your Drive, Recover Data, and Fix CRC Error Now
This guide provides 5 practical ways to fix the issue without losing any data, along with explanations of the causes of this error, offering a complete solution to the problem.
If you have important files on your drive, run Qiling data recovery software to scan and find them first. Then, apply the fixes on this page to resolve the error and get your drive working normally again.
To avoid data loss, back up all important files and stop using the device when a CRC error occurs. Follow the solutions on this page to recover data and fix the drive to make it functional again.
Related Articles
- How to Fix: SD Card Command Volume Partition Disk Failed with Null
- How to Recover Files after Reinstalling Windows 11/10/8/7
- 2022 Quick Fix: Windows 10 Preparing Automatic Repair Loop
- How to Work on Large Excel Files Without Crashing (5-Step Guide)
- How to Fix 'It Looks Like You Don't Have Permission to Save Changes to This File' on Windows 11/10
If you're unable to save files and are getting an “It Looks Like You Don't Have Permission to Save Changes to This File” error, don't worry - it's an easy fix. Simply follow this guide to resolve the issue. - You May Not Install to This Volume Because It Is Currently Being Encrypted
Mac users attempt to resolve this issue 'You may not install to this volume because it is currently being encrypted.' by entering recovery mode and continuing with the installation procedure, but they fail. This post will rescue you from this difficulty because the answer is quite simple and is detailed below.