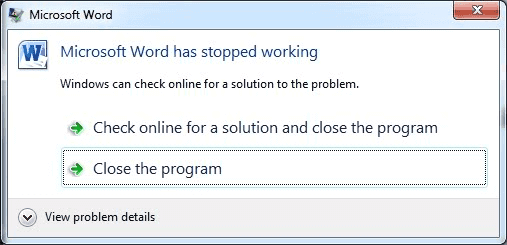
How to Fix Microsoft Excel Has Stopped Working 2007/2010/2013/2016
| Workable Solutions | Step-by-step Troubleshooting |
|---|---|
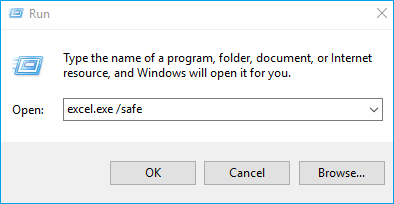
| Fix 1. Open Excel in Safe mode | Type excel.exe /safe To troubleshoot the issue of Excel crashing, you can try opening it in safe mode by running Excel in a Run box with the command "excel /safe". This will launch Excel with a minimal set of features, and if it still crashes, it suggests that the problem lies with the Excel software itself rather than any add-ins or other factors.Full steps |
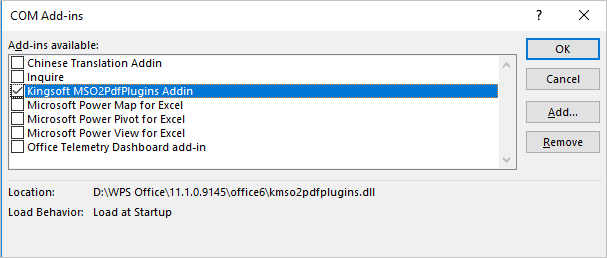
| Fix 2. Disable Add-ins | To resolve Excel issues, open Excel in safe mode, click "File" > "Options" > "Add-ins", select "COM Add-ins", and click "Go" to disable all add-ins, then restart Excel to see if the problem is resolved.Full steps |
| Fix 3. Check antivirus/conflicts | To troubleshoot the issue, try closing all running applications and antivirus software to see if the problem persists. This can help isolate the issue and determine if it's related to a specific program or system component. Simply click on the "X" in the top right corner of each window to close the applications, and then restart the computer. If the issue still occurs, it may indicate a deeper problem that requires further investigation.Full steps |
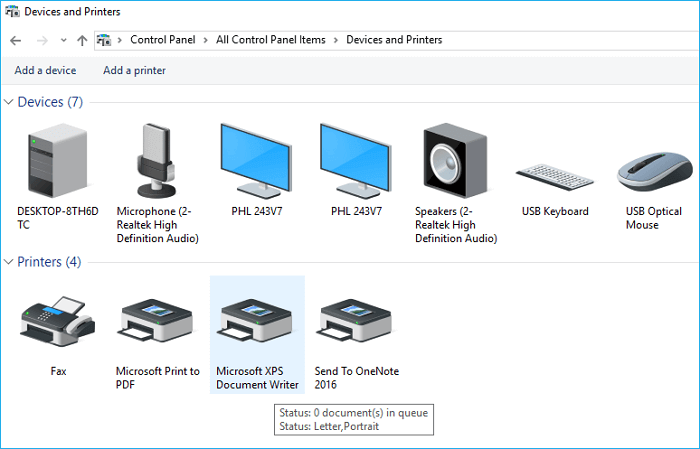
| Fix 4. Change default printer | To set the Microsoft XPS Document Writer as the default printer, go to the Control Panel, click on "Devices and Printers", and set the "Microsoft XPS Document Writer" as the default printer.Full steps |
| Fix 5. Repair Microsoft Office | To uninstall or change a program, go to the Control panel, choose Programs and Features, and click Change.Full steps |
| Fix 6. Recompile Macros | The steps to follow are: Open Excel and click on "Developer" > "Visual Basic" and then go to "Tools" > "Options" > "General" to make the necessary changes.Full steps |
| Fix 7. Keep Excel updated | To update Office, open any Office app, go to "File" > "Account", and under Product Information, choose "Update Options" to start the update process.Full steps |
Microsoft Excel Has Stopped Working When Saving
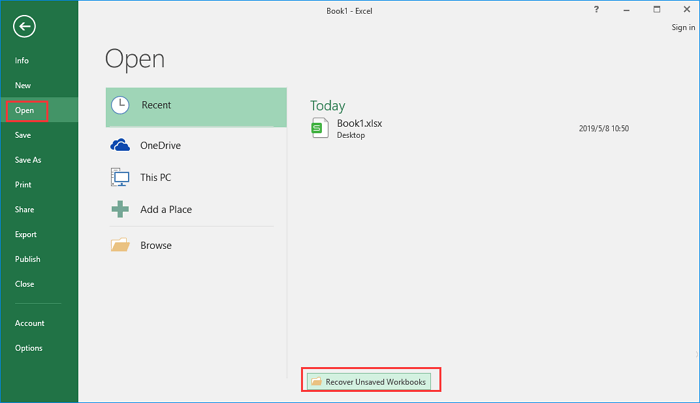
To recover your unsaved workbook in Microsoft Excel 2016, try the following steps: click on the "File" menu, then select "Recent" and look for your workbook in the list. If it's there, you can open it and continue working. If not, click "File" > "Open" and navigate to the location where you saved your workbook. If you still can't find it, try using the "Recover Unsaved Workbooks" feature in Excel. Go to "File" > "Recent" and click "Recover Unsaved Workbooks".
Microsoft Excel can handle various data processing tasks, but sometimes it may stop working, particularly when saving, due to unspecific errors. This page addresses the issue and provides solutions.
Part 1. 7 Useful Solutions to Microsoft Excel Has Stopped Working
Microsoft Excel has stopped working when saving may result from various factors, including large amounts of data, file corruption, third-party application interference, outdated Excel versions, and add-in conflicts. To resolve this issue, try saving the file in a different format, disable add-ins, update Excel to the latest version, and consider using a cloud-based storage service to minimize data loss. If the problem persists, consider seeking assistance from Microsoft support or a professional data recovery service.
1. Open MS Excel in Safe Mode
To open Microsoft Excel in safe mode, press Windows+ R to open the Run dialog box, type "excel.exe /safe", and click "OK". This will launch Excel with only its core functionality, allowing you to determine if an add-in or another program is causing the software to crash.
Qiling toolkit can repair severely corrupted XLS and XLSX files, retrieving everything from the Excel workbook without modifying its original format.
Step 1. Launch Deep Data Recovery. Select file types and click "Next" to start the recovery process.

Step 2. Click the "Scan" button to scan your disk for corrupted documents, and this software will enable you to fix damaged Word, Excel, PPT, and PDF files in a single, straightforward process.

Step 3. The Qiling data recovery and repair tool scans for all lost and corrupted files, allowing you to locate them by file type or search for a specific file using the search box.

Step 4. Deep Data Recovery can automatically repair damaged documents, and after previewing the files, you can click "Recover" to save the repaired files to a safe location.
2. Disable Problematic Add-ins
Step 1. To resolve Excel issues, open Excel in safe mode, click the "File" tab, then select "Options" and click "Add-ins". In the Add-ins window, select "COM Add-ins" and click "Go" to troubleshoot the problem.
Step 2. Try disabling add-ins one by one to see if the problem resolves, or remove a recently added add-in to test if Excel works correctly afterwards.
3. Check for Antivirus and Other Program Conflicts
Conflicts with antivirus or other programs may cause Excel to stop working. Try closing antivirus and other running applications, and ensure your antivirus software is up to date.
4. Change Default Printer
When you open an Excel document, it tries to communicate with the printer, which can cause Excel to crash and stop working if the communication fails. To troubleshoot this issue, you can try changing the default printer.
To resolve the issue of Excel not opening, go to the Control Panel, click on "Devices and Printers", and set "Microsoft XPS Document Writer" as the default printer. Then, try opening Excel again to see if the problem is resolved.
5. Repair Microsoft Office
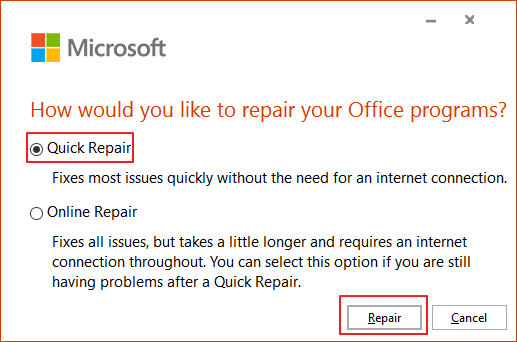
Step 1. To uninstall Microsoft Office, go to the Control panel, select Programs and Features, find Microsoft Office in the list, right-click it, and click the Change button.
Step 2. When you click on the "Change" option, an Office window appears, select "Quick Repair" and click on the "Repair" button, then wait for the process to finish.
6. Recompile Macros
You can check for the macros as some users have reported that problematic macros can make Excel stop working.
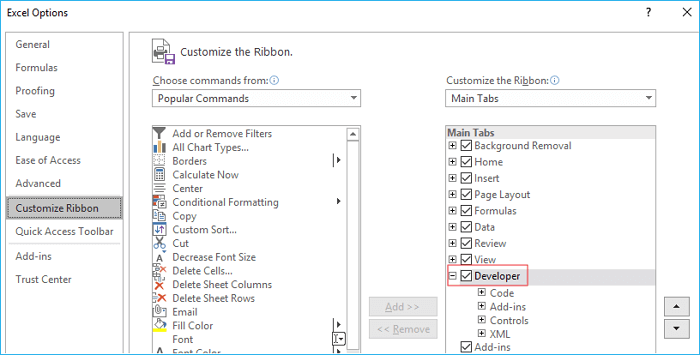
If the Developer tool is not in the menu bar, you can add it to the menu bar as follows.
Start Excel > click on "File" > "Options" > "Customize Ribbon" > check "Developer" in the Main Tabs list.
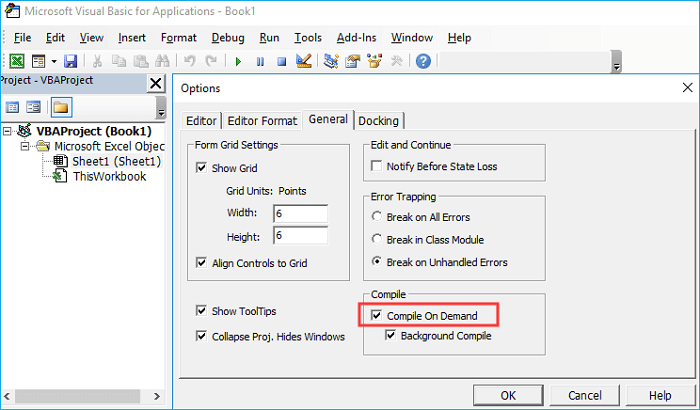
Step 1. Launch Excel and click on "Developer" > "Visual Basic". Then, go to "Tools" > "Options".
Step 2. In the Options window, go to the "General" tab and uncheck the box next to "Compile on Demand".
Step 3. To resolve the "Microsoft Excel stops working" error when using macros, follow these steps: Insert a new module in the "Project" navigation pane by right-clicking on "Module" and selecting "Insert". Save your spreadsheet and close Excel. This should prevent the error from occurring when using macros in the future.
7. Keep Microsoft Excel Updated
If your Microsoft Office installation is outdated, you may experience issues with its applications, such as Excel freezing or Word crashing when saving. This can often be resolved by installing the latest MS Office updates.
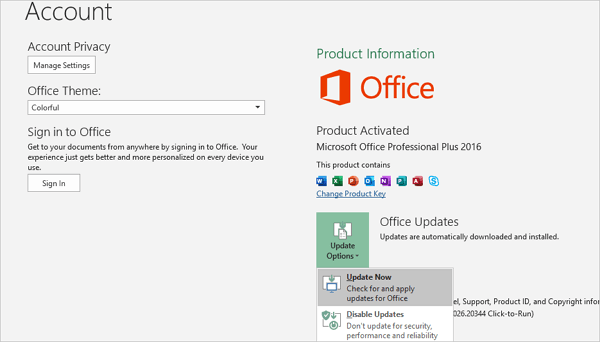
Step 1. To access your Office account settings, open any Office app, such as Word or Excel, and navigate to the "File" menu. From there, select "Account".
Step 2. Under Product Information, choose "Update Options" > "Update Now".
Conclusions
We've covered various solutions to resolve Excel stopped working errors in this article, and you can try them one by one to troubleshoot the issue. However, these measures may not be 100% effective. If you're unlucky and lose your unsaved Excel file, you can try to recover it using the AutoRecovery feature to get back the lost file.
Step 1. Start Microsoft Excel application, click "File" > "Recent".
Step 2. Click "Recover Unsaved Workbooks" and choose the unsaved Excel.
Step 3. To save the document, click the "Open" button first, and then select "Save As" from the menu. From there, you can choose a safe location to save the document.
Part 2. Extra Guide: How to Recover Deleted Excel Files
Losing saved documents, such as Excel files, can be a frustrating experience, often due to accidental deletion, hard drive formatting, emptying the recycle bin, partition loss, or a virus attack. In such cases, a file recovery tool can be a lifesaver, helping to restore lost files.
Deep Data Recovery is a worldwide trusted data recovery program that allows you to restore lost documents, graphics, videos, audio, email, and other files.
Download this capable tool to recover deleted Excel files within just three steps. It's also capable of recovering files from an emptied recycle bin, making it a convenient solution for restoring lost data.
Step 1. To launch Deep Data Recovery, select the file types you want to recover and click "Next" to initiate the recovery process in Windows 11/10/8/7.
Step 2. Choose the place where you lost data. Then, click "Scan".
Step 3. After scanning, use the file format filter to locate the desired files, and then click the "Preview" button or double-click a file to view its contents.
Step 4. To recover a lost file, select the file in the list, check the box next to it, and then click the "Recover" button. This will restore the file to a secure location.
Related Articles
- How to Solve Hard Disk Error 303 and 305
- Fixed: CPU Isn't Supported | CPU Isn't Compatible with Windows 10/8.1/8
- Automatically Copy Files When USB Drive Connected
- Fix: There Was a Problem Resetting your PC in Windows 10/8.1/8
- Is RAID 0 SSD Worth It for Gaming [Complete Guide in 2023]
Are you curious about this question: is RAID 0 SSD worth it for gaming? This article covers everything about RAID 0, and you can know the complete answer about RAID 0 SSD for gaming. - Is Windows 11 Good For Gaming? Your Best Answer in 2024!
Is Windows 11 good for gaming? Should I upgrade to Windows 11? To know this answer, you should know the features in Windows 11 that are dedicated to gaming. Qiling will lead you to get the complete answer to Windows 11 gaming performance and how to optimize it.