Fix Error 0x80070490 in Windows Update, Mail App, and Xbox
| Workable Solutions | Step-by-step Troubleshooting |
|---|---|
| Fix Error 0x80070490 in Windows Update |
Fix 1. Close Antivirus Software Temporarily...Full steps Fix 2. Run Windows Update Troubleshooter...Full steps Fix 3. Run SFC and DISM Scan...Full steps More fixes... |
|
Fix Error 0x80070490 in the Mail App |
Fix 1. Update Mail App...Full steps Fix 2. Check Email Privacy Settings...Full steps Fix 3. Reset Mail and Calendar...Full steps More fixes... |
| Fix Error 0x80070490 on Xbox |
Fix 1. Restart the Xbox/console...Full steps Fix 2. Factory Reset the Xbox...Full steps |
What Is the Error Code 0x80070490
Many Windows users encounter error 0x80070490, which can be frustrating due to its unclear meaning. However, understanding what this error is can help resolve the issue. It typically occurs when Windows is unable to access or write to a particular file or folder, often due to a corrupted system file, a faulty disk, or a permissions issue. By identifying the root cause, users can take corrective action to resolve the error and get their system running smoothly again.
You're trying to add a new account to your Windows computer, but instead of success, you get a notification saying that your trial was unsuccessful with an error code 0x80070490, leaving you wondering what to do next.
When your Mail app on Windows 10/11 fails to add another account, error code 0x80070490 occurs, which can also happen while updating via Windows Update or updating an application from the Microsoft Store.
Reasons for Error Code 0x80070490
0x80070490 is a Windows error code that typically occurs when the Windows Search service is not running or is not functioning correctly. This can prevent the Mail app from adding a new account, resulting in the error message. The error code is often related to issues with the Windows Search service, which is responsible for indexing and searching files on the computer.
The System Component Store, also known as the Component-Based Servicing (CBS), is a database on Windows computers that stores information about installed system components, such as Windows features, drivers, and applications. This database helps Windows to manage and maintain the system's integrity by keeping track of installed components and their versions. If the System Component Store becomes corrupted or damaged, it can cause issues with Windows updates, feature installations, and even system crashes.
CBS, or Component-Based Servicing, is a feature in Windows that streamlines the installation process, making it more manageable and robust compared to earlier systems. It handles all Windows-related update operations, ensuring a secure and efficient experience.
Here are the various causes of the error in brief:
- An antivirus program may interfere with software updates or installations, perceiving them as third-party objects that could potentially harm your system. This is a protective measure to safeguard your computer from malicious activity.
- The System Component Store or Component-Based Servicing (CBS) has been compromised due to a corrupted or tampered file or process. This has resulted in the system becoming unstable and potentially leading to system crashes or other issues.
- You might have inadvertently set some manual settings that are hindering Windows Update (WU) from updating your system. These settings could be interfering with the update process, preventing WU from installing the necessary patches and updates. By revisiting and adjusting these settings, you should be able to resolve the issue and allow WU to proceed with the updates.
How to Fix Error Code 0x80070490 on Windows 10/11
Now that you know what error code 0x80070490 signals and the reasons behind it, let's move on to fixing it. You can't stay with it, so let's get going with how to fix it on Windows 10/11, and we'll also cover how to fix it on other devices further in this article.
Even if you don't encounter this issue on your Windows 10/11, following this method can still help solve any other problems related to updates and installation. This method is specifically designed for Windows 10/11 and may not be applicable to other devices, so only follow it if you're using Windows 10/11.
Fix 1. Close Antivirus Software Temporarily
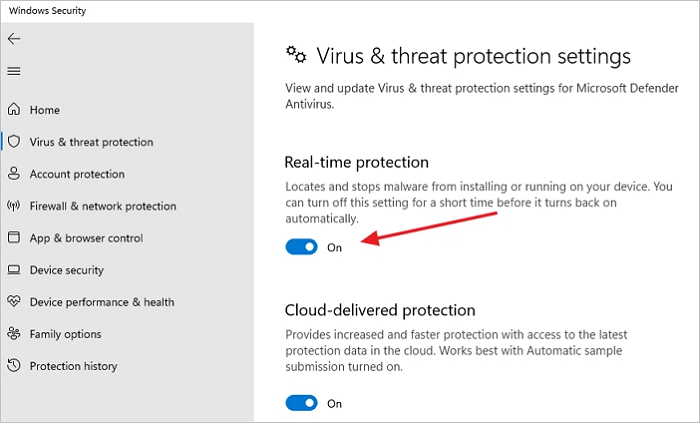
The error code 0x80070490 might be caused by an antivirus program, so you'll need to disable it to allow the update and installation process to proceed. First, ensure you have an antivirus installed on your system, then follow this method to disable it temporarily. If you don't have an antivirus, you can skip this step and try another solution.
Disabling antivirus software temporarily is a relatively straightforward process. Users can disable the firewall and real-time protection features, allowing them to install or update software without interference. This can be done to resolve issues related to installation or updating, and then re-enabled once the process is complete.
If reinstalling your antivirus didn't work, congratulations on completing the process, and you can now reinstall your antivirus. If that didn't resolve the issue, let's move on to the next step.
Fix 2. Run Windows Update Troubleshooter
Windows has a built-in troubleshooter that can resolve most Windows Update-related issues, providing a solution to fix the issue.
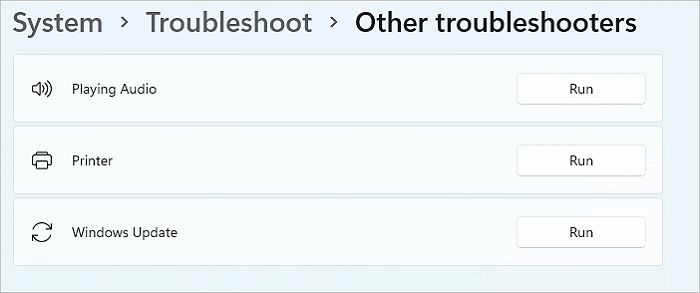
Step 1To access the Windows Settings, press the Windows key + I, then navigate to System > Troubleshoot > Other troubleshooters.
Step 2. The Windows update troubleshooter is a tool that can help resolve issues with Windows updates. To locate it, you can search for "Windows Update Troubleshooter" in the Start menu, or go to the Microsoft Support website and download the tool.
Step 3. Let the wizard complete the process, and once it's done, try to update Windows. If that doesn't work, you can try restarting your computer in safe mode, then updating Windows.
Fix 3. Run SFC and DISM Scan
Windows has a built-in tool called the System File Checker (SFC) that scans the operating system for corrupted system files, identifies the issues, and attempts to repair them.
Let us see how you can use System File Checker.
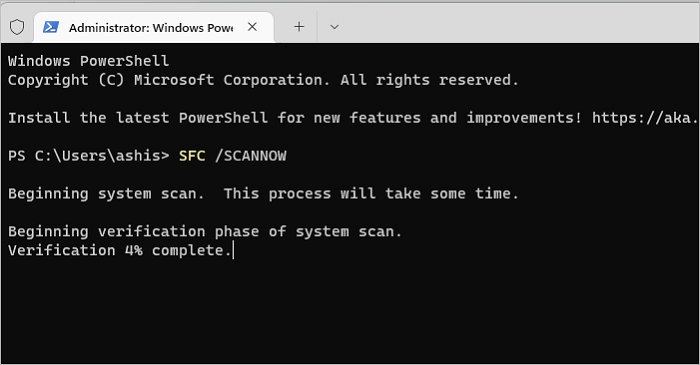
Step 1. On the start bar, type "cmd" and right-click on Command Prompt, then select "Run as administrator".
Step 2. Next, on Command Prompt, type SFC /scannow and tap Enter.
Step 3. Once the System File Checker completes its job, it will tell you if the CBS store is corrupted or not.
If you get a message that says-Windows Resource Protection found no integrity violations, therefore, there is no error.
To resolve the issue, you can run the DISM command to replace the old files. This command will scan your system and replace any corrupted or outdated files with the correct ones from the Windows installation media.
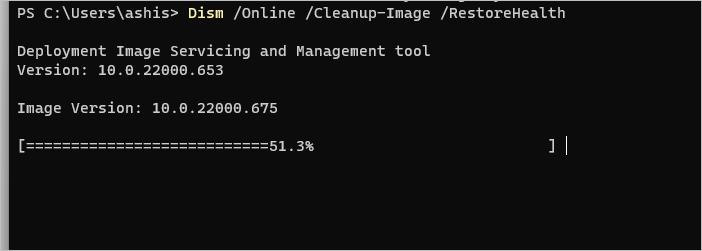
Step 1. In the admin command prompt, type and execute the following command:
Dism /Online /Cleanup-Image /RestoreHealth
Step 2. Once the scan and replacement of files are complete, you'll need to restart the Windows Update Service. To do this, open the Run prompt by pressing Win + R, then type "services.msc" and press Enter.
Step 3. To resolve the issue, look for Windows Update in the services list, right-click on it, and select Restart. After the system restarts, repeat the process with Windows Module Installer. Then, try updating again.
Fix 4. Reset Windows Update Components
If the previous methods didn't work, try resetting the Windows Update components manually.
To resolve Windows update issues, we will manually reset the Windows update components and clear the SoftwareDistribution and Catroot2 folders. This method involves manually resetting the update components and deleting the contents of these folders to create space for new updates.
Step 1. To access the Command Prompt as an administrator, click on the Start bar and search for "cmd". Right-click on the "Command Prompt" result and select "Run as administrator".
Step 2. We will stop BITS, Cryptographic, MSI Installer, and Windows Update services. Paste the following on the Command prompt and press enter after each line:
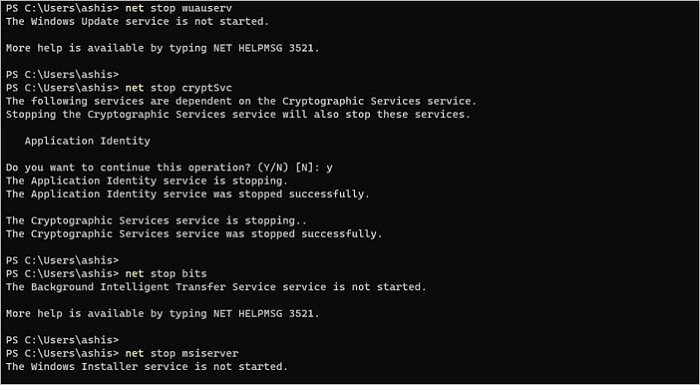
net stop wuauserv
net stop cryptic
net stop bits
net stop msiserver
Step 3. Now that the services are disabled, rename the Catroot2 and SoftwareDistribution folders. Pate the following on the command prompt and press enter after each line:
ren C:\Windows\SoftwareDistribution SoftwareDistribution.old
ren C:\Windows\System32\catroot2 Catroot2.old
Step 4. Restart the services. Do the same with the codes below that you did before, paste on the Command prompt, and press enter after each one.
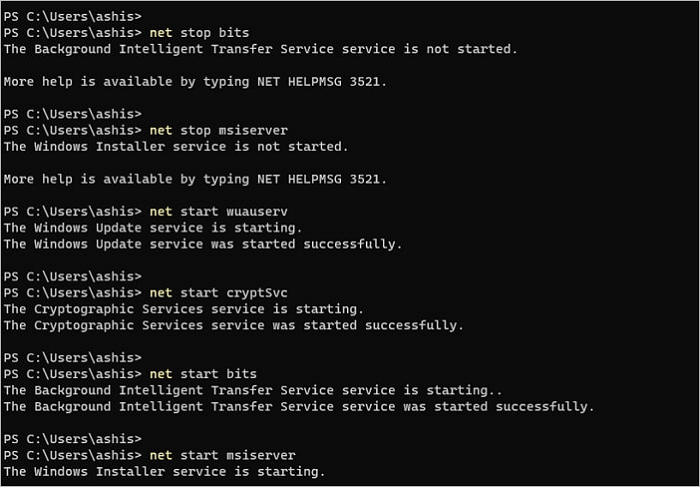
net start wuauserv
net start cryptSvc
net start bits
net start msiserver
Step 5. If the first method doesn't work, restart your system and try updating again. If that still doesn't work, move on to the final solution.
Fix 5. Perform a System Restore
We'll try restoring Windows to a previous version, which will take it back to a point when there were no issues, as a final solution to this problem.
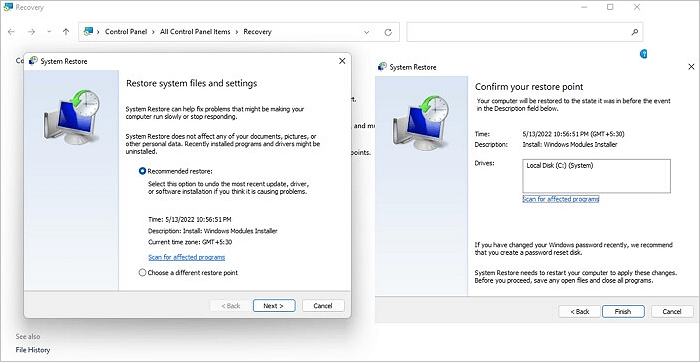
Step 1. To open System Restore, press Windows+R to open the Run command, type "rstrui" and press Enter. This will launch the System Restore utility.
Step 2. To resolve the issue, you can restore your system to a previous point when the application was working properly. To do this, click Next and go to the "Show more restore points" section. Select a restore point that occurred before the application started malfunctioning, then click Next. Finally, select Finish and confirm the restoration by clicking Yes. This should resolve the issue.
Step 3. Once the restoration is complete, your system will automatically restart. The older version of the OS will be installed, and you'll no longer see error code 0x80070490. You're good to go!
Bonus Tip: How to Restore Lost Data for Windows Error Code
If you lose data, you can use Deep Data Recovery to restore lost files, even if your computer won't boot.
Main features of Qiling data recovery software:
- Recover data from formatted partition
- The software is compatible with any file system, including FAT12, FAT16, FAT32, NTFS, NTFS5, HFS, HFS+, and exFAT.
- Preview files before recovery
- Remote Support for novice users
- Recover and repair corrupted files, including videos, photos, and documents
To use Deep Data Recovery, you simply follow the software's wizard, set your requirements, and extract the lost files. It's a straightforward process that doesn't require expertise, and you should extract the files to a separate drive to avoid overwriting the original data.
Step 1. Select file types and click "Next" to start
Launch Deep Data Recovery, select the desired file types, and click "Next" to initiate the recovery process.

Step 2. Select a drive and start scanning
To recover lost data, hover over the partition where the data was lost and click "Scan" once you've located it, whether it's an internal hard disk, external disk, USB, or SD card.

Step 3. Check and preview scanned files
To narrow down the scan results, use the file format filter on the left or upper right corner, and then preview the content of the files you need by clicking the "Preview" button or double-clicking a file.

Step 4. Recover lost data to a secure location
To recover lost data, select the file, click the checkbox next to it, and then click "Recover". It's recommended to save the recovered data in a different location to avoid overwriting the original lost data.
How to Fix Error Code 0x80070490 in the Mail App
The error code 0x80070490 on the Mail app of Windows 10/11 is a common and harmless issue. To resolve it, follow these easy methods.
Fix 1. Update Mail App
App updates are available through the Microsoft Store App.
Step 1. To open the Microsoft Store app, you can find it in the taskbar, which is typically located at the bottom of your screen, or you can search for it through the Start Menu, which can be accessed by clicking the Windows logo in the bottom left corner of your screen.
Step 2. To update your device, click on the Library icon at the bottom left of the screen to access the update and download section.
Step 3. To check for app updates, click the Get Updates button, allowing Microsoft to scan for available updates. If an update is found, it will be listed among other apps.
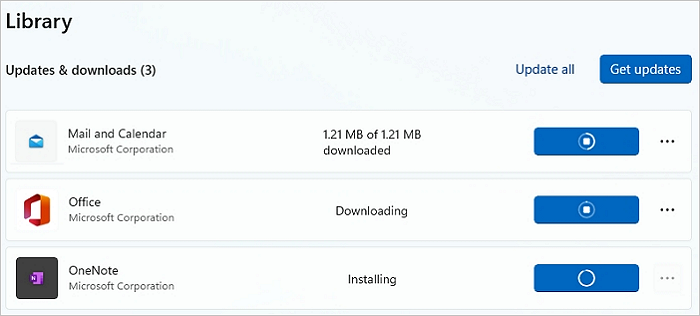
Step 4. Click on the update button next to the Mail app, and let the store download and update it.
Once the update is complete, launch the app and verify that it's fully updated.
Fix 2. Check Email Privacy Settings
To resolve the error code 0x80070490, check and correct your email settings, such as the SMTP server address, port number, and authentication details. Ensure that the settings are correctly filled in and match the requirements of your email provider.
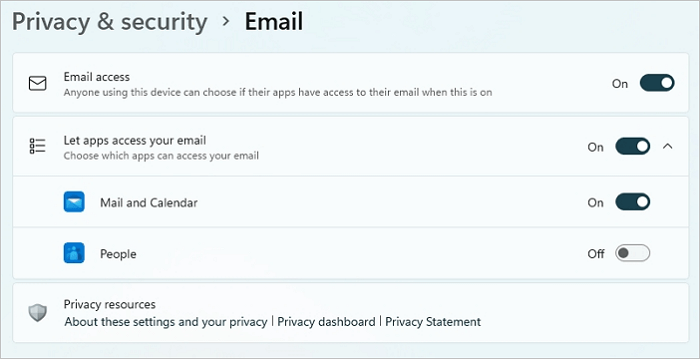
Step 1. To open settings, click on the gear icon in the top right corner of the page. Then, select Privacy & Security, and click on Email.
Step 2. To enable access to your email, mail, and calendar, turn on the switch next to "Email Access" and allow apps to access these services.
Step 3. Check if you are still facing the issue.
Fix 3. Reset Mail and Calendar
Step 1. To access the app settings, go to the "Settings" app, select the "Apps" or "App & Features" option, which may be located under a category like "System" or "System & Security".
Step 2. To access the advanced options for the Mail and Calendar app, locate the app listing and click on the three-dot menu, then select the advanced options menu.
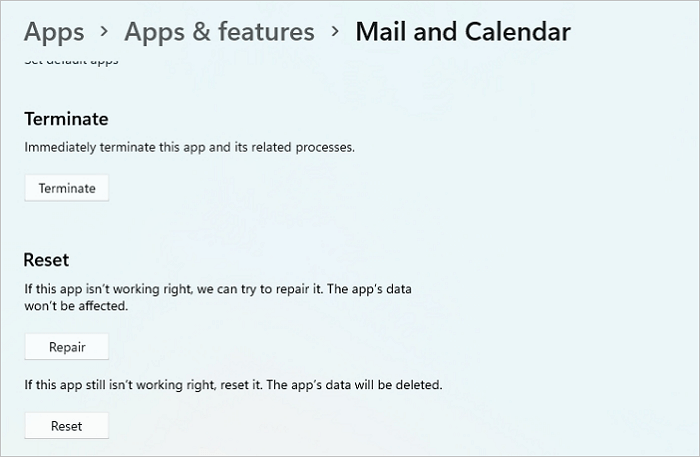
Step 3. The process involves terminating the system, then selecting "Repair" to see if the issue is resolved. If the problem persists, further resets may be necessary to complete the process.
Fix 4. Reinstall the Mail and Calendar
You can move forward and install Mail and Calendar, and hopefully, you won't encounter error code 0x80070490 again.
Step 1. To open the elevated Windows PowerShell console, right-click the Start button and select Windows Terminal (Admin) or Windows PowerShell (Admin), which will open the console with administrative privileges.
Step 2. To uninstall the Mail and Calendar apps, you can use the following PowerShell command:
Get-AppxPackage Microsoft.windowscommunicationsapps | Remove-AppxPackage
Step 3. To resolve the error code 0x80070490, open the Microsoft Store and install Mail and Calendar. This should finally allow you to install the required updates and resolve the error.
How to Fix Error Code 0x80070490 on Xbox
Many people enjoy using their Xbox, but a frustrating error code 0x80070490 can put a break on their gaming experience. Fortunately, there are steps that can be taken to resolve this issue and get back to enjoying Xbox services.
Fix 1. Restart the Xbox/console
Step 1. We will start with the very basic restarting of the system. For this, firstly, shut down the console.
Step 2. Unplug all devices, wait for a few minutes, then plug them back in and restart your computer to resolve the issue.
Fix 2. Factory Reset the Xbox
If the above fixes don't work, a factory reset might be necessary. This will erase all data, so ensure you have backups of everything before attempting this fix.
Step 1. Turn off your console, unplug everything, wait a few minutes, and then replug the power cord.
Step 2. To factory reset your Xbox, press and hold the BIND button while simultaneously pressing the Xbox button on the console.
Step 3. To access the Troubleshooters, hold down the BIND and EJECT buttons for 10-20 seconds. Once it starts, you'll be taken to the Troubleshooters menu. From there, select Reset and choose the option to Keep your games and apps, and the process will be complete.
Conclusion
This article explains what error code 0x80070490 is and its causes, which can occur on various devices, not just Windows 10/11, when trying to add an email account to the Mail app.
To fix the issue where Windows 10/11, Mail, and Xbox apps are stuck in a loop, you can try updating the apps, resetting the apps, and checking for any available updates. Additionally, you can try running the Windows Update Troubleshooter, resetting the Windows Store, and checking for any system file corruption. These fixes can also help update other apps and resolve any potential issues.
Related Articles
- How to Recover Formatted Files with Free Format Recovery Software
- Recover Data After Formatting Laptop/PC
- Files/Folders Keep Reappearing After Deletion in Windows 10/8/7
- Restore Accidentally Cleared Data on Kodi
- How to Reset BIOS to Default Settings in 3 Different Ways
You can easily reset your BIOS to its default settings using the methods outlined in this article, which explains what BIOS is, why you might need to reset it, and how to do so. - 4 Ways | How to Stop Windows 11 Update Pending Restart
If you're seeing a 'Windows 11 update pending restart' message under the Windows updates menu and aren't sure how to stop it, don't worry - this article is here to help. We'll guide you through the process of stopping the Windows 11 update pending restart.