How Do I Disable OneDrive in Windows 10? Your Complete Guide
To turn off OneDrive in Windows 10, go to Settings > System > OneDrive, toggle off "Sync your OneDrive files to this PC", and uncheck the box to turn off OneDrive. To restore lost OneDrive files, try checking the OneDrive recycle bin, or contact Microsoft support for further assistance.
If you're tired of OneDrive syncing your files on Windows 10, the easiest solution is to disable or unlink it. To do this, follow this complete guide and learn how to disable OneDrive and fix any issues on your computer.
| Workable Solutions | Step-by-step Troubleshooting |
|---|---|
| 1. Unlinking Account | To access OneDrive, click the white or blue OneDrive cloud icon on the taskbar in Windows 10. This will open the OneDrive folder, allowing you to view and manage your files.Full steps |
| 2. Hiding or Uninstalling OneDrive | To access OneDrive settings in Windows 10, click the OneDrive icon on the taskbar, then select "Help & Settings" from the dropdown menu.Full steps |
| 3. Stop File Syncing in OneDrive | To pause syncing on OneDrive, click the OneDrive icon on the taskbar, select the "..." or "Help & Settings" option, and then click "Pause Syncing".Full steps |
| 4. Disable via Group Policy | To open the Local Group Policy Editor, press the Windows key + R to open the Run dialog, type gpedit.msc, and click "OK". This will open the Local Group Policy Editor, which allows you to configure various settings and policies on your Windows computer.Full steps |
| 5. Disable It Using Registry Editor | To access the Registry Editor, press the Windows key + R to open the Run dialog box, type "regedit" and click "OK". This will open the Registry Editor, allowing you to make changes to your system's registry.Full steps |
Note: If you're experiencing file loss issues with OneDrive, try recovering your lost files using the 3 methods outlined in the article before disabling OneDrive.
What Is OneDrive?
OneDrive is a personal cloud storage service that saves your files and photos, making them accessible from any device, anywhere.
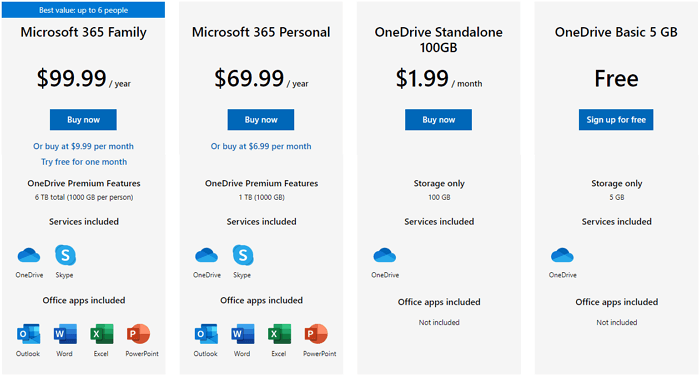
Microsoft has upgraded OneDrive to several editions that cater to both home and business users. Users can choose a suitable edition to meet their needs for backing up and sharing files online via OneDrive.
Why Do You Need and Don't Need OneDrive
In Windows 10, OneDrive is pre-installed and configured to sync files across devices, which can be convenient for some users. However, others may find it unnecessary or prefer to use other cloud storage services, leading them to disable or uninstall OneDrive. Additionally, some users may experience issues with OneDrive's performance or storage usage, prompting them to remove it.
Why do you need OneDrive?
Here is a list of features that you may like:
- Access Anywhere allows you to access, edit, and share files from anywhere on all your devices, providing flexibility and convenience in managing your digital content.
- You can save your files in OneDrive and they won't be lost even if your device is lost or damaged.
- With Real-Time Collaboration, you can share and edit documents, photos, and more in real-time using Office apps.
OneDrive is a reliable file backup plan that allows users to access and share files with friends, making it an ideal tool for those who want to keep their files safe and easily accessible.
Sign up for OneDrive now.
Why do you need to remove or disable OneDrive?
Some OneDrive users want to disable or uninstall the service from their computers due to various reasons, including privacy concerns, storage space issues, or simply not needing the service.
- Users have reported that the syncing feature in OneDrive can cause file loss after deleting local drive data. This issue occurs when the user deletes files or folders from their local drive, but the syncing feature does not update the cloud copy of the files in a timely manner, resulting in the loss of files.
- OneDrive is consuming excessive system resources, causing high CPU and RAM usage, and running in the background automatically.
- OneDrive folder taking large space on a local drive.
- OneDrive's cloud storage is running out of space, and Microsoft is charging high fees to extend it, which is frustrating for users.
- Simply don't like using OneDrive.
To disable or uninstall OneDrive from your computer, you can follow these steps on Windows 10. You can remove OneDrive in 5 reliable ways: uninstall it from the Control Panel, disable it from the System Settings, use the OneDrive setup to remove it, delete the OneDrive folder, and finally, use the built-in Windows feature to remove it. These methods allow you to completely remove OneDrive from your system, freeing up space and resources.
How to Disable, Unlink, or Remove OneDrive in Windows 10 - 5 Ways
To remove OneDrive from your Windows 10 computer, you can try one of the 5 methods listed, which also work on Windows 8.1/8/7. These methods will help you disable, unlink, or completely remove OneDrive from your system. Pick the suitable method and follow the steps to get rid of OneDrive on your computer now.
Note: Before attempting some of the methods, make sure to back up important OneDrive files to an external drive to avoid potential file loss.
#1. Disable OneDrive by Unlinking Account
Source: Microsoft Official solution
https://support.microsoft.com/en-us/office/turn-off-disable-or-uninstall-onedrive-f32a17ce-3336-40fe-9c38-6efb09f944b0
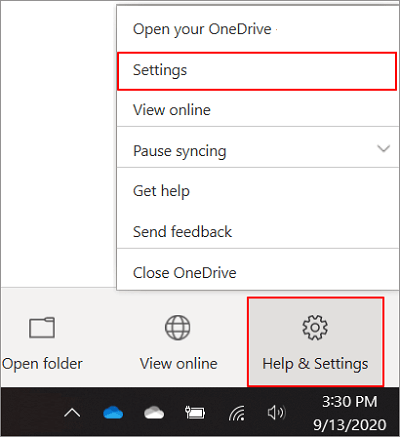
Step 1. To access OneDrive in Windows 10, click on the cloud icon on the taskbar. The cloud icon is either white or blue depending on the version of OneDrive you have installed.
Step 2. Click "Help & Settings", then select "Settings".
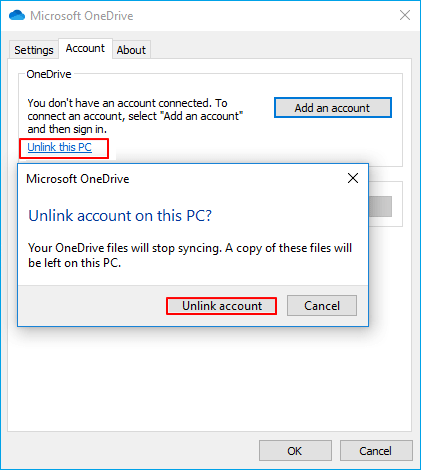
Step 3. To unlink your account, go to the Account tab, click "Unlink this PC" and select "Unlink account".
Then click "OK" to confirm.
#2. Permanently Disable/Remove OneDrive - Hide or Uninstall OneDrive
Source: Microsoft Official solution
https://support.microsoft.com/en-us/office/turn-off-disable-or-uninstall-onedrive-f32a17ce-3336-40fe-9c38-6efb09f944b0
Option 1. Hide OneDrive
To hide OneDrive from your PC, go to Settings > System > Apps & features, find OneDrive and click on it, then click on the "Uninstall" button. However, if OneDrive is built into your version of Windows, you won't be able to uninstall it directly. Instead, you can right-click on the OneDrive icon in the system tray and select "Quit" or "Close" to close the OneDrive application.
Step 1. Click the OneDrive icon on the taskbar in Windows 10.
Step 2. Click "Help & Settings", and select "Settings".
Step 3. Under General, uncheck all the boxes.
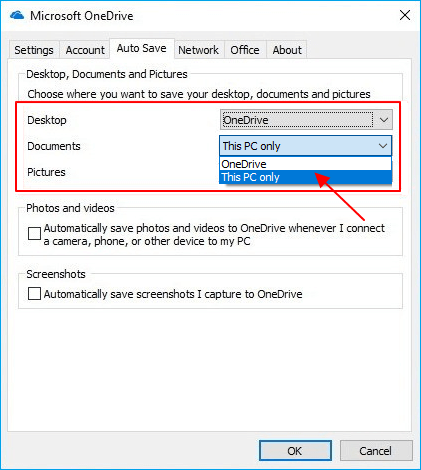
Step 4. In the Auto Save tab, set the "Documents and Pictures" list to "This PC only" and uncheck the other boxes.
Step 5. To sync all files and folders in your OneDrive, go to the Account tab, click "Choose folders", then check the box next to "Sync all files and folders in my OneDrive" to enable syncing.
Step 6. Click "OK" to save changes.
Step 7. To unlink OneDrive, go to the Settings app, navigate to the Account tab, click on "Unlink OneDrive," and then close the "Welcome to OneDrive" box that appears.
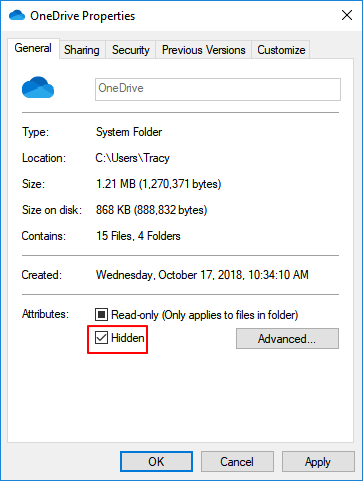
Step 8. Open File Explorer, right-click OneDrive and click "Properties".
Step 9. Go to the General tab, check the "Hidden" box.
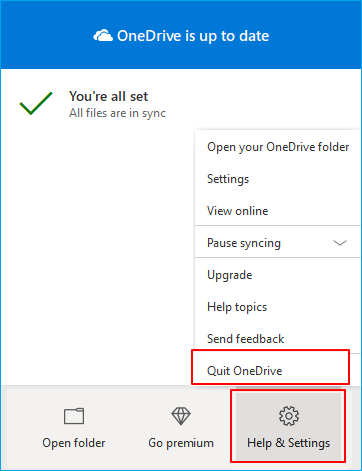
Step 10. Go to Help and Settings, select "Quit OneDrive".
Option 2. Uninstall OneDrive
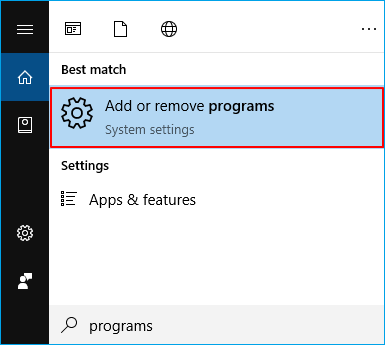
Step 1. To access the "Add or remove programs" feature, simply click the Start button, type "Programs" in the search box, and select the "Add or remove programs" option from the results.
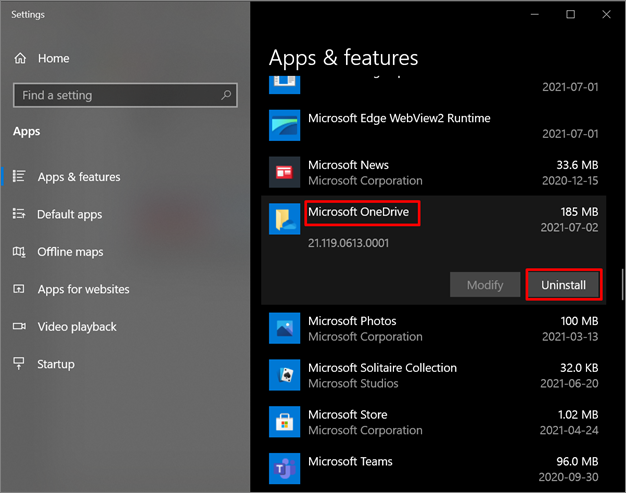
Step 2. Under Apps & features, select "Microsoft OneDrive" and select "Uninstall".
#3. Stop File/Folder Syncing in OneDrive Sync App
Source: Microsoft Official solution
https://support.microsoft.com/en-us/office/choose-which-onedrive-folders-to-sync-to-your-computer-98b8b011-8b94-419b-aa95-a14ff2415e85
If you don't want OneDrive to sync files to your PC, you can stop it from syncing files and folders, especially during bad syncing times.
Some users have reported losing files on their computer, particularly after deleting files in OneDrive while syncing was enabled, which can lead to unexpected file loss.
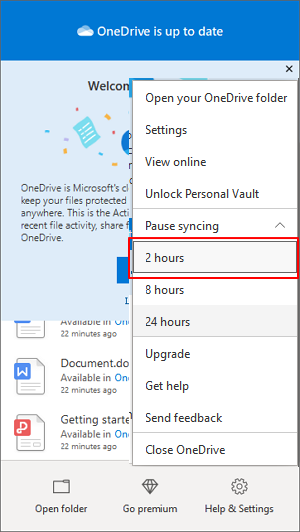
Step 1. To pause OneDrive syncing, click the OneDrive icon in the taskbar, select the ellipsis (more) or help and settings, and click "Pause Syncing", then choose a sync pause duration of 2 hours.
Step 2. Click OneDrive icon, select "Help & Settings", click "Settings".
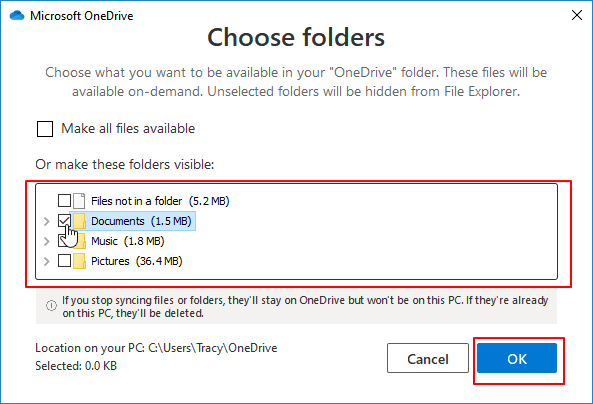
Step 3. Go to the Account tab, select "Choose folders".
Step 4. In the Sync your OneDrive files to this PC window, uncheck the folders you don't want to sync and click "OK".
After syncing, you can edit and adjust files on OneDrive or your computer without affecting the data on the other platform.
OneDrive Not Syncing on Windows PC?
To ensure OneDrive is running correctly and allowing you to access and sync files, try the quick fixes first, and then follow some additional tips to troubleshoot any issues.
#4. Disable OneDrive via Group Policy
Step 1. To open the Group Policy Editor, press the Windows key + R to open the Run dialog, type "gpedit.msc" and click "OK".
Step 2. When the Local Group Policy window opens, go to:
\Computer Configuration\Administrative Templates\Windows Components\OneDrive.
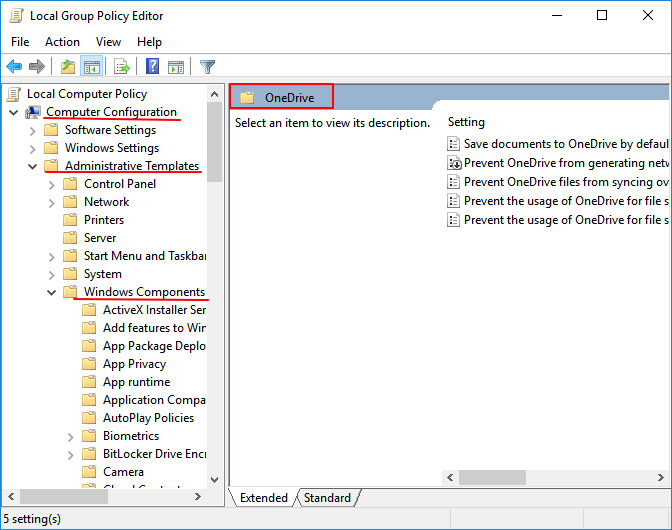
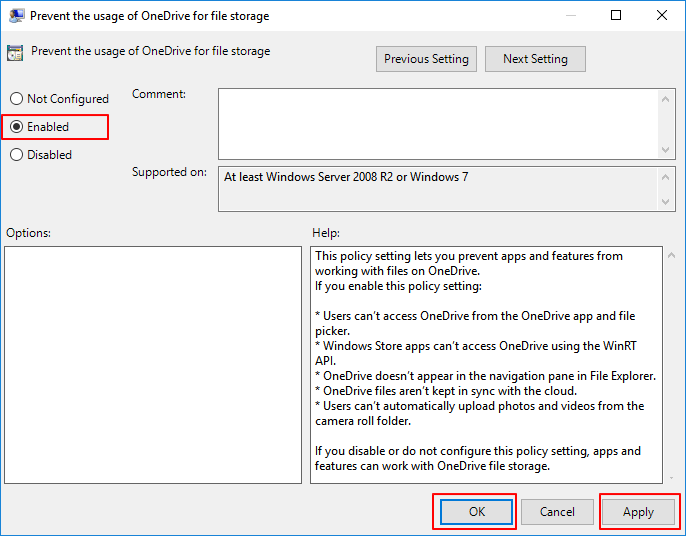
Step 3. Double-click on Prevent the usage of OneDrive for file storage.
Step 4. To enable the feature, check the box next to "Enabled" and click "Apply" and then "OK" to confirm the changes.
To resolve the issue, uninstall OneDrive, restart your PC, and then reinstall OneDrive. This will ensure that the OneDrive folder is removed from your PC and then re-added, allowing you to access it again.
#5. Disable OneDrive Using Registry Editor
Note: Using Registry Editor to disable OneDrive is not recommended, as it can lead to serious consequences if not done correctly. While it is possible to disable OneDrive using this method, it's not a recommended approach due to the potential risks involved.
To disable OneDrive, go to the Start menu and select Settings, then click on the "Apps" icon and "Manage Optional Features & Updates" on the left side of the window. Search for "OneDrive" and click on the "Remove" button, then restart your computer to ensure the changes take effect.
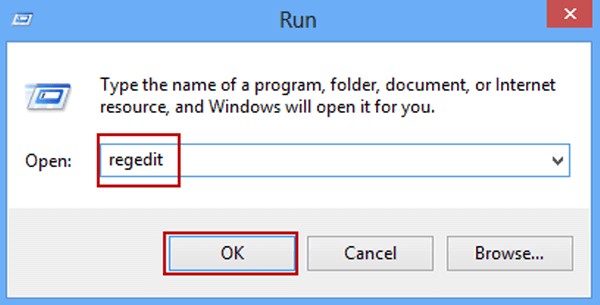
Step 1. Press Windows + R keys, type regedit, and click "OK".
Step 2. When the Registry Editor opens, go to:
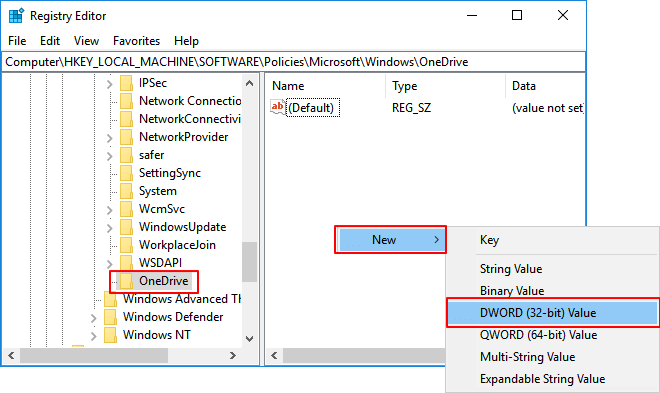
HKEY_LOCAL_MACHINE\SOFTWARE\Policies\Microsoft\Windows.
Step 3. Right-click Windows key and select "New" > "Key".
Step 4. Name the new key as "OneDrive".
Step 5. In the right pane, select the newly created DWORD (32-bit) Value, press F2 to rename it, and name it as "HonorComponentToPropagate".
Step 6. Double-click the "DisableFileSyncNGSC" key, change its value data to 1 and click "OK".
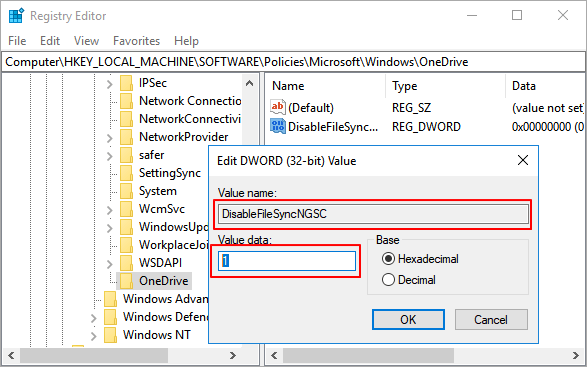
After this, restart your computer.
How to Access and Restore Lost or Deleted OneDrive Files - 3 Ways
Some of you may also want to know how to access and restore the lost OneDrive files online or on a local computer.
Here we've collected two ways that will help you out:
#1. Recover Deleted Files from OneDrive Recycle Bin
Step 1. Go to the OneDrive website:
https://go.microsoft.com/fwlink/p/?LinkID=251869
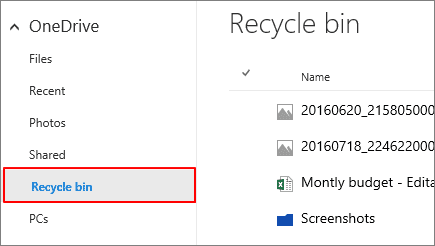
Step 2. To recover a deleted file, sign in with your account and click "Recycle Bin" on the left pane.
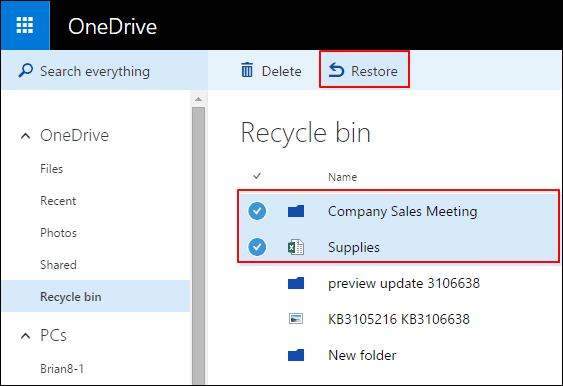
Step 3. To recover deleted files, select the files or folders that you deleted online, then move your mouse to point to the deleted items.
Click the circle check box that appears and click "Restore".
#2. Recover Deleted OneDrive Files or Folder on Your PC
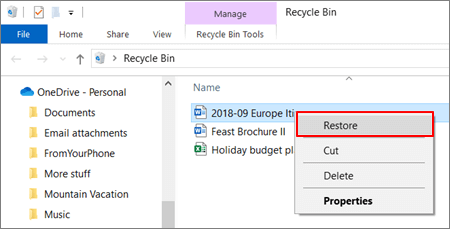
Step 1. Open the Recycle Bin on your computer and locate the deleted files.
Step 2. Right-click the deleted OneDrive files or folder, and select "Restore".
#3. Recover Permanently Deleted OneDrive Files on PC
When you deleted and emptied OneDrive files from the Recycle Bin on your computer, reliable file recovery software like Deep Data Recovery can help.
Qiling OneDrive Recovery Tool
- Recover lost or deleted files, documents, photos, audio, music, emails and other important data with ease, thanks to advanced data recovery software and techniques that can effectively restore lost information.
- You can recover files from various devices, including an emptied recycle bin, memory cards, flash drives, digital cameras, and camcorders, using data recovery software or services. These tools can help retrieve deleted or lost files, even if they've been permanently deleted, by scanning the device's storage for remnants of the files.
- The software supports the recovery of over 1000 file types on both Windows and Mac PCs and laptops.
To recover permanently deleted OneDrive files from your PC, the software will fully scan and restore them in just 3 simple steps.
Extra Tip: Your Best OneDrive Alternative for Windows 10/8/7
As for some users who give up OneDrive but still need a powerful file syncing tool for protection or automatically backing up data to a target storage device,you've come to the right place.
In this part, you'll find a perfect alternative tool - Qiling Backup to replace OneDrive for file syncing and data backup in Windows 10/8/7.
See what Qiling Backup do for you:
- 1. Support file backup, OS backup, Disk/Partition backup.
- 2. Support disk clone, system clone, and OS migration.
- 3. Cloud backup allows users to store and access their files from anywhere, using cloud storage services like OneDrive, Google Drive, Dropbox, and more. This enables users to securely store and retrieve their files, even if their device is lost, stolen, or damaged.
To make use of Qiling Backup as an alternative to OneDrive in Windows 10, you can follow these steps:
#1. Fully Back Up Windows 10 Data
Qiling Backup allows you to create a full backup of your system, files, and partitions to protect your important data.
#2. Automatically Back Up Windows 10 Files
You can set up automatic backup schedules to ensure your files are regularly backed up without manual intervention.
#3. Transfer or Migrate Windows 10 OS to SSD Without Reinstallation
Disabling OneDrive Is Possible, Disable It Without Damaging Your Files
On this page, we introduced OneDrive and discussed when to use it and when to disable it on your PC. Based on different needs, we offered 5 ways to disable, remove, or unlink OneDrive from your Windows 10 computer.
If you've accidentally deleted files from OneDrive, you can try recovering them using one of three methods. Qiling file recovery software is a powerful and efficient option for recovering OneDrive files, among other methods.
If you're looking for a OneDrive alternative to protect and back up your Windows files, Qiling Backup is a good option to consider.
Related Articles
- GoPro Support: How to Fix Corrupted GoPro Video Files Efficiently
- [Solved] 2018-11 Update For Windows 10 Version 1803 For X64-Based Systems (Kb4023057) – Error 0x80070643
- How to Get, View, Remove Windows 10 Update? [2022 Latest Guide]
- Is Your SD Card Not Working Camera? Here Is Why and How to Fix It!
- [Fixed] External Hard Drive Not Showing Up in Disk Management on Windows 10/11
If your external hard drive isn't being detected by your computer and isn't showing up in disk management, there are several potential reasons and solutions to consider. The drive may not be properly connected or powered, or the USB port may be damaged. In some cases, the drive's file system may be corrupted, or the drive may be set to be hidden or read-only. - How to Factory Reset an Acer Laptop on Windows 10/8/7
If you want to learn how to factory reset your Acer laptop running Windows 10/8/7, this guide is for you. It will walk you through the process of restoring your laptop to its original settings.