Fix Windows 11/Windows 10 Is Not Shutting Down or Won't Shut Down
To fix the "Windows 10 will not shut down" error, try restarting the Windows Update service, disabling any recently installed software, and checking for corrupted system files using the System File Checker (SFC) tool. Additionally, try disabling any recently installed drivers, running a full system scan with an antivirus program, and checking for malware using a dedicated malware removal tool.
If your Windows 10 computer is stuck with the error where it refuses to shut down after clicking "Shut down" from the Start menu, instead automatically restarting, the issue might be caused by a corrupted system file or a problem with the Windows Update process. To resolve this, you can try restarting your computer in Safe Mode and then running a System File Checker (SFC) scan to identify and replace any corrupted system files. Alternatively, you can also try disabling the "Restart on System Failure" option in the System Properties, or running a Windows Update troubleshooter to resolve any issues with the update process. If none of these steps work, you may need to consider a more advanced troubleshooting approach, such as checking for malware or performing a System Restore to a previous point when the issue did not occur.
To resolve the "Windows 10 Won't Shut Down" error, navigate to the Start menu, click on Settings, then select Update & Security, and finally, click on Recovery. From the Recovery page, click on Restart now under Get started, then select Troubleshoot, and finally, click on Advanced options.
| Workable Solutions | Step-by-step Troubleshooting |
|---|---|
| Fix 1. Disable Fast Startup | Go to Open Power & sleep settings > Additional power settings > Choose what the power buttons do.Full steps |
| Fix 2. Run Full Shutdown | To shut down the computer immediately, run Command Prompt as an administrator, then type the command: `shutdown /s /f /t 0` and press Enter. This will initiate an immediate shutdown with no warning, forcing all running applications to close. The `/s` option specifies a shutdown, `/f` forces all running applications to close, and `/t 0` sets the timeout to 0 seconds, meaning the shutdown will happen right away. Run Command Prompt as administrator > Enter: shutdown /s /f /t 0.Full steps |
| Fix 3. Run Windows Troubleshooter | Type troubleshoot Select the "Troubleshoot" option from the search results. Under the "Get up and running" section, click on the "Can't connect to the internet" option. This will guide you through a series of steps to resolve the issue. Follow the prompts to run a network troubleshooter and see if it resolves the problem. If not, you can try other options such as restarting your router or modem, or checking your internet service provider's status.Full steps |
| Fix 4. Enter Safe Mode, Cancel Automatically Restart | Boot PC to Safe Mode, open sysdm.cpl, uncheck "Automatically restart"...Full steps |
| For More Fixes | Boot your PC from Safe Mode, go to the BIOS settings, and change the settings to their original values as described in Fix 5 and 6. This will resolve the issue.Full steps |
For Your Information:
- If some of you are wondering why your Windows 10 or PC is not shutting down, check out the causes first.
- If you're experiencing issues with Windows 10 not shutting down, follow the detailed guide provided for specific fixes to resolve the problem. The guide will walk you through the necessary steps to troubleshoot and resolve the issue, allowing you to successfully shut down your Windows 10 system.
- If you lost important files during the process, you can use reliable data recovery software to help recover them.
If you need manual Windows repair services, Qiling's professional technical team can help you solve system startup errors such as system failure, BSOD, and unbootable devices.
Consult with Qiling data recovery experts for one-on-one manual recovery service, which includes the following services after a FREE diagnosis:
- Fix Windows boot issues, including BSOD
- Fix Windows error and configure Windows environment
- Restore the system when it fails to boot
- Optimize Windows computer to make it run quickly
Why Windows 11 or Windows 10 Won't Shut Down

Your PC or Windows 10 won't shut down? Check the causes! It could be due to a stuck process, a faulty driver, or a corrupted system file. Maybe a program is running in the background and refusing to close, or a driver is malfunctioning.
- Fast Startup is enabled.
- Corrupted system files
- Windows 10 update error
- BIOS issues
- Tip
- Fast Startup, also known as Hybrid Shutdown, is a feature that speeds up PC start and shutdown times by allowing the computer to hibernate instead of fully shutting down. This means that when you turn off your PC, it doesn't completely power down, but rather enters a low-power state, allowing it to quickly restart when turned back on.
- The shutdown process may be interrupted due to the presence of the program, leading to errors that prevent the computer from shutting down properly.
To fix the "Windows was not properly shut down" issue and get Windows 10/8/7 working normally, follow these methods: Check for power issues, run the System File Checker (SFC), and check for malware. Additionally, try running a System Restore, disable any recently installed software or hardware, and check for driver updates. If none of these methods work, consider reinstalling Windows.
How to Fix Windows 11/Windows 10 Not Shutting Down Error
To fix the Windows 10 shutdown problem, you can try restarting your computer in Safe Mode, disabling any recently installed software or drivers, checking for and removing any malware, running the System File Checker (SFC) and DISM tools to scan and replace corrupted system files, and updating your Windows 10 operating system to the latest version. If none of these steps resolve the issue, you may need to perform a System Restore to a previous point when your computer was functioning properly, or as a last resort, perform a clean installation of Windows 10.
Quick Guide: Force to Shut Down Windows 10
To resolve the issue of Windows 10 not shutting down, you can try forcing your computer to shut down by pressing the power button for 10 seconds. This will completely power off your computer.
Step 1. Press and hold the power button on your computer until the PC turns off.
Step 2. Unplug all power cables, including the battery and power cord wires, for 5 to 10 minutes. This will help reset the device and resolve any issues.
Step 3. Re-plug all the power cables and restart your computer.
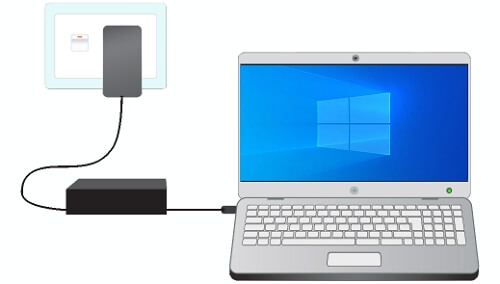
Before attempting to resolve the issue of "Windows 10 won't shut down" or "Windows 10 not shutting down", create a backup of your valuable files first. Then, you can try the below methods one by one to thoroughly resolve the issue on your own.
Method 1. Disable Fast Startup
To fix Windows 10 not shutting down, the quickest way is to turn off the Fast Startup feature.
To disable Fast Startup in Windows 10, go to Settings > Update & Security > Recovery, then toggle off the switch next to "Turn on fast startup (recommended)".
Step 1. To open the Power & sleep settings, press the Windows key + X, click on "Search" and type in "power". Then, from the search results, click on "Power & sleep settings".
Step 2. Scroll down the Settings window, click "Additional power settings".
Step 3. On the left pane of Power Options, click "Choose what the power buttons do".
Step 4. To disable fast startup, click "Change settings that are currently available", then uncheck "Turn on fast startup (recommended)" and click "Save changes".
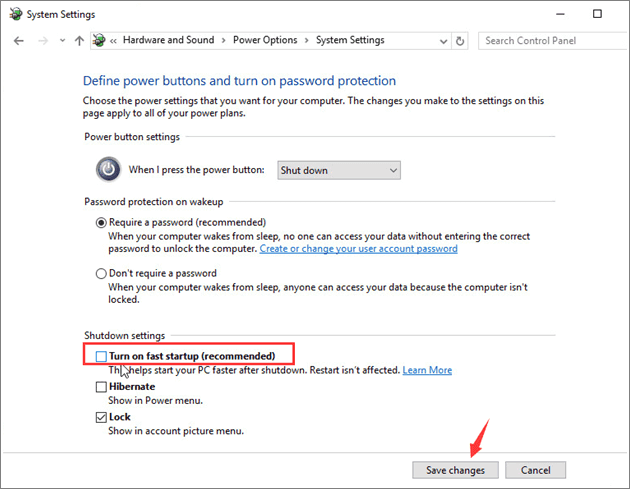
It's normal that the start and shutdown period in your computer increases after disabling Fast Startup. If you don't want to fix the Windows shutdown problem in this way, try other ways as shown below.
Method 2. Perform a Full Shutdown
Windows 10's Fast Startup feature doesn't completely shut down the computer, but rather hibernates the kernel session to speed up booting, preventing a full shutdown.
To fix the issue of not being able to shut down your computer in Windows 10/8/7, you can either use the Task Manager or the Command Prompt to perform a full shutdown. In the Task Manager, you can click on the "Shut down" button, while in the Command Prompt, you can type "shutdown /s" and press Enter to initiate a shutdown.
Option 1. Use the Shift Key
Step 1. Click the Start menu and click the Power button.
Step 2. Press the "Shift" key while clicking "Shut down" in the Start menu to initiate a shutdown. This will force a shutdown without saving any open documents or unsaved work.

This will turn off your computer completely.
Option 2. Use CMD
Step 1. Press the Windows key + X, click "Search", and type "cmd" in the search box.
Step 2. Right-click "Command Prompt" and choose "Run as administrator".
Step 3. Enter the command "shutdown /s /f /t 0" and hit Enter. This will immediately shut down the computer.

Wait for the process to complete, your computer will shut down automatically. Once the shutdown process is complete, you can unplug your computer from the power source.
Method 3. Run Windows Update Troubleshooter & Install the Latest Windows 10
If you're having trouble shutting down Windows 10 during an update, you can run the Windows troubleshooter to resolve any issues preventing the update.
#1. Fix Errors That Stop Windows 10 from Shutting Down
Step 1. Right-click the Windows icon and select "Search", type "troubleshoot" in the Search box.
Step 2. In the result, choose "Troubleshoot".
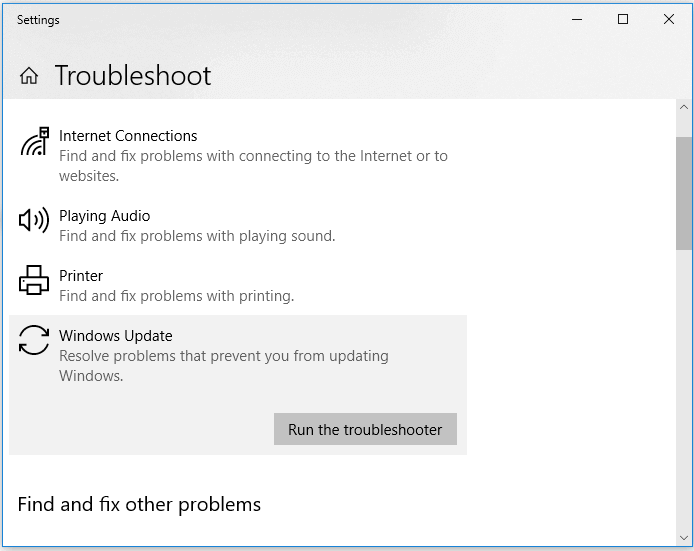
Step 3. Under the "Get up and running" section, click "Windows Update".
Step 4. Click "Run the troubleshooter".
#2. Install The Latest Windows 11
Installing the latest Windows 11 on your computer can also work to fix some system errors or unknown bugs that stop your computer from shutting down. Additionally, downloading and installing Windows 11 can be done by following the steps outlined in the article "How to download and install Windows 11".
Method 4. Boot Computer from Safe Mode and Cancel Automatically Restart
When Windows 10 won't shut down, it may keep restarting instead. To resolve this, you can disable the automatic restart feature on your computer. This can be done by going to the settings, clicking on "Update & Security", then "Recovery", and finally toggling off the "Restart" option.
Step 1. Continuously press "F8" before the Windows logo appears.
Step 2. Release the F8 key until the boot menu shows up, then choose Safe Mode from the options.
Step 3. To resolve the issue, boot the computer into Safe Mode, then go to search after Windows boots up. This will allow you to access the search function without any potential interference from other programs or drivers that may be causing the problem.
Step 4. Type: sysdm.cpl and open sysdm.cpl.
Step 5. Click "Advanced" and "Settings" under Startup and Recovery.
Step 6. Uncheck "Automatically restart".
Step 7. Click "OK" and reboot the computer.
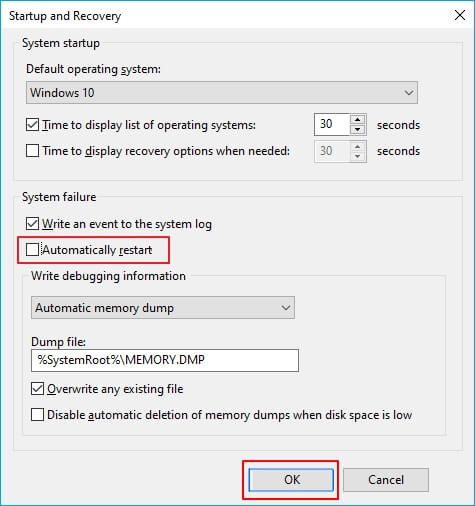
After you've tried the above steps, shut down your PC and see if the Windows 10 shutdown issue still occurs. If it does, you might want to consider seeking further assistance or trying additional troubleshooting steps.
Method 5. Run Windows System File Checker Tool
If Windows system files are corrupted, you may experience issues like a missing drive partition, and the Windows System File Checker can scan and repair the missing or damaged system files.
Here are the steps to fix the "Windows 10 won't shut down" issue in one paragraph:
Step 1. Right-click the "Windows" icon, select "Search" and type cmd.
Step 2. Right-click "Command Prompt" and choose "Run as administrator".
Step 3. Enter the command sfc /scannow.
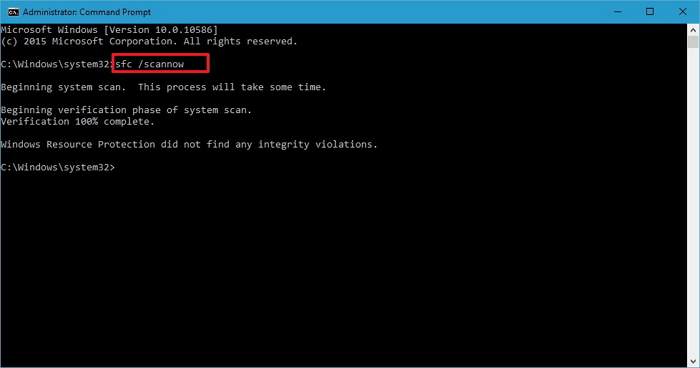
Step 4. When the process completes, shut down your PC.
Method 6. Change BIOS Settings
Your Windows 10 may fail to shut down due to BIOS issues, such as incorrect settings or corruption, and resetting your BIOS to its default settings can often resolve the problem.
Here are the steps:
Step 1. Press the power button on your computer to shut it down.
Step 2. Once your PC shuts down, restart it and press the designated key (usually F2, F11, or Del) to enter the BIOS settings, allowing you to configure and customize your system.
Step 3. To change the boot order, go to the Boot section, select "The Default" or "HDD" at the top of the boot order.
Step 4. Press F10 or click "Save" to keep the changes, and exit BIOS.
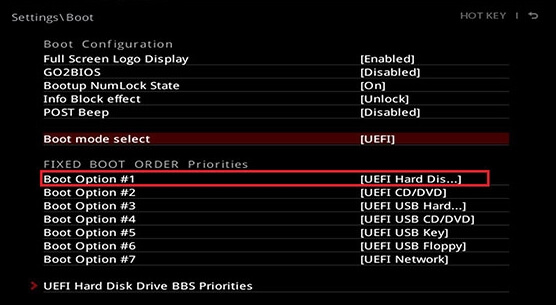
Step 5. Restart and shut down your PC.
After this, your computer will work normally again with a right start and shutdown state.
If none of the methods introduced helps to solve the problem "Windows 10 cannot shut down", you may need to consider replacing your computer's motherboard.
Restore Lost Data While Fixing Windows Not Shutting Down
When a computer can't shut down, it may lead to data loss. If files are lost during or after resolving the issue, using reliable hard drive recovery software like Deep Data Recovery can help recover lost data.
This data recovery software makes it easy to retrieve your lost data by following a simple three-step process.
Step 1.1. Run Deep Data Recovery on your computer. 2.

Step 2. To recover lost files, choose the drive where the files were lost and click "Scan". If the lost files were on an external storage device, connect it to your computer first. Then, click "Scan" to begin the recovery process.

Step 3. The software rapidly scans deleted files, followed by a deep scan to locate additional lost files. Once the scan is complete, users can utilize the "Filter" feature to quickly narrow down file types.

Step 4. Click the "Preview" button or double-click on a file for a full preview. Select the desired files, click "Recover", and choose another safe location to save all the files at once.
This tool supports various data recovery scenarios, including recovering deleted files, formatted data, and lost files, as well as helping to recover data after OS crashes, OS reinstallation, and other system-related issues.
Bonus Fixes: Another Windows 10 Shutdown Error - PC Randomly Restart or Shutdown
Windows 10 users may experience issues with shutdown, including the computer randomly restarting or shutting down. To resolve this problem, users can try troubleshooting steps such as checking for software updates, running a System File Checker scan, and checking for malware or viruses. Additionally, users can try disabling any recently installed software or drivers that may be causing the issue. If none of these steps resolve the problem, users may need to consider reinstalling Windows 10 or seeking further assistance from a technical support specialist.
Method 1. Change Power Options
This is an effectiveness-based solution to Windows randomly restarting or shutting down. Don't hesitate to try it if you are bothered by the Windows 10 shut down issue.
Step 1. Right-click the Windows icon, select "Search", type "power", and choose "Power & sleep settings" from the search result.
Step 2. Go to Settings, scroll down and click "Additional power settings".
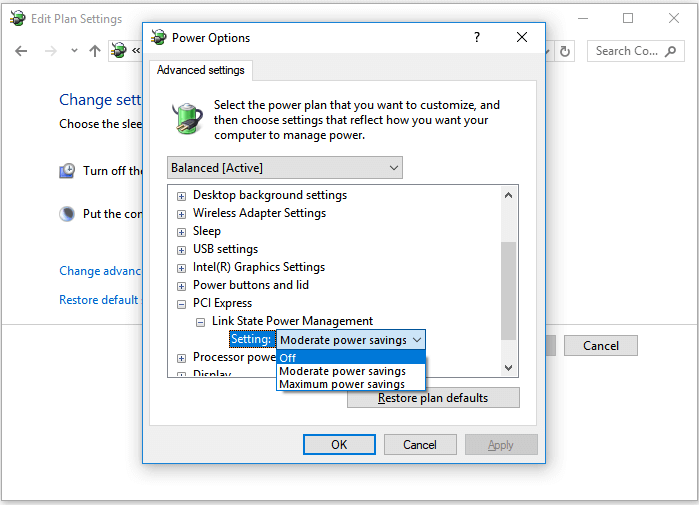
Step 3. Click "Change plan settings" > "Change advanced power settings"
Step 4. Expand "PCI Express" > "Link State Power Management".
Step 5. Set the "Settings" to "Off".
To save battery life, turn off your computer when not in use. If you are using a laptop, there are other options available. Set them to "Off", too.
Method 2. Disable Hibernation
To disable hibernation, open Command Prompt as Administrator and type the command `powercfg /h off` followed by pressing Enter. This will disable hibernation on your system.
Step 1. Press the Windows key + X keys, click "Search" and type cmd in the box.
Step 2. Right-click "Command Prompt" and choose "Run as administrator".
Step 3. Enter powercfg.exe /hibernate off and hit Enter.

To turn off hibernation on your computer, type "powercfg.exe /hibernate off" in the command prompt. To re-enable it, type "powercfg.exe /hibernate on" instead.
Step 4. Type exit to close command prompt when the process completes.
Hope that one of the tips above is helpful to you to fix the Windows 10 shutdown problem.
FAQs About Windows 10 Won't or Not Shutting Down
In addition to the solutions for Windows not shutting down issue, some users may also want to learn the causes and what is slowing down the Windows shutdown process. Here we have the answers for you. Check and find the answer to your question now.
1. What to do when Windows won't shut down?
If you're experiencing issues with Windows not shutting down, don't worry, there are solutions to help you resolve this problem. To start, try restarting your computer in Safe Mode to see if the issue persists.
1) Disable Fast Startup; 2) Run Full Shutdown; 3) Run Windows Troubleshooter; 4) Run System File Checker; 5) Boot from Safe Mode; 6) Change BIOS Settings, to resolve issues with Windows 10.
Revert back to the main content on this page, and you can follow any method to make your computer shutdown normally again.
2. Why is my PC or laptop not shutting down?
Windows 8 and later versions have a feature called Hybrid Shutdown, also known as Fast Startup, which is enabled by default on many laptops and some desktops, causing Windows to not shut down normally.
Faulty CMOS and BIOS settings can also cause issues with startup and shutdown, adding to the list of potential problems.
3. Why does Windows 10 take so long to shut down?
You may encounter a Windows that takes forever to shut down or fails to shut down when you forget to close all running programs and files on your computer.
Windows shutdown may be slowed down due to various issues, including a large number of open programs, disk errors, or a full page file. Additionally, issues such as a large number of open programs, disk errors, or a full page file may also contribute to a slow shutdown process.
- 1). Software Problems - If you have many programs running that need to close, it can take a while for the computer to shut down as it closes each program individually.
- 2). Process Problems - The more processes running on a Windows computer, the slower it will shut down, as Windows needs to close all running processes before completely shutting down.
- Operating System or Driver Problems can cause a computer to slow down, particularly when starting up or shutting down, due to outdated Windows OS or drivers.
- 4). Local Services Problems - Enabling many local services on a computer can cause it to take longer to close these services before shutting down, resulting in a slower Windows shutdown process.
Related Articles
- Fix: The Volume Does Not Contain A Recognized File System in Windows 10/8/7
- Does Initializing a Disk Erase Data, Yes or No?
- Btrfs vs EXT4, All You Need to Know About Btrfs and EXT4!
- Stellar Data Recovery Review [2022 Update]